

Insights, ideas and inspiration. A go to wisdom hub right here.
Featured Posts


Tutorials
7 Min Read

Latest Posts

Plugins
6 min read
Best Security Plugins for WordPress to Safeguard Your Site in 2026
Best WordPress Security Plugins in 2026 to Protect Your Site
1. Sucuri Plugin
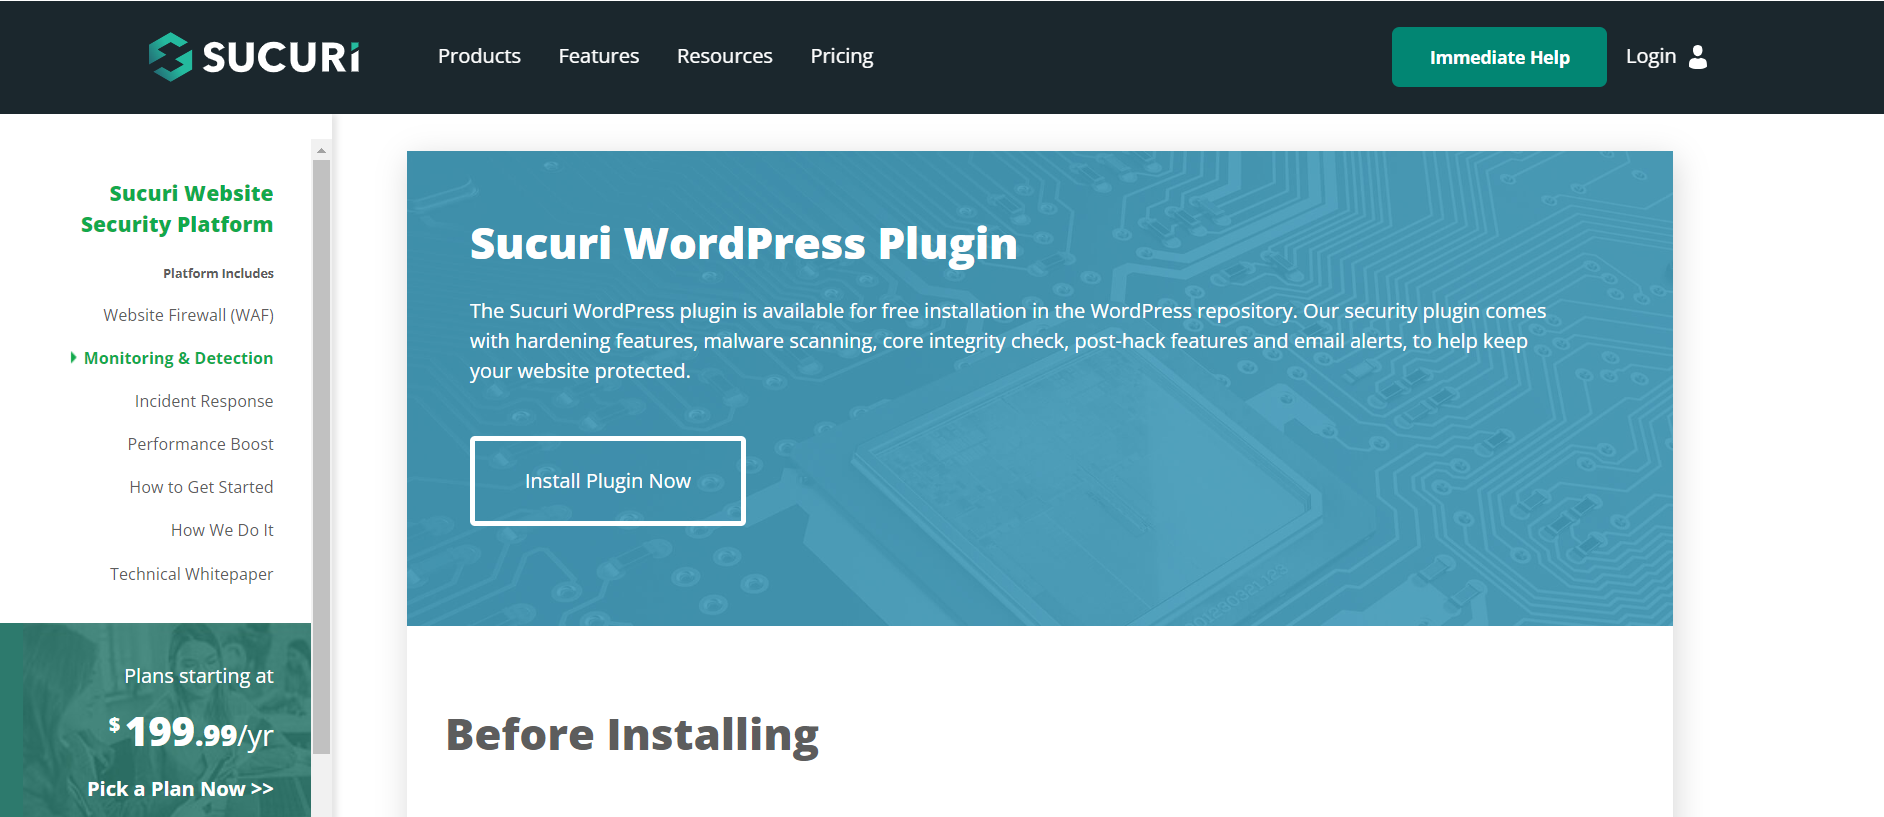 When talking about the best free WordPress security plugins, Sucuri surely tops the list. Sucuri Security is a well-known WordPress security plugin that offers website monitoring, malware detection, and blacklist monitoring.
It provides a firewall that blocks harmful traffic from reaching your website.
Sucuri also offers an incident response service, which ensures that any security issues are handled quickly and effectively.
Though most of the features are available in the free version, features like the website firewall, SSL support, and more are provided in the pro version.
Key Features:
When talking about the best free WordPress security plugins, Sucuri surely tops the list. Sucuri Security is a well-known WordPress security plugin that offers website monitoring, malware detection, and blacklist monitoring.
It provides a firewall that blocks harmful traffic from reaching your website.
Sucuri also offers an incident response service, which ensures that any security issues are handled quickly and effectively.
Though most of the features are available in the free version, features like the website firewall, SSL support, and more are provided in the pro version.
Key Features:
- Protection from Brute Force Attacks with Web Application Firewall (WAF)
- The plugin identifies and prevents DDoS attacks
- Monitors blocklist authorities’ security warnings
- e-Commerce malware scanning
- Keeps track of all site activity, including file changes, most recent logins, and unsuccessful login attempts.
- Protection from SQL injection, XSS, and other similar attacks.
2. iThemes Security Plugin
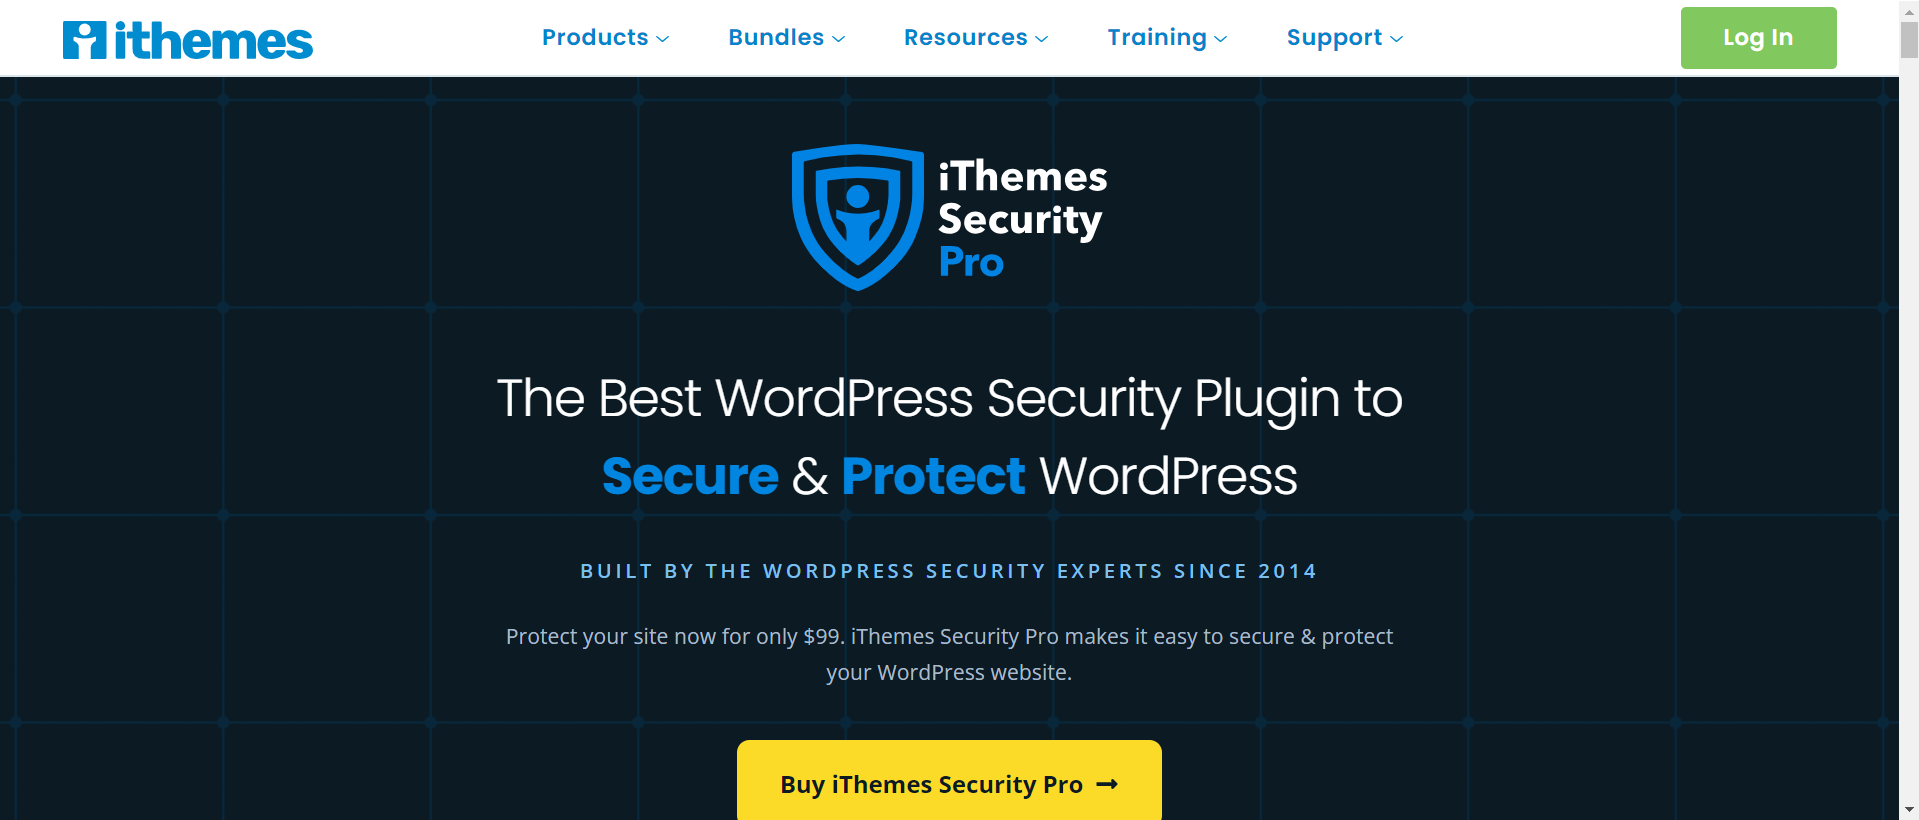 iThemes Security Plugin focuses on enhancing your site’s security. It provides numerous options in the free version, such as protection against brute force, tracking of file integrity, backups of database files, and two-factor authentication.
The pro version of the plugin offers user activity logging, a WordPress User Security Check, Real-time WordPress Security Dashboard, and many more features.
Key Features:
iThemes Security Plugin focuses on enhancing your site’s security. It provides numerous options in the free version, such as protection against brute force, tracking of file integrity, backups of database files, and two-factor authentication.
The pro version of the plugin offers user activity logging, a WordPress User Security Check, Real-time WordPress Security Dashboard, and many more features.
Key Features:
- Blocks any malicious IP address that attempts to scan your website for vulnerabilities.
- Notifies you through email if any potentially dangerous files have been updated on your site.
- Protection by blocking specific IP addresses and user agents from accessing the site.
- Strong password enforcement
3. All-in-one Security and Firewall
 The All-in-one Security and Firewall plugin offers extensive security features in the free version itself. The features in the free version include hiding the login page from bots by configuring a custom URL for the ‘Admin’ page, user account monitoring, IP filtering, brute force attack prevention by implementing a ‘Login Lockdown’ feature, two-factor authentication, and many more.
The plugin supports best practices, meaning that it prompts users to change their usernames if they have the default "admin" or identical login and display names.
You can add Google reCAPTCHA or simple math CAPTCHA using this plugin.
The pro version of the plugin offers automatic malware scanning, alerts you for the site’s status of blacklisting, reports blocks traffic from specific countries, blocks traffic to specific pages, and many more features.
Key features:
The All-in-one Security and Firewall plugin offers extensive security features in the free version itself. The features in the free version include hiding the login page from bots by configuring a custom URL for the ‘Admin’ page, user account monitoring, IP filtering, brute force attack prevention by implementing a ‘Login Lockdown’ feature, two-factor authentication, and many more.
The plugin supports best practices, meaning that it prompts users to change their usernames if they have the default "admin" or identical login and display names.
You can add Google reCAPTCHA or simple math CAPTCHA using this plugin.
The pro version of the plugin offers automatic malware scanning, alerts you for the site’s status of blacklisting, reports blocks traffic from specific countries, blocks traffic to specific pages, and many more features.
Key features:
- Firewall protection
- Sending an alert if file change is detected
- Password strength tool to force the user to create stronger passwords for their sites.
- Manually blacklist suspicious IP addresses
- Comment spam prevention by automatically blocking the spammer’s IP address.
4. Wordfence
 Wordfence Security is an all-inclusive plugin for website protection that includes many useful features. WordPress users widely use it due to its user-friendly interface and consistent upgrades.
A robust firewall, malware detection, and real-time threat intelligence are all part of its extensive security features.
The free version includes two-factor authentication, brute force attack protection, basic firewall protection, a malware scanner, and others.
While the free version of Wordfence covers most of the security issues, the premium version enables the user to get real-time updates on malware scanning and firewall, blocking traffic from specific countries (geoblocking), and support.
Key features:
Wordfence Security is an all-inclusive plugin for website protection that includes many useful features. WordPress users widely use it due to its user-friendly interface and consistent upgrades.
A robust firewall, malware detection, and real-time threat intelligence are all part of its extensive security features.
The free version includes two-factor authentication, brute force attack protection, basic firewall protection, a malware scanner, and others.
While the free version of Wordfence covers most of the security issues, the premium version enables the user to get real-time updates on malware scanning and firewall, blocking traffic from specific countries (geoblocking), and support.
Key features:
- The free version allows users to secure unlimited sites.
- Monitors and notifies you of any security breaches in your password, allowing you to quickly generate a new and secure password.
- The free and premium versions include ‘Wordfence Central’ allowing users to administrate various sites' security from a single dashboard.
5. WPScan
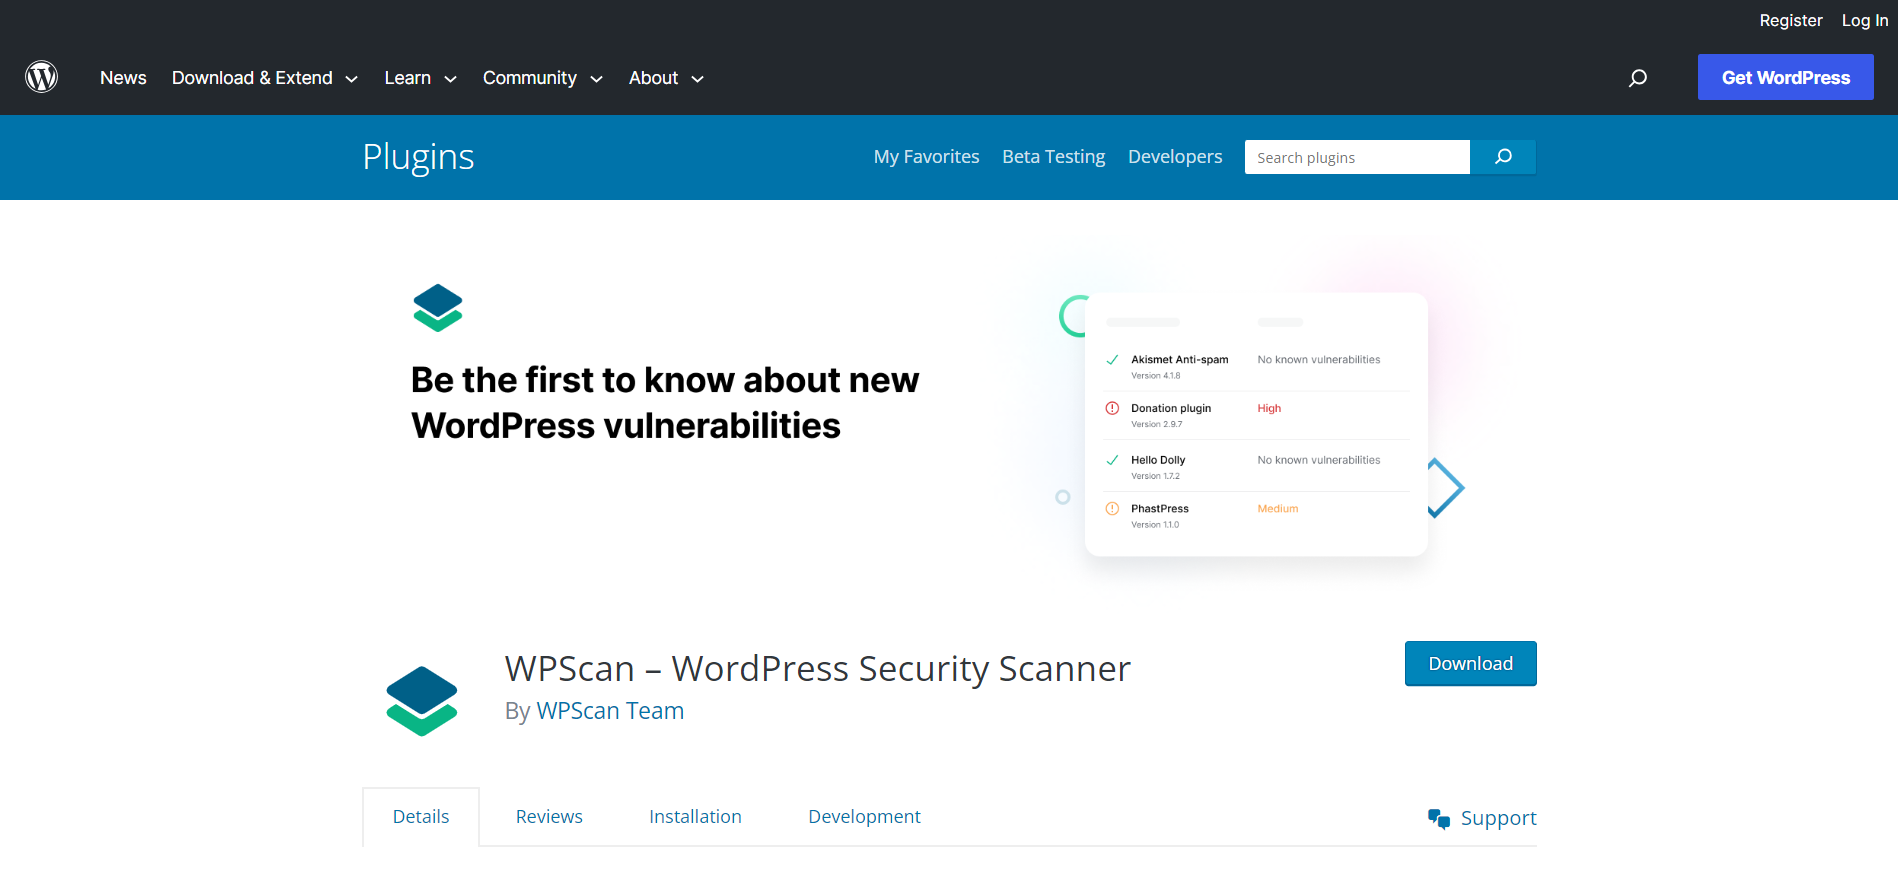 WPScan is a WordPress security plugin that utilizes the WPScan vulnerability database, which is a continually updated list of WordPress core, plugin, and theme vulnerabilities.
WPScan, the company, is renowned for its open-source WordPress security scanner, and the WPScan plugin brings that same level of scanning to your WordPress site's dashboard.
The plugin is able to scan around 21,000 vulnerabilities in your site, including plugins, themes, and the core software.
The plugin not only identifies vulnerabilities but also provides suggestions and guidelines on how to fix them and improve your site's overall security.
Key features:
WPScan is a WordPress security plugin that utilizes the WPScan vulnerability database, which is a continually updated list of WordPress core, plugin, and theme vulnerabilities.
WPScan, the company, is renowned for its open-source WordPress security scanner, and the WPScan plugin brings that same level of scanning to your WordPress site's dashboard.
The plugin is able to scan around 21,000 vulnerabilities in your site, including plugins, themes, and the core software.
The plugin not only identifies vulnerabilities but also provides suggestions and guidelines on how to fix them and improve your site's overall security.
Key features:
- Scheduled scanning and get the reports of scanning by email.
- Get risk scores to see how vulnerable your site really is.
- See how hackers attack your site with the security scanner.
6. Bulletproof Security
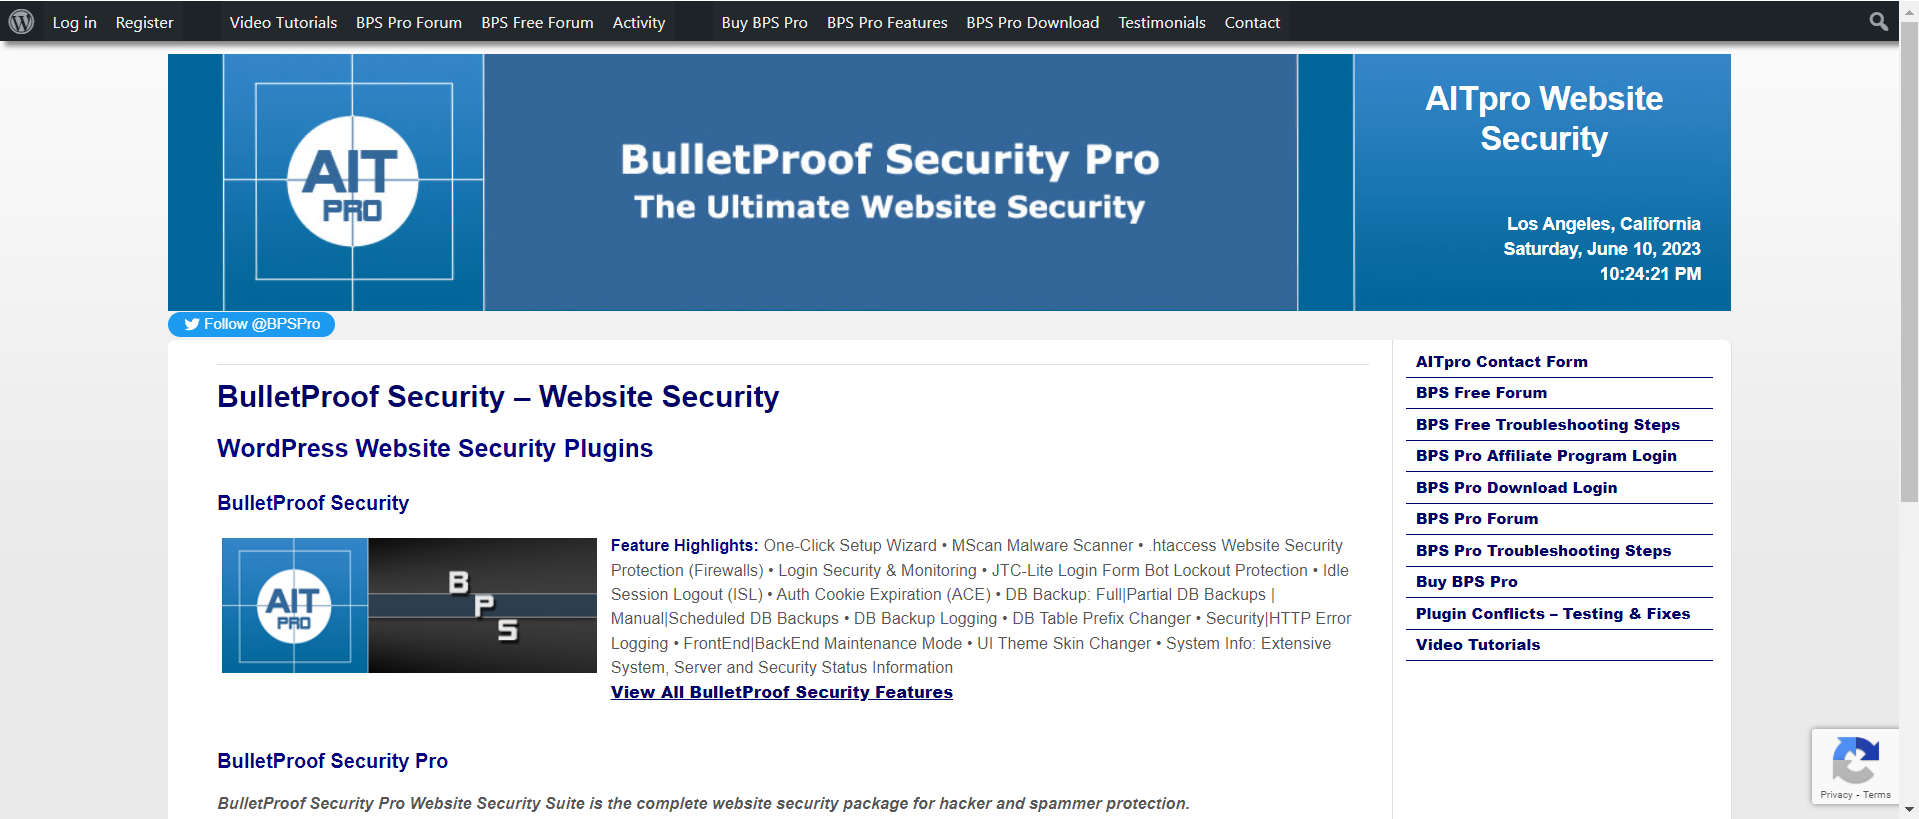 If you need a more robust, hands-on security plugin, BulletProof Security is a good option. Along with database security and login security, the plugin also offers firewall protection, but in a pro version.
This plugin comes with anti-spam, auto-restore, monitoring, the Mscan malware scanner, automatic and manual lockout options, and many more.
While the free features cover most of the security parameters, upgrading to the pro version will enhance the security of your site.
It offers advanced features such as quarantine, monitoring of the database and sending an alert if there is any change, an IP firewall that protects the WordPress Plugins folder, allowing only valid image file extensions through Upload Anti-Exploit Guard (UAEG) mode, and much more.
Key features:
If you need a more robust, hands-on security plugin, BulletProof Security is a good option. Along with database security and login security, the plugin also offers firewall protection, but in a pro version.
This plugin comes with anti-spam, auto-restore, monitoring, the Mscan malware scanner, automatic and manual lockout options, and many more.
While the free features cover most of the security parameters, upgrading to the pro version will enhance the security of your site.
It offers advanced features such as quarantine, monitoring of the database and sending an alert if there is any change, an IP firewall that protects the WordPress Plugins folder, allowing only valid image file extensions through Upload Anti-Exploit Guard (UAEG) mode, and much more.
Key features:
- Automatic logout idle sessions
- Provides BPS Pro ARQ Intrusion Detection and Prevention System
- Security logging of hackers, spammers, or any kind of attackers
- The pro version comes with 16 mini plugins that provide advanced security
7. Malcare Security
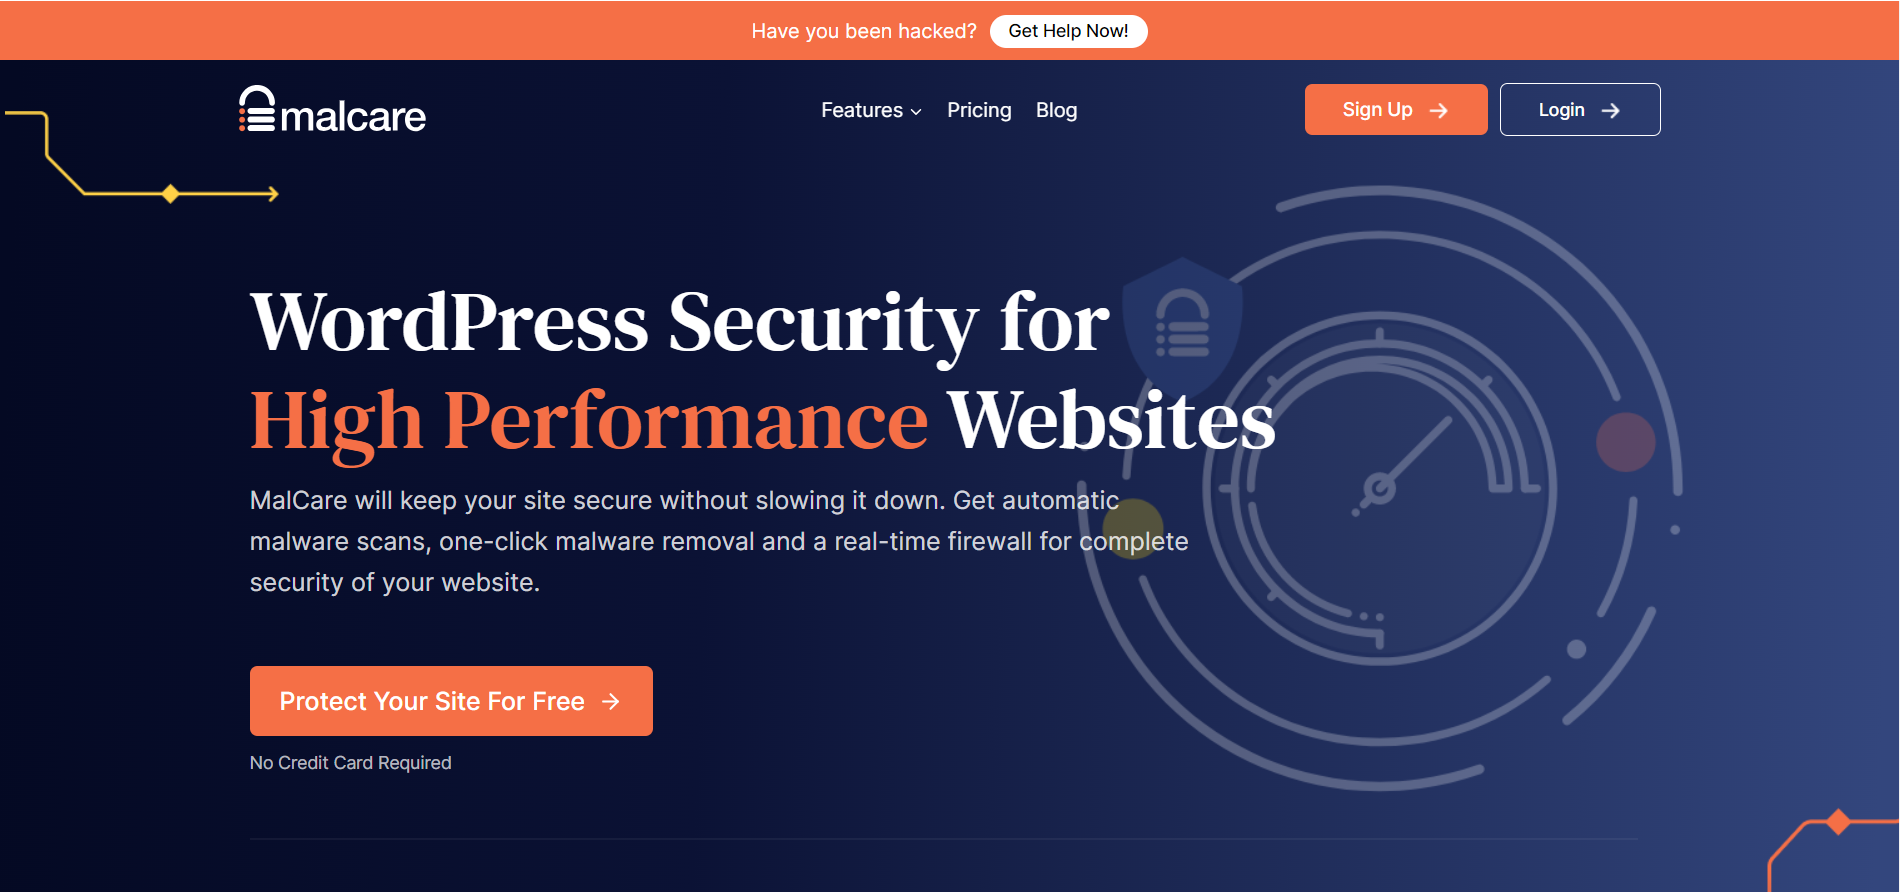 Developed by BlogVault, Malcare Security comes with a cloud-based malware scanner that scans your entire website for thefts and fixes them. The plugin helps you to clean your website with the help of a one-click removal tool, even before the search engine detects any problems with your site.
When you install MalCare's firewall, you'll notice a speed boost right away. The reason is that MalCare keeps attacks from getting to your site, which makes it less busy. Failed attacks can drain the site once they reach it.
Based on WordPress hardening measures, MalCare provides various levels of protection, including disabling file editing, blocking PHP execution in untrusted folders, and changing security keys.
Key Features:
Developed by BlogVault, Malcare Security comes with a cloud-based malware scanner that scans your entire website for thefts and fixes them. The plugin helps you to clean your website with the help of a one-click removal tool, even before the search engine detects any problems with your site.
When you install MalCare's firewall, you'll notice a speed boost right away. The reason is that MalCare keeps attacks from getting to your site, which makes it less busy. Failed attacks can drain the site once they reach it.
Based on WordPress hardening measures, MalCare provides various levels of protection, including disabling file editing, blocking PHP execution in untrusted folders, and changing security keys.
Key Features:
- Identifies and blocks bots
- An intelligent tracking system for plugins and a firewall to keep intruders out.
- CAPTCHA for login page
- Activity log for all changes happening on your website
Conclusion
While all the above-mentioned plugins are best in their own way, the use of these plugins depends on the needs of your website. From the robust features of Wordfence Security and Sucuri Security to the user-friendly interface of iThemes Security and All In One WP Security & Firewall, each of these WordPress security plugins offers unique functionalities that can drastically enhance the security profile of your website. These plugins can improve site security, but no technology is perfect. Maintaining a secure WordPress site requires updating the WordPress core, themes, and plugins, using strong passwords, and taking other web security precautions.
WordPress
8 min read
Schemas that Digital Marketers Must Use on their Website in 2026
Role of Schema in SEO
Here’s how schemas help in SEO: 1. Enhanced Visibility in Search Results: Schema markup allows websites to give search engines detailed content information. This data is displayed in search results as rich snippets, knowledge panels, and other enhanced SERP features. To get more attention and clicks, websites can utilize these visually beautiful and informative snippets to differentiate themselves from the competition. 2. Improved Click Through Rates (CTR): Schema markup's rich snippets commonly include ratings, reviews, pricing, event details, and many more in search results. These characteristics make the search listing more appealing and relevant, increasing the likelihood of a click. A higher CTR indicates to search engines that the website is offering valuable and relevant content, which can positively impact its ranking. 3. Voice Search Optimization: Schema markup optimizes material for voice searches as voice assistants and voice searches grow. Schema tags like FAQ and Q&A enable search engines to extract and offer direct responses to voice search queries, boosting their likelihood of showing up in voice search results. 4. Structured Data Understanding: Algorithms interpret online material for search engines. Schema markup helps search engines understand your content better. It also helps search engines categorize and display your material, improving your ranking for relevant search queries. 5. Competitive Advantage: Implementing schema markup sets you apart from competitors who may not be utilizing it effectively. Rich snippets and better search results make your website more appealing and trustworthy than your competitors. Visibility and credibility can boost rankings, organic traffic, and conversions.Schemas That Digital Marketers Should Use
The following are the schemas that digital marketers must use:1. Organization Schema:
Organization Schema markup helps brands show that they are credible and authoritative. It tells about the organization, such as its name, logo, contact information, and social media accounts. By using Organization Schema, digital marketers can increase the exposure of their brand, get it into knowledge graphs, and make users trust the brand more. Best practices for implementing Organization Schema include using verified profiles and providing comprehensive and consistent information across various online platforms. Below is a screenshot of the organization schema in action for the search term WPoets. It shows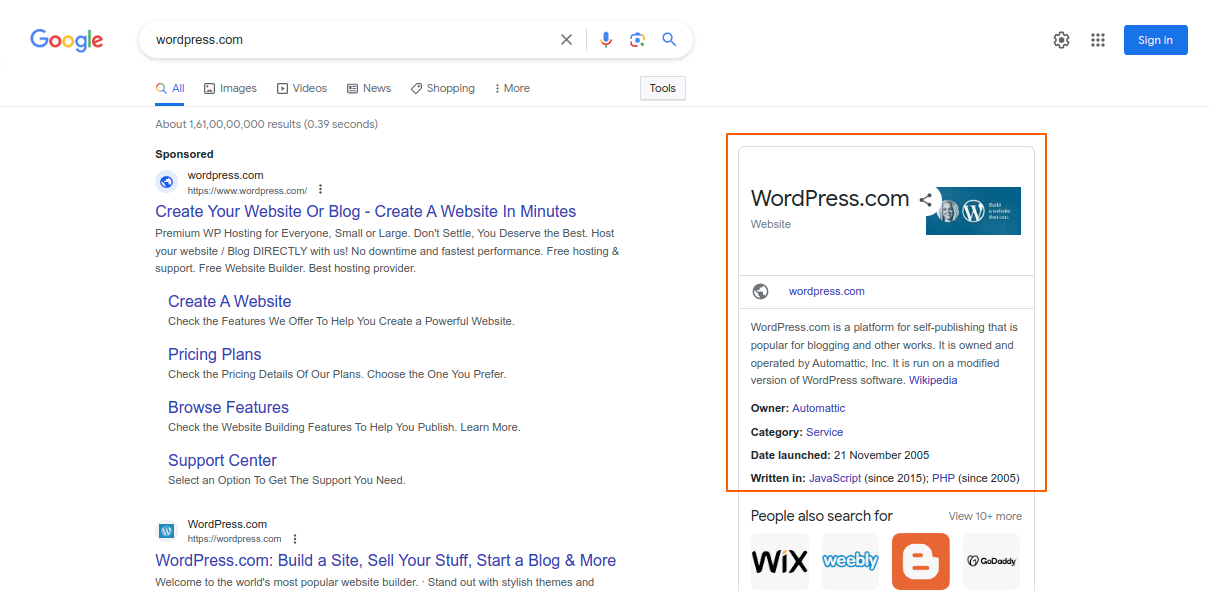
Screenshot 1: Organization Schema in action
Organization Schema should be added to the following web pages- Homepage
- About Us
- Our Work or a similar page,
- What We Do or a similar page,
- And other pages.
2. BreadCrumb Schema
The BreadcrumbList Schema allows you to specify the hierarchical structure of your website's pages using a list of breadcrumbs. Each item represents a step in the navigation path and typically includes the page title and URL. The order of the items in the list reflects the hierarchy of the pages. By implementing the BreadcrumbList Schema on your website, you provide search engines with structured data that can be used to enhance search results. When search engines recognize the schema markup, they may display the breadcrumb navigation in the search results, making it easier for users to understand the website's structure and navigate directly to specific pages. Below is a sample of breadcrumbs displayed in SERPs.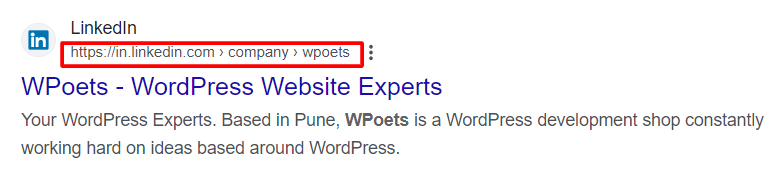
Screenshot 2: BreadcrumbList Schema in action
BreadcrumbList Schema should be implemented on all the website pages.3. Article Schema
Article schema markup is important for websites that are based on their content. It helps search engines figure out how articles are put together and what they're about, including the article body, author, date of publication, word count, keywords, and many more. By using the Article Schema, digital marketers can make their content more visible in search results and increase the chance that it will show up in Google's Top Stories or other rich results. Correctly structuring an Article Schema means using the right headline tags, giving information about the author, and following schema rules. The Article Schema should be used on web pages that give detailed information or content in the form of articles:- Blog Posts
- News Articles
- Documentation Pages
- Editorial Pages
- Magazine or Journal Articles
4. FAQ Schema
FAQ Schema markup makes it easy for websites to answer frequently asked questions directly in search results. It makes your site more visible and makes it more likely that it will show up in featured snippets, especially in voice search results. Digital marketers should use FAQ Schema by finding important questions and answers, organizing the content with the right HTML tags, and making sure it works well with voice search queries.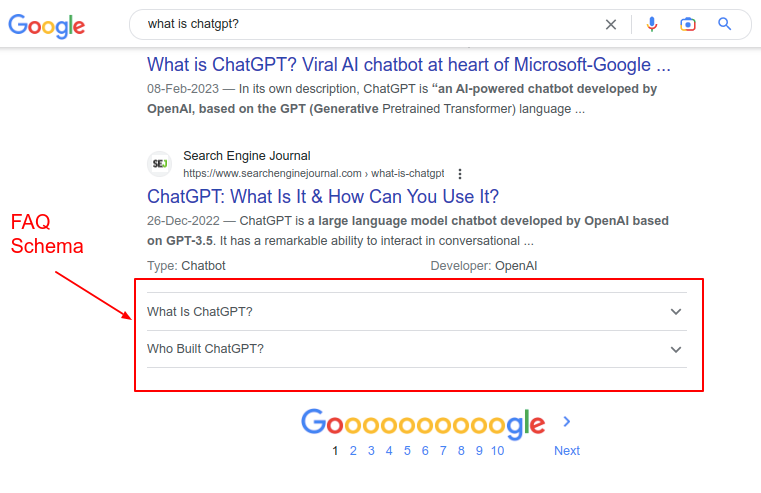
Screenshot 3: FAQ Schema in action
In fact, we have written a comprehensive article on adding FAQ Schema to WordPress with and without plugins. The FAQ schema should be used on websites that list Frequently Asked Questions (FAQs) and the answers to those questions. A few examples could be,- FAQ Pages
- Product Pages
- Service Pages
- Support or Help Pages
5. Local Business Schema
Local Business Schema markup is very important for companies that want to reach people in their area locally. It tells you where the business is, when it's open, how to contact them, their address, and what other customers have said about them (basically, Google reviews). Digital marketers can improve their visibility in local search results, improve their Google My Business listing, and attract possible customers in their area by using the Local Business Schema. Name, address, and phone number (NAP) consistency, getting real customer reviews, and optimizing for mobile devices are all important parts of the Local Business Schema. Below is a screenshot of the Local Business schema in action, showing Opening Hours. Screenshot 4: Local Business Schema in action
- About Us page
- Contact Us page
- Home page
- Any location or place-specific page
6. Web Page Schema
Web Page Schema is a type of schema markup that provides structured data about a specific web page on your website. It allows search engines to understand the content and context of your web pages more effectively. By implementing the Web Page Schema markup, you can enhance the visibility, accuracy, and presentation of your web page in search engine results pages (SERPs). The Web Page Schema should be implemented on all the individual web pages of your website:- Content Pages
- Landing Pages
- Product and Service Pages
- Category Pages
- Home page
7. Video Schema
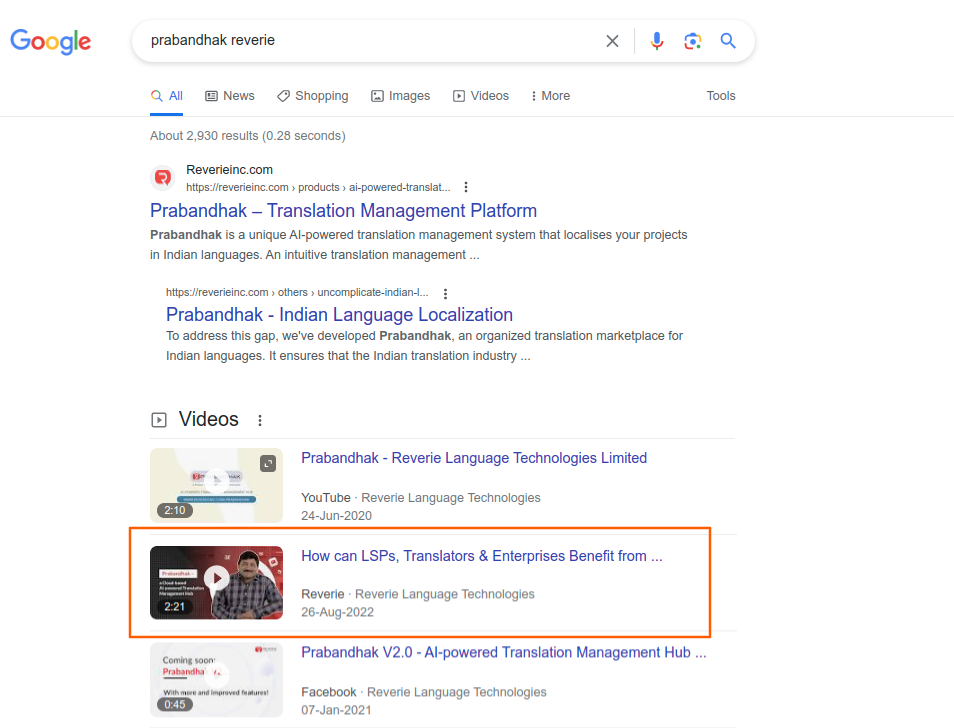
Video schema markup is a type of schema that provides structured data about a video on your website. It allows search engines to understand the video content, its metadata, and other relevant details. By implementing Video Schema markup, you can enhance the visibility and appearance of your video in search engine results pages (SERPs) and potentially increase the chances of it being featured in video-specific search results. The Video Schema should be implemented on web pages that contain videos or provide information about specific videos:- Gallery Pages (if the gallery contains videos)
- Article Pages with embedded videos
- Landing Pages with videos
8. Event Schema
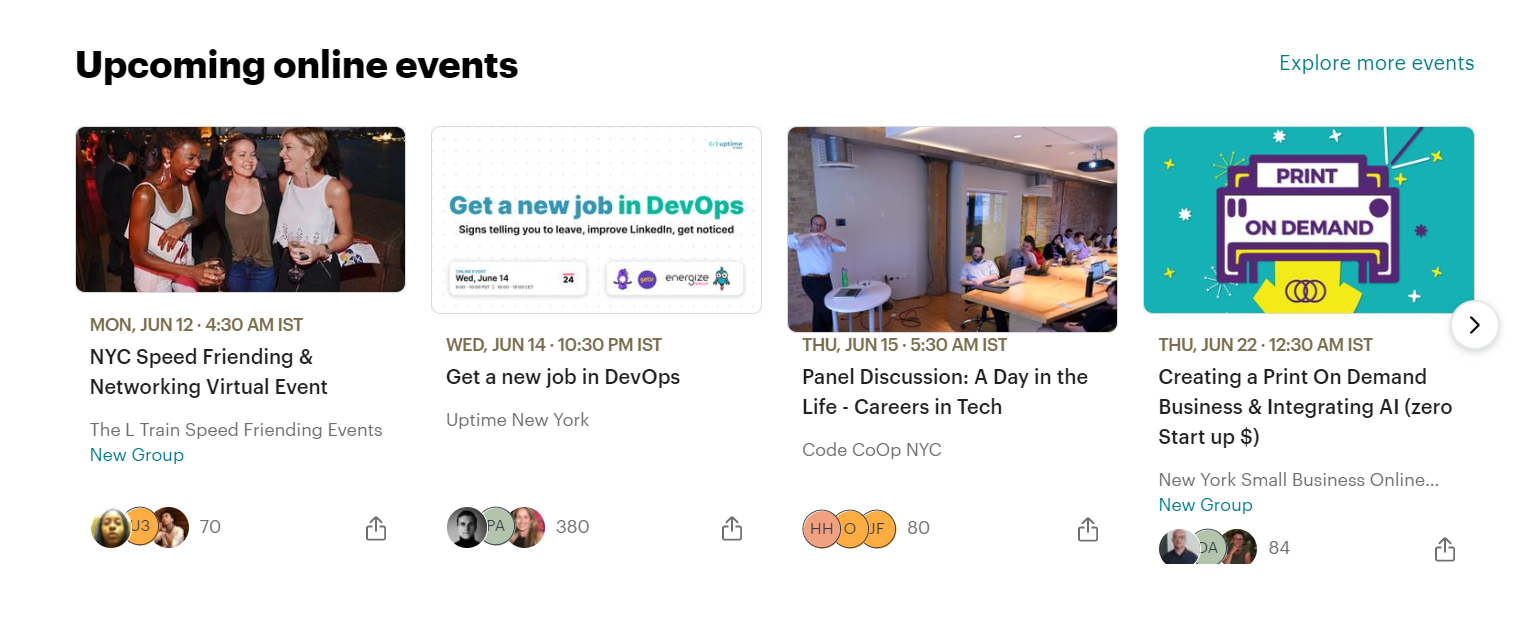
Event schema markup is helpful for businesses that host events or promotions. It has a lot of information about the event, like the date, time, location, organizer, and people who will be performing, among others. Digital marketers can make events more visible in search results and thus get more people to attend by using Event Schema. To optimize the Event Schema, it's important to include correct and up-to-date information and use structured data testing tools to make sure everything is correct. The Event Schema should be implemented on web pages that provide information about specific events:- Event Listing Pages
- Individual Event Pages
- Calendar Pages (if your website has one)
- Landing Pages (created for promoting specific events)
9. Review Schema
Every business, no matter what they do, should implement the Review Schema on their website. This is because reviews are such a big part of how most people decide what to buy. Before buying something, almost 90% of people read reviews. So there's no reason not to show good reviews if you have them. Review snippets will show the number of reviews your product, local business, or software product has gotten, along with the yellow stars. Following is a screenshot of a product search query. Notice that the yellow stars are below the SERPs.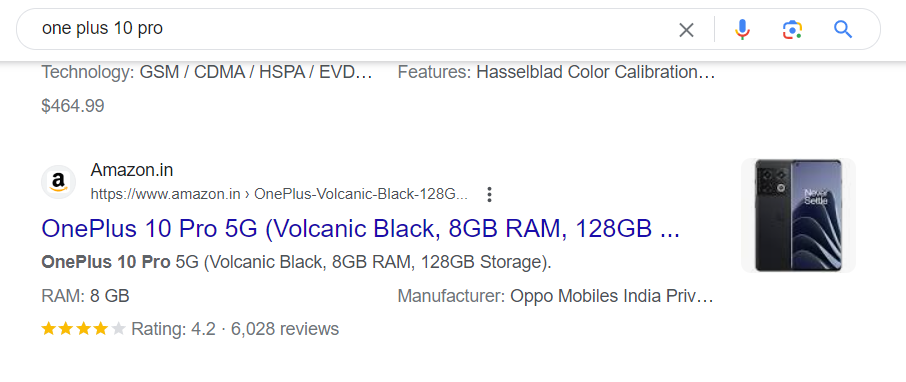
Screenshot 5: Review Schema in action
Web pages with user-generated reviews or testimonials should use the Review Schema:- Product Pages
- Business Listings
- Testimonial Pages
10. Product Schema
Product schema markup tells search engines about a product's name, price, availability, and reviews, among other things. By using Product Schema, digital marketers can make their goods more visible in search results and attract people who might buy them. It can also be used for adding schema for services.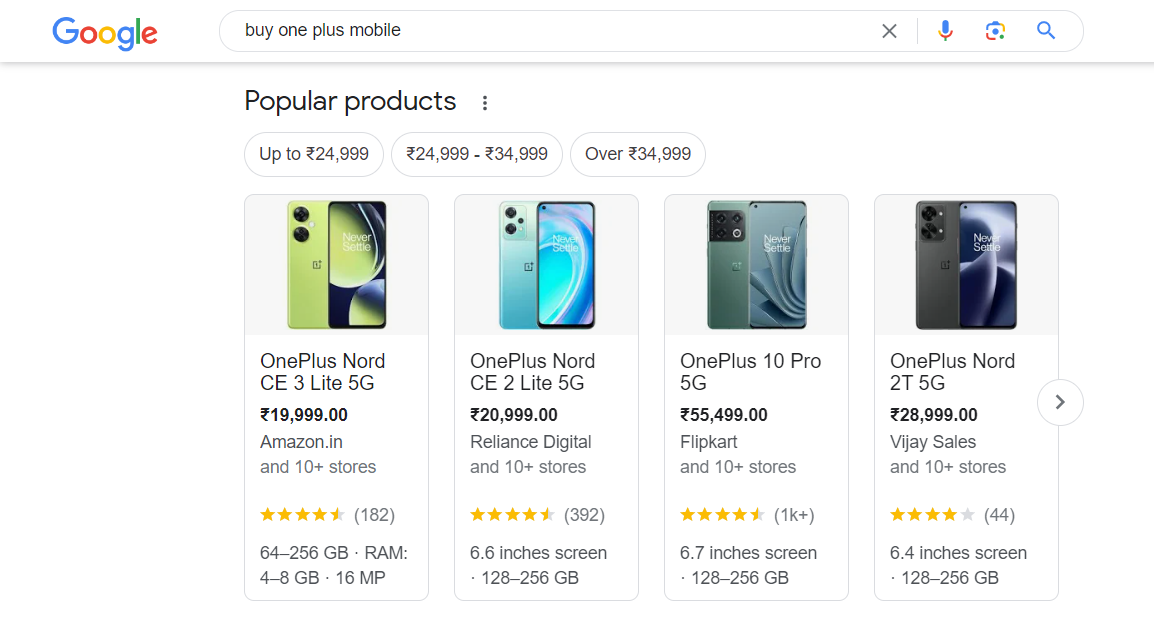
Screenshot 6: Product Schema in action
The Product Schema should be implemented on web pages that provide information about specific products:- Product Details Page
- e-Commerce Category Page
- Featured Product Section
- Review Pages
- Comparison pages
Conclusion
In conclusion, leveraging schema markup on your website is a powerful strategy for digital marketers in 2026. Schemas provide a structured way to communicate essential information about your web pages, videos, and other content to search engines, helping them understand and present your content more effectively to users. By incorporating schema markup, you can potentially enhance your SEO efforts and improve your website's visibility and ranking in search engine results. If you want to know more about how to add these schemas to your WordPress website, get in touch with our web experts.
Plugins
6 min read
Best Backup and Restore WordPress Plugins for 2026
Things to look for before choosing the backup plugin
When choosing a backup and restore plugin, it's essential to consider the following key features to ensure it meets your specific needs: 1. Automatic Scheduling Automatic scheduling allows you to set up regular backups without manual intervention. Instead of remembering to initiate backups manually, the plugin will handle the process for you based on your preferred schedule. With this feature, your time and effort are saved without having to initiate the backups manually. It also facilitates a consistent data backup routine and reduces human error. 2. Incremental Backups Incremental backups are a method of storing only the changes made since the last backup, rather than creating a full backup every time. This improves site performance and eliminates dozens of backup files on your server. Thus, your backup plugin should analyze the latest file and avoid the next backup if no changes have been made. This leads to a faster backup process, reduced storage space, and efficient storage utilization. 3. Real-time backup for high-traffic sites Real-time backups refer to the ability of a backup plugin to capture and save changes to your website's files and database as they occur, ensuring that your backup is always up to date. High-traffic sites such as e-commerce and membership sites often experience frequent content updates, user interactions, and database modifications. In the event of a disaster or site failure, relying solely on scheduled backups could result in data loss since the most recent changes may not be captured. Real-time backups help minimize data loss by continuously saving updates as they happen, ensuring that even the latest changes are backed up. Real-time backups let you quickly restore your site after a hacking attempt, data corruption, or critical error. In the event of a failed transaction or interaction, you may easily revert back to the state before the interruption with the help of real-time backups. This is a must-have for e-commerce and membership sites so that users can connect with them easily.Best Backup and Restore Plugins
1. BlogVault
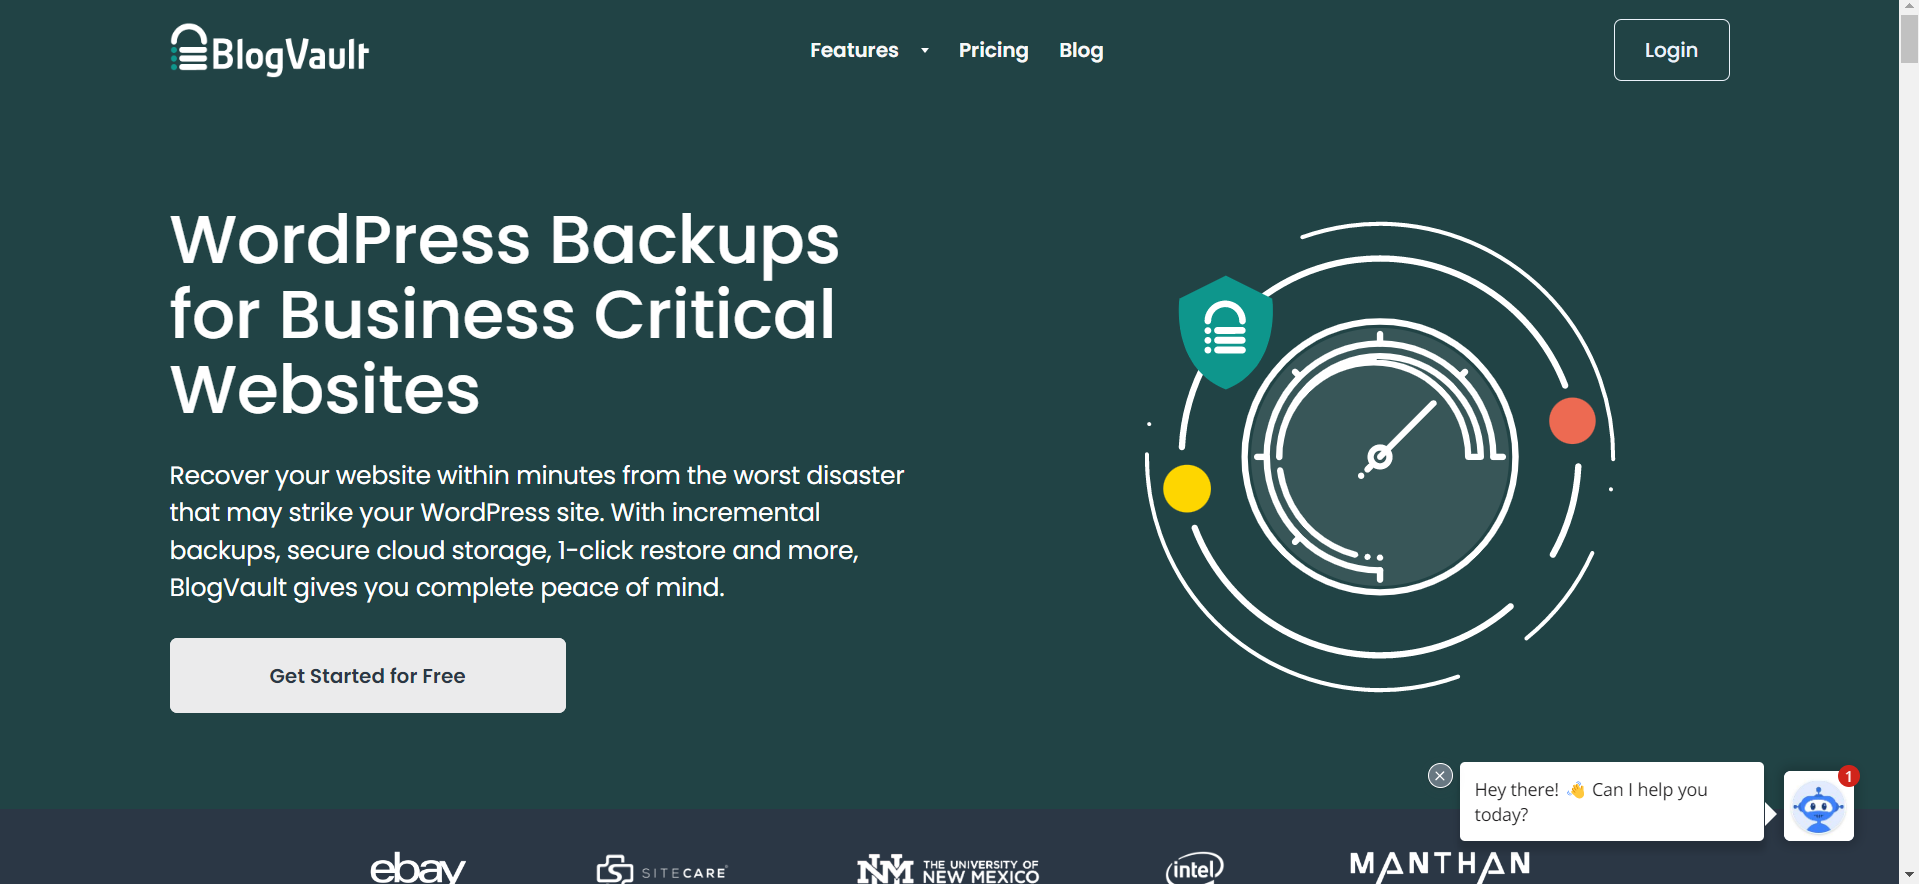 BlogVault is a comprehensive backup and restores solution designed specifically for WordPress websites. It provides users with a reliable and user-friendly platform to safeguard their valuable website data and easily recover from any potential disasters or issues.
In addition to backups, BlogVault offers a range of website management features that enhance its value. These include one-click staging environments for testing site changes, malware scanning and removal, and a site management dashboard to oversee multiple websites from a single location.
This comprehensive set of features makes BlogVault a versatile tool for managing and protecting your WordPress sites.
Key Features:
BlogVault is a comprehensive backup and restores solution designed specifically for WordPress websites. It provides users with a reliable and user-friendly platform to safeguard their valuable website data and easily recover from any potential disasters or issues.
In addition to backups, BlogVault offers a range of website management features that enhance its value. These include one-click staging environments for testing site changes, malware scanning and removal, and a site management dashboard to oversee multiple websites from a single location.
This comprehensive set of features makes BlogVault a versatile tool for managing and protecting your WordPress sites.
Key Features:
- Real-Time Backup: BlogVault offers real-time backups, guaranteeing that every update made to your website is quickly captured and safely preserved.
- Incremental Backup: BlogVault comes with an incremental backup which reduces unnecessary multiple backups thus reducing storage space.
- Restores fully crashed sites: With BlogVault’s Emergency Connector, you can completely restore your crashed sites.
2. Jetpack
 Automattic has released a premium feature for their Jetpack plugin called VaultPress Backups. With this helpful WordPress plugin, restoring to a prior backup of your site is quick and painless.
Jetpack offers a suite of powerful features to enhance the functionality, security, and performance of WordPress websites. The beauty of Jetpack is that it doesn't require you to download and install a bunch of extra plugins.
Thus, you'll only need to use a single plugin, reducing the overall number of plugins that slow down your website.
While it comes with various tools for website management, we'll focus specifically on its backup-related features.
Key Features:
Automattic has released a premium feature for their Jetpack plugin called VaultPress Backups. With this helpful WordPress plugin, restoring to a prior backup of your site is quick and painless.
Jetpack offers a suite of powerful features to enhance the functionality, security, and performance of WordPress websites. The beauty of Jetpack is that it doesn't require you to download and install a bunch of extra plugins.
Thus, you'll only need to use a single plugin, reducing the overall number of plugins that slow down your website.
While it comes with various tools for website management, we'll focus specifically on its backup-related features.
Key Features:
- Automated and Incremental Backups: Jetpack offers daily automatic scheduling of backups along with incremental backups. Thus there is less human intervention and reduced storage space.
- Real-Time Backups: Backups happen in real-time preventing loss of data when the website crashes.
- Protection from Brute Force Attacks.
- Automated security fixes for vulnerabilities.
- Secured off-site backup storage.
- One-click restoration.
3. UpdraftPlus
 UpdraftPlus will allow you to back up your entire WordPress site to the cloud or download it locally. The plugin supports automated and scheduled backups. You can also choose which parts you want to back up, like themes, plugins, or data.
UpdraftPlus offers more remote storage options than any other WordPress plugin. The free version of the plugin supports cloud backup to Amazon S3, Rackspace Cloud Files, Dropbox, Google Drive, Microsoft OneDrive, Microsoft Azure, FTP/ SFTP servers, and many more.
The premium edition adds incremental backups, site migration to a new domain, and extensive safety reports.
Key features:
UpdraftPlus will allow you to back up your entire WordPress site to the cloud or download it locally. The plugin supports automated and scheduled backups. You can also choose which parts you want to back up, like themes, plugins, or data.
UpdraftPlus offers more remote storage options than any other WordPress plugin. The free version of the plugin supports cloud backup to Amazon S3, Rackspace Cloud Files, Dropbox, Google Drive, Microsoft OneDrive, Microsoft Azure, FTP/ SFTP servers, and many more.
The premium edition adds incremental backups, site migration to a new domain, and extensive safety reports.
Key features:
- Easy modular backup and restoration of your WordPress website.
- Encrypting database backups for security in the pro version.
- Compatible with multisite WordPress installations.
- Off-site backup storage
4. BackWPup
 Full backups, database backups, and selective file and directory backups are the backup options that BackWPup provides. This feature lets customers personalize their backup plan to meet their unique requirements.
Similar to others, scheduled and automated backups are provided in this plugin.
The plugin supports backup destinations like Google Drive, Dropbox, Microsoft Azure, Amazon S3, and more. Users can store backups offsite to reduce data loss.
Key Features:
Full backups, database backups, and selective file and directory backups are the backup options that BackWPup provides. This feature lets customers personalize their backup plan to meet their unique requirements.
Similar to others, scheduled and automated backups are provided in this plugin.
The plugin supports backup destinations like Google Drive, Dropbox, Microsoft Azure, Amazon S3, and more. Users can store backups offsite to reduce data loss.
Key Features:
- The users are notified about the status and results of backup operations through email.
- The plugin supports database optimization and maintenance tools. This feature reduces database size and fixes bugs to improve website performance.
- Automated and scheduled backups.
- BackWPup provides restoration and migration capabilities.
5. All-in-one WP Migration
 This plugin has been developed for non-technical people to migrate their websites from one server or hosting provider to another. The plugin makes it easy for you to back up your site's data (posts, plugins, media, and themes) and upload it to the cloud or local storage with just one click.
The plugin also supports incremental and scheduled backups. The backup frequency can be customized in accordance with your needs: daily, weekly, or monthly.
Key features:
This plugin has been developed for non-technical people to migrate their websites from one server or hosting provider to another. The plugin makes it easy for you to back up your site's data (posts, plugins, media, and themes) and upload it to the cloud or local storage with just one click.
The plugin also supports incremental and scheduled backups. The backup frequency can be customized in accordance with your needs: daily, weekly, or monthly.
Key features:
- All-in-One WP Migration lets you make several versions of backup copies at different times. This lets you choose from which backup you want to restore.
- All-in-One WP Migration has extensions for Google Drive, Dropbox, Amazon S3, and more, thus helping you with off-site storage.
6. Duplicator
 Anyone with minimal experience may quickly and easily create backups, move, and clone their WordPress sites using the Duplicator plugin.
The duplicator plugin provides automated and scheduled backups, and cloud backup storage (OneDrive, Google Drive, FTP, Dropbox, Amazon S3, or any S3 Compatible service).
The one-click migration feature of Duplicator simplifies the process of transferring your website to a new location. There is no other WordPress backup plugin like Duplicator, that allows you to back up a brand-new site. With Duplicator, setting up WordPress and configuring your site takes a few minutes.
Key Features:
Anyone with minimal experience may quickly and easily create backups, move, and clone their WordPress sites using the Duplicator plugin.
The duplicator plugin provides automated and scheduled backups, and cloud backup storage (OneDrive, Google Drive, FTP, Dropbox, Amazon S3, or any S3 Compatible service).
The one-click migration feature of Duplicator simplifies the process of transferring your website to a new location. There is no other WordPress backup plugin like Duplicator, that allows you to back up a brand-new site. With Duplicator, setting up WordPress and configuring your site takes a few minutes.
Key Features:
- Supports backup of large sizes of sites even in the free version. The plugin also creates a zip file of the backup in storage.
- Get quick notifications through email whenever Duplicator fails to complete a backup, takes too long, or requires manual intervention.
- Duplicator may generate new databases and execute search and replace operations during migration, improving its efficiency and versatility.
- Multisite support.
Conclusion
WordPress site owners need reliable backup and recovery solutions. The plugins mentioned in this blog are the ones that can protect your website from calamities and restore it quickly. Consider automatic scheduling, remote storage, migration, and convenience of use when choosing a backup and restoration plugin. Choosing the proper plugin and following best practices will protect and restore your WordPress website, letting you focus on content and business goals.
WordPress
14 min read
Celebrating 20 Years of WordPress: A Journey through Milestones
Introduction
On May 27th, 2023 WordPress will turn 20 years old! WordPress has grown exponentially over the last two decades. From its humble beginnings as a simple blogging platform to its transformation into a versatile content management system (CMS) that powers millions of websites worldwide. Many CMSs were launched, and gone but WordPress thrived like no other. Let's look back at some of the significant milestones of WordPress from the past 20 years.WordPress launched (May 27, 2003)
Matt Mullenweg, at the age of 18 (from Houston, Texas), used to weblog on his website, photmatt.net, where he wrote about technology, economics, politics, and his passion for jazz music and photography. Mike Little (from Stockport, England), on his weblog, wrote about books he read, and blogging technology. They both used the blogging tool b2/cafelog, which French programmer Michel Valdrighi created. On January 24, 2003, Matt posted a blog titled “The Blogging Software Dilemma,” where he expressed his concern that the then-famous blogging tool b2/cafelog had not been updated for months. The lead developer, Michel of b2/cafelog had disappeared for some unknown reasons. Matt’s blog was growing. At that time, his blog had passed twenty thousand unique visitors in 2003. He was looking for b2/cafelog alternatives. He tried the Textpattern and Movable Type weblog tools but due to licensing restrictions, he was not willing to use them. b2/cafelog was GPL, so Matt on his weblog proposed the idea of forking it since nobody was actively working on improving it.“Fortunately, b2/cafelog is GPL, which means that I could use the existing codebase to create a fork, integrating all the cool stuff that Michel would be working on right now if only he was around. The work would never be lost, as if I fell of the face of the planet a year from now, whatever code I made would be free to the world, and if someone else wanted to pick it up they could. I’ve decided that this the course of action I’d like to go in, now all I need is a name.”To which Mike Little replied back (the first comment).
“Matt, If you’re serious about forking b2 I would be interested in contributing. I’m sure there are one or two others in the community who would be too. Perhaps a post to the B2 forum, suggesting a fork would be a good starting point.”This conversation was the starting point for WordPress. That's the power of a single comment, and the rest is history. Here is a screenshot of the blog with the comment.
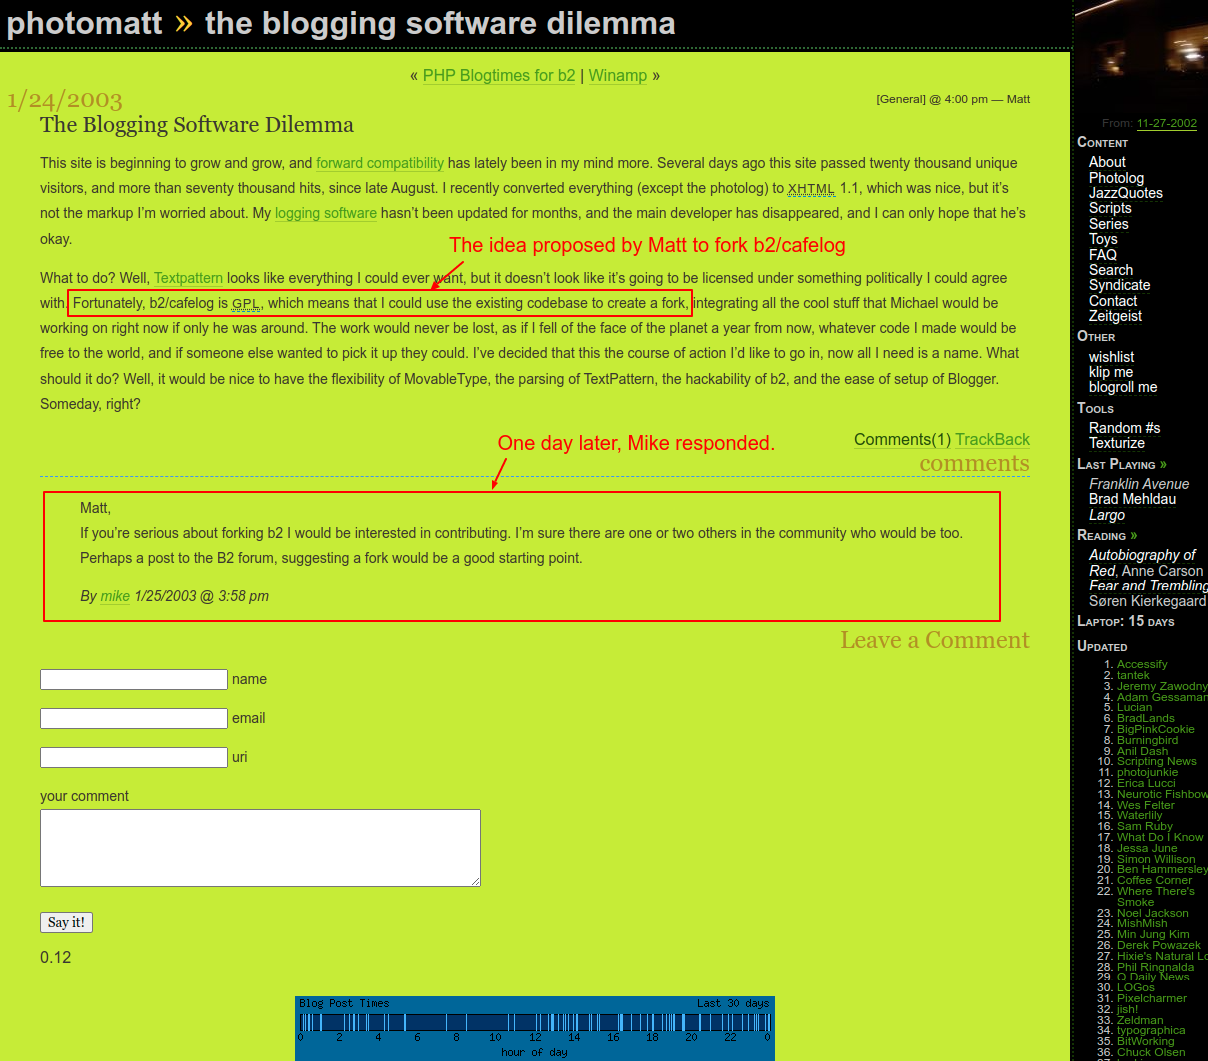
Matt proposed the idea of forking b2/cafelog on his weblog to which Mike responded.
Since then both Matt and Mike, from their homes started working on improving b2/cafelog script which then became WordPress (with the name coined by Matt’s friend Christine Tremoulet) Finally, on May 27, 2003, Matt announced the release of the first version of WordPress, 0.7.WordPress 1.2 "Mingus" (May 22, 2004)
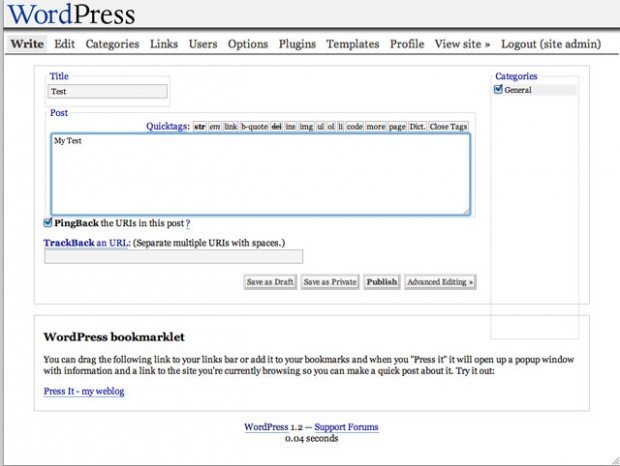
WordPress 1.2 Mingus Write screen Image credit
WordPress version 1.2 is named “Mingus” in honor of jazz upright bassist, pianist, and composer Charles Mingus Jr.New Plugin Architecture
WordPress version 1.2 was the first major release since its launch, which included the addition of plugin support. This release was significant because WordPress became a fully mature product as compared to the weblog tools available back then. Ryan Boren invented the plugin system. In his 2013 interview, he recalled the idea behind the plugin system,“The 80/20 is like, is this useful to the 80 percent of our user's. If not, try it in a plugin. And it allowed us to do things like, you know, all these taxonomy plugins that did their own thing that kind of paved the way and then we later adopted. That was nice.”The new plugin architecture made it easy to modify or extend WordPress’ features. It uses hooks (actions and filters) that developers could use to extend WordPress functionality without having to edit core PHP files. The WordPress community loved this feature.
The luck of timing
Back in those days, the Moveable Type (MT) blogging tool was a top competitor to WordPress. Six Apart, the company behind the Movable Type weblog on May 13th, 2004, made changes to the licensing and, most importantly, the pricing structure for the version 3.0 launch. The users had to pay for personal or commercial licenses based on the maximum number of authors and active weblogs. The free version had only one author and three active weblogs. Nine days later, on May 22, 2004, the WordPress 1.2 version was released. Dissatisfied MT users migrate to WordPress, which is flexible and has no restrictions. WordPress downloads increased from 8,670 in April 2004 to 19,400 in May 2004 on the SourceForge website, which was more than doubled.WordPress 1.5 "Strayhorn" (February 17, 2005)
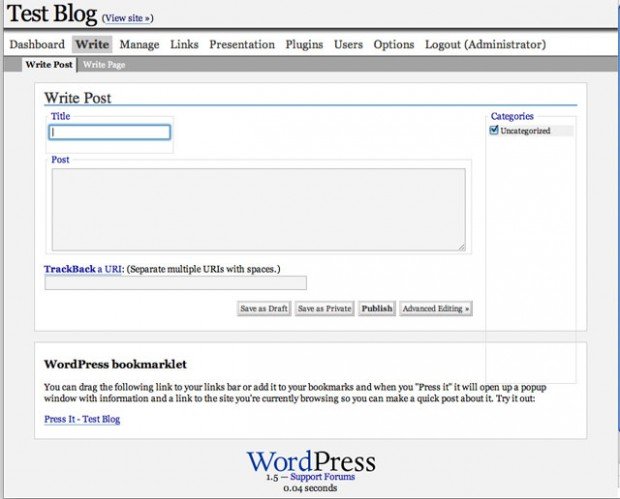
WordPress 1.5 Write Post screenshot
WordPress version 1.5 is named “Strayhorn” in honor of jazz composer, pianist, and lyricist Billy Strayhorn. This was another milestone event where WordPress version 1.5 was released with a Pages feature, better comment moderation tools, and a new theme system (on which the entire theme ecosystem that we see today was built)WordPress Pages
The Pages feature was first introduced so that, apart from traditional weblogs, users could create websites with custom pages such as About Us, and Contact Us, among others.Streamlined comment management Tools
To fight spam better, the comment management process was streamlined. For example, when someone comments on a blog, they are automatically held in moderation (called automatic whitelisting) unless the site owner has approved something from them before. Also, it was easy to deal with hundreds or thousands of comments, pingbacks, and trackbacks at once. Additionally, an option to blacklist spammers was added so that one does not need to monitor comments added to the list. And lastly, an option to allow comments only from visitors who verified their email and registered on the site.Flexible Theme System
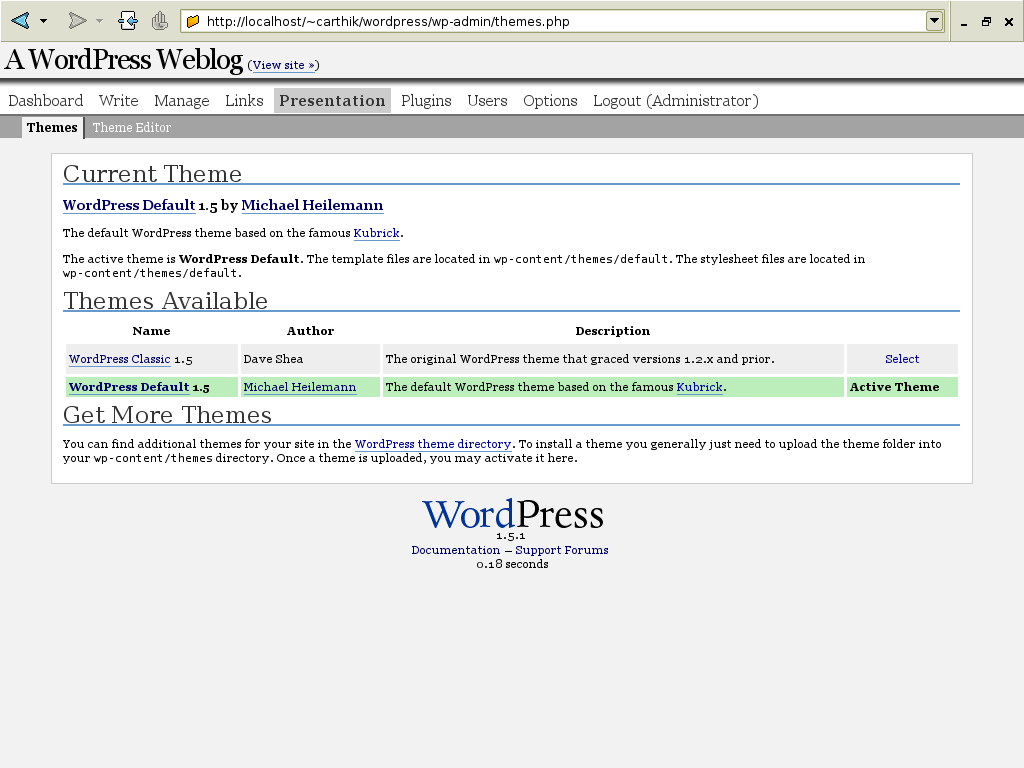
WordPress Presentation Panel Image Source.
The introduction of the theme system allowed users to modify their blogs' look and feel. Common site elements were divided into sections like headers, footers, and sidebars, each with its own file. The theme system was so flexible that individual pages, posts, or even categories could have their own template design. Also, multiple theme support was implemented so that users could switch the entire look and feel of the site with a single click.New Default Theme Kubrick
This was the first time in WordPress history that a default (adapted version of the Kubrick theme) was bundled with a release. This theme was WordPress’ default theme (also in a sub-folder named “default” in the themes folder) until 2010. From 2010 onward, yearly themes such as Twenty-Ten, Twenty-Eleven, and so on were launched.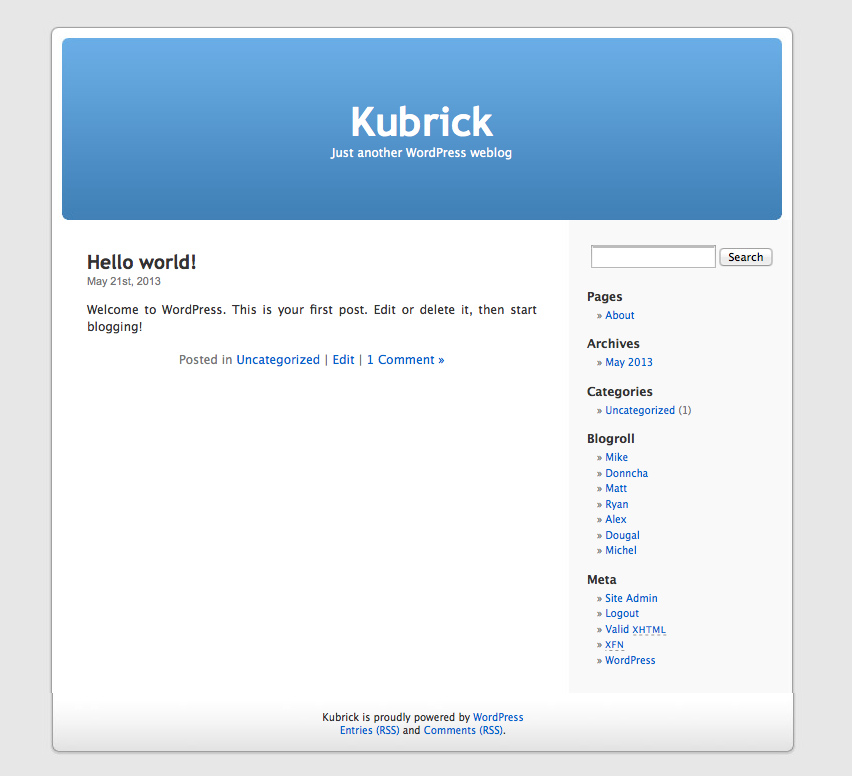
The Kubrick Theme was WordPress’ default theme until 2010.
WordPress 2.0 "Duke" (December 26, 2005)
WordPress version 2.0 is named “Duke” in honor of jazz pianist and composer Duke Ellington.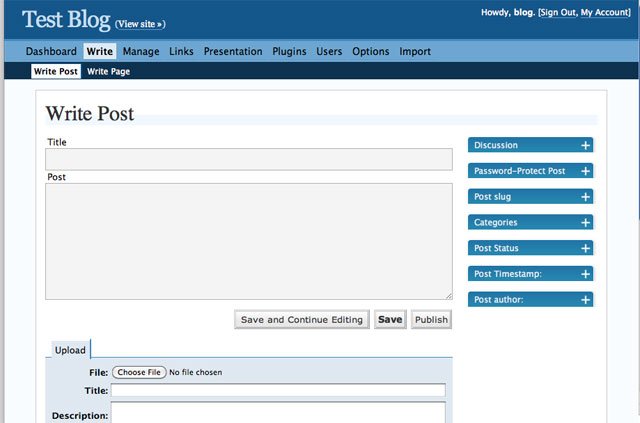
WordPress 2.0 Write Post screenshot Image Credit
New backend dashboard
WordPress 2.0 was released with a complete overhaul of the admin dashboard screens. Along with the User Interface (UI) facelift, the User Experience (UX) was also reimagined. For example, bloggers could add categories or tags without having to leave the post editor screen or delete comments or categories which will fade out without reloading the screen. Ability to drag and drop dialogs to rearrange and customize the admins' screens easily. In short, the publishing experience was faster and more streamlined thanks to AJAX functionality.New User Role System
Previous versions of WordPress had an old numerical user-level system ranging from 0 to 10. User Level 0 had the lowest privileges and User Level 10 had the highest level of access (basically administrator). The numbered access level was confusing and was not a direct indicator of how these levels (ranging from 0 to 10) were mapped to capabilities. In the new system, roles such as administrator, editor, and contributor were created, which made it easier to understand what capabilities the users had.New TinyMCE WYSIWYG Editor
In this version of WordPress, TinyMCE's WYSIWYG editor was integrated. This “What you see is what you get” (WYSIWYG) editor brought a smooth creating and editing experience natively to WordPress. TinyMCE remained the default editor from WordPress version 2.0 (December 26, 2005) to version 5.0 (December 6, 2018) for almost 13 years, which was then replaced by the Gutenberg Block Editor.WordPress 3.0 "Thelonious" (June 17, 2010)
Introducing WordPress 3.0 Video (CC-BY-SA-4.0)
WordPress version 3.0 is named “Thelonious” in honor of American jazz pianist and composer Thelonious Sphere Monk. It was the thirteenth major release and the culmination of 218 contributors' work over a half-year period.WordPress MU merged in the Core
3.0 release was bundled with lots of features that made WordPress a true CMS. One of the main features included the merging of the WordPress MU project (renamed to Multisite) into the core software. WordPress MU project was about creating the new multi-site functionality which makes it possible to run a single or multiple blogs (two or more) on the same WordPress installation.Custom Post Types and Taxonomies
Custom post type (CPT) was a groundbreaking feature in this release. It was one of the features that transformed WordPress from a simple blogging tool to a full-fledged CMS. Before 3.0 the default content types were Post, Page, Attachment, Revisions, Nav Menus (and two more). The introduction of CPTs allowed the creation of new types of content for users, CPTs such as events, testimonials, books, portfolios, case studies, e-books, and staff, among others could be created. This helped users organize their content beyond the default Post and Page post types. Prior to 3.0, WordPress had categories and tags as default taxonomies. Users could create custom taxonomies from 3.0 (similar to CPTs) thus helping to organize content in better ways.Default Theme every year
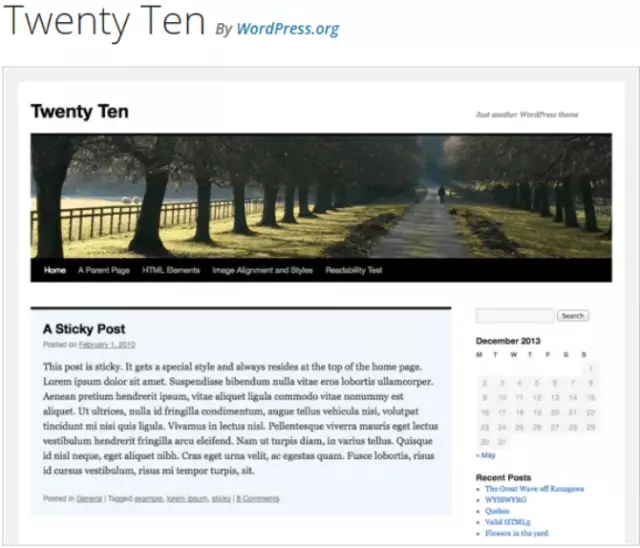
Twenty Ten theme was included in the WordPress 3.0 distribution
Along with WordPress 3.0, the Twenty Ten theme was launched, which replaced the Default (Kubrick) and Classic theme. Until then, Kubrick was the default theme from version 1.5 (February 17, 2005) to version 3.0 (June 17, 2010) for more than 5 years. The introduction of the Twenty Ten theme started the tradition of a new default theme every year. Since then, every year a new theme has been launched, such as Twenty Eleven, Twenty-Twelve, Twenty Twenty-Three, and so on.WordPress 3.7 “Basie" (October 24, 2013)
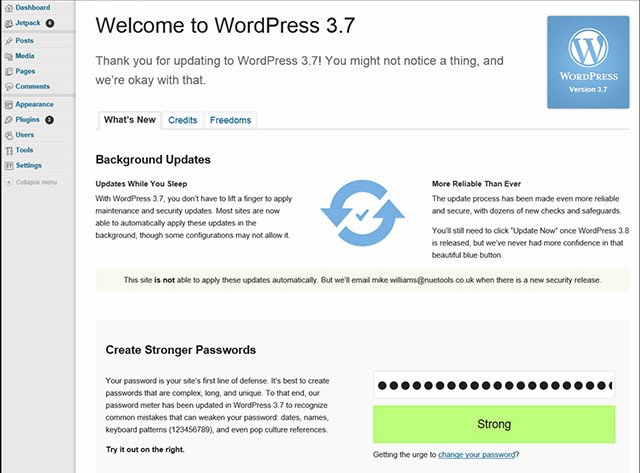
WordPress 3.7 Dashboard screen
WordPress version 3.7 is named “Basie” in honor of American jazz pianist and composer Count Basie. 211 volunteer contributors' worked on this release.Automatic maintenance and security updates.
With WordPress 3.7, maintenance and security updates were automatically applied. The update process happens in the background and is more reliable and secure than ever before. Minor point releases of WordPress (3.7.1, 3.7.2, for example) were automatically updated. Updates for major releases such as 3.7 and 3.8 were not applied automatically. Many users in the WordPress community didn't like this feature, as they felt it took away control from them since, without their permission, WordPress was updated in the background.A new plugin-first development process
WordPress 3.7 was launched with the new plugin-first development process. Using this process, the new features were developed as plugins, and once the development was complete, they would be merged into the core. This process helped the core development team release updates in a much shorter timeframe and decouple feature development from a release.One billion total plugin downloads (August 12, 2015)
WordPress Plugin Directory surpassed one billion total downloads between the 11th to 12th of August 2015. Below is a screenshot of the plugin directory.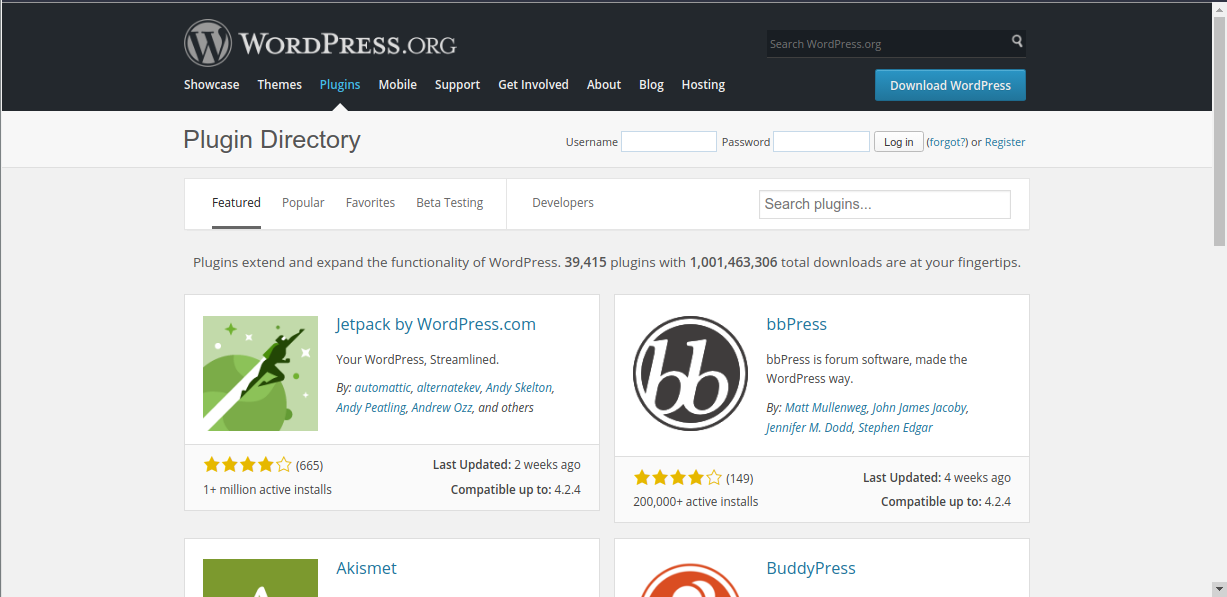
One billion total plugins downloads
WordPress 4.4 “Clifford” (December 8, 2015)
Introducing WordPress 4.4 video (CC-BY-SA-4.0)
WordPress version 4.4 is named “Clifford” in honor of jazz trumpeter and composer Clifford Brown. 471 contributors helped develop version 4.4.REST API infrastructure.
In WordPress 4.4, the REST API infrastructure was integrated into the core. It was the first phase of the multi-stage rollout of the REST API integration. This was marking the dawn of a new era in developing with WordPress and it was one step closer to becoming a fully-fledged application framework. The REST API gave developers an easy way to connect WordPress with third-party applications. Most importantly it laid out the foundation for the Gutenberg Block editor, the future of publishing.In-built responsive images
Another awesome feature that was launched in WordPress 4.4 was native responsive image support. This removes the need for any custom code or plugin. WordPress smartly displayed responsive images on any device (based on the srcset and sizes attributes on the image tag.)WordPress 5.0 "Bebo" (December 6, 2018)
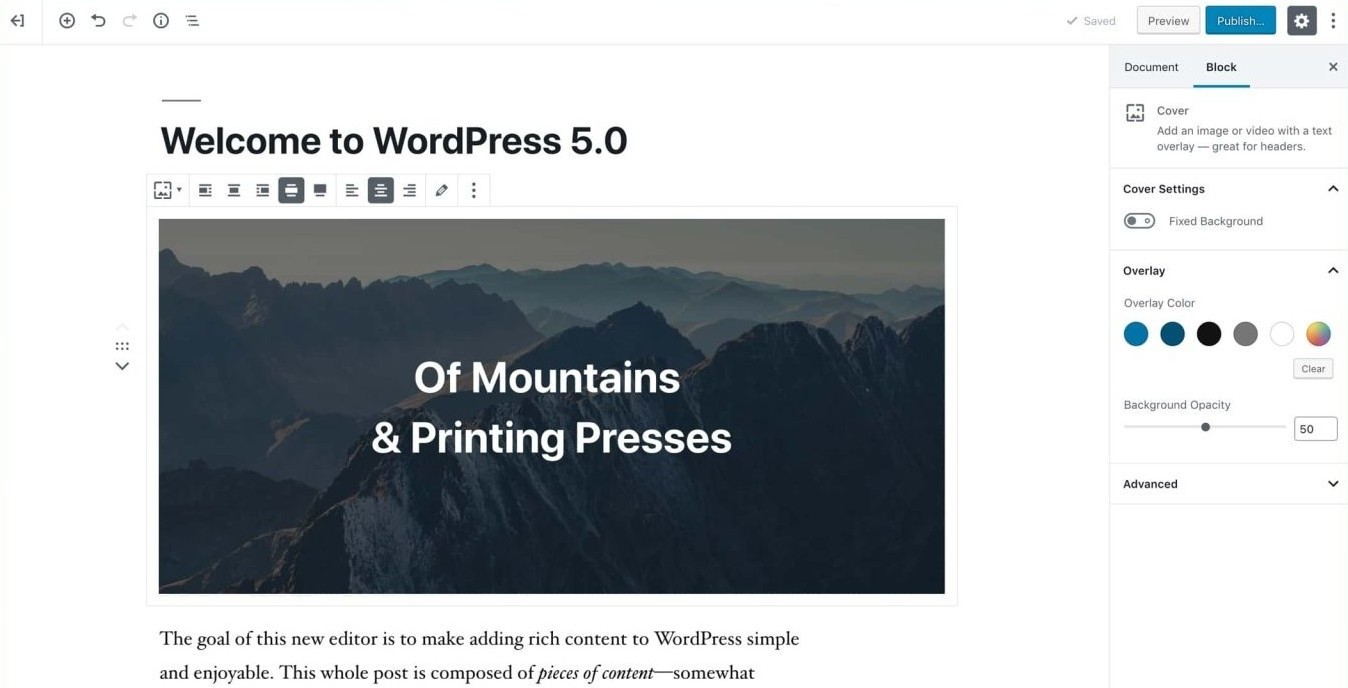
WordPress 5.0 screenshot
WordPress version 5.0 is named “Bebo” in honor of Cuban jazz musician Bebo Valdés. This release had 423 contributors with props.Say Hello to Gutenberg Editor
“What is Gutenberg?” video (CC-BY-SA-4.0)
WordPress 5.0 revolutionized the content editing experience with the introduction of a new block editor Gutenberg. The new block-based editor was a game-changer and the first step toward a next-level content editing experience. The Classic TinyMCE WYSIWYG editor (launched on December 26, 2005) was replaced by the Gutenberg editor (December 6, 2018) after almost 13 years. The classic editor was available as a plugin in the WordPress repository for users who wanted a legacy editing experience.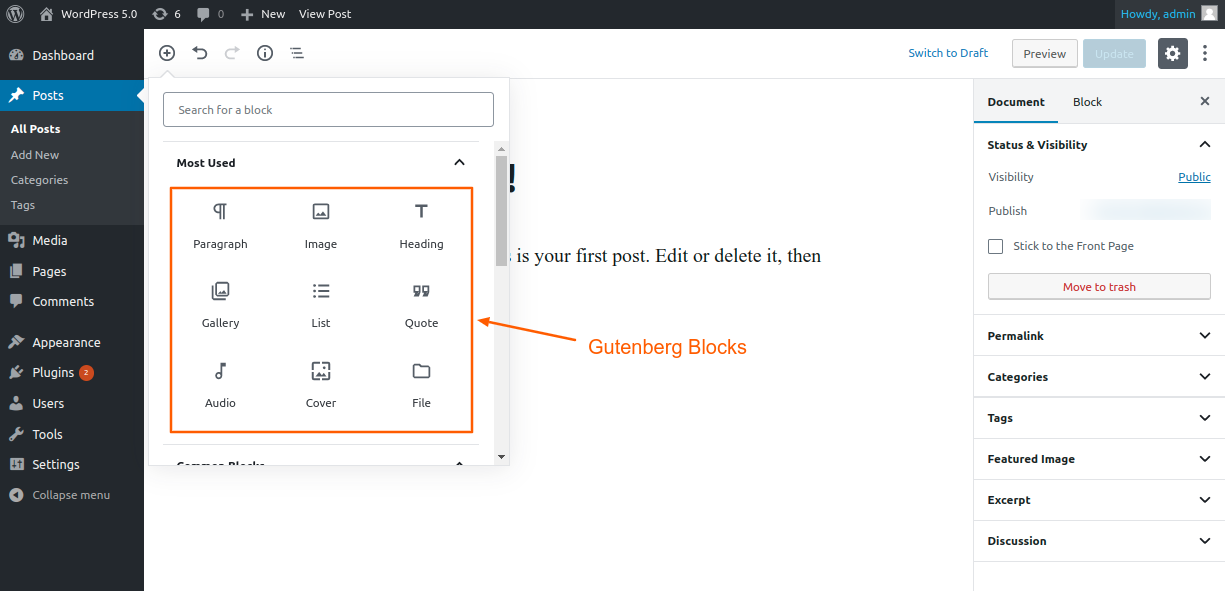
Native Gutenberg Blocks in WordPress 5.0
Gutenberg editor has basic website building blocks such as paragraphs, headings, code, and quote, among others, as well as more advanced blocks such as gallery, audio, video, cover image, and many more to build custom layouts. Using these blocks, users can build their websites without writing a single line of code.Introducing Twenty Nineteen theme
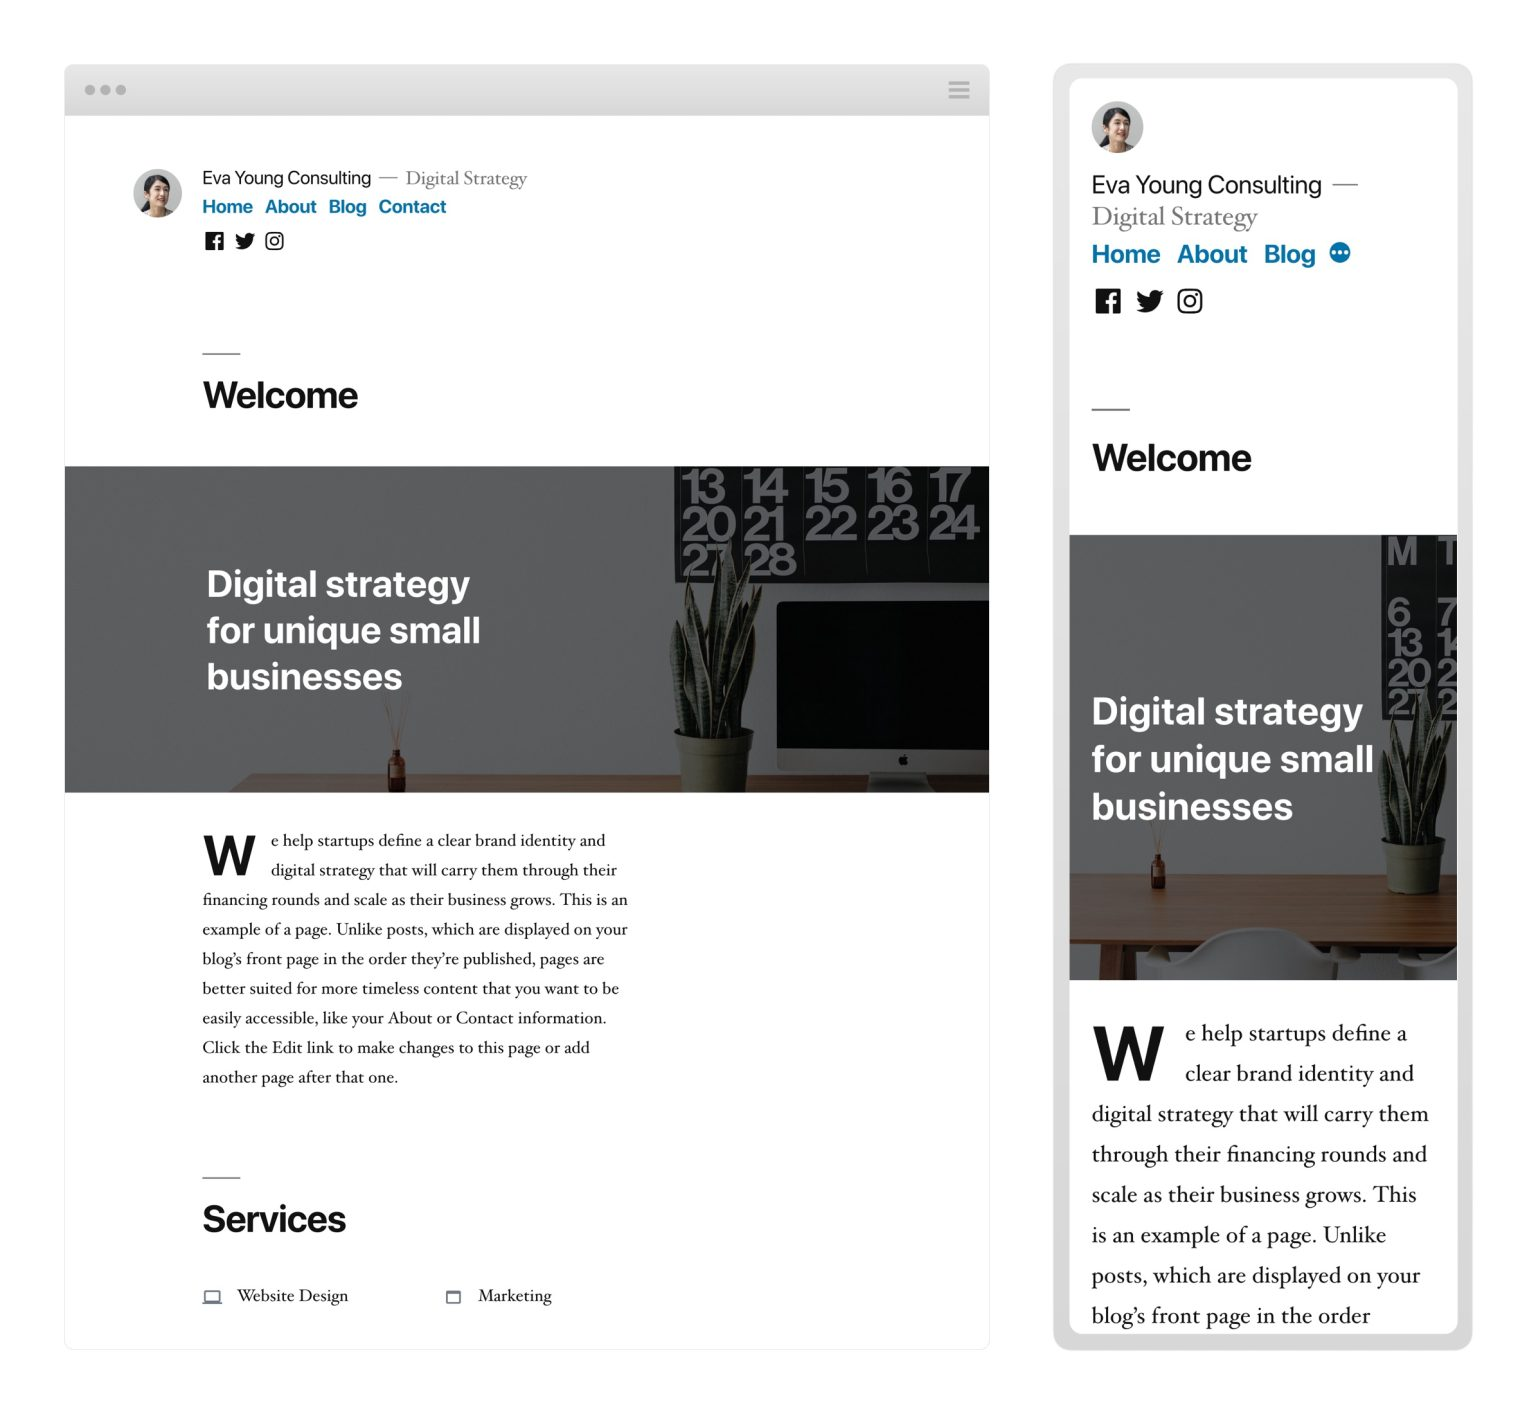
Twenty Nineteen theme Desktop and Mobile view.
Twenty Nineteen theme which has full Gutenberg support was launched with WordPress 5.0. It showcased the power of building websites using blocks. It’s a first-of-its-kind new generation theme where the layouts designed in the Gutenberg editor will be displayed exactly in the front end of the website.WordPress 5.9 "Josephine" (January 25, 2022)
WordPress version 5.9 is named “Josephine” in honor of dancer, singer, and actress Josephine Baker. 624 generous volunteer contributors contributed to WordPress 5.9.Introducing WordPress 5.9
Full Site Editing
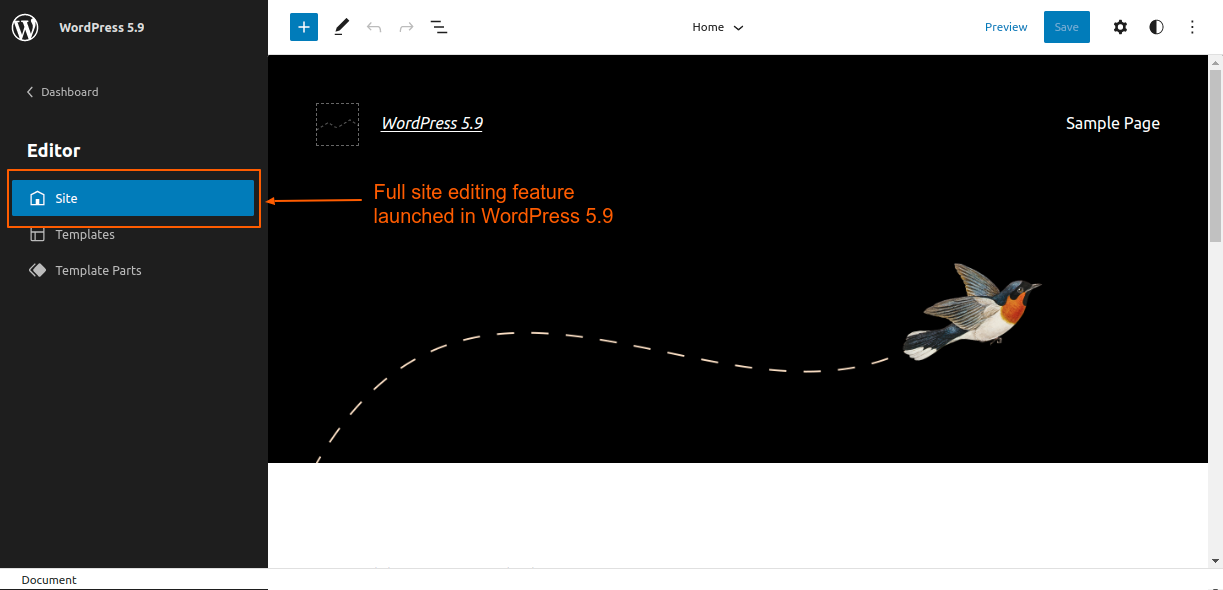
Full Site Editing experience right in WordPress admin
WordPress 5.9 introduced Full Site Editing (FSE). In simple terms, in FSE, one can build and customize the entire website in the Site Editor. All the parts of the website, such as the header, footer, sidebar, pages, and posts in short, every section of the website can be built and customized using the Site Editor.Twenty Twenty-Two Theme
Twenty Twenty-Two, the first default block theme in the history of WordPress, was shipped with version 5.9. It's a perfect example of how block-based themes should be built, and how Full Site Editing works. It's also an excellent reference for theme and plugin developers to learn from by looking at the source code.Templates customization
WordPress 5.9 introduced various native block-based templates such as Home, Search, Single Post, and many others.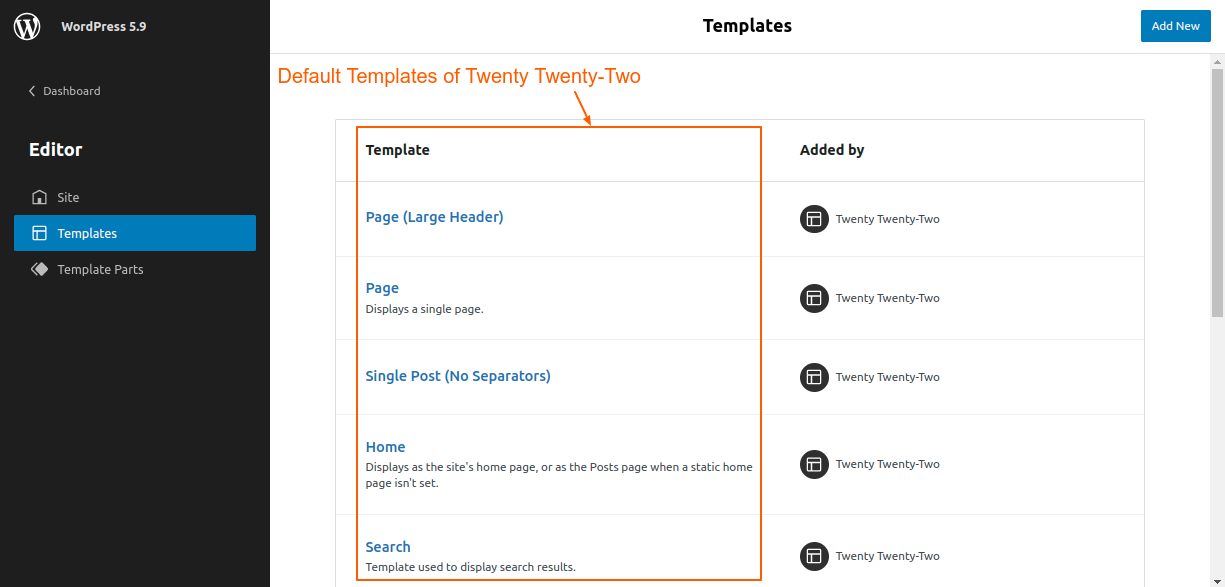
Templates of Twenty Twenty-Two Theme in Full Site Editing
In classic themes, these templates are PHP files such as home.php, single.php, and search.php, among others stored in the theme directory. In block-based themes such as Twenty Twenty-Two, there are HTML files stored in the “templates” directory. The best part about Full Site Editing is that these templates can be customized directly in the Site Editor without writing a single line of code. Below is a screenshot of editing the “Page” template right in the WordPress admin. All the layout changes in the site editor are stored in the database (instead of directly editing HTML files in the template folder of the Twenty Twenty-Two theme.)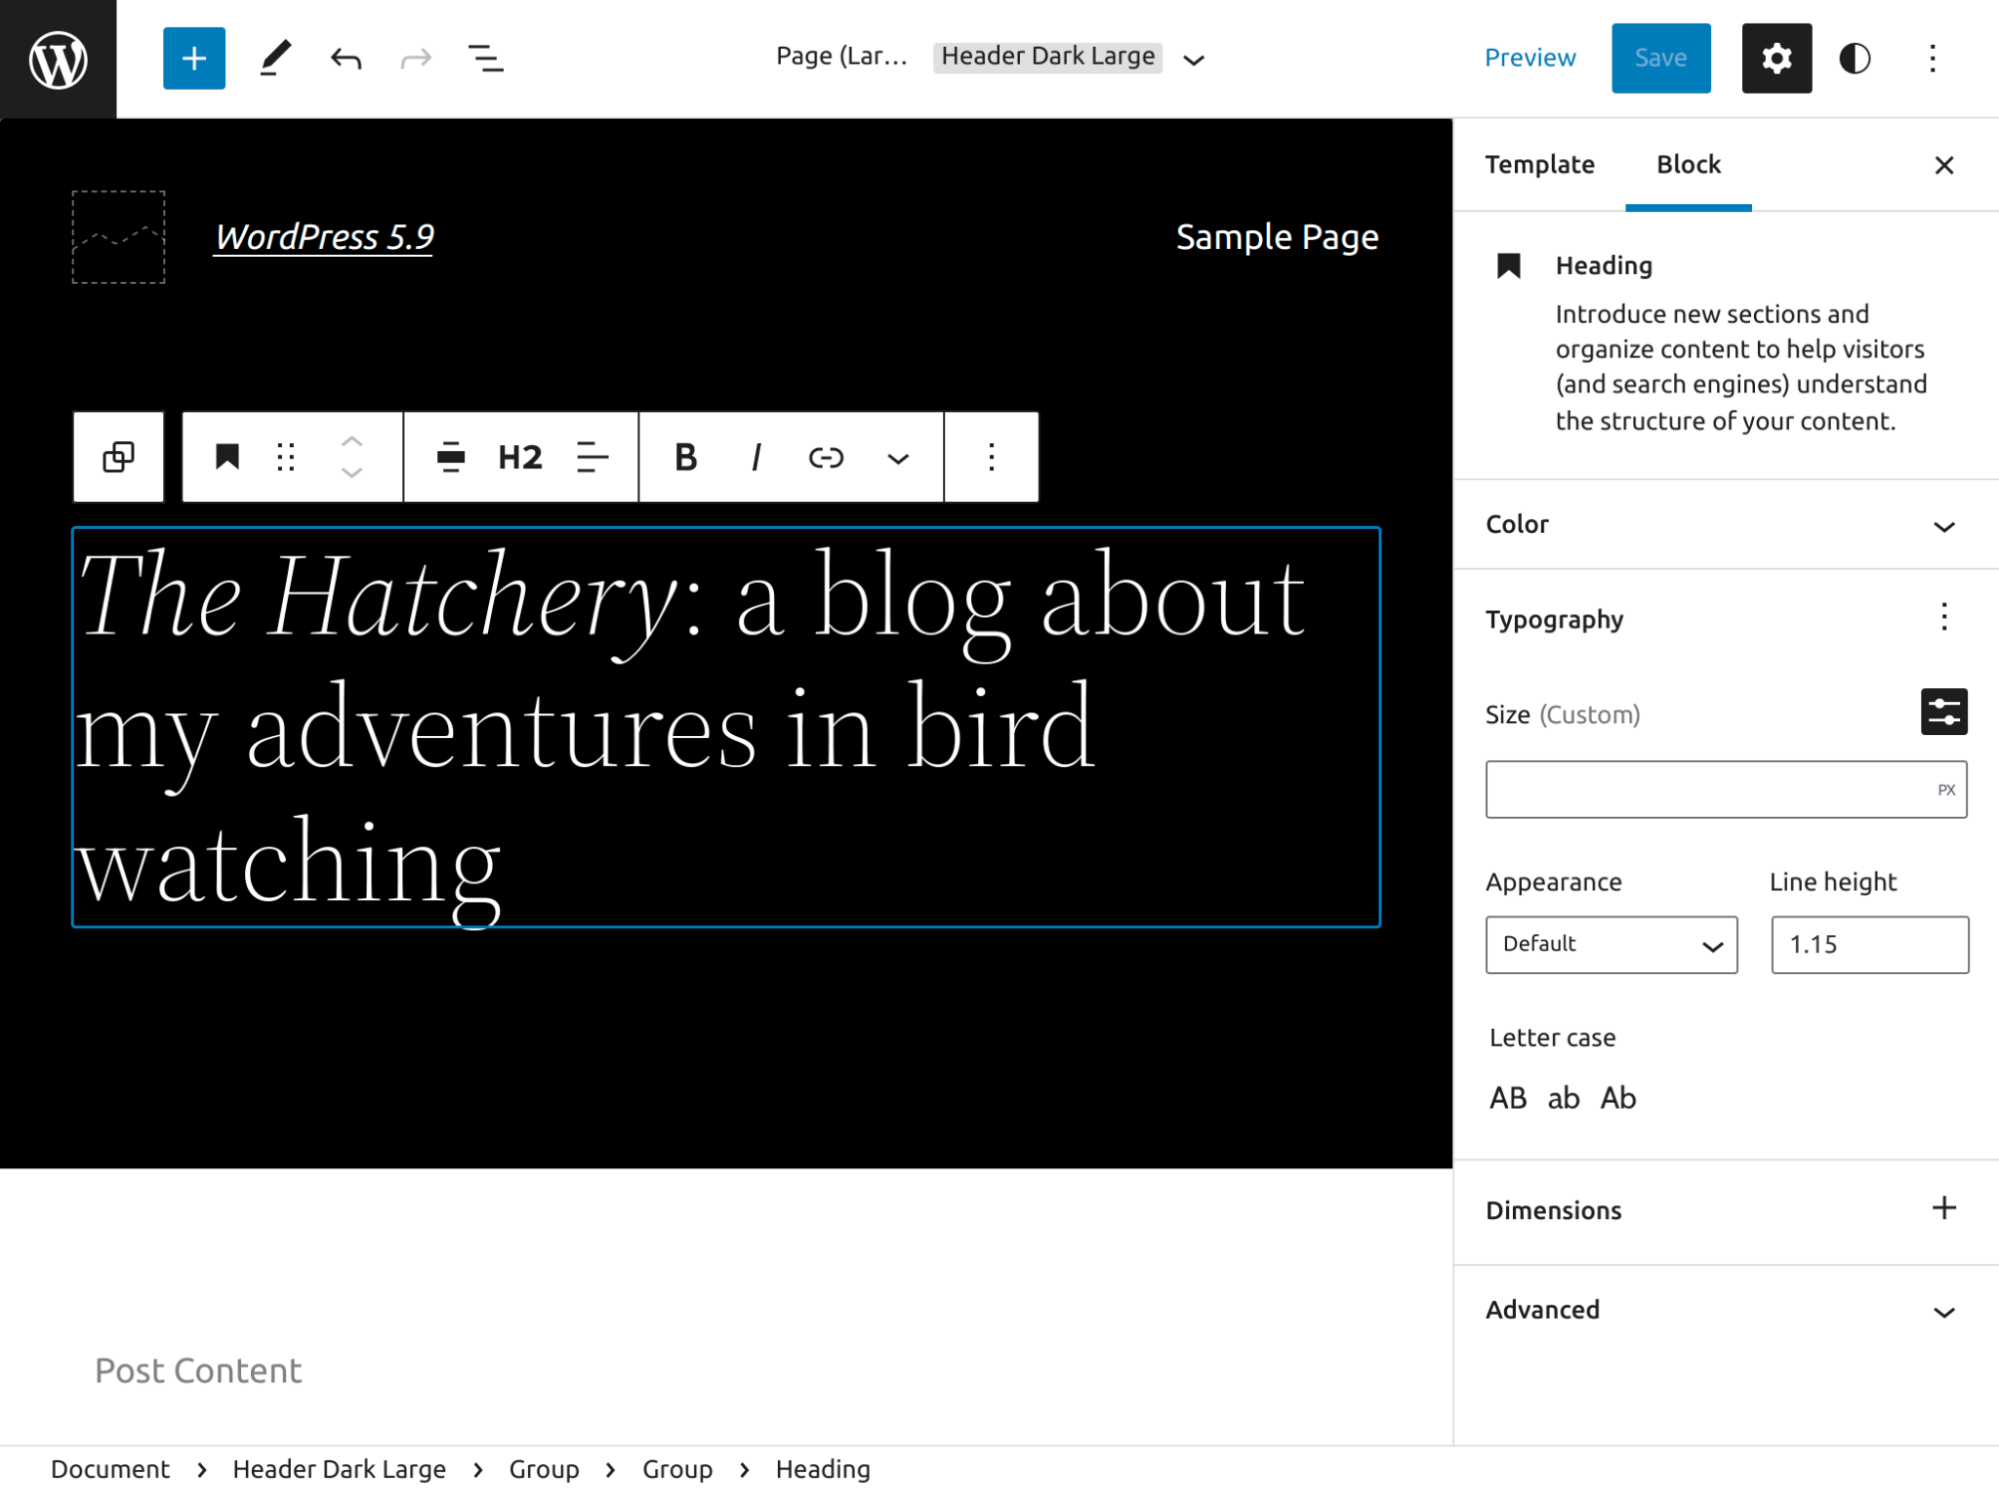
Editing the “Page (Large Header)” template of the Twenty Twenty-two theme
Template Parts Customization
WordPress 5.9 also introduced the customization of template parts which are smaller reusable structural parts commonly used for site headers and footers. Again, one can customize the header and footer Template Parts in the Site Editor.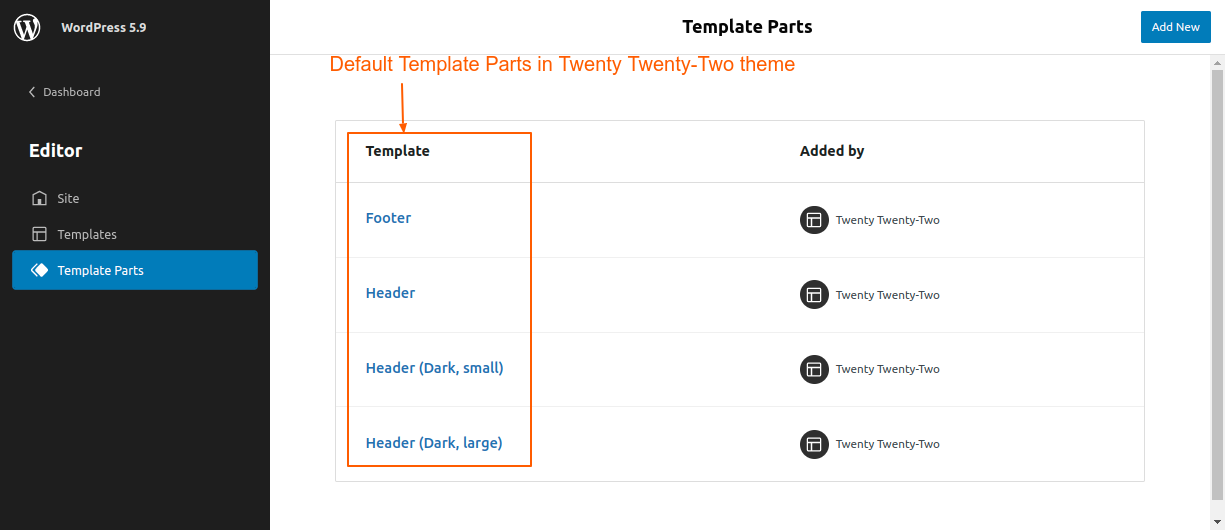
Template Parts in FSE
WordPress 6.2 "Dolphy" (March 29, 2023)
WordPress version 6.2 is named “Dolphy” in honor of e woodwind jazz wiz, and multi-instrumentalist, Eric Allan Dolphy Jr. Over 600 contributors have contributed to this release. Out of which 178 were new contributors.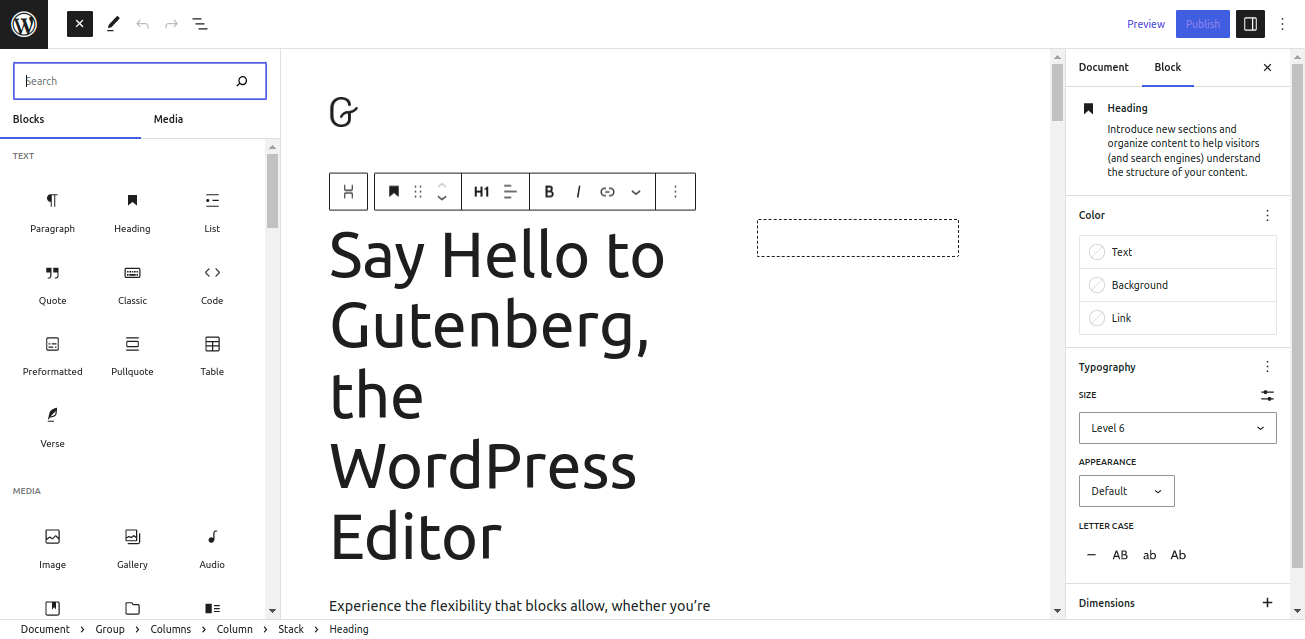
The new Gutenberg editing experience
Reimagined Site Editor
WordPress 6.2 is the most recent, major, and stable release in 2023. The Site Editor is just getting better and better with every major release. The Site Editor has been completely reimagined and is now out of beta. Awesome new features were introduced, such as distraction-free mode, an easier-to-use navigation block, the ability to copy and paste styles between blocks, and many more.Openverse integration
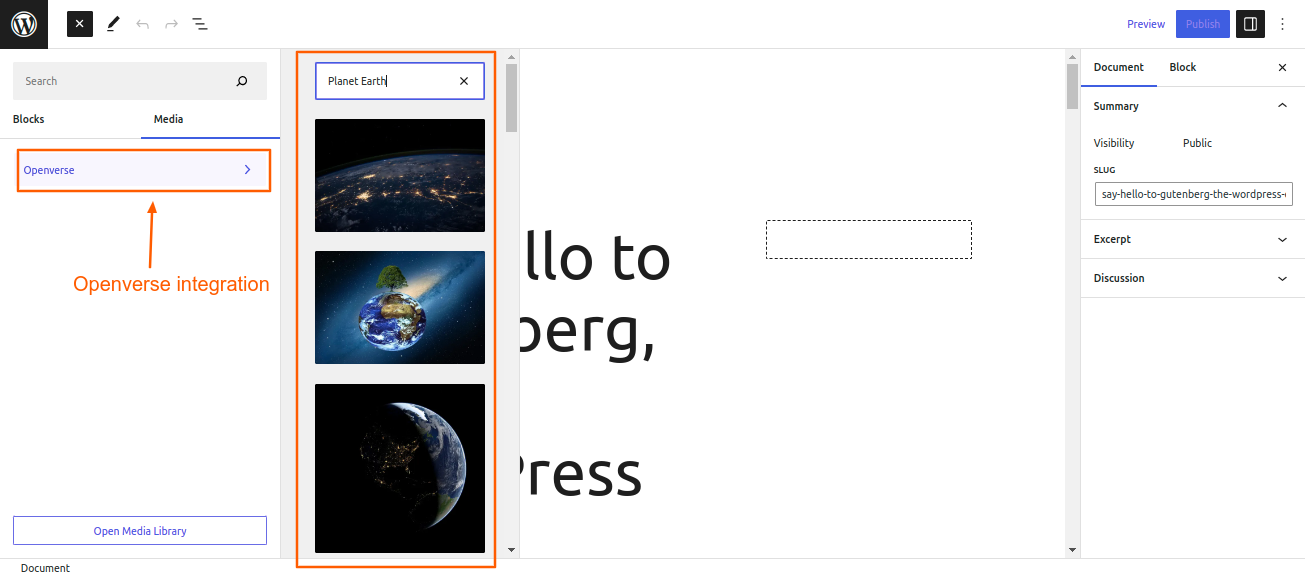 Over 700 million free, openly licensed, and public domain works are available in Openverse's library (currently only stock photos and audio).
Users can search the Openverse catalog right in the media tab of the block inserter. Once the image is selected, it gets uploaded and inserted in the content with the correct attribution.
Over 700 million free, openly licensed, and public domain works are available in Openverse's library (currently only stock photos and audio).
Users can search the Openverse catalog right in the media tab of the block inserter. Once the image is selected, it gets uploaded and inserted in the content with the correct attribution.
WordPress Powers 43.1% of The Web (May 27, 2023)
On May 27th, May 2023, WordPress Powers 43.1% of the top 10 million websites. The below screenshot shows yearly trends in the CMS usage statistics since January 2012.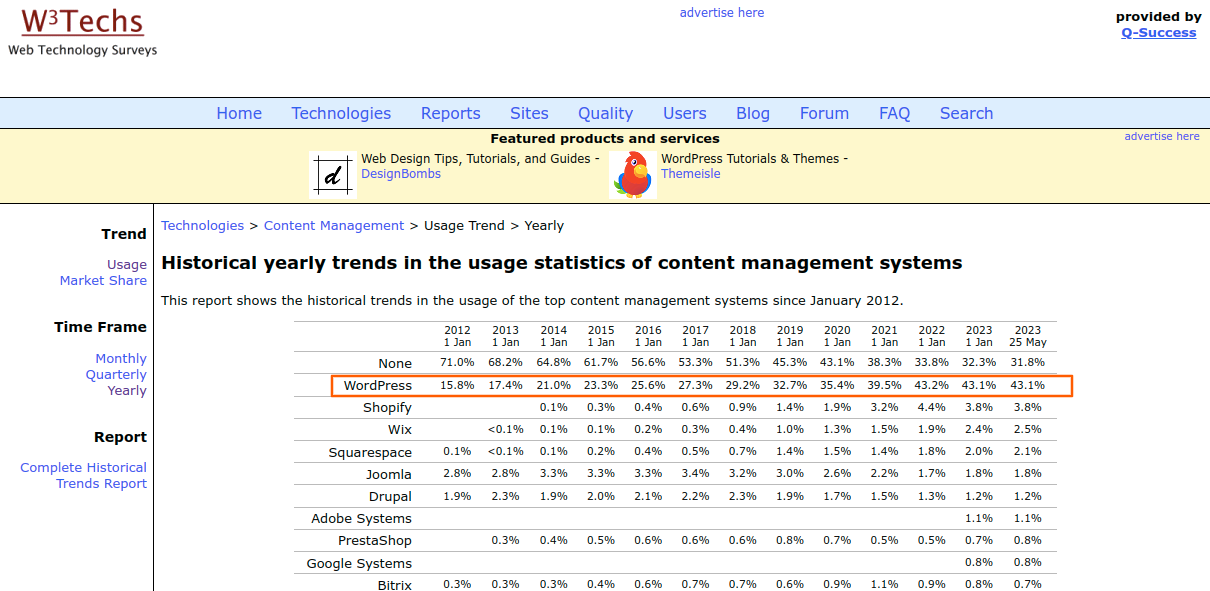
Wrapping up
Over the past two decades, WordPress has achieved remarkable milestones. Since its initial release on May 27th, 2003, it has come a long way. It now powers more than 40% of the web. It’s been an awesome journey so far, and one that won’t stop any time soon. Here is a video that shows how WordPress has grown. [video src="https://w3techs.com/pictures/cms-bcr-202209.mp4" /]The evolution of CMS usage statistics, 2014-2022, Video Source
That’s it for this article. Signing off for now. Happy birthday, WordPress, from the bottom of our hearts.
Plugins
5 min read
Best WordPress SEO Plugins for 2026
1. Yoast SEO
 Yoast SEO is one of the best WordPress SEO plugins. The free version provides multiple features, such as analyzing the content of your post or page, XML Sitemaps, social media integration, and many more.
The Yoast SEO Premium provides more sophisticated features like advanced language analysis that helps to write naturally, the use of synonyms and keyphrases that help to make text richer, adding schema markup, optimizing a page for up to five keywords, previewing your page appearance on Twitter and Facebook, and suggesting internal links to guide users to other areas of your site.
Furthermore, Yoast SEO boasts its own website, offering premium support options, a vibrant community in its forum section, an educational blog for SEO insights, and courses catering to beginners, intermediates, and advanced users.
Nevertheless, budget-conscious users can still take advantage of the free version, which outperforms most other WordPress SEO plugins by a significant margin.
Key features:
Yoast SEO is one of the best WordPress SEO plugins. The free version provides multiple features, such as analyzing the content of your post or page, XML Sitemaps, social media integration, and many more.
The Yoast SEO Premium provides more sophisticated features like advanced language analysis that helps to write naturally, the use of synonyms and keyphrases that help to make text richer, adding schema markup, optimizing a page for up to five keywords, previewing your page appearance on Twitter and Facebook, and suggesting internal links to guide users to other areas of your site.
Furthermore, Yoast SEO boasts its own website, offering premium support options, a vibrant community in its forum section, an educational blog for SEO insights, and courses catering to beginners, intermediates, and advanced users.
Nevertheless, budget-conscious users can still take advantage of the free version, which outperforms most other WordPress SEO plugins by a significant margin.
Key features:
- Preview your exact appearance in Google search results, allowing you to tweak the meta description and title for improved appeal and keyword usage.
- Yoast SEO allows you to add schema markup to your website, enhancing the visibility and appearance of your pages in search engine results.
- It enables you to use focus keywords, thus helping you to optimize content with targeted keywords.
- It comes with a Redirect manager, so you don’t have to install another plugin to handle your 301 redirects.
2. Rank Math
 Rank Math SEO is a multipurpose plugin for your WordPress website. It provides complete on-page SEO management at your fingertips. Rank Math is a lightweight and easy-to-manage SEO plugin for WordPress that consolidates the functionality of several other plugins.
The free version comes with an XML Sitemap, SEO Titles and Meta Descriptions, schema markup, focus keyword analysis to visualize the optimized content with different keywords, and much more.
The premium version provides the user with keyword rank tracking, local SEO integration, Google News, and Video Sitemap, to name a few.
Key features:
Rank Math SEO is a multipurpose plugin for your WordPress website. It provides complete on-page SEO management at your fingertips. Rank Math is a lightweight and easy-to-manage SEO plugin for WordPress that consolidates the functionality of several other plugins.
The free version comes with an XML Sitemap, SEO Titles and Meta Descriptions, schema markup, focus keyword analysis to visualize the optimized content with different keywords, and much more.
The premium version provides the user with keyword rank tracking, local SEO integration, Google News, and Video Sitemap, to name a few.
Key features:
- Each post, page, or product undergoes an SEO analysis based on 40 criteria.
- It allows automatically adding alt or title tags to images that lack them.
- Rich Snippets support is built-in, with a choice of six different snippets, such as Article, Product, Recipes, Events, Video, and Local Business.
- The plugin also features a Redirection module, allowing you to direct 404 errors to more relevant content on your website.
- Breadcrumbs are incorporated within the plugin, eliminating the need for an additional plugin.
- Open Graph and Twitter Card support are also included.
3. All-in-One SEO (AIOSEO)
 The most effective SEO plugin for WordPress is All in One SEO for WordPress (AIOSEO). It helps you improve your search results without learning complicated SEO terms.
XML sitemaps, SEO title and meta tags, schema markup, and social media integration are some of the features available in the free version. The premium features come with more extensions, such as advanced WooCommerce support, local SEO integration, and an advanced robots.txt editor that offers an intuitive interface for editing and managing the robots.txt file of your website, thus controlling search engine crawlers' access to specific areas of your site.
Key features:
The most effective SEO plugin for WordPress is All in One SEO for WordPress (AIOSEO). It helps you improve your search results without learning complicated SEO terms.
XML sitemaps, SEO title and meta tags, schema markup, and social media integration are some of the features available in the free version. The premium features come with more extensions, such as advanced WooCommerce support, local SEO integration, and an advanced robots.txt editor that offers an intuitive interface for editing and managing the robots.txt file of your website, thus controlling search engine crawlers' access to specific areas of your site.
Key features:
- Open Graph metadata is easily manageable with the built-in social media integration.
- SEO Audit Checklist.
- Faster Indexing with RSS sitemaps.
- 404 Error detection and redirection.
- It provides a Link Assistant, which completely revolutionizes the practice of internal linking.
- It offers the best features from different plugins, which eliminates the need for multiple plugins.
4. SEOPress
 SEOPress is an ad-free, premium WordPress SEO plugin. Even the free version is 100% white-labeled and leaves no trace. It's easy, quick, and powerful, and it lets you control the title and meta descriptions for all of your pages, posts, and post types.
It has a simple setup for new users and more complicated controls for those with more experience. As far as capabilities and customization go, it's on pace with the best WordPress SEO plugins available today.
Optimizing tags (Open Graph and Twitter Cards) for sharing on social media; generating sitemaps in XML and HTML; and monitoring site traffic using Google Analytics are a few of the features of SEOPress.
The free edition also includes a content analyzer for site administrators to use while writing articles. More than seventy-five hooks are available to developers for configuring the plugin. The paid version of the plugin comes with additional features such as breadcrumbs optimization, Google structured data types, and many more.
Key features:
SEOPress is an ad-free, premium WordPress SEO plugin. Even the free version is 100% white-labeled and leaves no trace. It's easy, quick, and powerful, and it lets you control the title and meta descriptions for all of your pages, posts, and post types.
It has a simple setup for new users and more complicated controls for those with more experience. As far as capabilities and customization go, it's on pace with the best WordPress SEO plugins available today.
Optimizing tags (Open Graph and Twitter Cards) for sharing on social media; generating sitemaps in XML and HTML; and monitoring site traffic using Google Analytics are a few of the features of SEOPress.
The free edition also includes a content analyzer for site administrators to use while writing articles. More than seventy-five hooks are available to developers for configuring the plugin. The paid version of the plugin comes with additional features such as breadcrumbs optimization, Google structured data types, and many more.
Key features:
- WooCommerce optimization for enhanced SEO support to eCommerce websites.
- Local SEO integration.
- The premium feature Backlink Integration helps to monitor and analyze your website's backlinks to understand your link profile and improve your SEO strategy.
- Modify and optimize your website's URLs for better readability and SEO with URL rewriting.
5. Squirrly SEO
 Squirrly SEO is one of the finest WordPress plugins for large, unique-content websites with high traffic. To help you improve your WordPress site in all aspects, from its backlink profile to its domain authority, it employs artificial intelligence and has an easy-to-use interface.
The full keyword tracking and data tools make Squirrly SEO stand out. This WordPress plugin is also useful for regional search engine optimization thanks to features like local business schema and Google Earth integration.
Squirrly's SEO recommendations differ from those of the other plugins. To begin, enter the topic you want to write about. You then proceed to compose your piece while the green lights respond to the inputted term.
Key features:
Squirrly SEO is one of the finest WordPress plugins for large, unique-content websites with high traffic. To help you improve your WordPress site in all aspects, from its backlink profile to its domain authority, it employs artificial intelligence and has an easy-to-use interface.
The full keyword tracking and data tools make Squirrly SEO stand out. This WordPress plugin is also useful for regional search engine optimization thanks to features like local business schema and Google Earth integration.
Squirrly's SEO recommendations differ from those of the other plugins. To begin, enter the topic you want to write about. You then proceed to compose your piece while the green lights respond to the inputted term.
Key features:
- Optimization of keywords happens in real time as you write.
- If you're replacing another WordPress SEO plugin with Squirrly, your current settings will remain intact.
- You can share content reports created using Squirrly with colleagues.
- Analyze your competitor’s SEO strategies to gain insights and stay ahead of them.
Conclusion
In conclusion, when it comes to WordPress SEO plugins for 2026, there are several notable options to consider. Yoast SEO offers comprehensive features and user-friendliness, while Rank Math provides advanced functionality like keyword tracking and internal linking suggestions. All-in-One-SEO is a reliable choice with essential features, while SEOPress and SEO Squirrly offer a range of advanced features like competitor analysis (SEOPress) and social media monitoring (SEO Squirrly). Consider your specific SEO needs and budget when choosing the right plugin for your website. Stay updated with the latest developments as these plugins evolve to meet the changing SEO landscape. Ultimately, integrating an SEO plugin will optimize your content, improve visibility, and drive organic traffic in the years to come. We hope this article has helped you learn about the best SEO plugins that suit your needs.
Tutorials
10 min read
How to Add Google Analytics 4 in WordPress from Scratch (With and Without Plugins)
Introduction
Google is advising website owners to upgrade to Google Analytics 4, as Universal Analytics (UA) will be discontinued on July 1, 2023. (July 1, 2024, for Analytics 360 properties). It's critical that you switch to Google Analytics 4 as soon as possible since UA will stop collecting data after sunset. In this article, we’ll show you how to easily switch to Google Analytics 4 and add the tracking code to your WordPress website.Switch to GA4 from GA3 using the setup assistant
The first step to setting up Google Analytics 4 is to create a new property in your Google Analytics account. 1. Log in to your Google Analytics account. 2.1 Once you have logged in to your account, you will see a warning message to migrate to GA4 property (from UA). As seen in the below screenshot, click on the “Manage GA4 migration” link.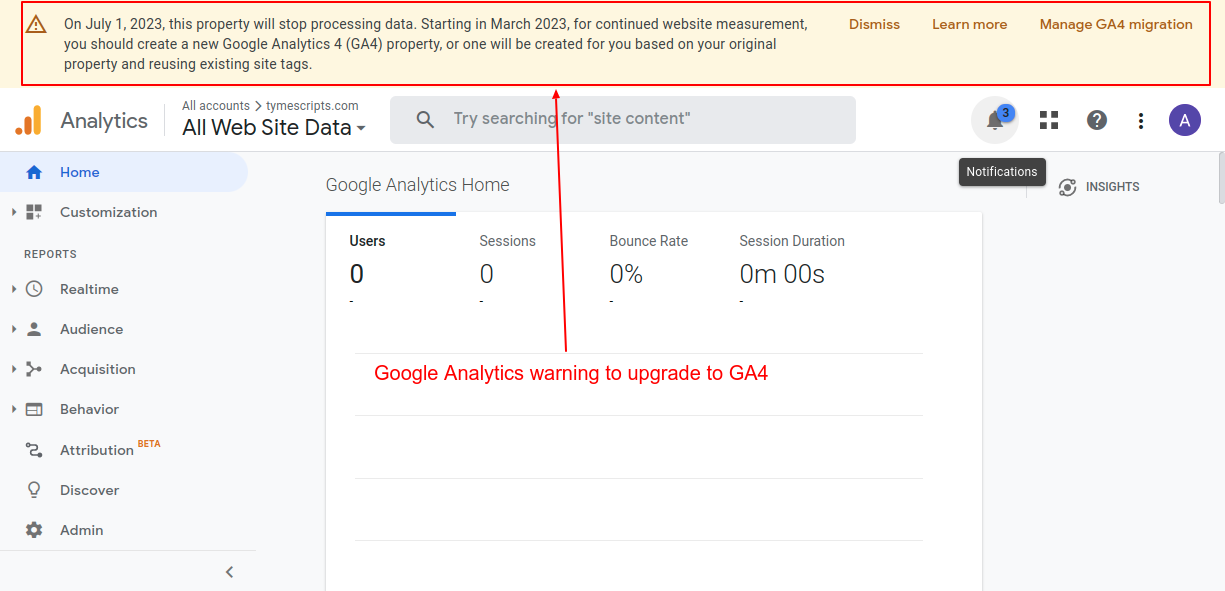
Screenshot 1: Migrate to GA4 warning message
2.2 If you don't see any warning messages, then head over to the admin section on the bottom left.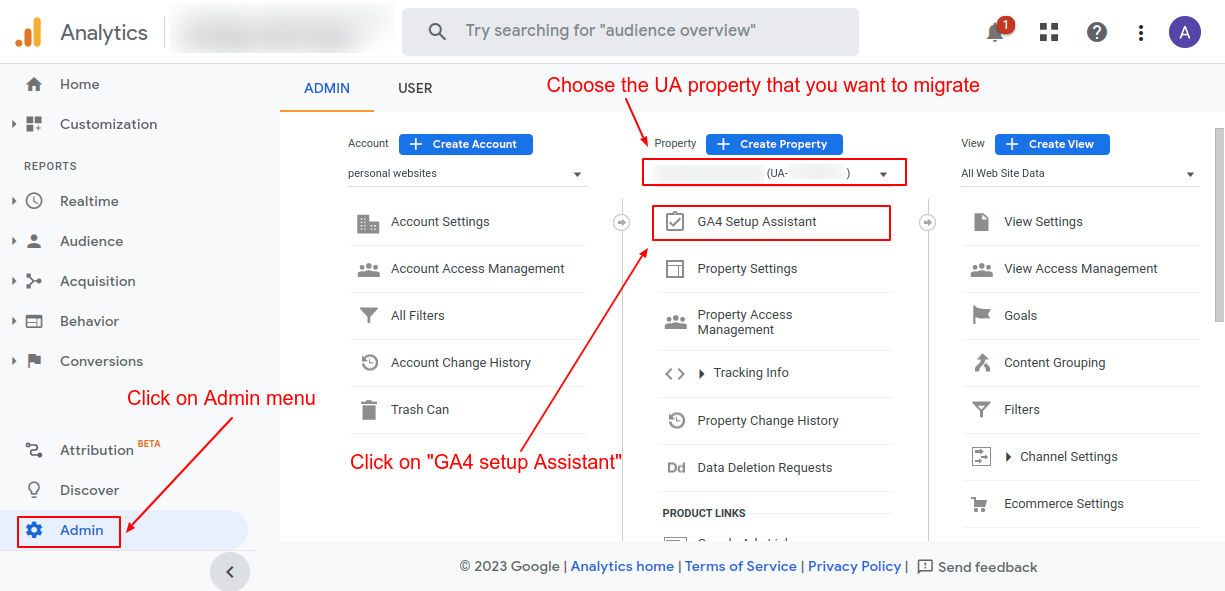
Screenshot 2: Choose the UA property to migrate
3. Choose the UA property you want to migrate, and click on the “GA4 Setup Assistant.” 4. To create a new GA4 property, click on "Get Started."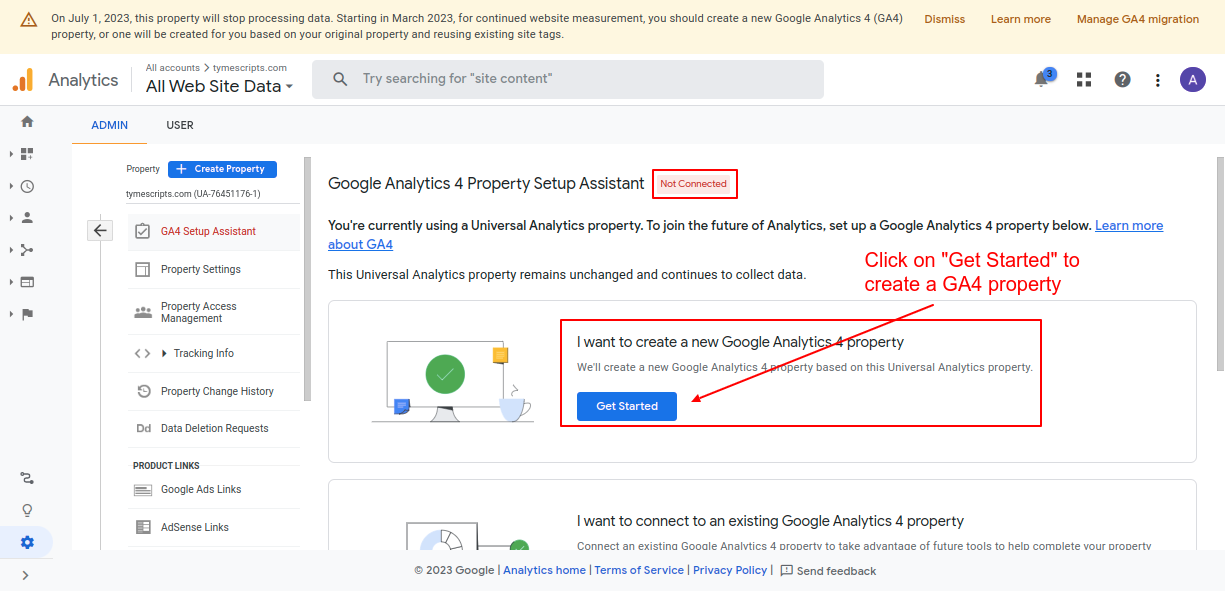
Screenshot 3: Click on “Get started” to create a GA4 property
5. The setup assistant popup will appear; click on “Create and continue.” This step will create a new GA4 property.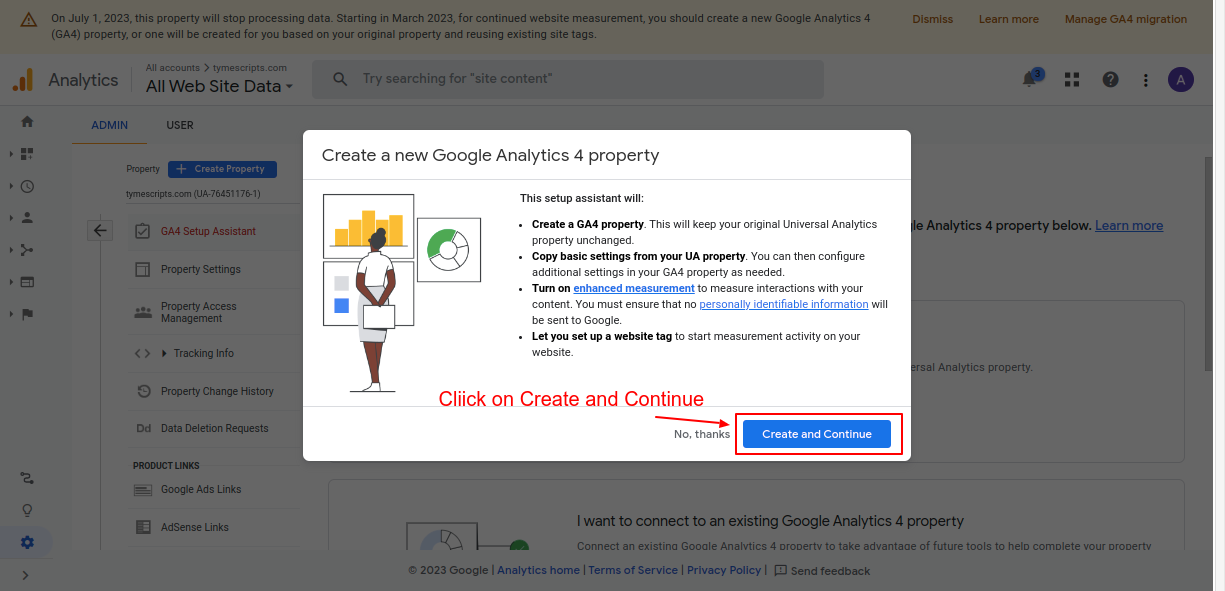
Screenshot 4: Click on “Create and continue” in the GA4 setup assistant popup
A few things to note when you are creating a new property using the GA4 setup assistant- The setup assistant will keep your original Universal Analytics (UA) property unchanged.
- Basic settings from your UA will be copied over to the GA4 property. If you have configured advanced settings in UA, then it needs to be set up manually in GA4.
- By default, the setup assistant creates a website tag to start measuring activity
- GA4 offers enhanced event measurements, which capture all the interactions on your website as events. This new feature is enabled by default.
| Measurement option (event name) | Parameters collected |
| Page views (page_view) |
|
| Scrolls (scroll) | No parameters are collected |
| Outbound clicks (click) |
|
| Site search (view_search_results) |
|
| Video engagement (video_start, video_progress, video_complete) |
|
| File downloads (file_download) |
|
| Form interactions (form_start, form_submit) |
|
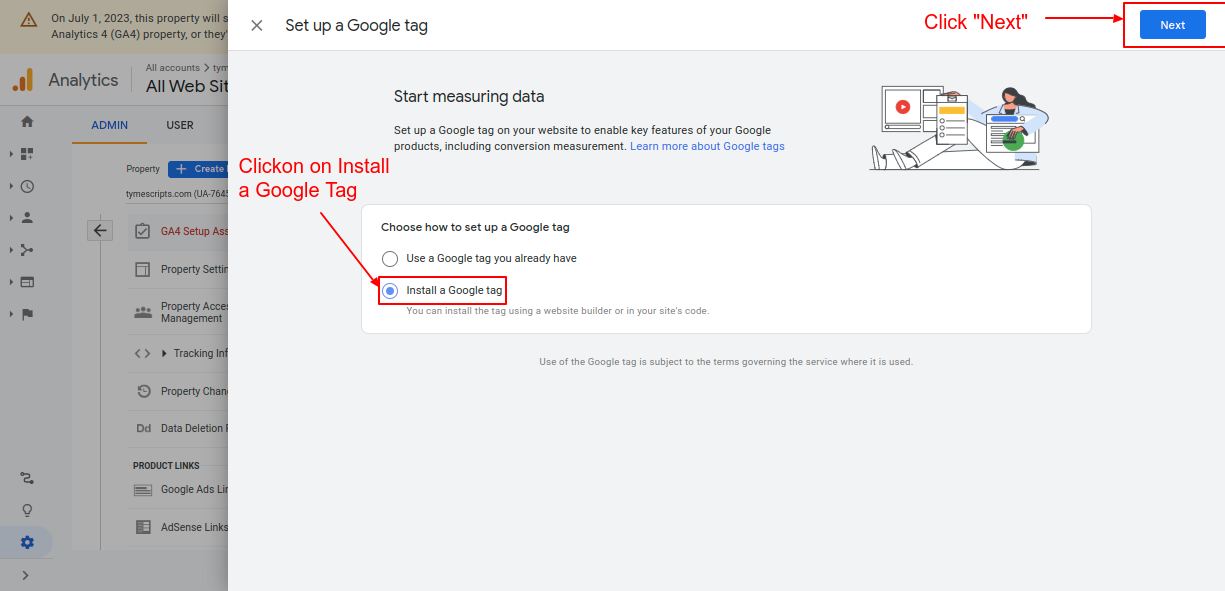
Screenshot 5: Choose how to set up a Google Tag
After that, it will give two options to configure Google Analytics 4 property
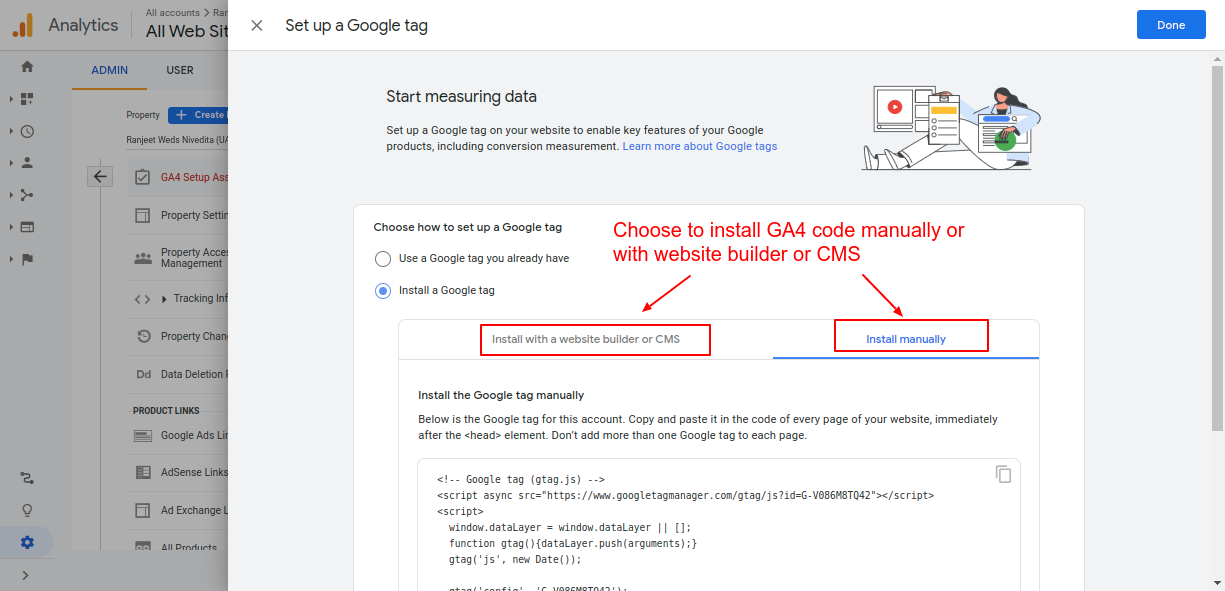
Screenshot 6: Two options to install GA4 code
7. Click on the “Install Manually” tab to copy the code that is generated. This will be later used in setting up GA4 manually.
<!-- Google tag (gtag.js) -->
<script async src="https://www.googletagmanager.com/gtag/js?id=TAG_ID"></script>
<script>
 window.dataLayer = window.dataLayer || [];
 function gtag(){dataLayer.push(arguments);}
 gtag('js', new Date());
 gtag('config', 'TAG_ID');
</script>Let’s dive deeper into both options to configure GA4.
Methods for adding GA4 to your WordPress website.
Once you have created your new GA4 property, the next step is to install the tracking code on your WordPress site. We’ll show how to do it using two different methods.- Method 1: Manually add the GA4 code (without plugins)
- Method 2: Using Site Kit and MonsterInsights Plugins
Method 1: Install the GA4 tag manually on your WordPress website (without plugins)
A few things to consider when you are manually adding code- We recommend adding GA4 code to the child theme instead of the Parent theme. If you don't have a child theme installed follow this tutorial for creating a child theme.
- Before making any changes to your site we recommend, you should always back it up. Read this blog on how to back up a WordPress website. At the minimum, you should make a copy of your child theme’s header.php file or functions.php since we are modifying it. if something goes wrong during the editing process then you can restore it.
- We recommend adding the tag manually only if you have the technical expertise to do so.
Option 1: Adding a tag to the header.php file (recommended for developers)
To install the GA4 tag manually, first log into your WordPress dashboard. 1. Go to Appearance -> Theme File Editor (If you’re using a block-based WordPress theme then go to Tools -> Theme File Editor ) Because we were directly editing the theme files, you will see a warning popup message as shown in below screenshot 3. Hence, we recommend this option only for developers.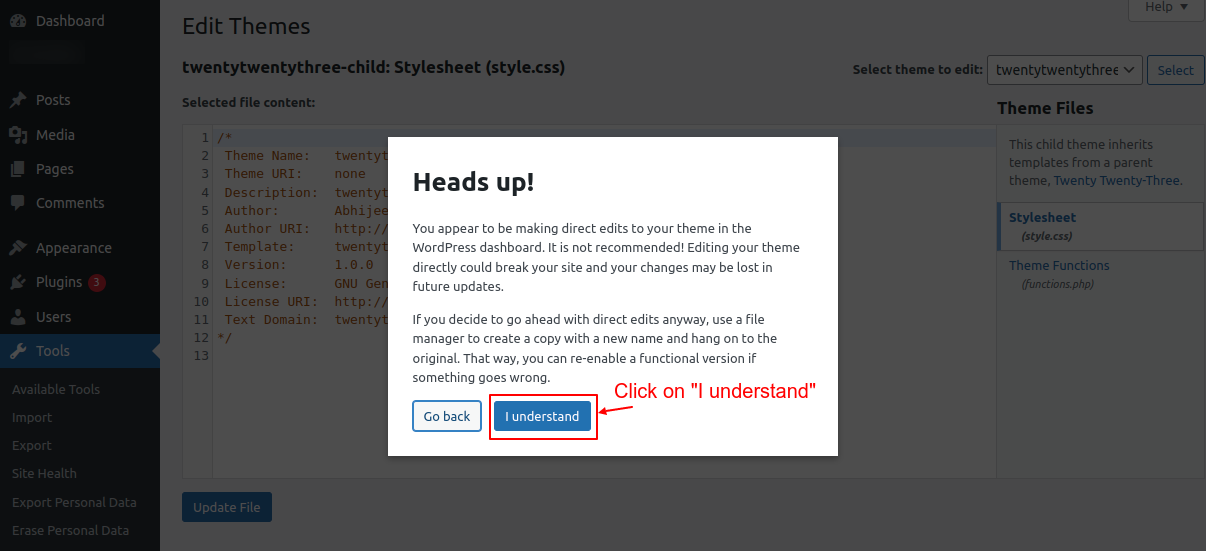
2. Select the child theme to edit from the dropdown on the right. After that, select the header.php file.
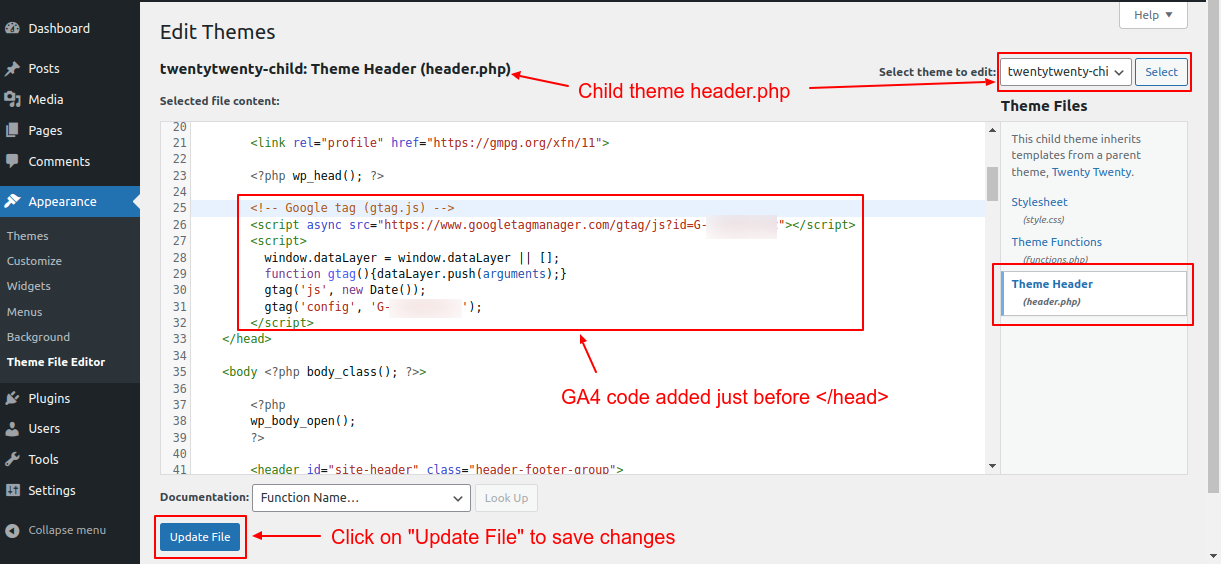
Screenshot 8: Paste the GA4 code before the HTML </head> tag
3. Paste the GA4 code (that was copied from the previous step) just before the HTML </head> tag, as shown in the above screenshot.
4. Click on “Update File.”
Option 2: Add a Google tag through the functions.php file (recommended for developers)
1. Open the child themes functions.php file in the code editor. Here is a blog for more information on the functions.php file. 2. Add the GA4 code snippet (that was copied from the previous step) at the end of the file.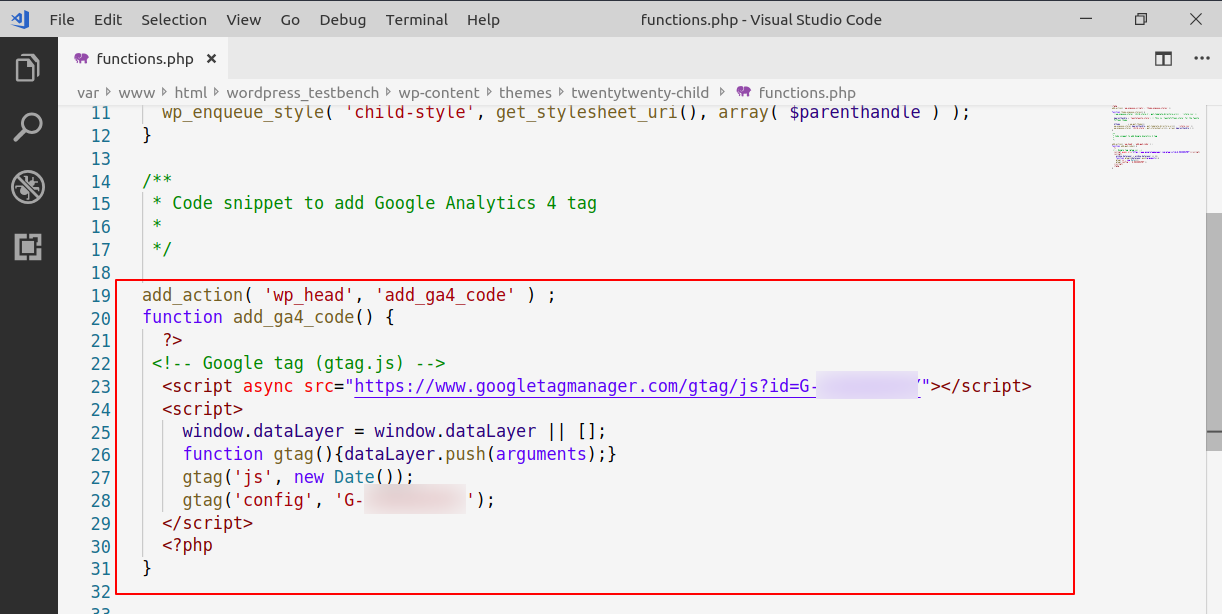
Screenshot 9: GA4 code added through functions.php file
4. Save the file and reload your webpageadd_action( 'wp_head', 'add_ga4_code' ) ;
function add_ga4_code() {
?>
<!-- Google tag (gtag.js) -->
<script async src="https://www.googletagmanager.com/gtag/js?id=TAG_ID"></script>
<script>
window.dataLayer = window.dataLayer || [];
function gtag(){dataLayer.push(arguments);}
gtag('js', new Date());
gtag('config', 'TAG_ID');
</script>
}
Code snippet 2: Sample GA4 code added through functions.php file
Method 2: Using a free version of the plugins (Site Kit or Monsterinsights )
Note: In the steps that follow, we will assume that you are installing the Site Kit or Monster Insights plugin from scratch.Option 1: Adding GA4 tag using the Site Kit plugin by Google
1. Head over to Plugins -> Add New Plugin, in your WordPress backend. Search for the keyword “google analytics”. 2. Next, install and activate the Site Kit plugin, as shown in the below screenshot.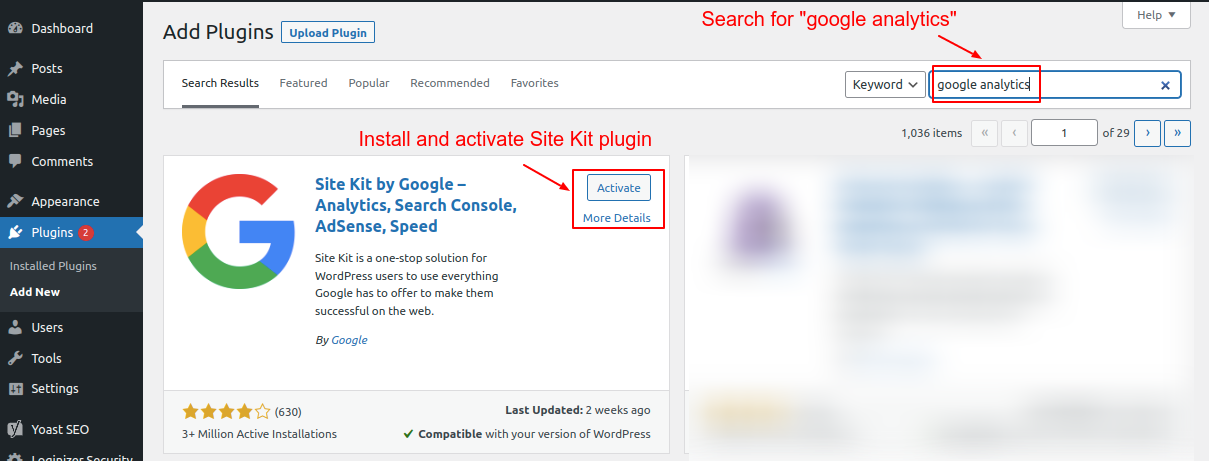
Screenshot 10: Install and activate the Site Kit plugin.
3. Once the Site Kit plugin is activated, click on "Start setup."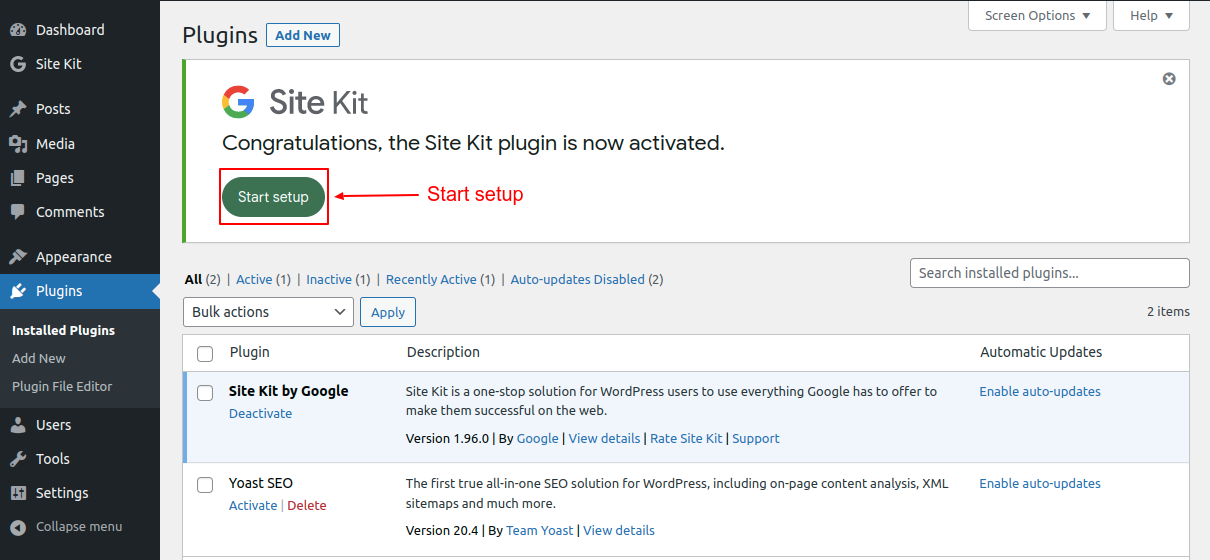
Screenshot 11: Click on "Start Setup."
4. Select the check box ”Connect Google Analytics as part of your setup.” This step is important in configuring GA4. 5. Click on “Sign in with Google.”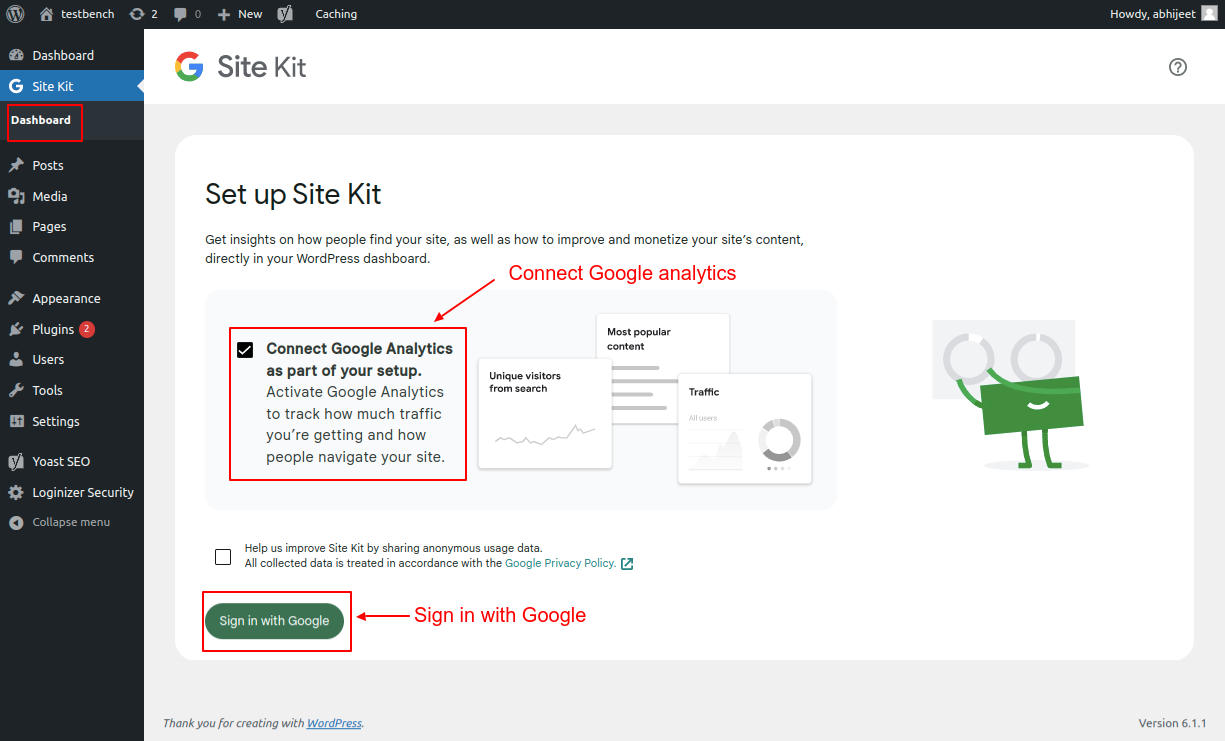
Screenshot 12: Connect Google Analytics as part of your setup
6. Choose an account that you use to login into Google Analytics.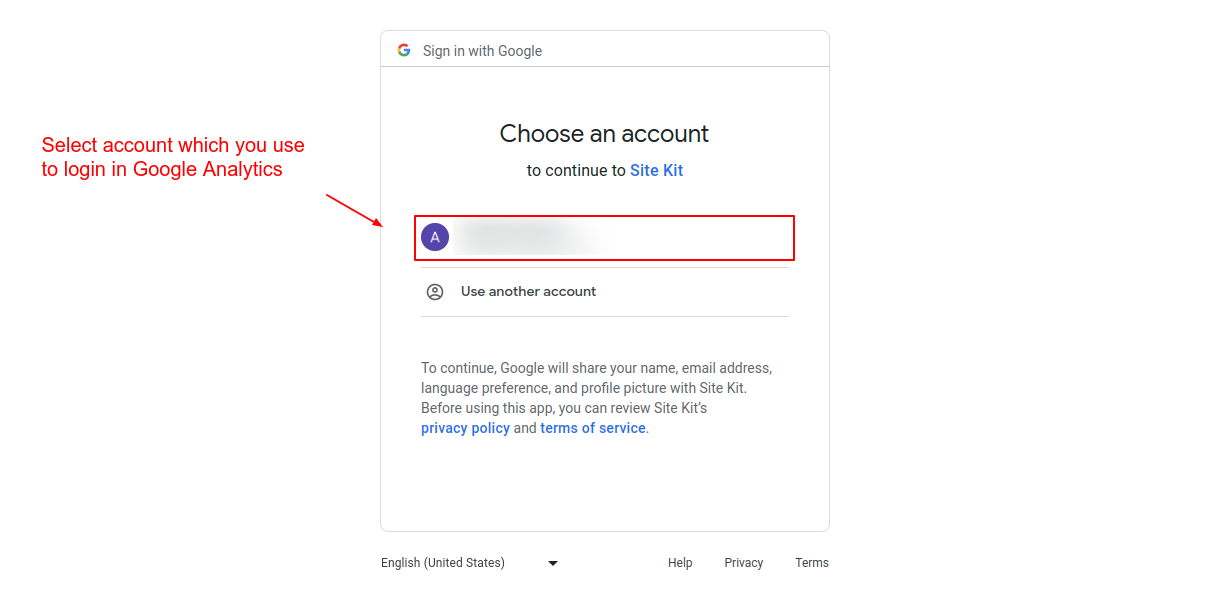
Screenshot 13: Choose the Google account that you use to log in to Analytics.
7. Give access to the Site Kit as shown in the below screenshot and click “Continue.”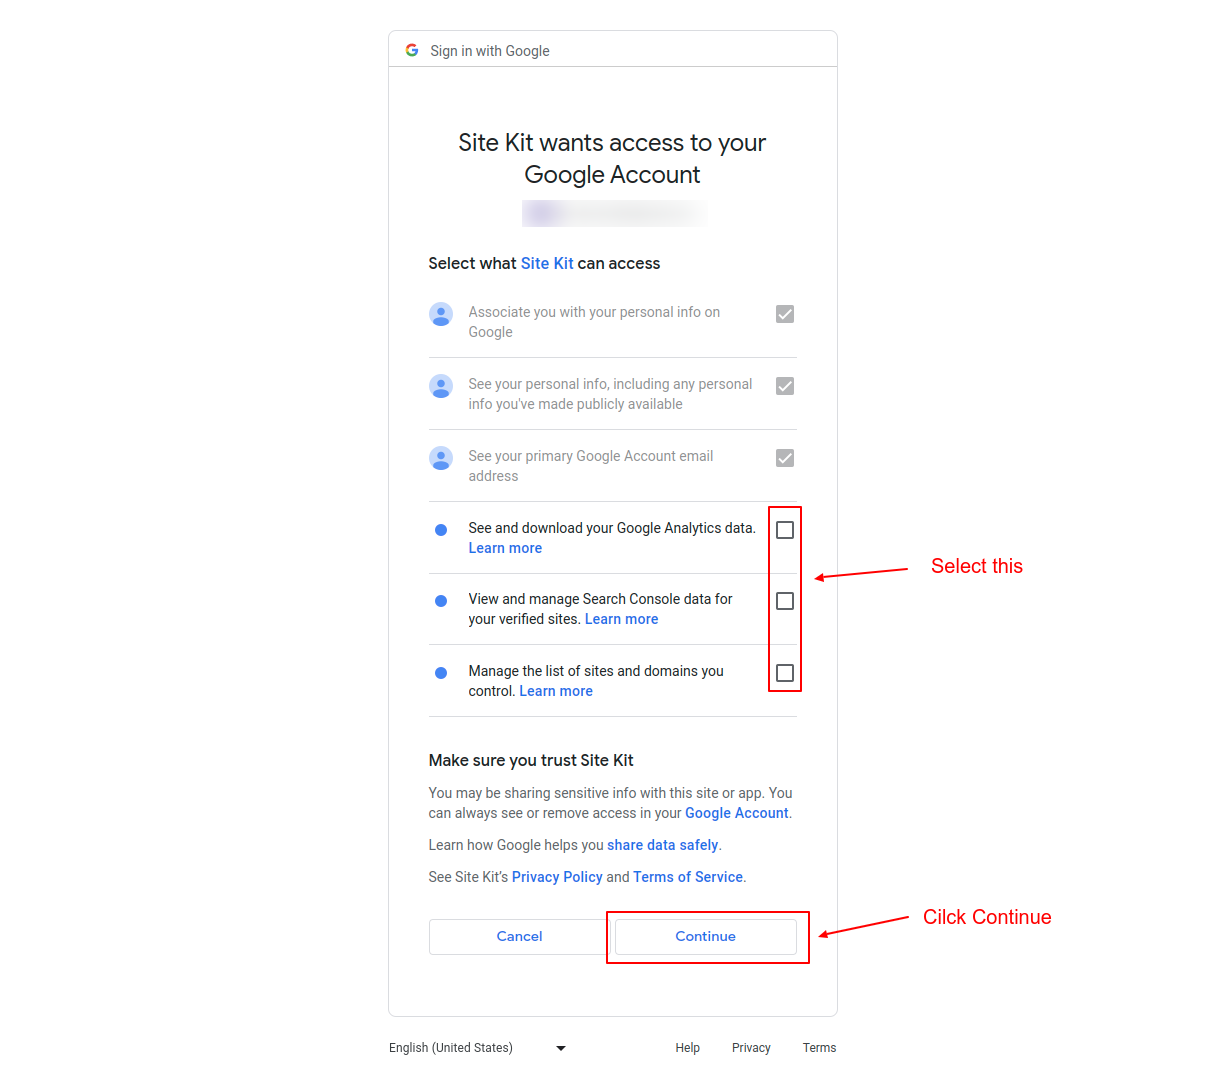
Screenshot 14: Select all the checkboxes to proceed further.
8. Click on “Verify.” This will add a verification token to your site's HTML code.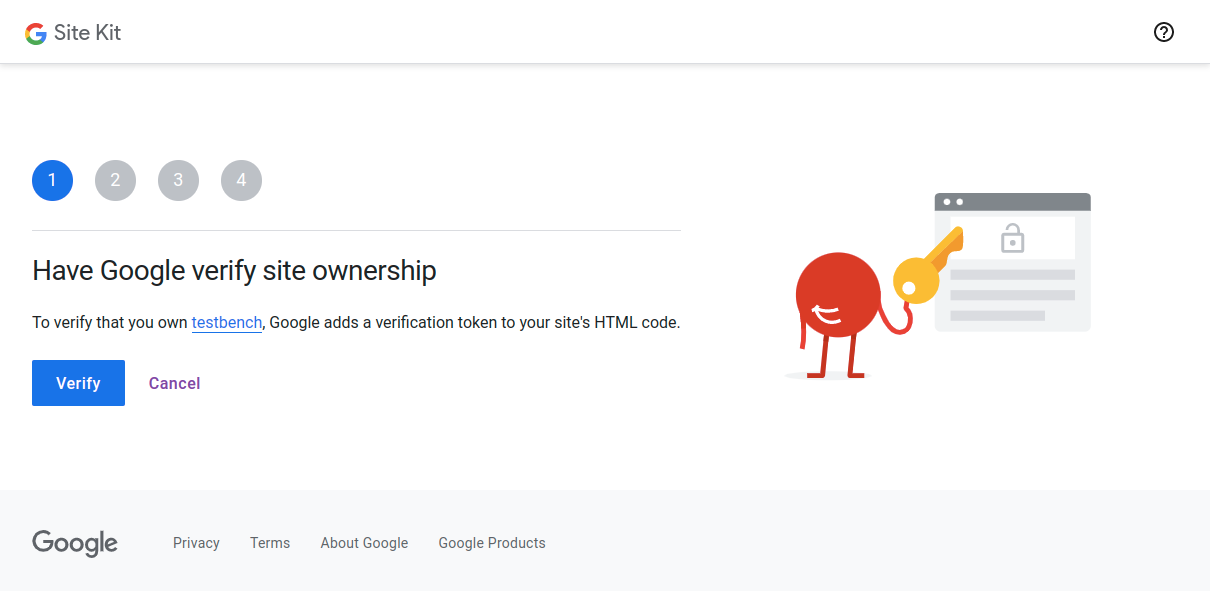
Screenshot 15: Verify site ownership
9. Click "Allow." It will allow your website to access Google Analytics data. The metrics will be shown in the Site Kit dashboard.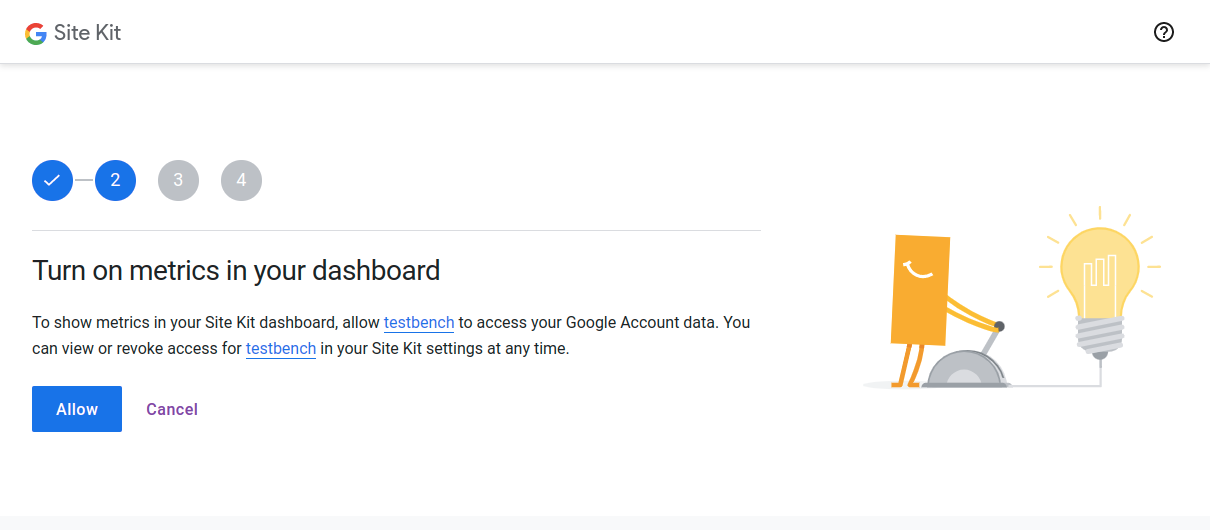
Screenshot 16: Allow your website to access Google Analytics data
10. Click on “Setup” to connect Site Kit and Search Console.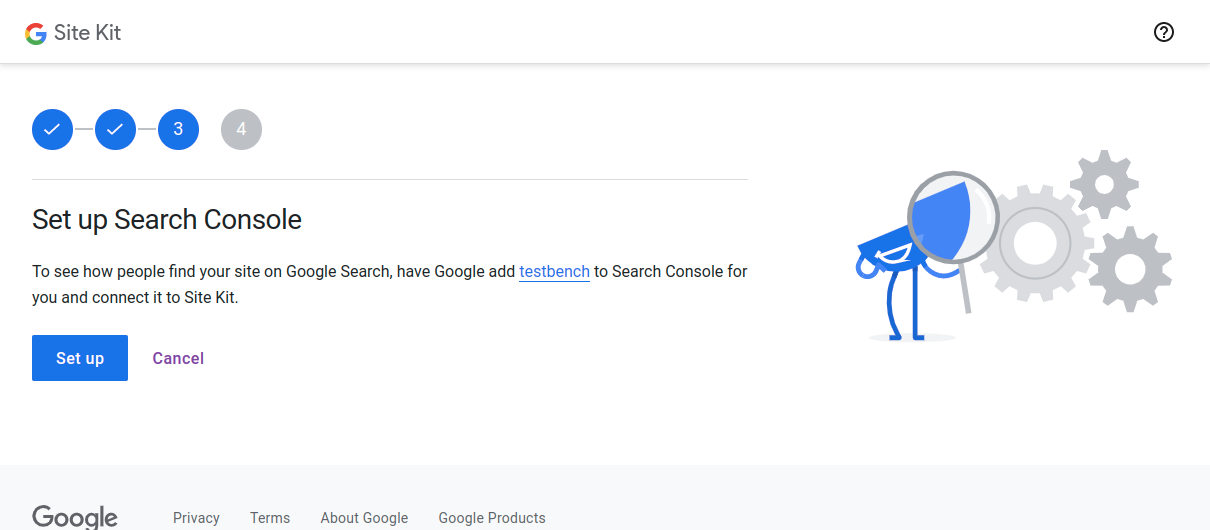
Screenshot 17: Connect Site Kit and Search Console
11. Click on “Next” to allow Site Kit to set up Google Analytics. You will be redirected to the Site Kit dashboard.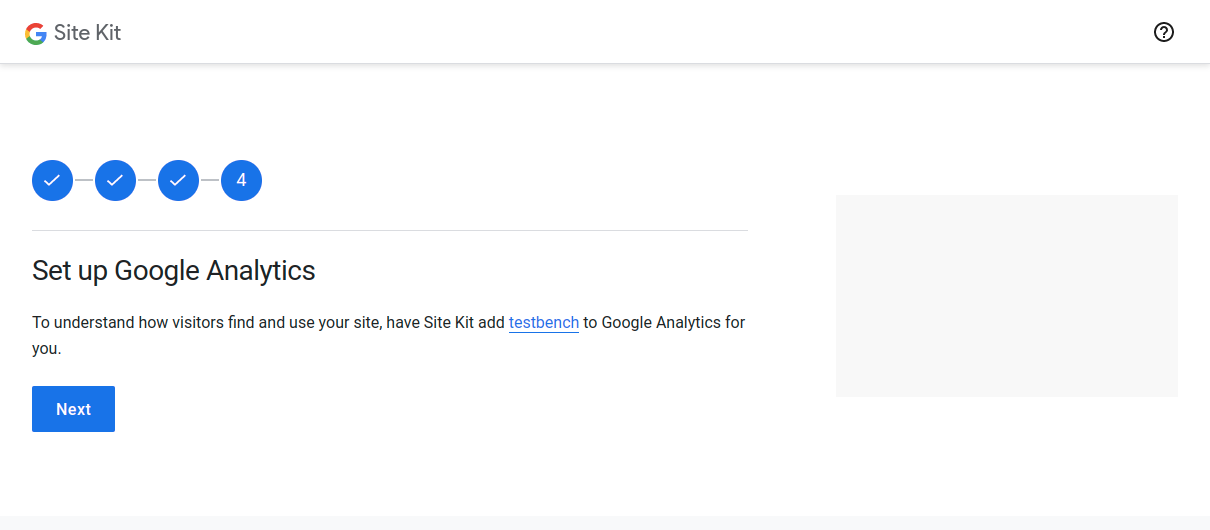
Screenshot 18: Allow Site Kit to add your website to Google Analytics
12. In the Site Kit dashboard, select the Google Analytics account and the newly created GA4 property. Also, select the associated UA (GA3) property as shown in the below screenshot.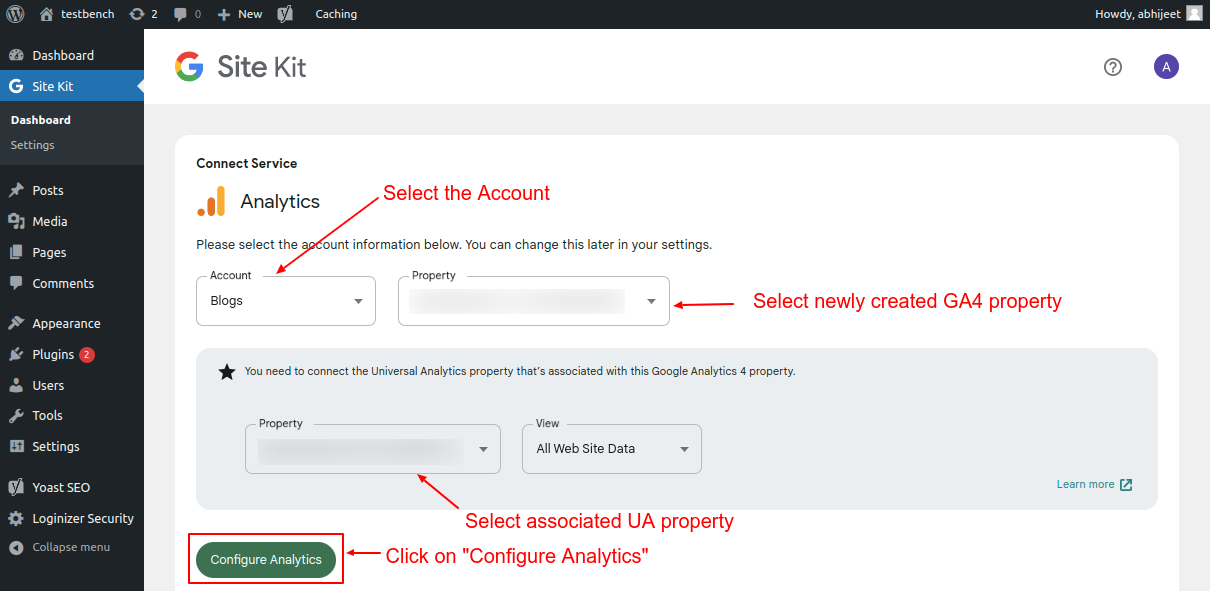
Screenshot 19: Connect Google Analytics service
13 Click on “Configure Analytics,” and the Site Kit setup is complete.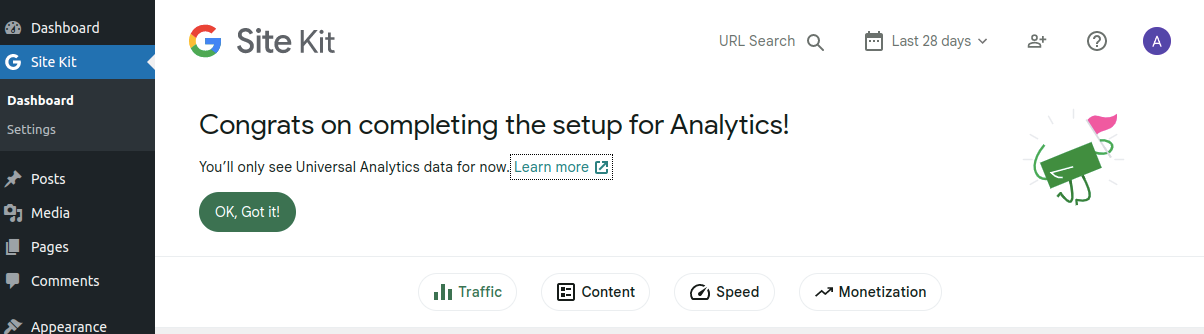
Screenshot 20: Site Kit setup completed
Here is a screenshot of the code snippet added by Site Kit.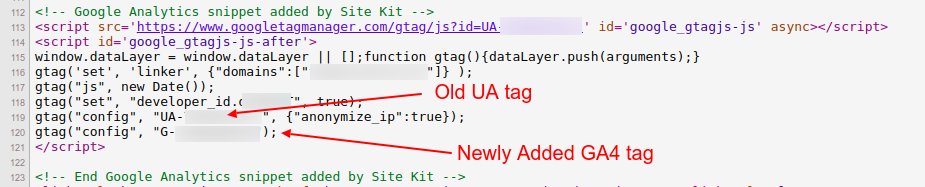
Screenshot 21: Google Analytics snippet added by Site Kit
Few things to note when you have installed the GA4 tag using the Site Kit Plugin- If Site Kit is used to configuring UA and GA4, stats will be tracked for both properties.
- At the time of writing, GA4 statistics are not shown in the Site Kit dashboard and can only be viewed. Integration of GA4 data to Site Kit’s dashboard is not yet implemented in the current version of the plugin hence you have to view GA4 data in your Analytics account.
Option 2: Adding GA4 tag using the MonsterInsights plugin
1. Go to Plugins -> Add New Plugin, in your WordPress backend. Search for the keyword “monsterInsights”. After that, install and activate the plugin as shown in the below screenshot.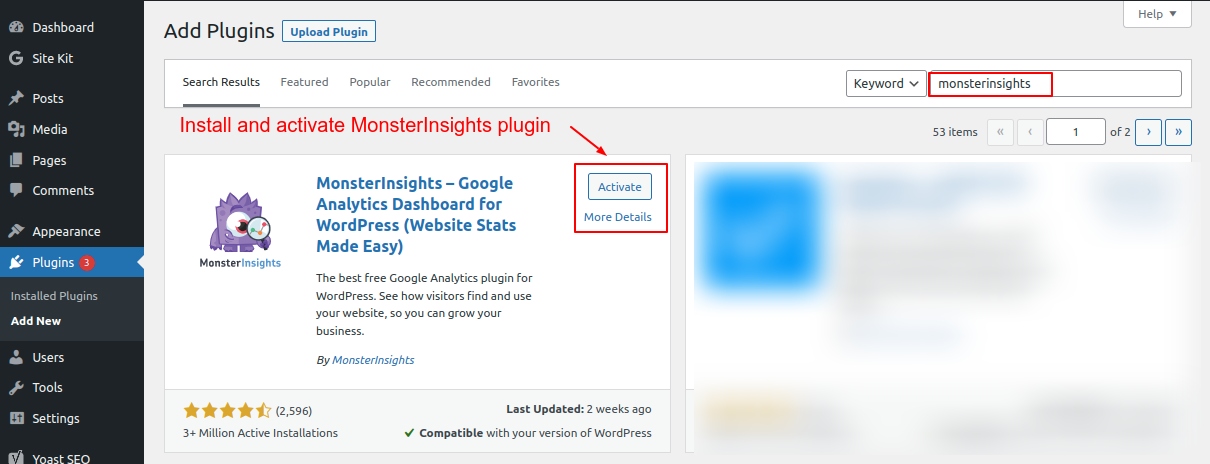
Screenshot 22: Install and activate the MonsterInsights plugin.
2. Click on “Launch the Wizard.”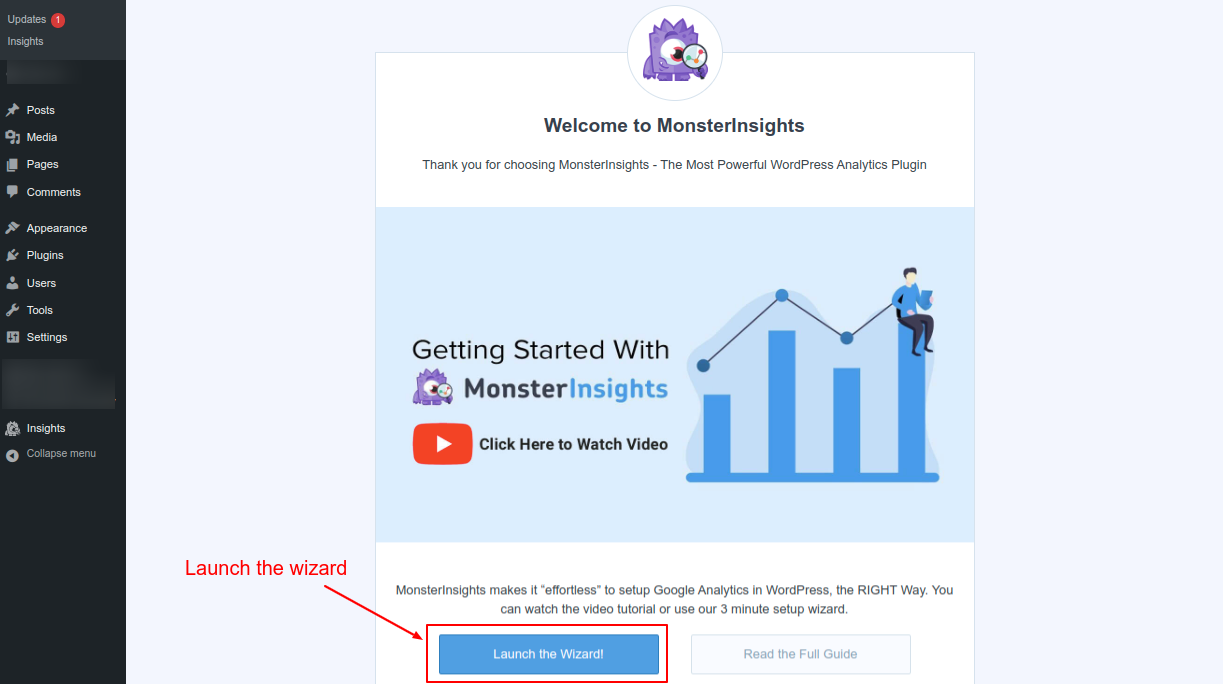
Screenshot 23: Launch the wizard
3. Choose your website category and click “Save and Continue..”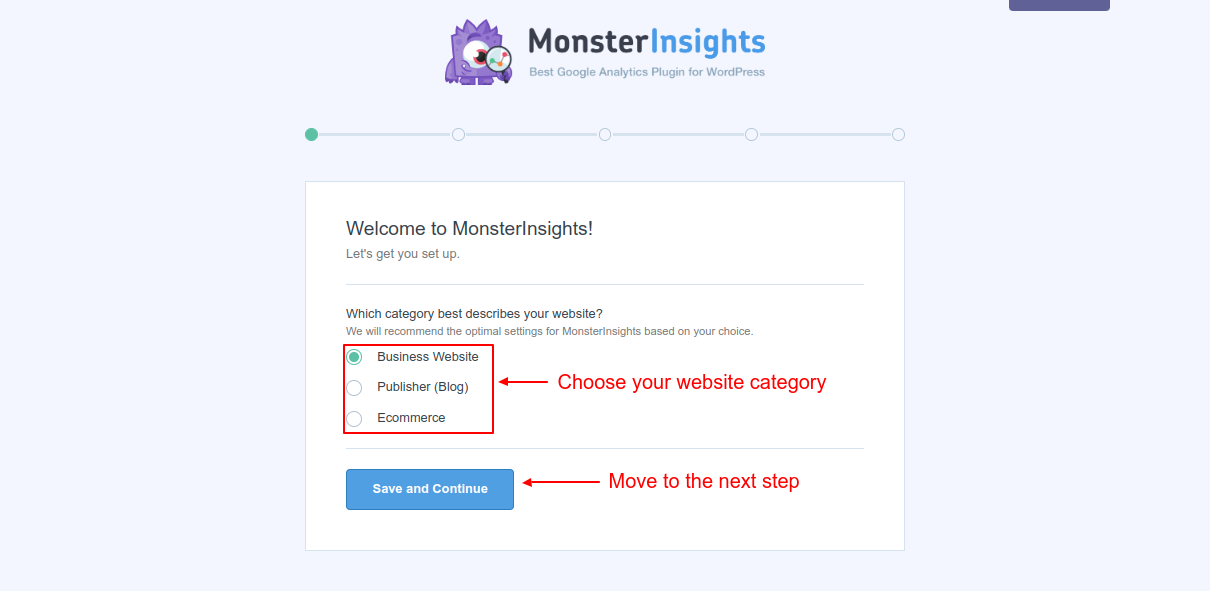
Screenshot 24: Choose a category that best describes your website
5. Click “Connect MonsterInsights.” After which you will be redirected to the MonsterInsights website to connect your Google Analytics account.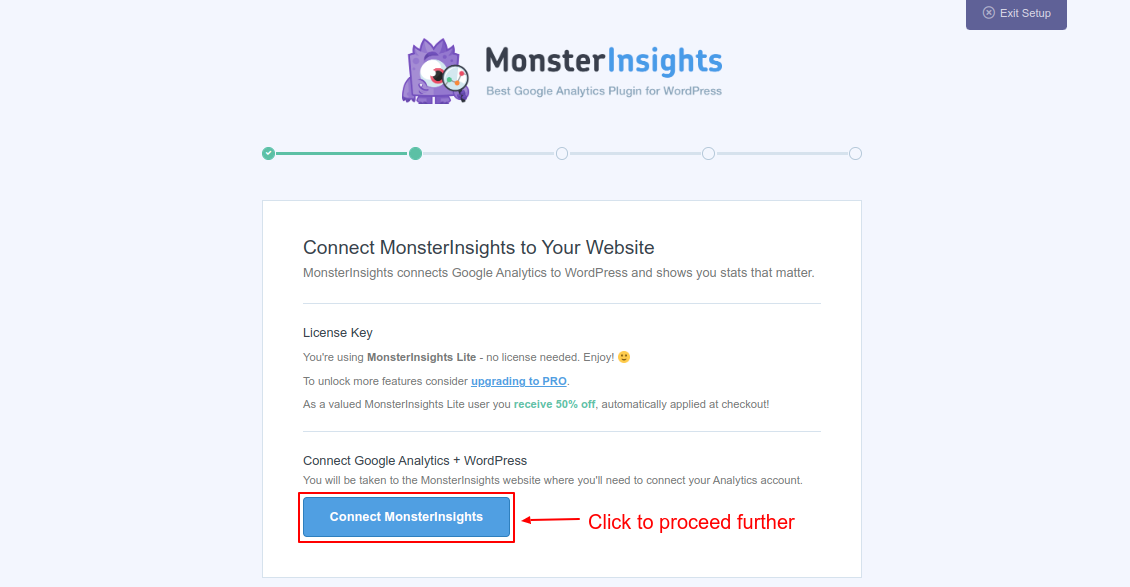
Screenshot 25: Connect MonsterInsights
6. Choose a Google account to continue.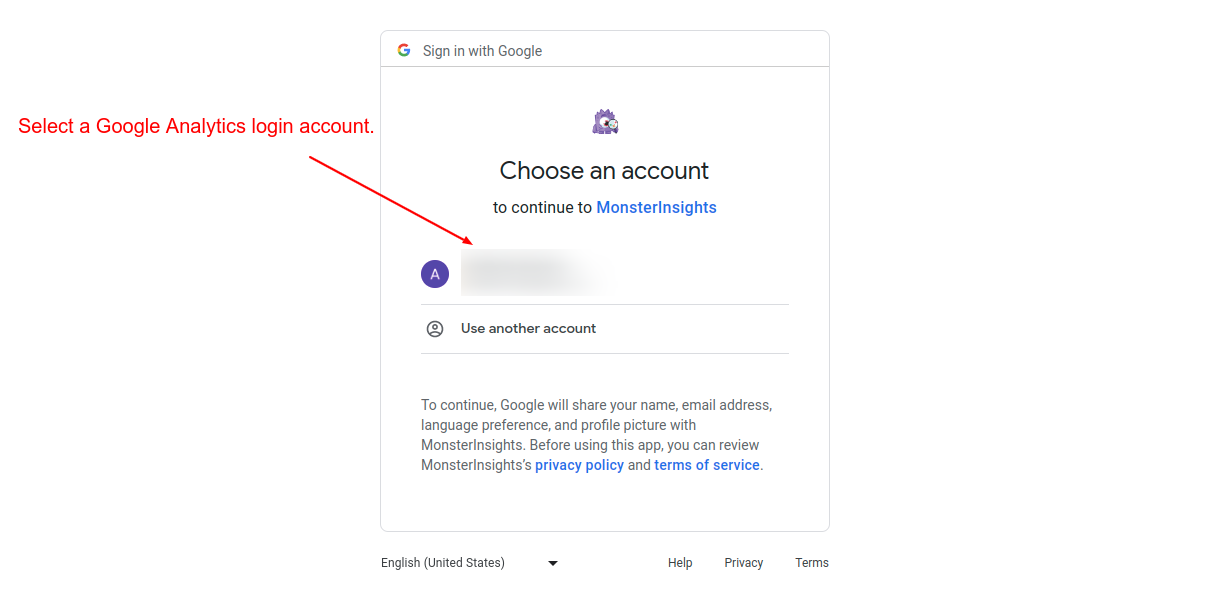
Screenshot 26: Select a Google Analytics account.
7. Click on “Allow” to give MonsterInsights access to your Google Analytics and Search Console data.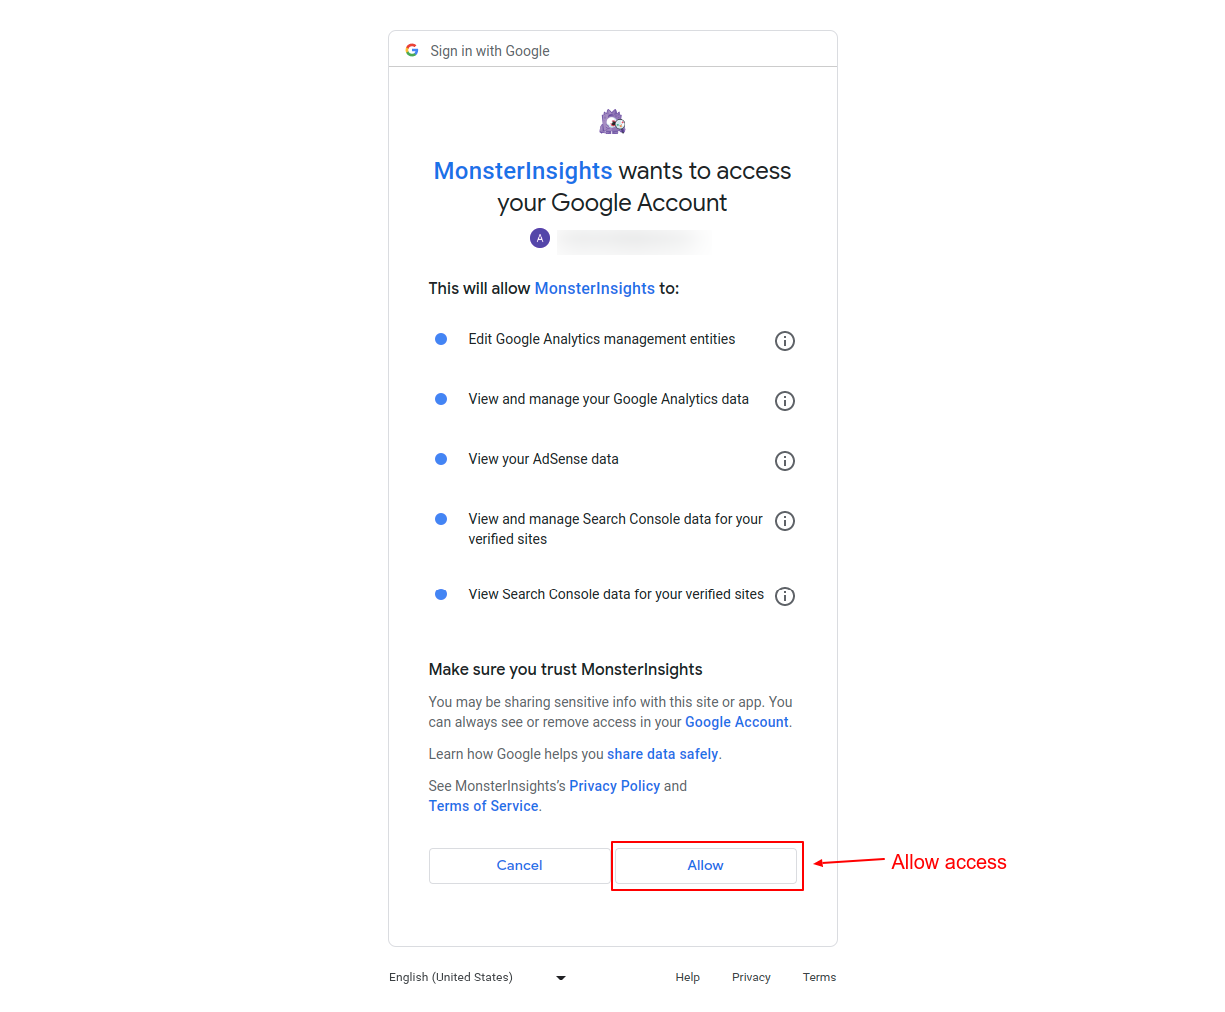
Screenshot 27: Allow Monsterinsights to access your Google account data.
8. Choose the GA4 property from the list of available properties and click on “Complete connection.”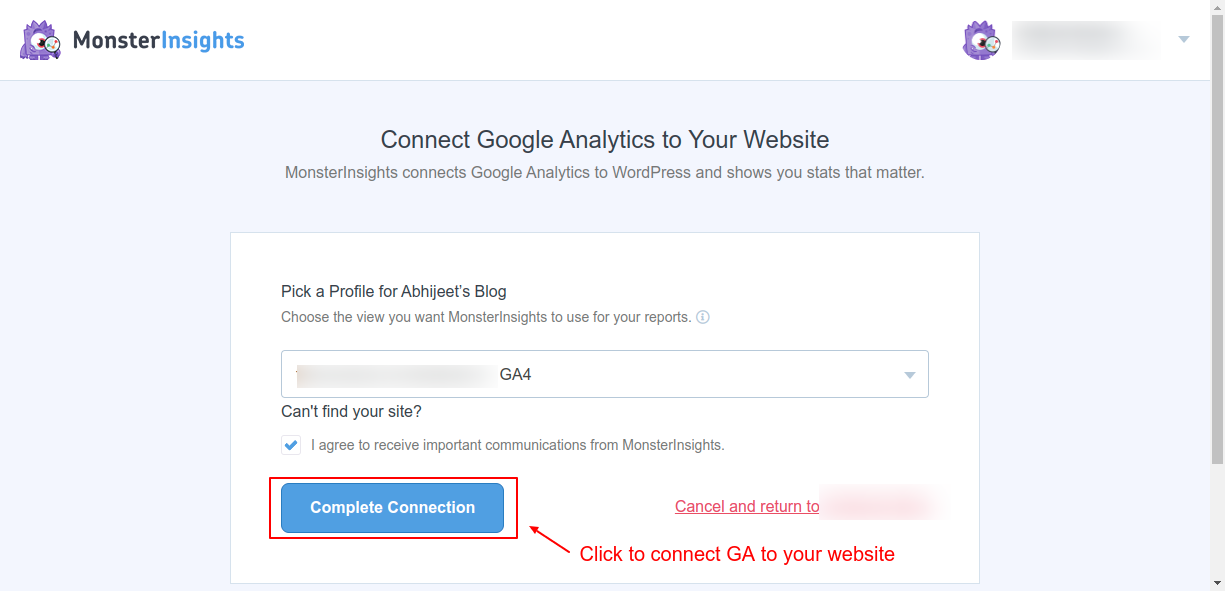
Screenshot 28: Choose the GA4 property to connect
9. Click on “Save and continue” on the recommended settings page.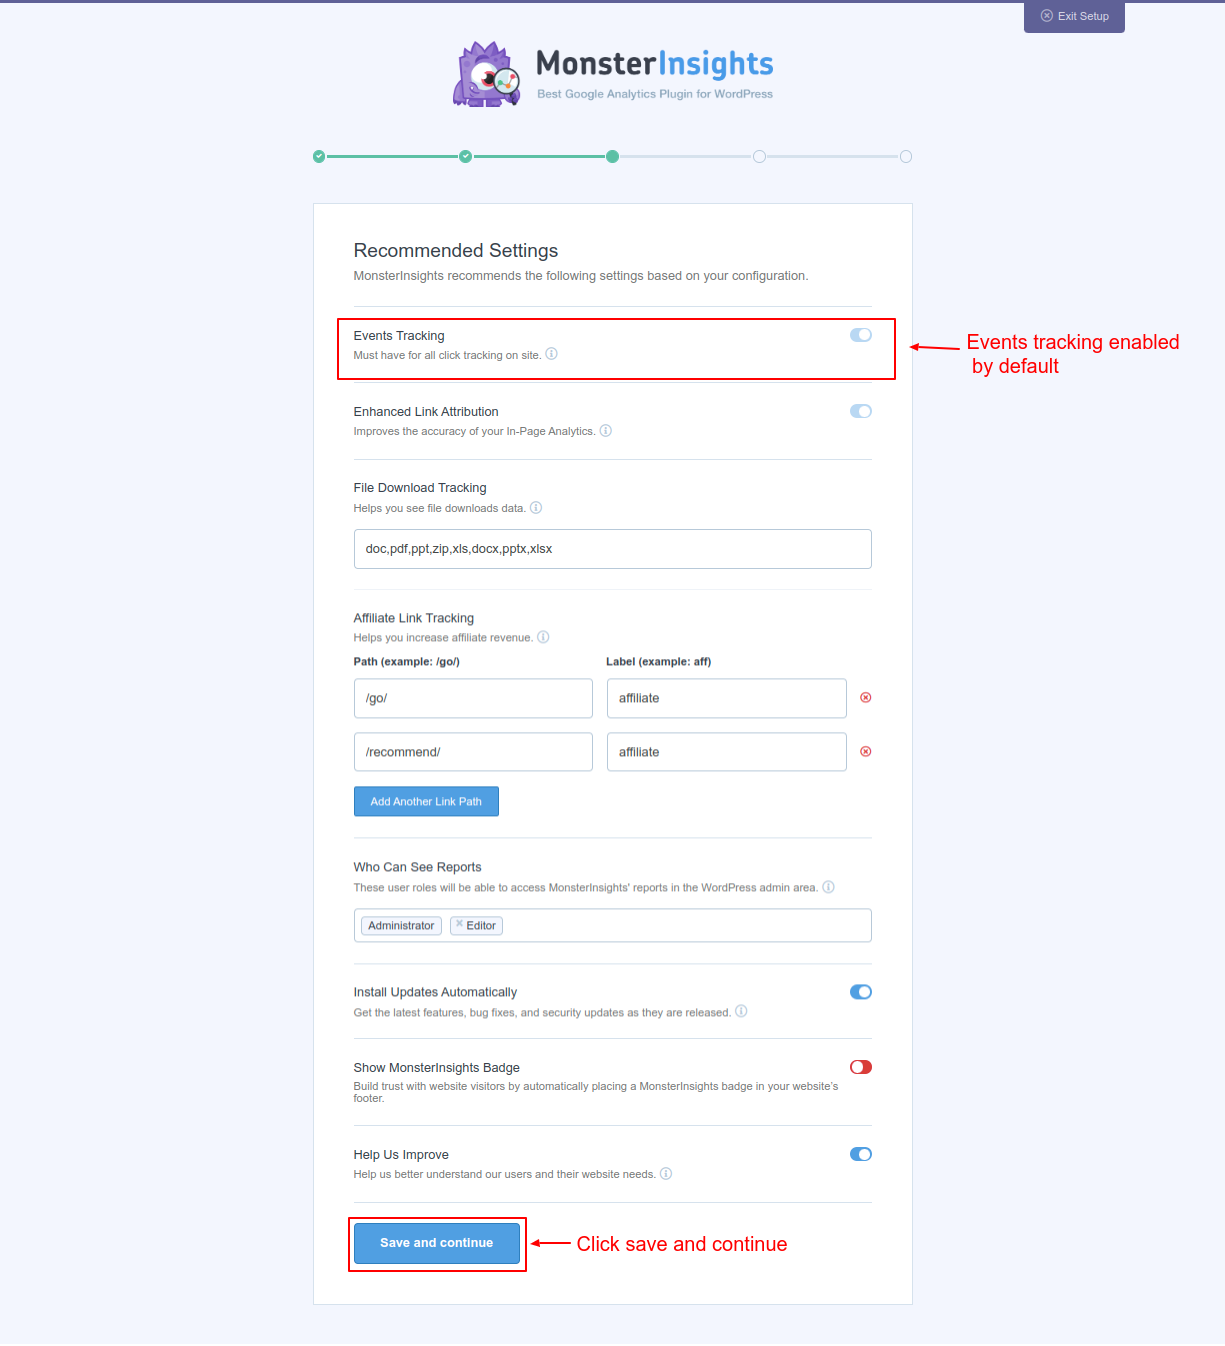
Screenshot 29: Events tracking enabled by default
10. Choose which features you want the MonsterInsights plugin to enable. We recommend enabling the “Advanced Reports” and “Advanced Tracking” features. 11. Click on “Continue.”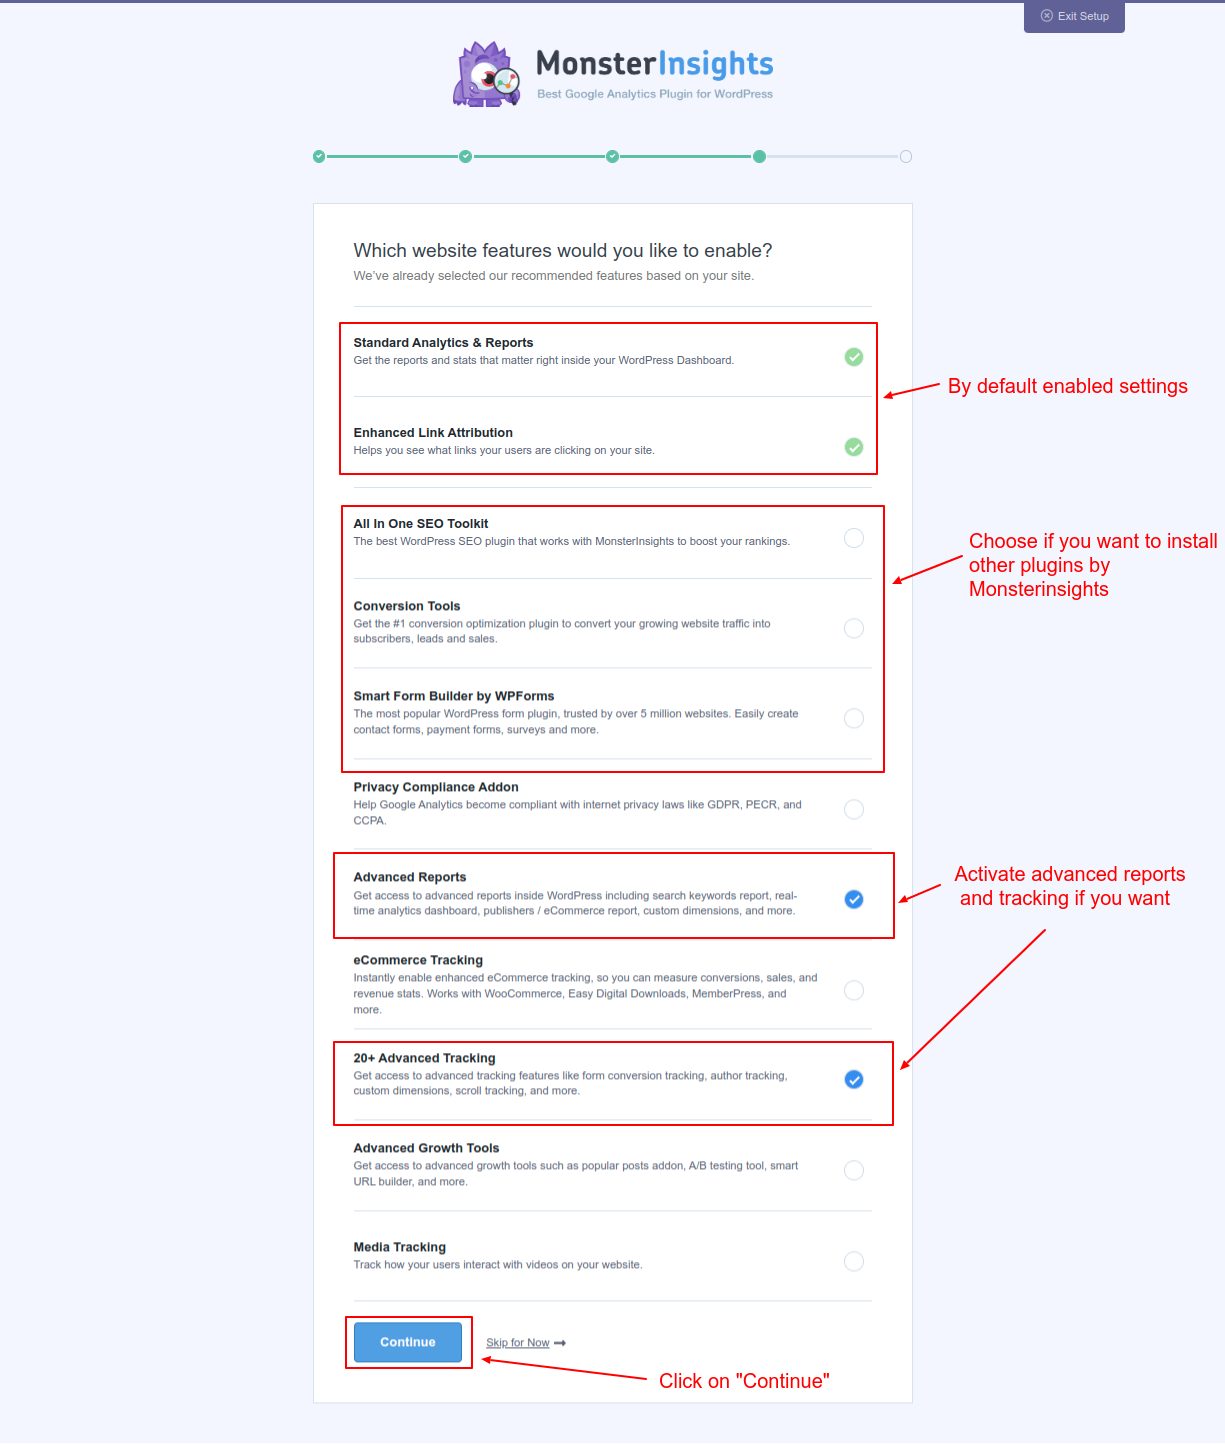
Screenshot 30: Choose which feature you want to enable.
At this point, the tracking and analytics setup is complete. 12. Next, click on “Complete setup without Upgrading.”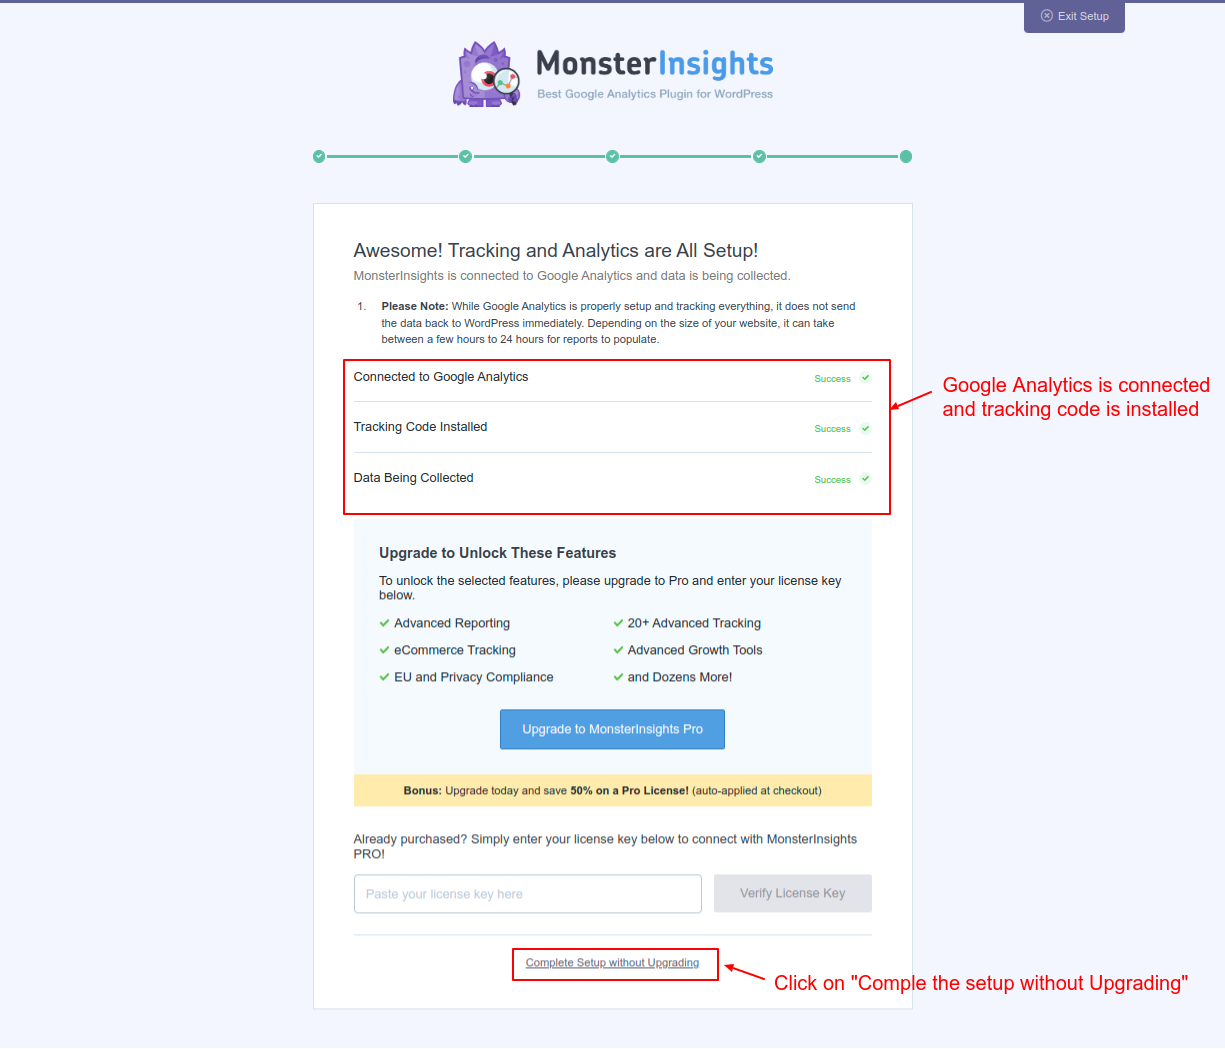
Screenshot 31: Google Analytics is connected, and the tracking code is installed.
You will be redirected to the settings page, which will show a success message. 13. Click on “View Reports.”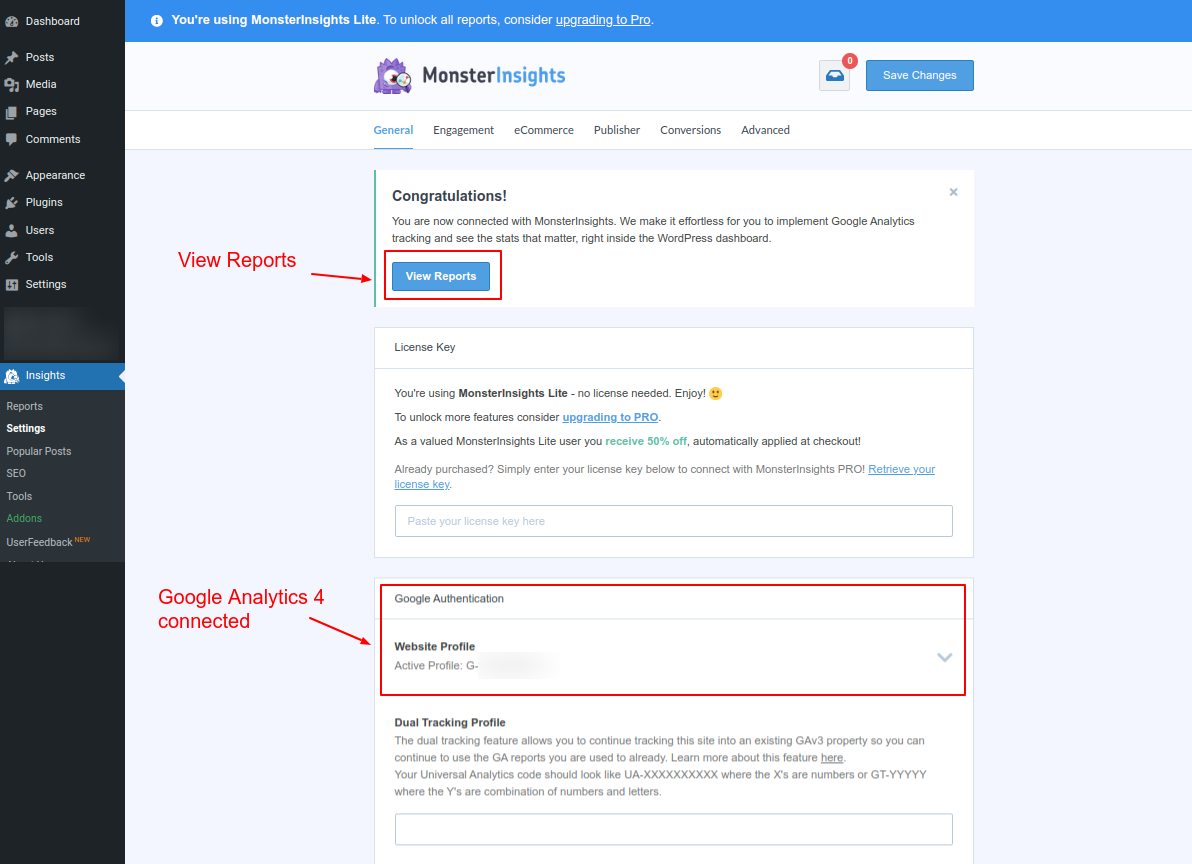
Screenshot 32: Google Analytics 4 property is connected
You will be redirected to the “Reports” menu, where you will be able to see Google Analytics 4 data in the WordPress dashboard.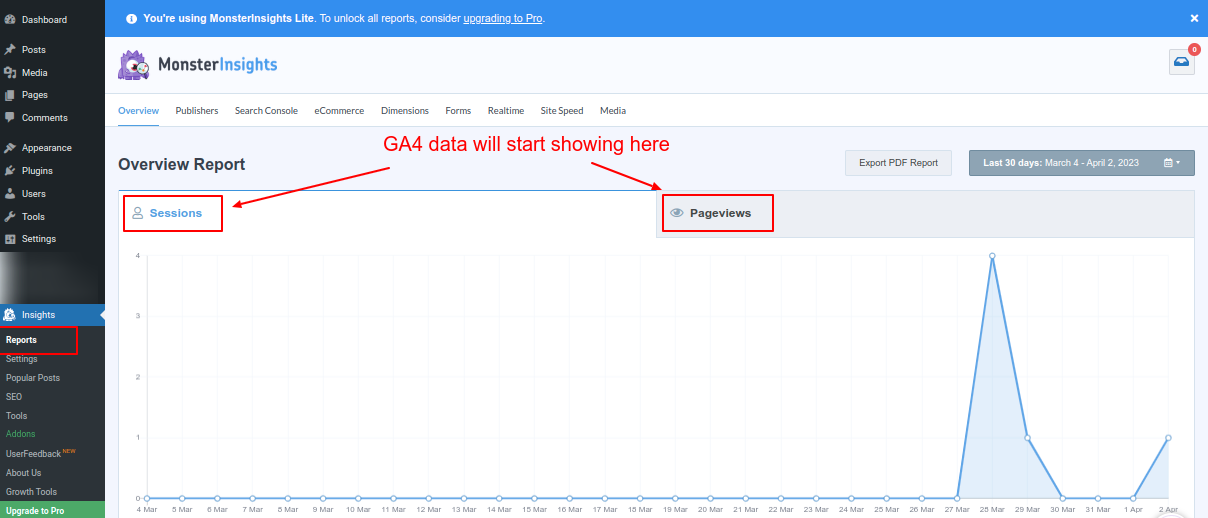
Screenshot 33: View reports to see your GA4 data flowing.
Note: It can take a few hours for the data to start appearing in GA4 and in your MonsterInsights Dashboard.Conclusion
Google is sunsetting Universal Analytics (UA) as of July 1, 2023, which means it will stop collecting and processing new data. In order to have a considerable amount of GA4 data tracked before UA is retired, we advise setting up Google Analytics 4 (GA4) as soon as you can. After this date, Site Kit will no longer display previous UA data. In this blog post, we discussed in detail two methods of adding GA4 code. First, by adding code manually, and second, by using the plugins Site Kit and MonsterInsights. That's it for this blog, Signing off for now. If you want experts to manage your WordPress website, then hire our awesome experts.
Tutorials
13 min read
How to Add FAQ Schema in WordPress with and without plugins (2026)
Introduction
Are you looking to add a FAQ schema to your WordPress website? If yes, then you have come to the right place. In this blog, we will discuss in-depth & step-by-step methods of adding an FAQ schema to a WordPress website.What is FAQ Schema, and why should you add it to your website?
In simple terms, a FAQ schema is structured data (JSON markup) that allows the contents of frequently asked questions (FAQs) on your website to be displayed in rich result snippets, as shown in the below screenshot.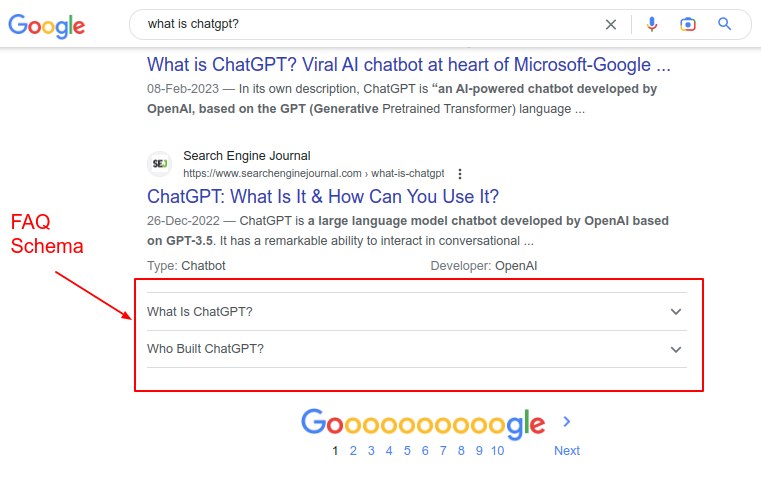
Screenshot 1: Example of FAQ schema in action
As you can see from the above screenshot when a user searches for the query “What is ChatGPT?”, along with the blog content that has ranked organically, there are two FAQs shown below it. You can accomplish this by adding a FAQPage schema markup to your website. The benefit of implementing FAQ structured data markup is that you get more screen estate in SERPs, it improves click-through rates, and it will drive more traffic to your website. In short, by adding an FAQ schema to your website, you can help search engines better understand your content so that they can display it in rich results.Methods for adding FAQ schema in WordPress
In this post, we’ll show how to add a FAQ schema using two different methods. Method 1: Using Plugins Method 2: Manually adding the schema code Note: All the methods that we discuss in this post use the Gutenberg Block Editor.Method 1: Using a free version of Plugins (Rank Math SEO and Yoast SEO)
The simplest and most straightforward method is to add an FAQ schema using plugins. The plugins will automatically generate the FAQ schema and dynamically add it to the post without you worrying about the underlying technical aspects of it.Option 1: Adding FAQ schema using Rank Math SEO
Step 1.1: Install and activate the Rank Math SEO plugin
The first step is to install and activate the Rank Math SEO plugin on your WordPress website. This plugin makes it very easy to add structured data markup to your website, such as FAQ Schema. If you have already installed the plugin on your website, you can skip this step and go to step 1.2.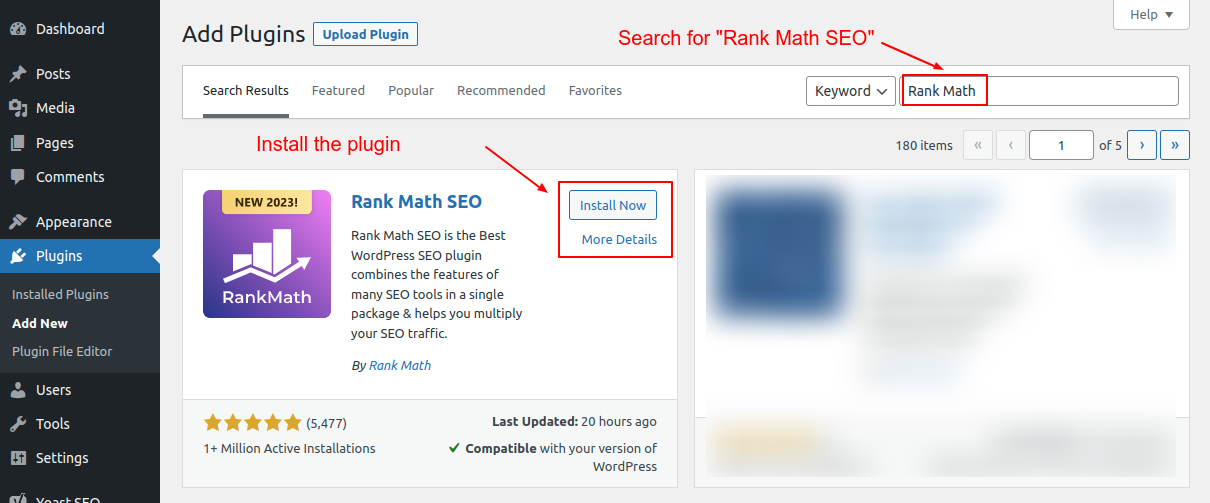
Screenshot 2: Search, install, and activate the Rank Math SEO plugin.
Search for the Rank Math SEO plugin and install it, or download (from here), upload, and install it on your website.Step 1.2: Create a new post and add the Rank Math FAQ block
Let's say you want to add the FAQ schema to a post (similarly, you can add it to a page).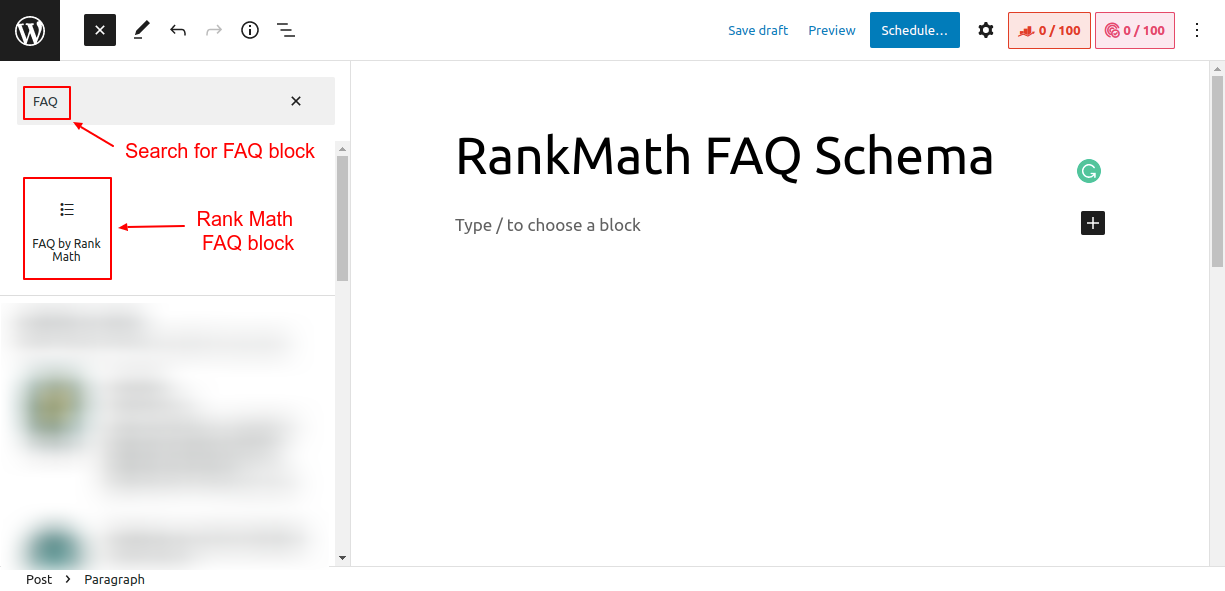
Screenshot 3 Search and add Rank Math FAQ block to the post
Search for the FAQ schema block in the Gutenberg blocks. You will see the Rank Math FAQ block since we have installed this plugin in Step 1 above. Add the FAQ block to the post.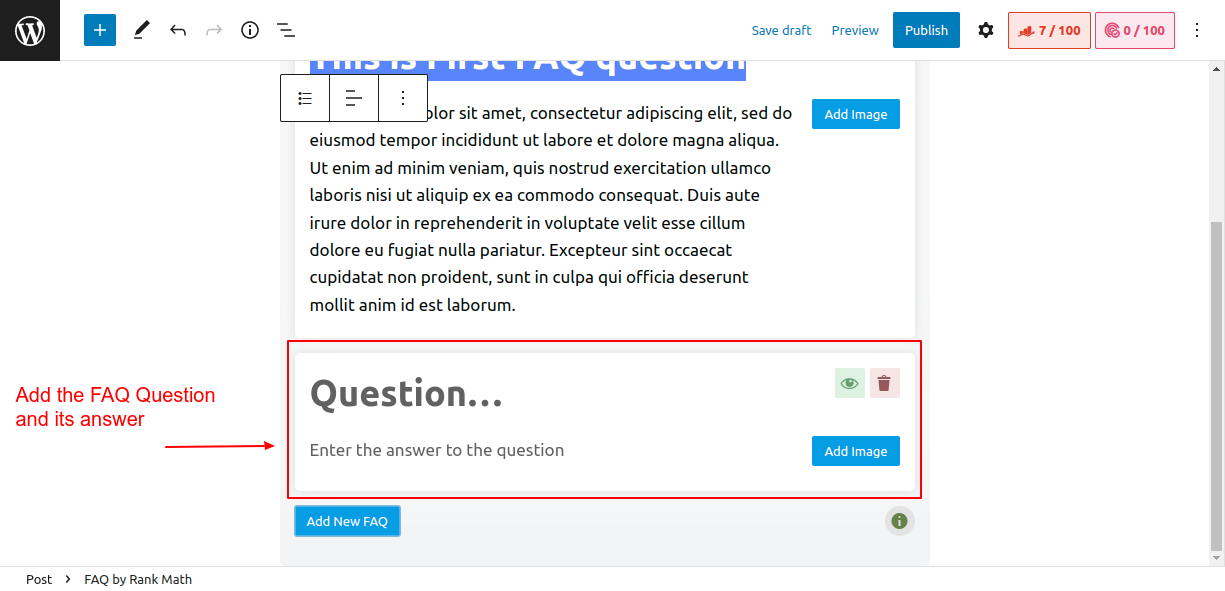
Screenshot 4: Add the FAQ question and its answer
Next, fill out the question and answer as seen in the above screenshot. You can add multiple FAQ blocks as per your requirements. Once you've added your FAQs, you can publish them by clicking the "Publish" button. The Rank Math SEO plugin will automatically generate the FAQ structured data and add it to your post.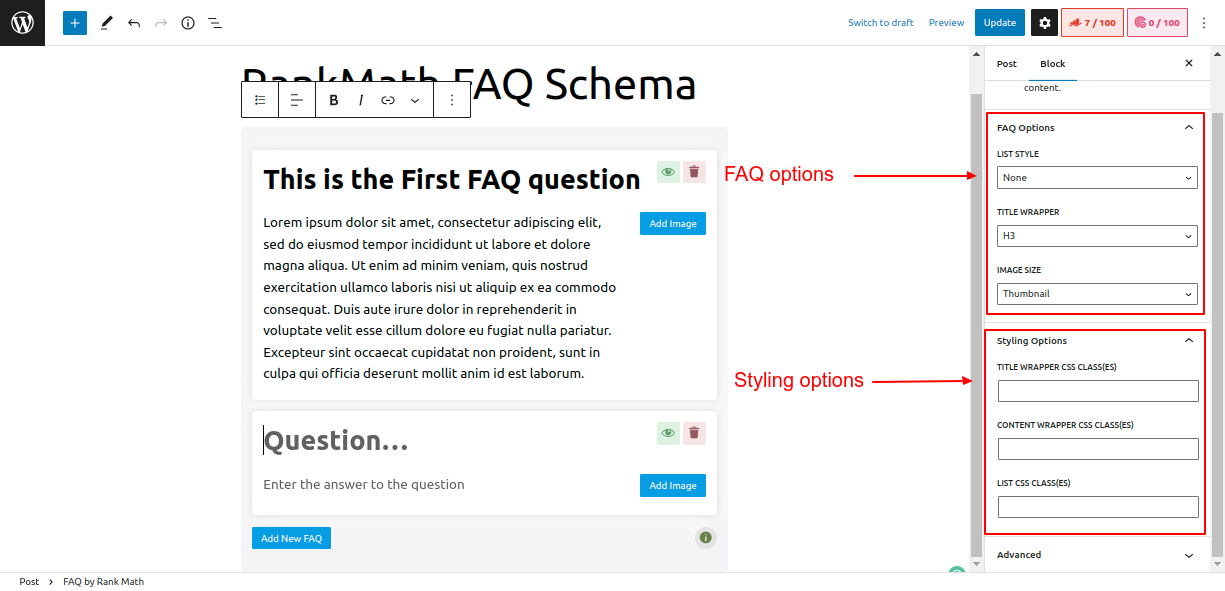
Screenshot 5: FAQ and Styling options of Rank Math SEO plugin
The Rank Math SEO plugin also lets you set FAQ options such as- Choosing the List style of the FAQs (Numbered or Unordered HTML list )
- Setting the HTML elements as a wrapper for the title of FAQ (H3 to H6, P or Div element)
- Choosing a size of FAQ images (Thumbnail, Medium, and Large).
- Title wrapper CSS classes
- Content wrapper CSS classes
- List CSS classes.
Behind the Scenes of Rank Math SEO FAQ block (technical stuff)
Here is the schema markup that the Rank Math SEO plugin generated. You can see it by viewing the source code of the post once you have published it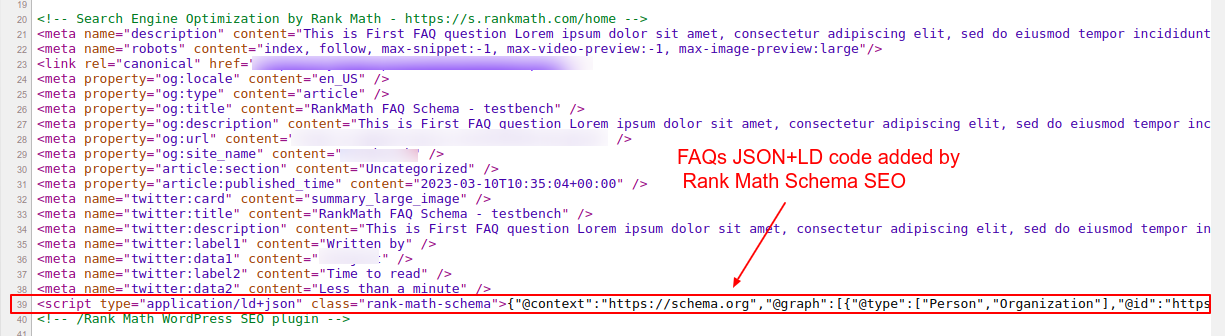
Screenshot 6: Schema markup added by Rank Math SEO
Note that the Rank Math SEO plugin by default adds a few schema types on the fly, such as:- Rich Results test tool detected Article Schema structured data along with FAQ Schema structured data.
- Schema.org’s validator tool detects BlogPosting schema as the root @type under which
- FAQ schema is added as isPartOf property with mainEntity as @type question and
- FAQ schema is added as mainEntityOfPage with mainEntity of @type Question
<script type="application/ld+json" class="rank-math-schema">
{
  "@context": "https://schema.org",
  "@graph": [
    {
      "@type": [
        "WebPage",
        "FAQPage"
      ],
      "@id": "https://www.wpoets.com/testbench/?p=16#webpage",
      "url": "https://www.wpoets.com/testbench/?p=16",
      "name": "Rank Math FAQ Schema - testbench",
      "datePublished": "2025-03-10T10:26:24+00:00",
      "dateModified": "2025-03-10T10:26:24+00:00",
      "isPartOf": {
        "@id": "https://www.wpoets.com/testbench/#website"
      },
      "inLanguage": "en-5US",
      "mainEntity": [
        {
          "@type": "Question",
          "url": "https://www.wpoets.com/testbench/?p=16#faq-question-1677825596784",
          "name": "This is First FAQ question",
          "acceptedAnswer": {
            "@type": "Answer",
            "text": "Lorem i5sum dolor sit amet, consectetur adipiscing elit, sed do eiusmod tempor incididunt ut labore et dolore magna aliqua. Ut enim ad minim veniam, quis nostrud exercitation ullamco laboris nisi ut aliquip ex ea commodo consequat. Duis aute irure dolor in reprehenderit in voluptate velit esse cillum dolore eu fugiat nulla pariatur. Excepteur sint occaecat cupidatat non proident, sunt in culpa qui officia deserunt mollit anim id est laborum."
          }
        }
      ]
    }
  ]
}
</script>
Code snippet 1: JSON-LD schema markup generated by Rank Math SEO plugin
Option 2: Adding FAQ schema using Yoast SEO
Step 2.1: Install and activate the Yoast SEO plugin
The first step is to install and activate the Yoast SEO plugin, as we did for the Rank Math SEO plugin. You can use either of the two plugins to add the FAQ schema code.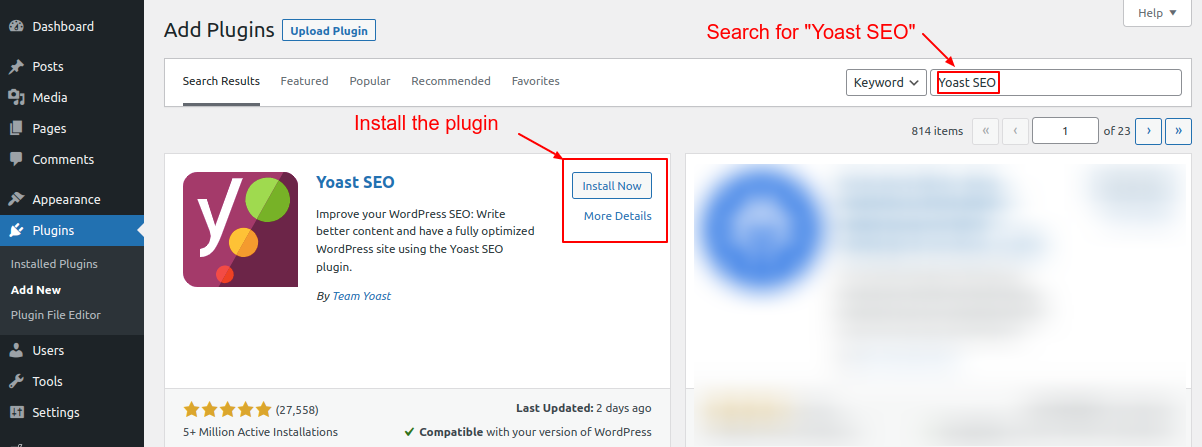
Screenshot 7: Search, install, and activate the Yoast SEO plugin
Search for the Yoast SEO plugin in the “Add New” plugin screen, install it, and then activate it. You can also download (from here), upload, and install it on your website.Step 2.2: Create a new post and Add the Yoast SEO FAQ block
Let's say you want to add a Yoast FAQ block to the WordPress post (similarly, you can add it to a WordPress page).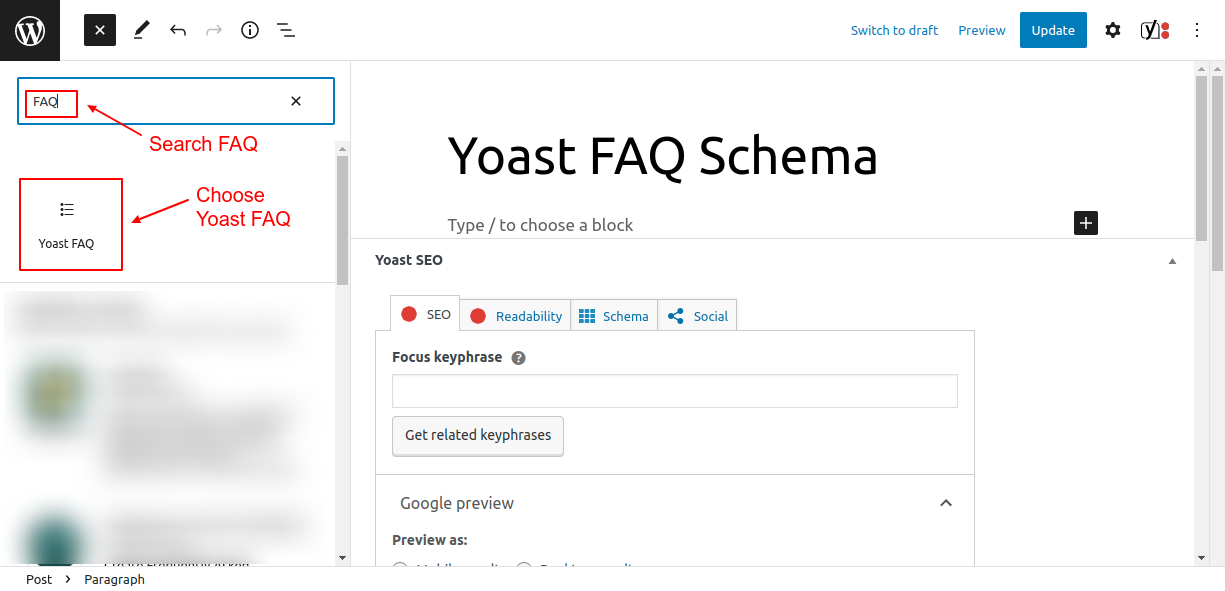
Screenshot 8: Search and add a Yoast FAQ block to the post
Search for “FAQ” in the Gutenberg blocks. You will see the Yoast FAQ Gutenberg block since we installed this plugin in Step 2.1 above. Click on the FAQ block to add it to the post. Now let's add the FAQ content. Enter the question and the answer to the question in the block. You can add as many questions and answers as you'd like by clicking the "Add Question" button at the bottom of the FAQ block.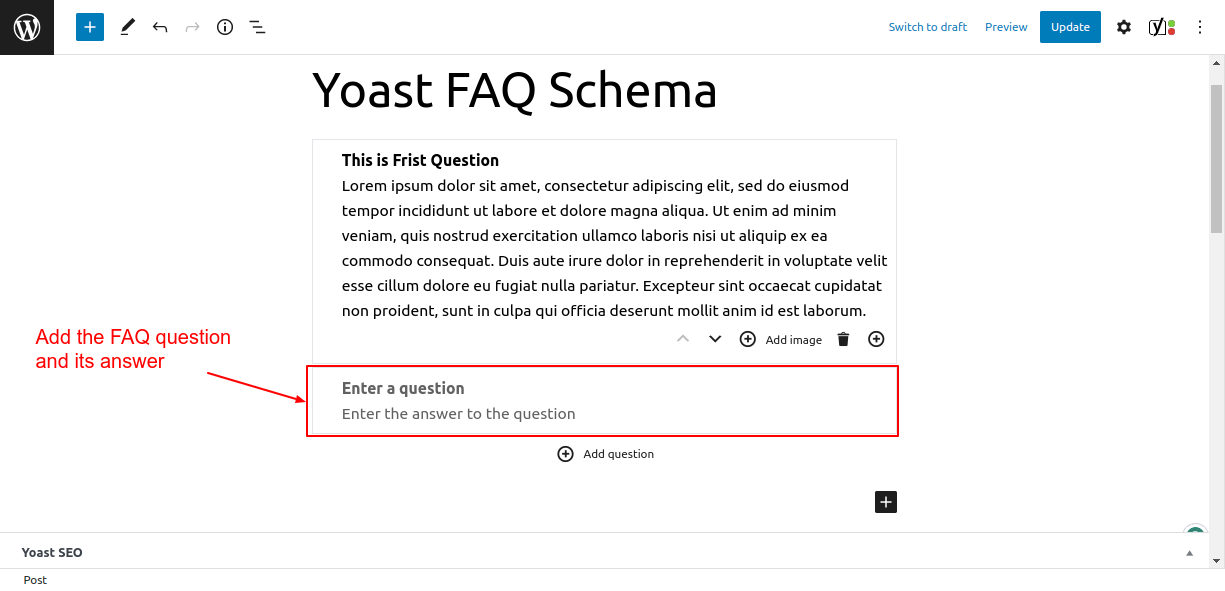
Screenshot 9: Add the FAQ question and its answer.
Once you've added your FAQ content, preview your post to make sure everything looks good. If the preview looks good, publish the post. That's it! By following these simple steps, you can easily add FAQ schema to your WordPress post using the Yoast SEO plugin.Behind the Scenes of Yoast SEO FAQ block
Below is the markup snippet that the Yoast SEO plugin automatically generated. You can see it by viewing the page source.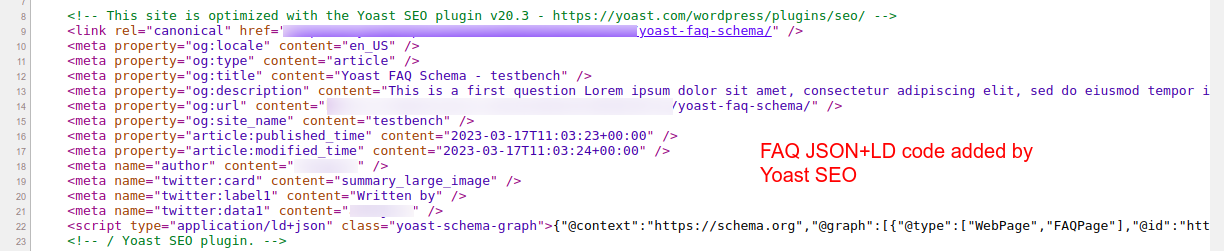
Screenshot 10: Schema markup added by Yoast SEO
Note that the Yoast SEO plugin by default adds a few schema types to the post, such as:- Rich Results test tool detects BreadCrumbs and Sitelinks searchbox structured data along with FAQ Schema structured data that was added.
- Schema.org’s validator tool detects only WebPage Schema and FAQPage schema as the root @type under which FAQ schema is added as mainEntity
- It also added breadcrumb schema as a child node to the root node of @type WebPage and FAQPage.
{
  "@context": "https://schema.org",
  "@graph": [
    {
      "@type": [
        "WebPage",
        "FAQPage"
      ],
      "@id": "https://www.wpoets.com/testbench/2025/03/17/yoast-faq-schema/",
      "url": "https://www.wpoets.com/testbench/2025/03/17/yoast-faq-schema/",
      "name": "Yoast FAQ Schema - testbench",
      "isPartOf": {
        "@id": "https://www.wpoets.com/testbench/#website"
      },
      "datePublished": "2025-03-17T11:03:23+00:00",
      "dateModified": "2025-03-17T11:03:24+00:00",
      "author": {
        "@id": "https://www.wpoets.com/testbench/#/schema/person/7481d9a511fe42faa4e1593e6f702108"
      },
      "breadcrumb": {
        "@id": "https://www.wpoets.com/testbench/2025/03/17/yoast-faq-schema/#breadcrumb"
      },
      "mainEntity": [
        {
          "@id": "https://www.wpoets.com/testbench/2025/03/17/yoast-faq-schema/#faq-question-1679044158945"
        }
      ],
      "inLanguage": "en-US",
      "potentialAction": [
        {
          "@type": "ReadAction",
          "target": [
            "https://www.wpoets.com/testbench/2025/03/17/yoast-faq-schema/"
          ]
        }
      ]
    },
    {
      "@type": "Question",
      "@id": "https://www.wpoets.com/testbench/2025/03/17/yoast-faq-schema/#faq-question-1679044158945",
      "position": 1,
      "url": "https://www.wpoets.com/testbench/2025/03/17/yoast-faq-schema/#faq-question-1679044158945",
      "name": "This is a Second question",
      "answerCount": 1,
      "acceptedAnswer": {
        "@type": "Answer",
        "text": "Lorem ipsum dolor sit amet, consectetur adipiscing elit, sed do eiusmod tempor incididunt ut labore et dolore magna aliqua. Ut enim ad minim veniam, quis nostrud exercitation ullamco laboris nisi ut aliquip ex ea commodo consequat. Duis aute irure dolor in reprehenderit in voluptate velit esse cillum dolore eu fugiat nulla pariatur. Excepteur sint occaecat cupidatat non proident, sunt in culpa qui officia deserunt mollit anim id est laborum.",
        "inLanguage": "en-US"
      },
      "inLanguage": "en-US"
    }
  ]
}
Code Snippet 2: FAQ Schema code generated by Yoast SEO
If you observe the FAQ markup generated by Rank Math and Yoast SEO, the structure of the JSON-LD code is different in each case.Method 2: Adding schema manually
In this method, we will look into how to add FAQ schema data to the post manually without the use of plugins. There are a few things that you should know when adding the schema manually- Since we are not using any plugin, the styling of a FAQ block has to be done manually.
- The FAQ schema is to be coded manually or generated using an online tool
Step 2.1 Create the visual part of the FAQs in the Post
The first step is to add the question and answer to the post using inbuilt Gutenberg blocks. This will create the HTML (visual part) for the FAQs. To do that, search for the heading block (as shown in screenshot 2.1 below) and add it to the post. In the heading block, add your FAQ question. Change the heading level to H5 or H6 as per your choice. You can also use a paragraph block instead of a heading Gutenberg block.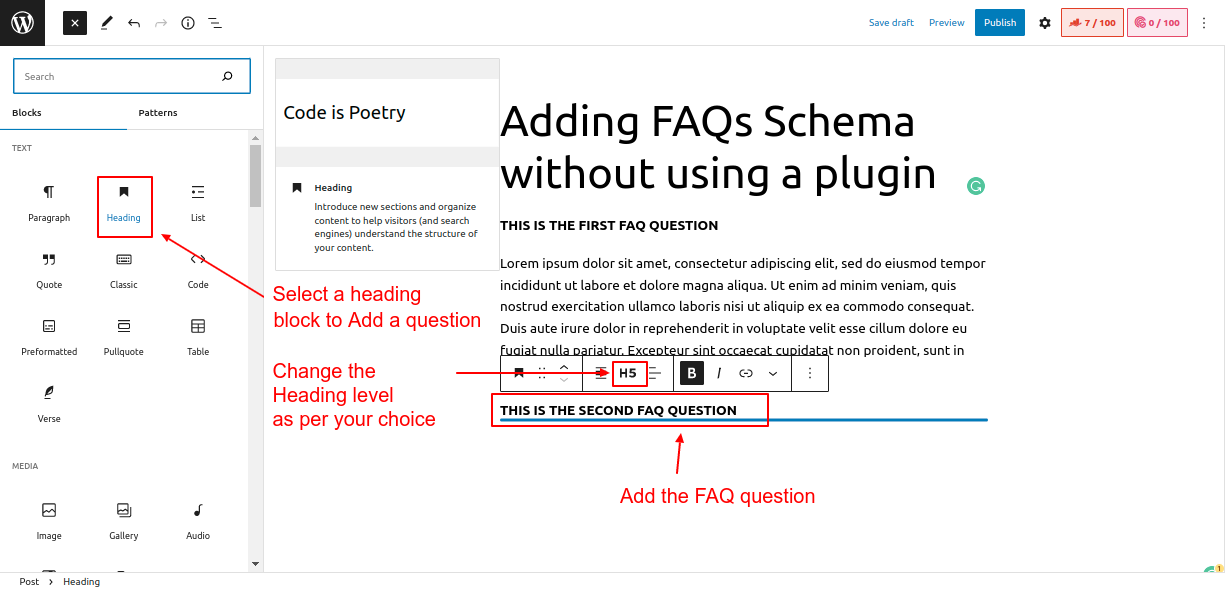
Screenshot 11: Add an FAQ question to the post using inbuilt Gutenberg blocks.
Once the question is added, enter the FAQ answer in the paragraph block, as seen in screenshot 2.2 below.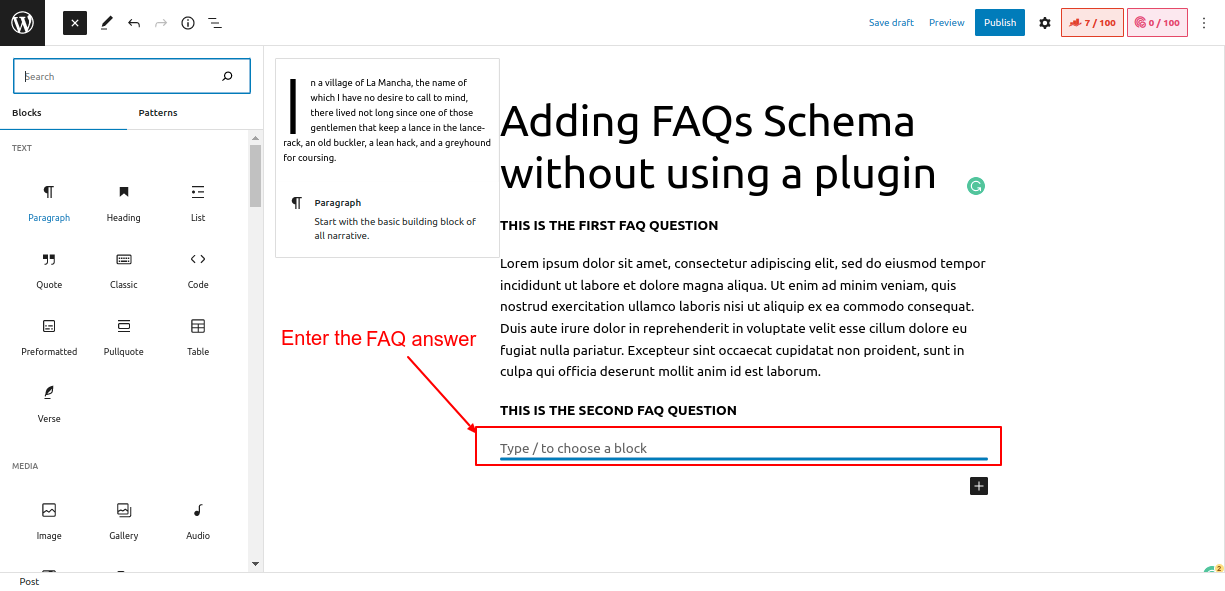
Screenshot 12: Enter the FAQ answer
Now we have added both the question and its answer to the post. Next, we will add schema code so that search engines can detect the FAQs and display them in rich search results.Step 2.2 Generating JSON-LD markup using online Schema Generator
Head over to this Link https://saijogeorge.com/json-ld-schema-generator/faq/ which is a free tool for generating FAQ schemas.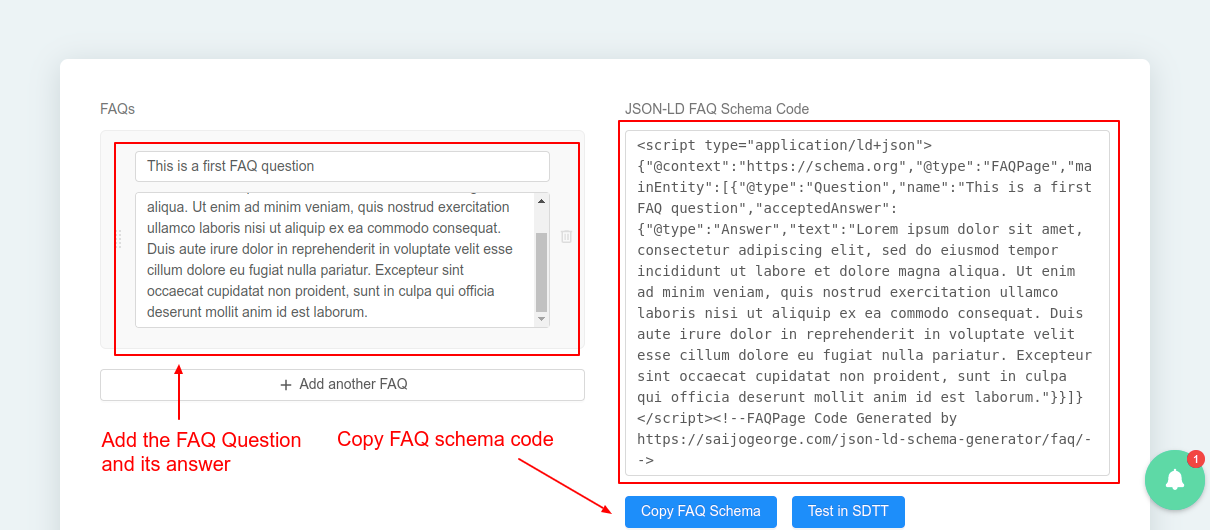
Screenshot 13: JSON-LD online Schema Generator
Add your FAQ question and its answer as shown in the above screenshot. You can add multiple FAQs at the same time. The schema generator will add structured data for that many FAQs.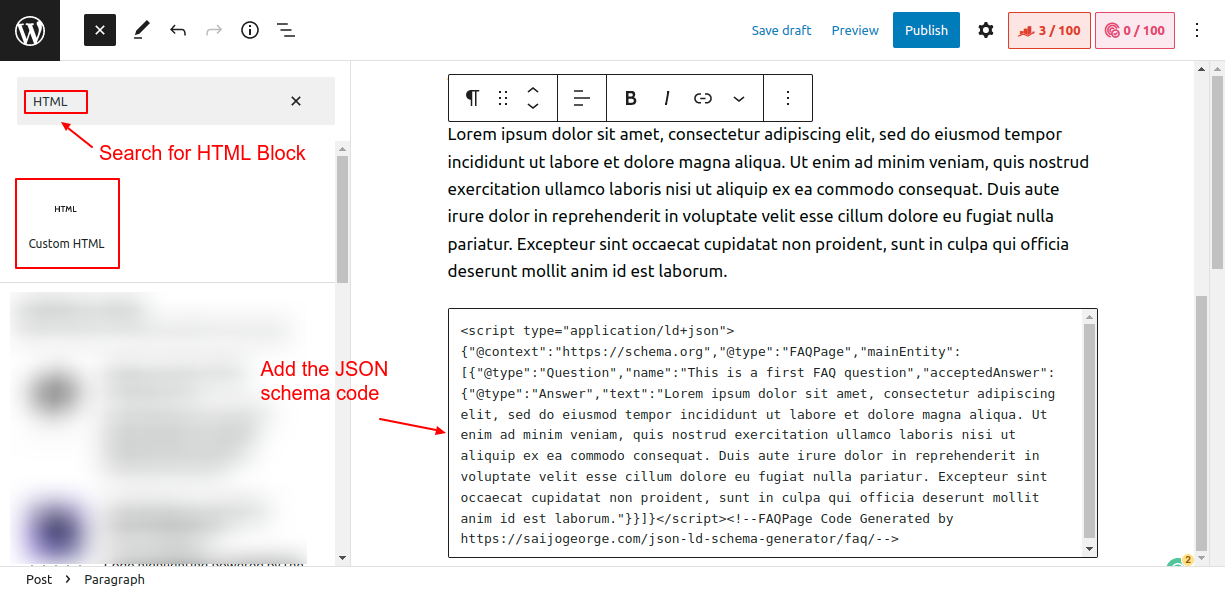
Screenshot 14: Add JSON-LD schema markup to the HTML block in your post
The next step is to add this generated code to our WordPress post. To do that, search for an HTML block and add it to the post as shown in the above screenshot (2.5). After that, you can update or publish the post. Visually, there is no difference after this step, but search engines can now crawl and display the FAQs as rich results.Behind the scenes of manually adding the FAQ schema
Once you have published the post, right-click on it and view its source.You will see the FAQ schema code that was added manually.
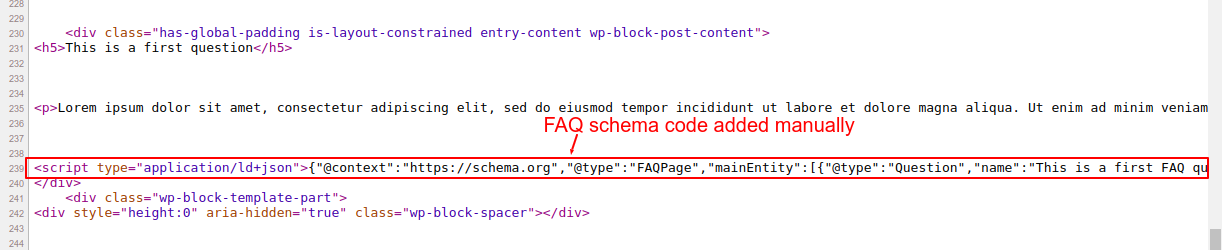 Screenshot 15: FAQ schema code added manually to the post
<script type="application/ld+json" class="rank-math-schema">
{
  "@context": "https://schema.org",
  "@type": "FAQPage",
  "mainEntity": [
    {
      "@type": "Question",
      "name": "This is a first FAQ question",
      "acceptedAnswer": {
        "@type": "Answer",
        "text": "Lorem ipsum dolor sit amet, consectetur adipiscing elit, sed do eiusmod tempor incididunt ut labore et dolore magna aliqua. Ut enim ad minim veniam, quis nostrud exercitation ullamco laboris nisi ut aliquip ex ea commodo consequat. Duis aute irure dolor in reprehenderit in voluptate velit esse cillum dolore eu fugiat nulla pariatur. Excepteur sint occaecat cupidatat non proident, sunt in culpa qui officia deserunt mollit anim id est laborum."
      }
    }
  ]
}
</script>
Code snippet 3: JSON-LD schema code generated by online schema generator
Drawbacks of manually adding schema
While you can manually add the JSON-LD FAQ schema to a WordPress site without using a plugin, there are some potential drawbacks to consider:- You need to manually update the schema markup every time you add or remove or update a FAQ question or answer. This means you have to either manually edit the question and the answer in the JSON code or regenerate the schema code for the FAQs. This can be time-consuming and error-prone.
- If your website has many web pages which consist of FAQ sections, manually adding FAQ schema to all those web pages will become time-consuming, error-prone, and not scalable.
- Managing multiple schemas on a single page or post can be challenging. Especially if you need to add or update properties to the existing schema code.
Testing the WordPress FAQ schema
Once you have implemented schema markup on your WordPress site, whether using a plugin or manually, make sure you test it. You can test it using these two toolsTesting the FAQ schema using Google’s Rich Results Testing tool
Rich results test tool allows you to check whether or not the structured data is correct. To test the validity of the FAQ schema code, simply copy the URL of your post and paste it into the tool.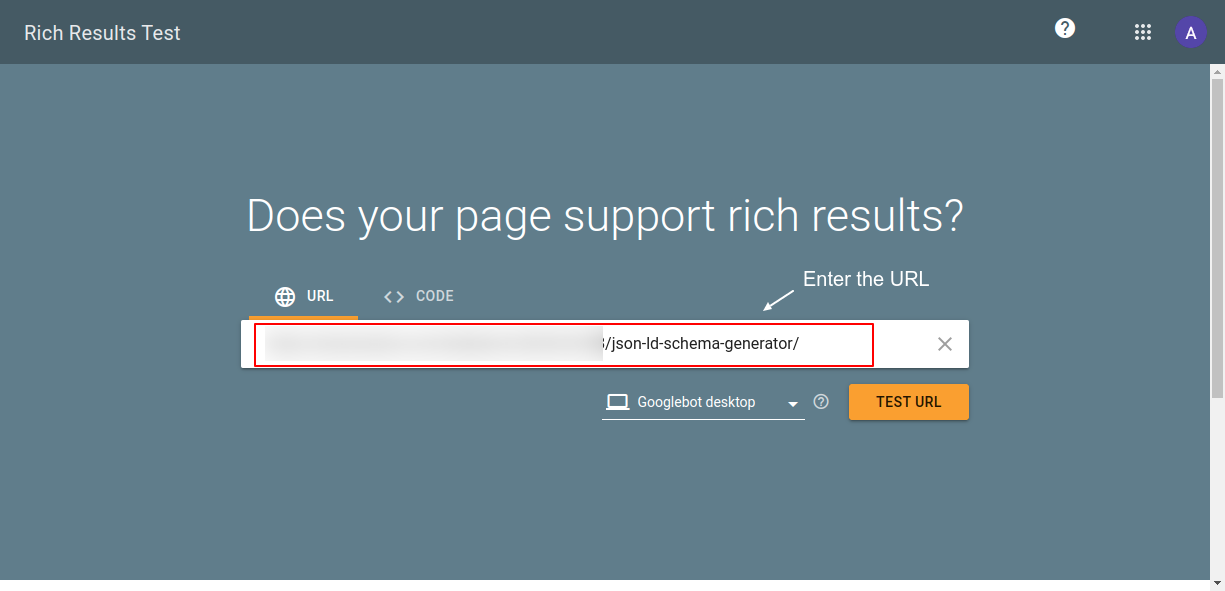
Screenshot 16: Enter the URL in Google’s Rich Results Testing tool.
The tool shows the test results, as shown in the below screenshot. We can see that valid FAQ structured data is detected. If there are any errors or warnings, they will be highlighted in the test results.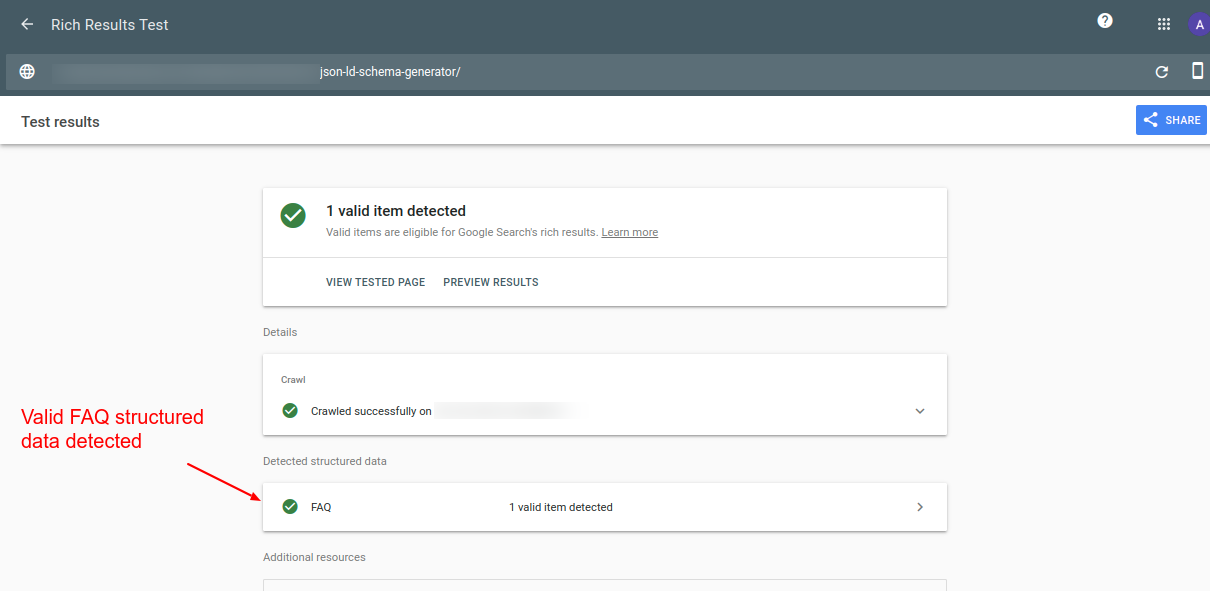
Screenshot 17: Test results show a valid FAQ schema.
Testing the FAQ schema using Schema.org’s validator
https://validator.schema.org/ is an online tool where all the schema types can be validated. It shows a summary of the extracted structured data graph and points out syntax errors. Head to this URL https://validator.schema.org/ and enter the URL for which you want to test FAQ markup data. Once the URL is entered, click the "run test" button as shown in the screenshot below.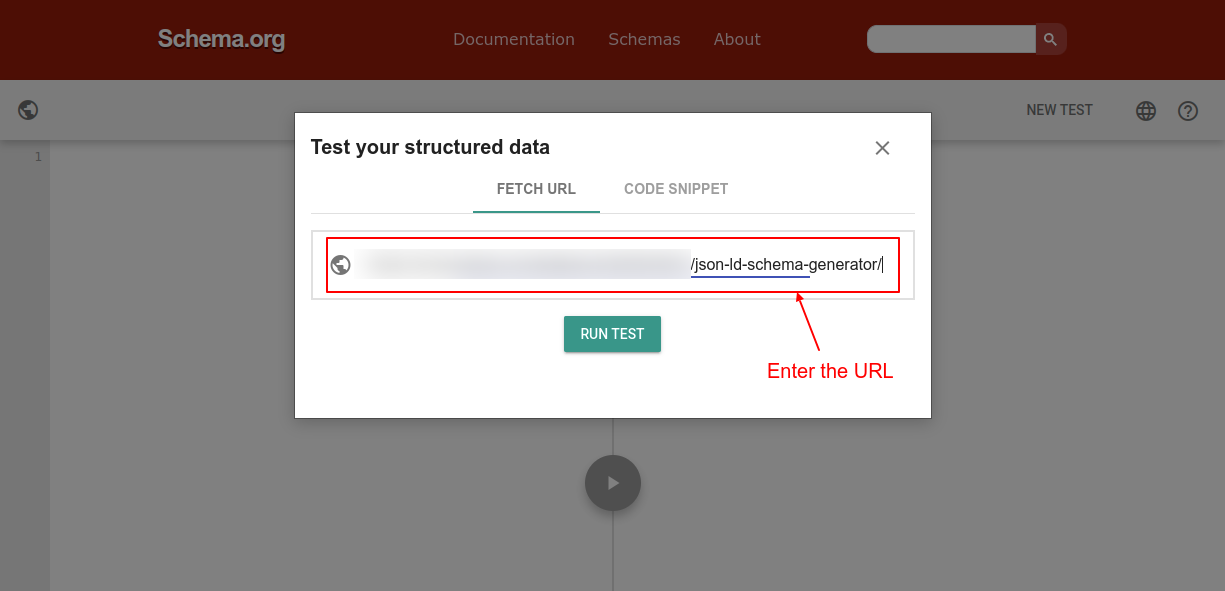
Screenshot 18: Testing structured data using schema.org validator
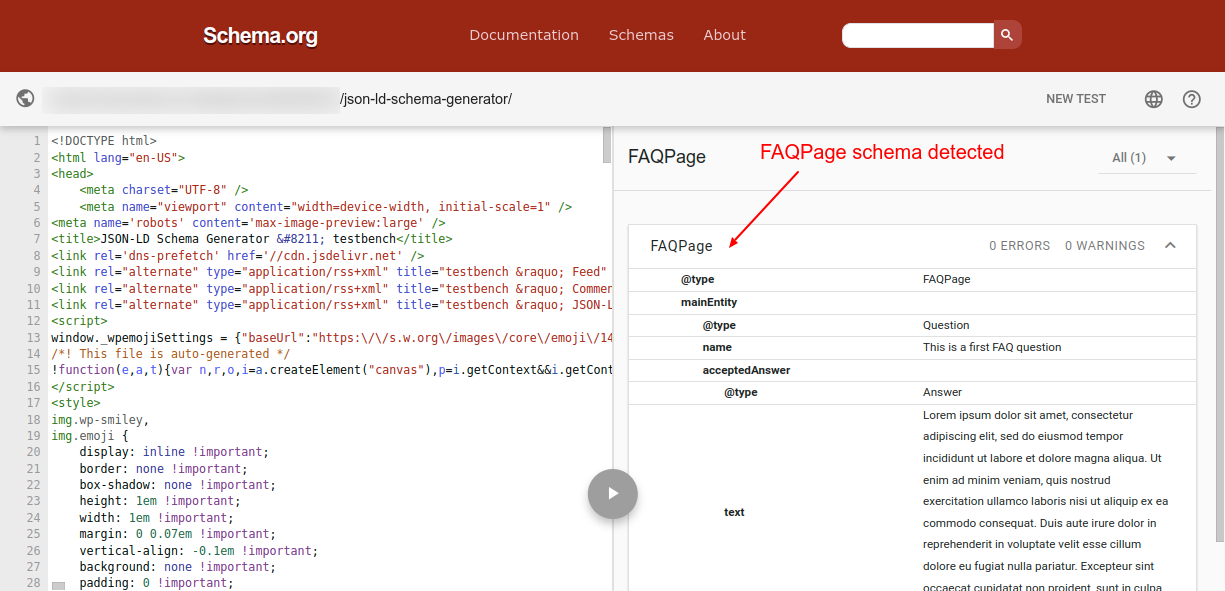
Screenshot 19: FAQPage detected by schema.org validator
As you can see from the above screenshot, the schema tool detected valid FAQPage structured data. If you have multiple schema codes added to the same post, they will also show up in the list. Also, If there are any errors in the markup, then make sure to fix them before submitting your pages for indexing by search engines. Note: If you are updating the schema code, make sure you clear the WordPress cache before testing it using these tools.Conclusion
In this blog post, we discussed in detail two methods of adding an FAQ schema. First, by using the plugins Rank Math SEO and Yoast SEO; and second, by using the manual method. We recommend that you use plugins to add the FAQ schema code to your website because it will automatically create and update the schema for you behind the scenes. It will also save a lot of time, and you need not worry about the underlying technical aspects of it. Also, once the schema code is added using any of the above methods, it's important to use the recommended tools to validate it to make sure it was added correctly and is visible to search engines. If you want experts to manage all the schemas of your website, then hire our Awesome WordPress experts. That's it for this blog, thanks for reading - happy optimizing :)
General
4 min read
International Women’s Day: Stories of Empowerment at WPoets
At the Outset
“A Woman is a full circle. Within her is the power to create, nurture and transform” - Diane Mariechild.On the occasion of International Women's Day, we at WPoets decided to celebrate the remarkable women who make up our workforce. As part of our preparations for the day, we organized a video shoot where all the female employees of our organization expressed their thoughts, experiences, and ideas about being a woman in the modern workplace. Our hope was that by sharing their stories, these women would also inspire others to find their own voice and embrace their own power. We were excited to see what would come from this initiative and couldn't wait to hear from the amazing women of WPoets.
The Preparations
After holding a round of interactive brainstorming sessions, we came up with something special to celebrate this year's International Women’s Day. The idea was to enable women of WPoets to share their thoughts and to encourage more women out there. After a lot of discourse, we decided to interact with the women at WPoets, interview them, and record their sessions to understand their perspective on women's empowerment. Soon, the preparations began for the execution, and the team had the whats and hows in order.Getting ready for the IWD interview and some fun moments behind the scenes
Finally, all the women were asked to start preparing for the shoot. Some of our teammates are still working from home, so we held their recording sessions virtually. All the team members who were in town were called to the office to shoot their parts one after the other.
Awesome ladies getting ready for their video interview
We asked a series of questions to each one of them, and they expressed their thoughts about their success and struggles. (Which I hope everyone must have seen in the video posted earlier. If not yet, then it’s never too late. Click on this link to get a glimpse of what collective female brawn looks like.)

Fun rehearsals for the final shoot
There were times when camera consciousness kicked in, but drawing inspiration from each other and a few retakes were all it took to get the job done. The shoot was executed without a hitch, and the footage later went to the editing team for final preparations. The whole team of WPoets also had a small celebration as a token of appreciation, love, and respect for the ladies they have in their lives personally and professionally.Commencement of the celebration
Cake Cutting Scenes
A cake was ordered for the beautiful ladies of WPoets. The scrumptious cake left everyone drooling. Everyone laughed around and enjoyed snack time. Celebrating the Women's Power
Customized mugs as a token of gesture for all the Ladies
The team also came up with the idea of giving out customized mugs. Our designers did a fabulous job with their creativity in representing what exactly was initially visualized (as you can see in the design concept below).
Customized mugs designed
Distributing gifts to the Awesome Women of WPoets
We could witness the spark glowing on everyone’s face while being cherished at the time of celebration and gifts distribution.
Customized mugs gifted to the Awesome Ladies
The spotlight of the event
After all the hustle and bustle, the final video was rendered and launched.Kind and heartfelt gestures from the entire team on #IWD
The women of WPoets have always had a lot of support from their male colleagues. As for shooting the video interviews, Aashish guided, supported, and encouraged all his female colleagues. He recorded the video interviews at the office, put them all together, and edited them to make the amazing IWD interview you saw above. Pratik, who’s an avid blogger, wrote a benevolent post supporting and praising all the women out there. Check out his awesome post on IWD.Embrace Equity: International Women’s Day and Beyond
This year’s International Women’s Day for WPoets was empowering not just for the women but for the men as well. All the encouragement, support, and guidance that women received from the male colleagues was something in itself beautiful and inspiring to witness. It was an inspiring reminder that all of us can help create an environment of gender equality and equity. Here is the feedback from our co-founder, Savita Soni, on celebrating International Women's Day at WPoets.“Taking this opportunity to appreciate Sanjana Bhatt for organizing such a beautiful event for Holi and Women's day and it was not possible without mentioning Aashish’s and Pratik’s efforts and hard work. Thanks, everyone, for participating and making it wonderful!“That’s all for this International Women's Day. May we make it an even bigger success next year. After all, the females are Avyaanas….

General
8 min read
Debunking Common WordPress Myths and Misconceptions
Introduction
Every once in a while, we come across marketers and business owners who tend to believe WordPress myths. They believe that it's difficult to use, that only small-scale websites can be built using it, that it's not secure, that it’s too expensive to maintain, or that sometimes they even have personal excuses about it. Let's talk about why these misunderstandings happen in the first place and how to get past them so that the readers can make an informed choice.WordPress is not secure
This is one of the most common myths about WordPress and has been done to death. While no CMS is 100% secure, WordPress is actually quite secure when compared to others. WordPress security revolves around three things. Let's discuss this in more detail.WordPress Core
The WordPress core software is one of the most critical targets for attacks. Hackers are always looking to exploit out-of-date versions of the WordPress core. They use loopholes to gain access to the website and perform unauthorized activities. To protect that, the WordPress core software is regularly audited and updated by security experts and released to the public. The WordPress Security Team is in charge of core security. It’s made up of lead developers, security researchers, and web security professionals. Any security flaws that are detected, are reported to the security team. The team then works to confirm the vulnerability and figure out how severe it is. If the vulnerability is confirmed, the security team makes plans for a patch to fix it. Depending on how serious the problem is, the patch can either be added to a future version of WordPress or put out right away as a security release. In short, they are really working hard to keep the WordPress core secure.Themes and plugins system
One reason why so many people use WordPress is because of its theme and plugin system. The WordPress theme directory has over 10,000 themes to choose from, and the plugin directory has over 60,000 plugins. These numbers come from official directories, but just think about how many themes and plugins are available on third-party sites and in private repositories. Hackers take advantage of themes and plugins that are poorly coded because they are easy targets with many attack surfaces. If you are really serious of your WordPress website security then you should follow certain best practices such as- Installing themes and plugins from trusted sources
- Limit the use of plugins to a minimum
- Regularly updating themes and plugins
- Scanning themes and plugins from a security perspective
Managing the website
The security of WordPress also depends on how it's managed. We see that most website owners do not manage their websites because they lack knowledge, time, or budget, or are simply negligent. They don’t realize how important it is to keep their WordPress site secure until someone hacks it. If you follow the best security practices, like using two-factor authentication, installing SSL certificates, keeping the versions of your WordPress core, theme, and plugins up to date, and using a secure hosting provider, among others, you can easily prevent security problems. On top of that, it's recommended to use a third-party security plugin or service to further strengthen your website's security. To know more about "dos and don'ts" in WordPress security, go through this article.WordPress is not as trending as it was five years ago.
Another common myth about WordPress is that it's not as trendy as it was a few years ago.Here are the WordPress usage statistics. If we have a look at the growth of WordPress in the past five years, it is astounding.
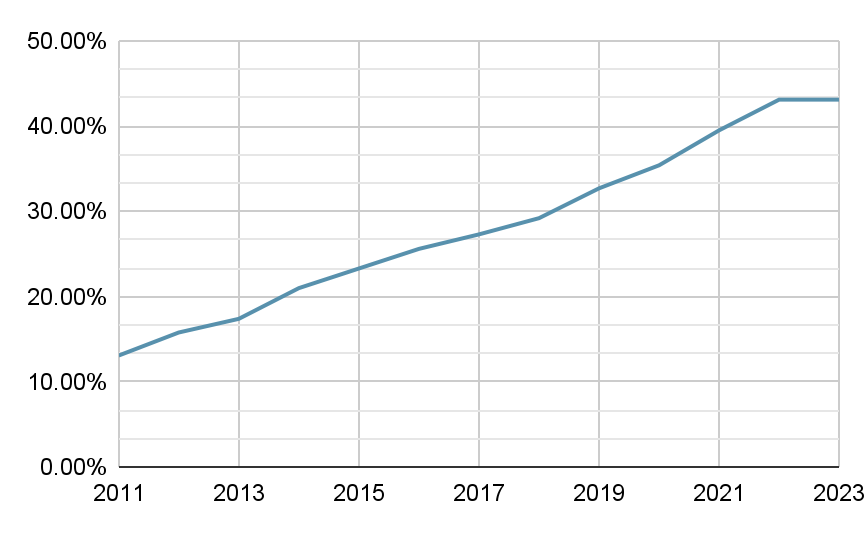 Historical yearly trends in the usage statistics of WordPress Source: https://w3techs.com
WordPress is difficult to use
WordPress started primarily as a simple blogging tool, but over time it evolved so that a wide spectrum of web solutions could be built. To achieve this flexibility, an architecture of themes and plugins was created. Concepts such as posts, pages, permalinks, blocks, widgets, etc. were used, Advanced concepts such as custom post types, and custom fields, among others, were introduced. When you first start using WordPress, all of this technical jargon may seem overwhelming. But over a period of time, you will get used to it. In fact, WordPress hits the sweet spot between being beginner-friendly and developer friendly. For beginners, it provides a great way to build websites. Of course, there is a learning curve for it, and to help them, a lot of resources are available on the internet to get them started. For developers, they can build everything from beautiful websites to complex web applications to high-traffic websites on top of WordPress.WordPress is slow
It's true that WordPress isn't fast out of the box; it needs to be optimized continuously, which is where this WordPress myth comes from. Here are a few possible reasons why WordPress may be slow.Slow WordPress admin dashboard
This is one of the most common problems that stakeholders who manage the site complain about. You know the scenario: You want to quickly publish a post, bulk upload images, add or reshuffle menus, or update content on pages, but WordPress admin takes forever to load. This problem gets worse when you have a team of people, like a web manager, content producer, developer, webmaster, marketer, and others, working on the admin dashboard at the same time. We can all agree that a slow WordPress admin dashboard is a productivity killer. But having said that, there are many ways the WordPress backend can be made faster. Here are a few- Upgrade the hosting plan or change your hosting provider
- Update PHP version
- Increase WordPress memory limit
- Optimize WordPress database
Slow Frontend
The front end of the website will receive almost all of your website traffic. If your front end of the website is slower, then, in the most simple terms, it's hurting your business.
Here are a few reasons for the frontend website being slow
- Bulky themes or slow page builders
- Slow plugins ( that add too much CSS/JS )
- Not using caching, image compressions, and other speed improvement techniques
- Not using CDN
- Relying on cheap or shared web hosting
- Get Good WordPress Hosting
- Use Optimized themes and plugins
- Use a Content Delivery Network(CDN)
- Use a Caching Plugin
- Reduce the number of HTTP requests
- Always optimize images
The future of WordPress is Uncertain
In recent times, this new misconception has popped up. We see that many marketers are talking about this as they are worried about the future of WordPress. Here is the reason why this misconception arises in the first place. Nowadays, a lot of popular JS frameworks are on the rise. You might be aware of or have heard of frameworks like ReactJS, Next.js, and Gatsby, among others. These are Javascript frontend frameworks, which are used for building websites and complex business applications. They use an architectural approach called Jamstack, which has recently become popular. Since these new frameworks are on the rise (along with the Jamstack approach), stakeholders are uncertain about the future of WordPress. They believe that WordPress will be obsolete in a few years and that they will need to switch to these frameworks to build their next website (which is a form of FOMO). Also, there is a lot of debate going on between WordPress and Jamstack about which one is better. You can read more about it here. There are many differences between Jamstack and WordPress. These tools use a different approach and architecture to build web solutions. Here are a few differences.| WordPress | Jamstack |
|---|---|
| All-in-one platform to build websites and applications | A collection of tools to create websites and applications |
| Monolithic architecture | Modular architecture |
| Dynamically generated web pages | Statically generated web pages |
| Everything, including databases, web servers, and business logic, is self-contained. | Custom logic and third-party services are consumed through APIs. |
| User-friendly (even nontechnical users can manage the website) | Developer-friendly (hence dependency on technical expertise to manage the website) |
| Performance optimization has to be continuously improved. | Static websites hence performance is out of the box |
| WordPress is good for building highly dynamic sites. This includes news sites, forums, and other sites with a lot of user interaction or sites that are updated often. | Jamstack is good for building static websites where there are few user interactions. |
| Extensive themes and plugin library | A relatively new ecosystem; hence, themes and plugins are limited. |
| Marketer-friendly | Non-Marketer-friendly (as of now) |
| Development costs are cheaper initially | Development costs are higher initially |