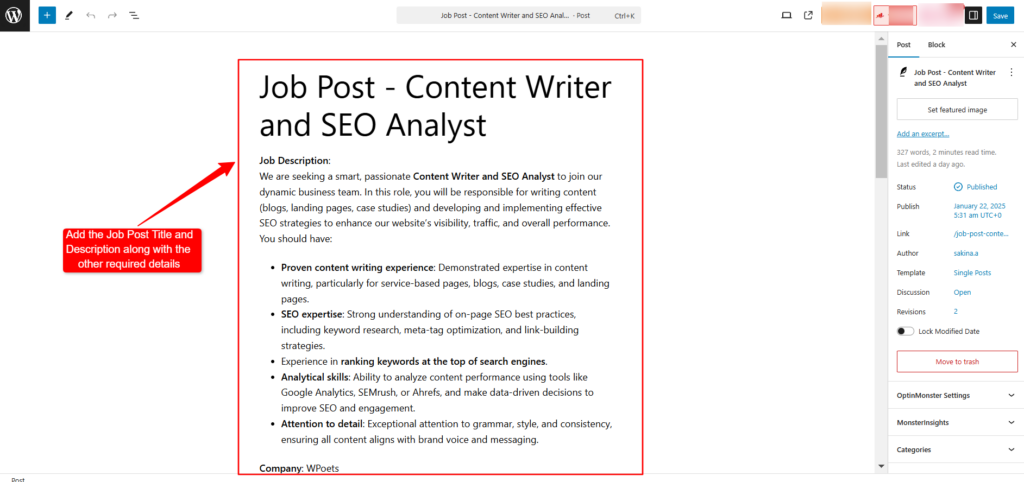
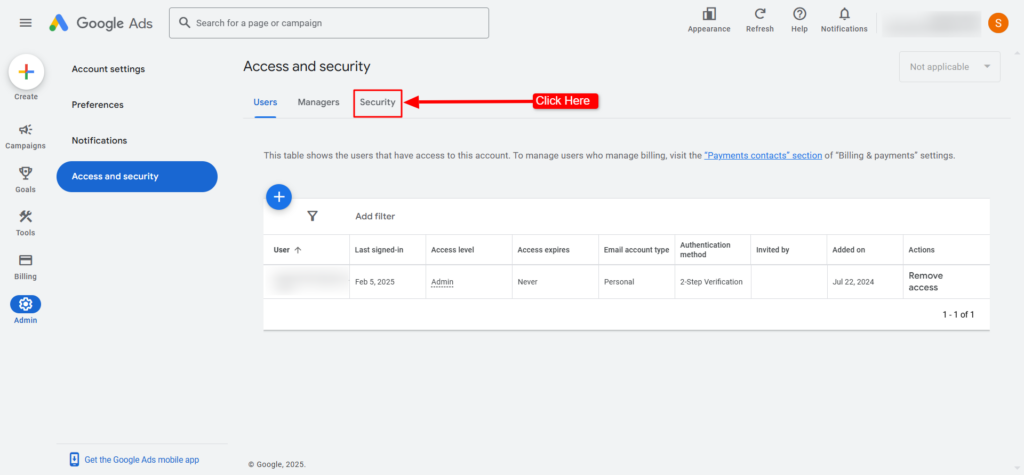
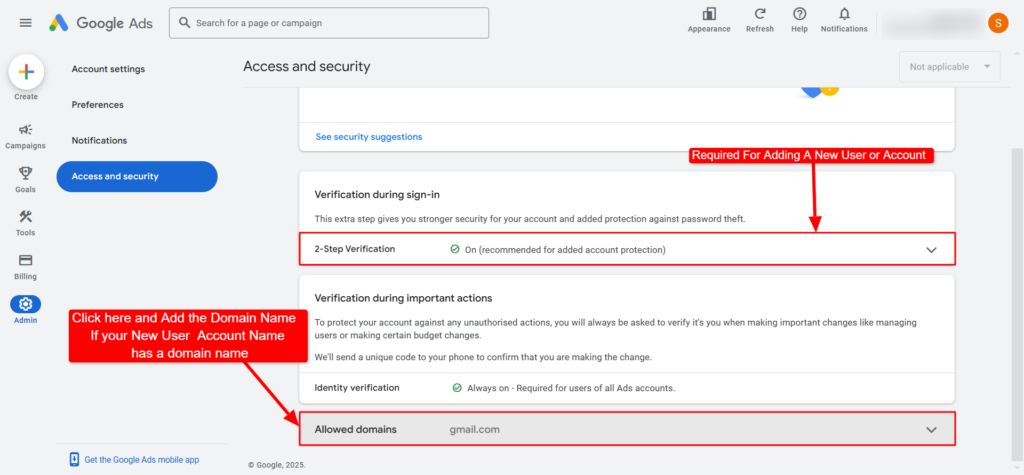
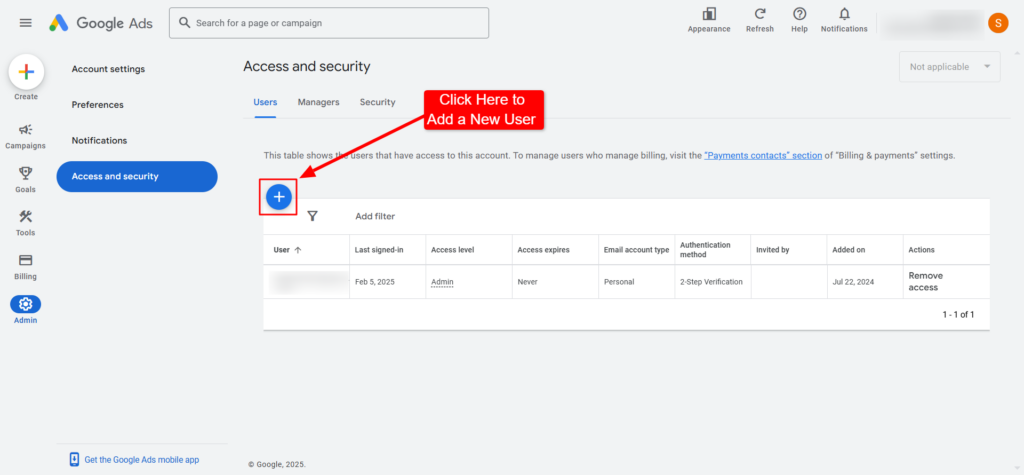
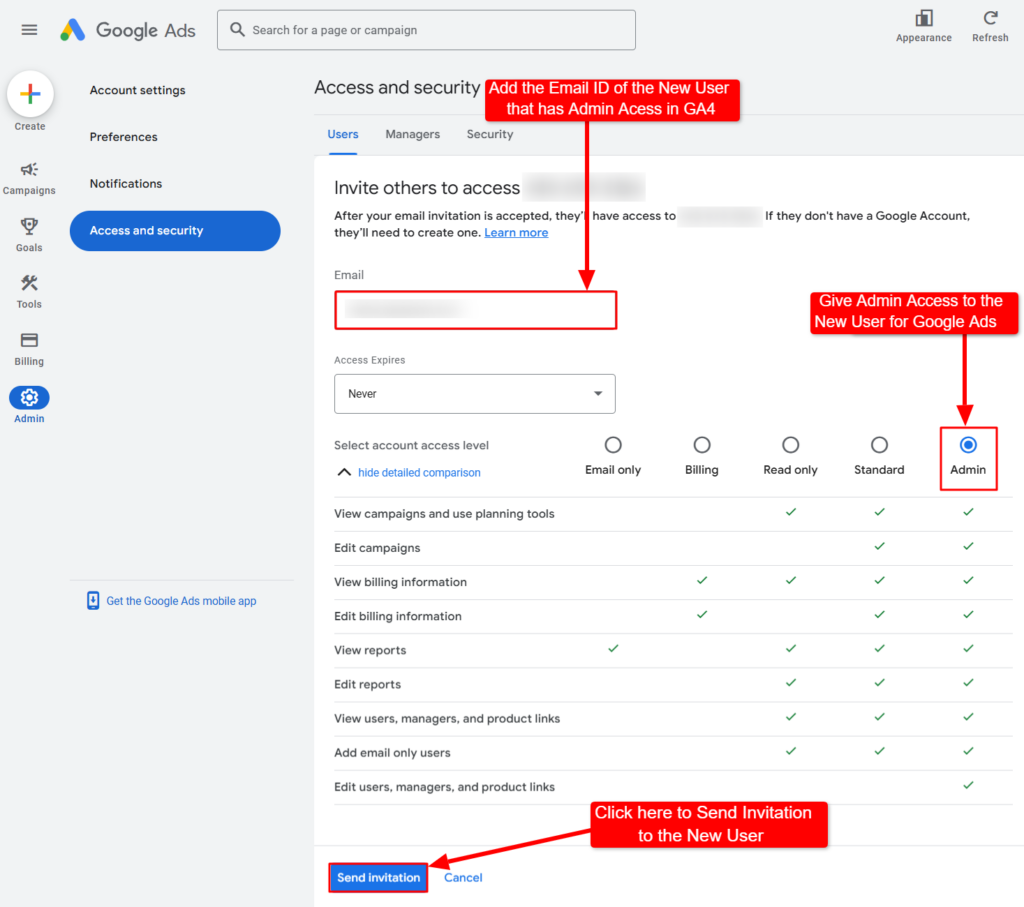
Fill in all the relevant details about the job, such as the title, description, and any additional information job seekers might need.
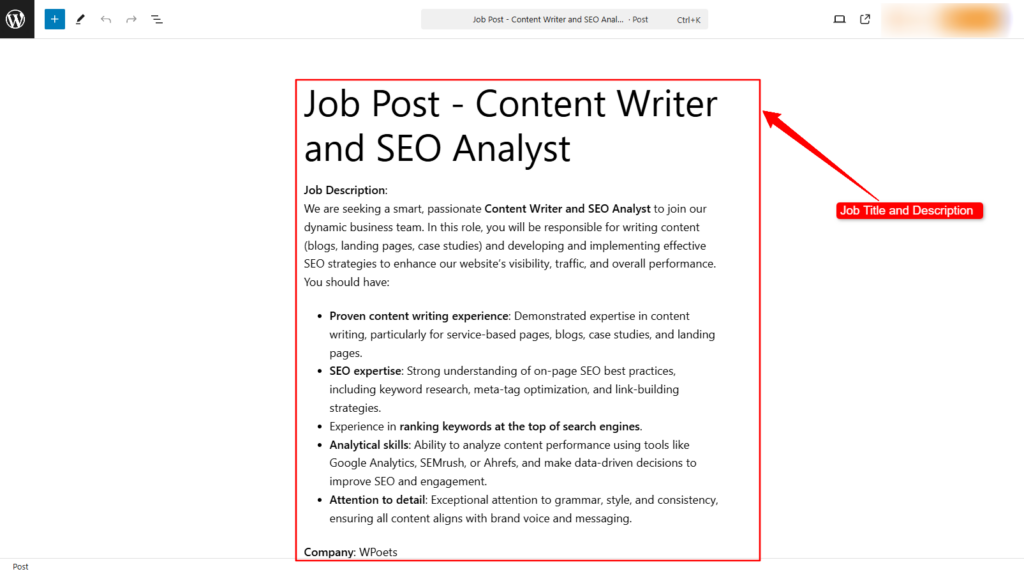
Screenshot 2: Create a new post on your WordPress Website and add the Job Post details
Step 1.3: Access the Schema Generator from Rank Math Schema Settings
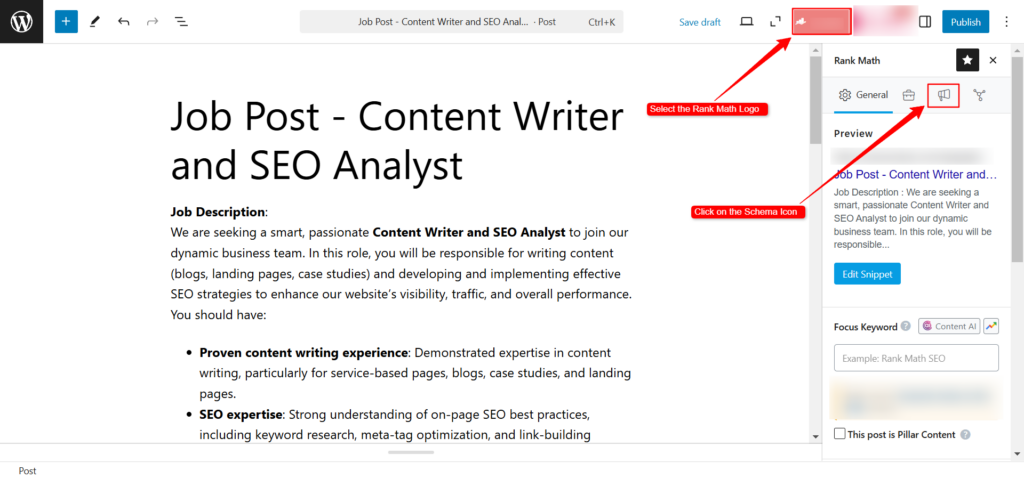
Once you’ve added the job post details, look for the Rank Math button.
Click on it to access the Rank Math options as shown in screenshot 2. A sidebar menu will appear on your screen.
Then, select the Schema Icon from the sidebar menu.
Screenshot 3: Click on the Rank Math logo and select the Schema Icon from the sidebar menu
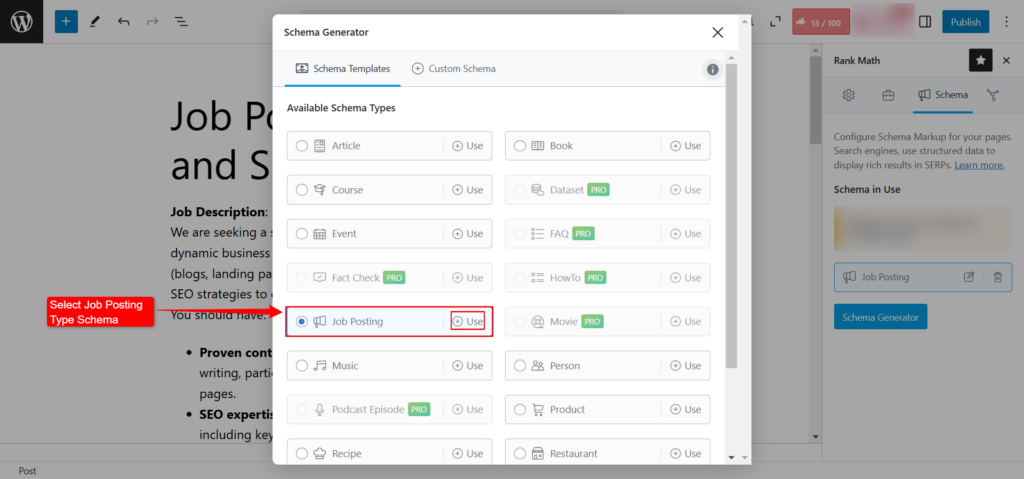
In the Schema Generator menu, locate and click on the Job Posting Schema option to enable the job schema for this post. as shown in screenshot 4.
Screenshot 4: Select the Job Schema option from the Schema Generator Tab of the Rank Math Plugin
Step 1.4 Fill in the Job Posting Schema Fields:
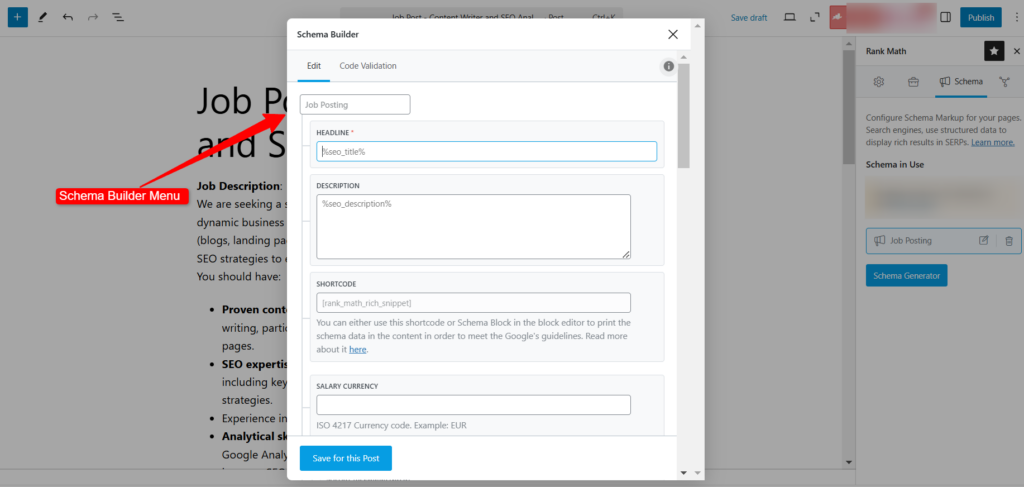
A Schema Builder menu will appear after selecting the Job Posting option.
Screenshot 5: Schema Builder Menu
Add Job Posting Details:
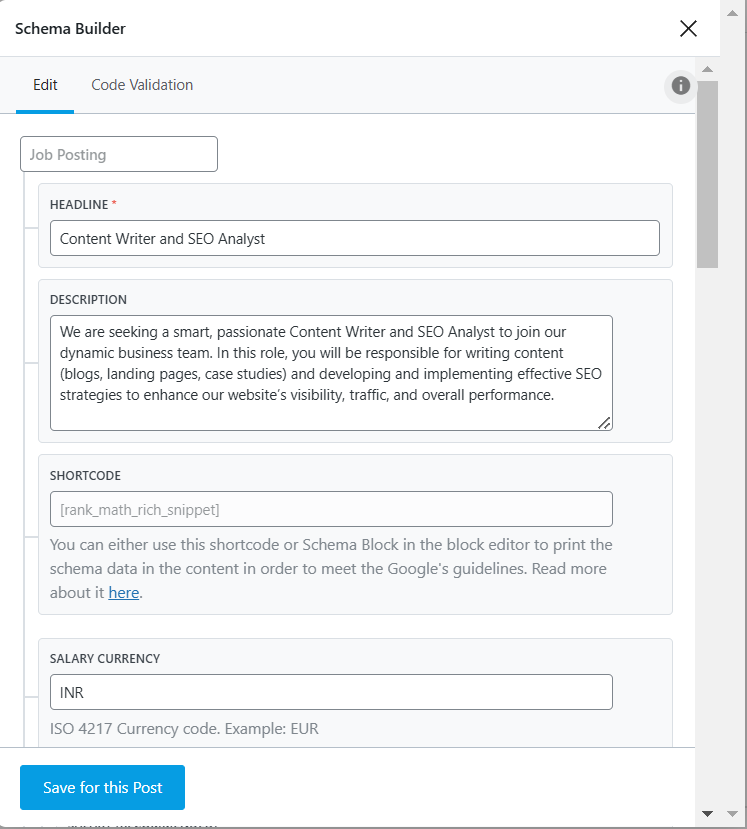
Provide the Job Title that reflects the role being advertised.
Include a Job Description that outlines the responsibilities and key qualifications required for the position.
Specify the Salary Currency to ensure clarity for applicants on the expected remuneration.
Screenshot 6: Added Job Posting Details
Add Salary Details:
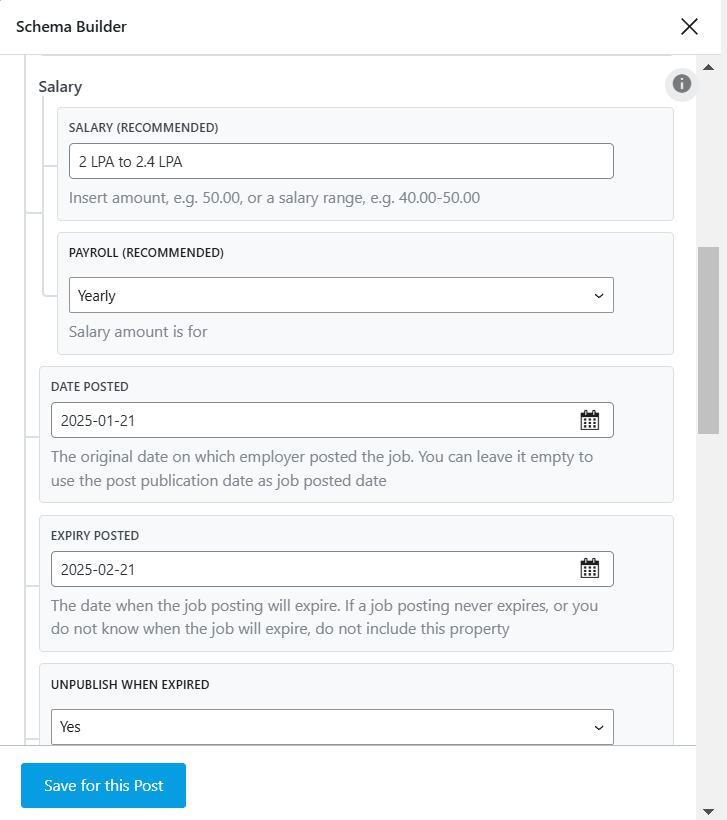
Include the Recommended Salary to give potential candidates an idea of the compensation range for the role.
Specify the Payroll Type to explain how employees will be paid (e.g., hourly, salaried, commission-based).
Add Job Posting Date and Expiry:
Mention the Date Posted, which marks when the job was first made available.
Set an Expiration date for the job post, indicating when the listing will no longer be available to applicants.
Enable the Unpublished When Expired option to automatically remove the job posting after the expiry date. This ensures that applicants are only seeing active opportunities, improving the clarity and relevance of your job listings.
Screenshot 7: Added Salary Details and Job Posting Date and Expiry Date
Add Organization Details:
Provide the Organization URL so applicants can easily learn more about your company.
Upload the Organization Logo to create a recognizable and professional brand presence in the job post.
State the Organization Name to identify the company offering the position.
Screenshot 8: Added Organization Details
Add Address Details:
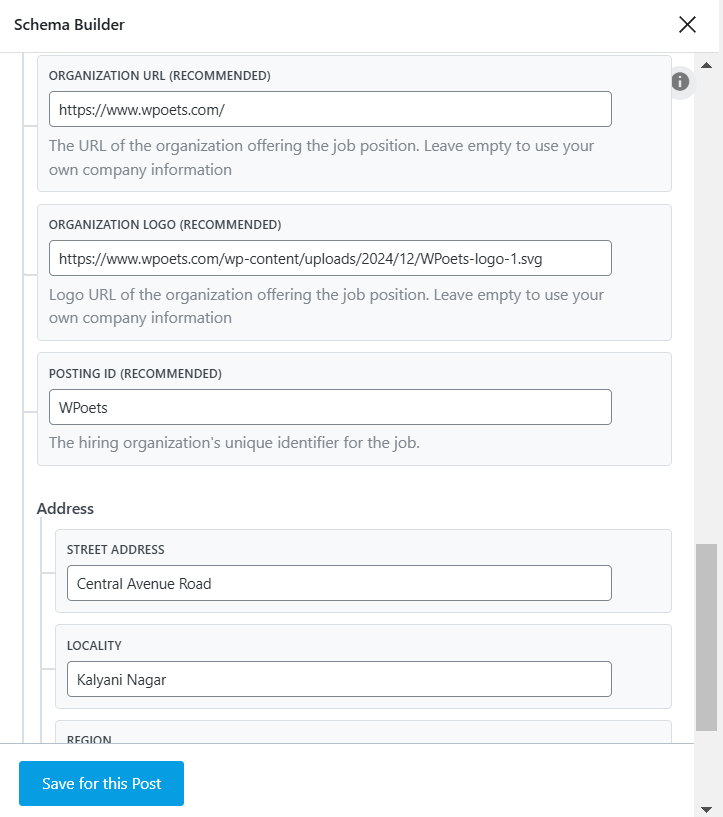
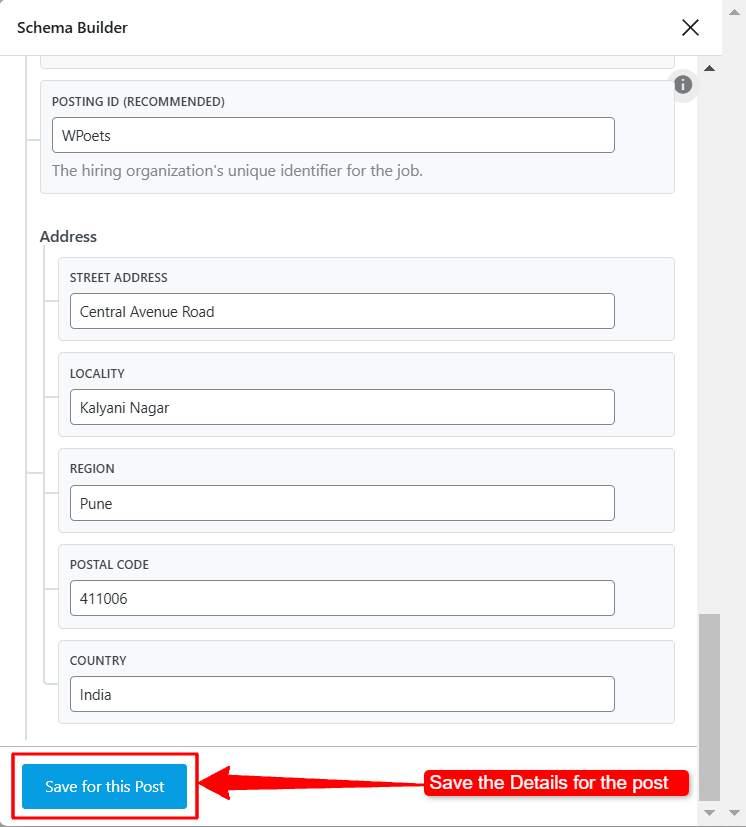
Clearly state the Address of the workplace, giving applicants a sense of where the role is based.
Consider adding specific location information or city/region for added context.
Finally, Save the Post.
Screenshot 9: Added Address Details and Save the Job Posting Details
Step1.4: Publishing the Job Post and Job Posting Schema:
Once the Job Posting Schema details, click on the Publish Button. The Rank Math SEO plugin will automatically generate the Job Posting structured data and add it to your post.
The Coding of the Job Post Schema in Rank Math SEO
When you publish a job post using the Rank Math SEO plugin, the system automatically generates a schema markup. You can view this markup by inspecting the source code of the post after it has been published.
This schema helps search engines understand and display job listing details like title, description, salary, and more, enhancing visibility and accuracy on search results pages.
{ "@context": "https://schema.org", "@graph": [ { "@type": "JobPosting", "title": "Content Writer and SEO Analyst", "description": "We are seeking a smart, passionate Content Writer and SEO Analyst to join our dynamic business team. In this role, you will be responsible for writing content (blogs, landing pages, case studies) and developing and implementing effective SEO strategies to enhance our website’s visibility, traffic, and overall performance.", "baseSalary": { "@type": "MonetaryAmount", "currency": "INR", "value": { "@type": "QuantitativeValue", "value": "2 LPA to 2.4 LPA", "unitText": "YEAR" } }, "datePosted": "2025-01-21", "validThrough": "2025-02-21", "employmentType": [ "FULL_TIME" ], "hiringOrganization": { "@type": "Organization", "name": "WPoets", "sameAs": "https://www.wpoets.com/", "logo": "https://www.wpoets.com/wp-content/uploads/2024/12/WPoets-logo-1.svg" }, "id": "WPoets", "jobLocation": { "@type": "Place", "address": { "@type": "PostalAddress", "streetAddress": "Central Avenue Road", "addressLocality": "Kalyani Nagar", "addressRegion": "Pune", "postalCode": "411006", "addressCountry": "India" } }, "@id": "https://tymescripts.com/stagingblogs/2025/01/22/job-post-content-writer-and-seo-analyst/#schema-152", "mainEntityOfPage": { "@id": "https://tymescripts.com/stagingblogs/2025/01/22/job-post-content-writer-and-seo-analyst/#webpage" } } ]}
Code Snippet 1: Sample code generated by rank math
Screenshot 10: Job Posting Schema added by Rank Math SEO Plugin
Method 2: Adding Job Posting Schema Markup Manually Without Plugins
To manually add structured data to your WordPress posts, you can directly insert JSON-LD code into the HTML block of the post template. This structured data serves as a behind-the-scenes guide for search engines like Google, enabling them to understand your content in a better way and display it as rich snippets in search results.
Step 2.1: Creating or Editing a Job Post in WordPress
Go to Posts,then Add New, and create a new post for your job listing in WordPress.
Note: We recommend creating a custom post type of “Jobs” using a plugin. Here is an excellent tutorial that explains how to create a custom post type with and without plugins.
Fill in all the relevant details about the job, such as the title, description, and any additional information job seekers might need.
Screenshot 11: Post created for Job Posting in WordPress
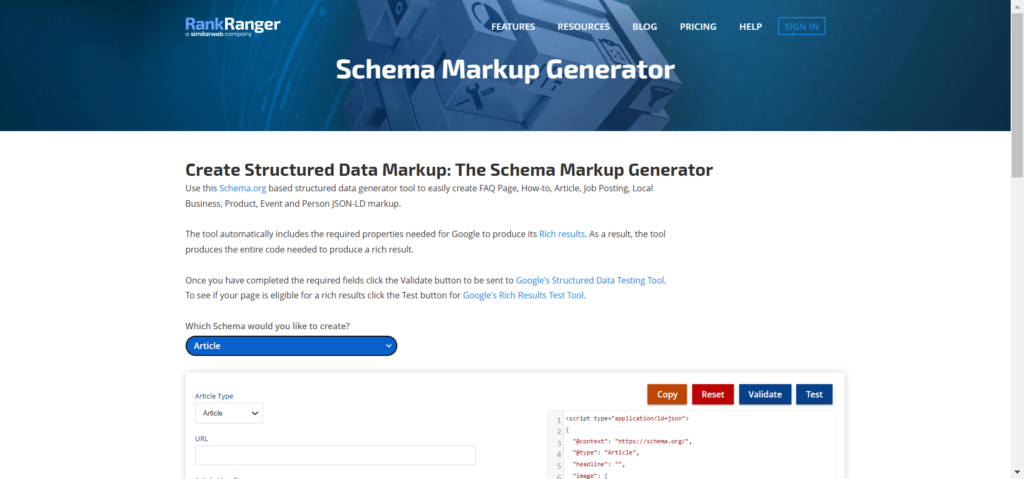
Step 2.2: Open the RankRanger Schema Markup Generator
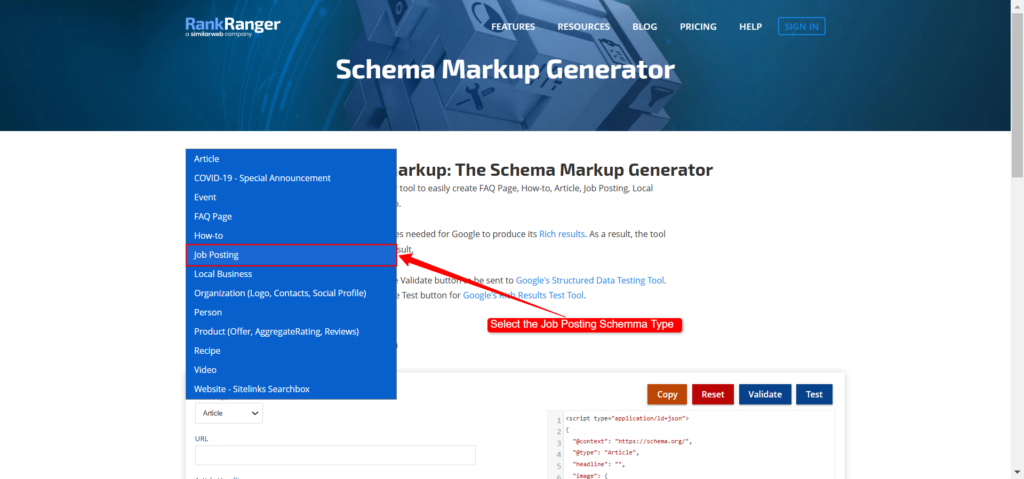
From the available options, select Job Posting Schema to begin creating schema markup specific to job listings as shown in screenshot 13 below.
Screenshot 13: Selecting job Posting Schema in The RankRanger Schema Generator
Step 2.3: Input Your Job Posting Details
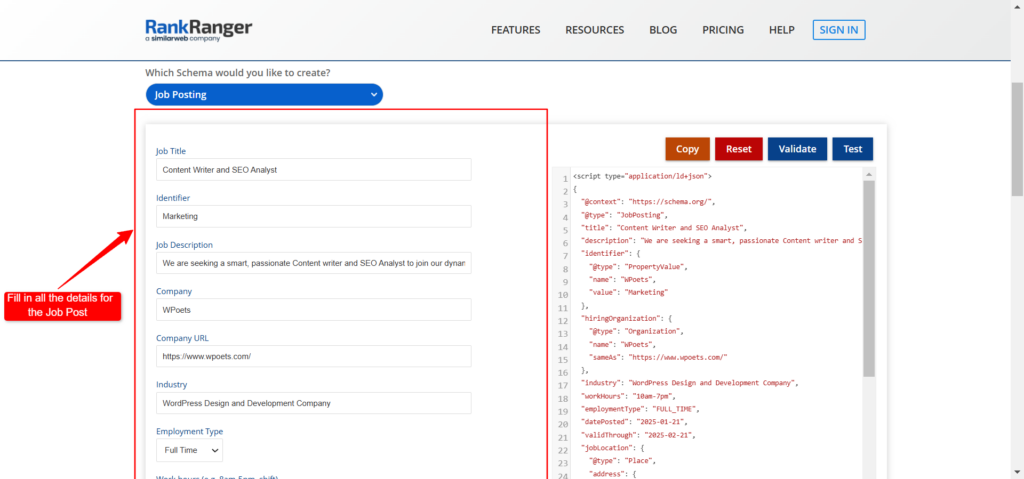
Add in all the job posting details. Examples of the details are provided in the screenshots below.
Job Title: Clearly state the role, like "Marketing Specialist" or "Web Developer," so candidates know exactly what’s being offered.
Job Description: Write a concise summary outlining the main responsibilities, required qualifications, and what the role involves.
Company Name and Website: Include the official name of the company and a link to its website to build trust and credibility.
Employment type: Provide details about the work being full time, part-time, or an internship.
Screenshot 14: Filling details for the Job Post in Schema Generator
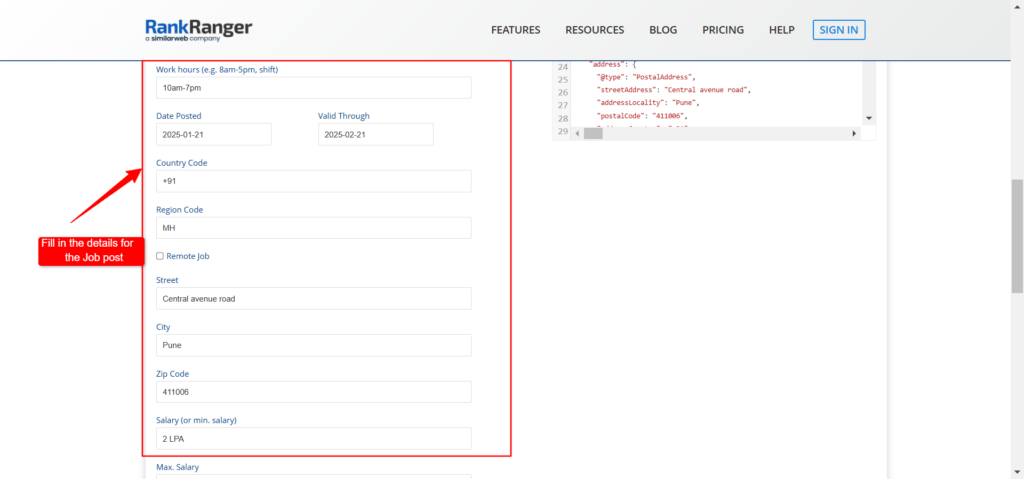
Next, add:
Work Hours: Specify the expected work schedule, such as full-time, part-time, or flexible hours.
Posting Date and Validity: Add the date the job was posted and the deadline for applications to ensure the listing remains relevant.
Location Details: Provide complete location information, including the country, state or region, city, street address, and zip code, to help local candidates find the opportunity.
Salary Range: Mention the minimum and maximum salary for transparency, along with the payment frequency (e.g., monthly, weekly, hourly).
Screenshot 15: Filling details for the Job Post in Schema Generator
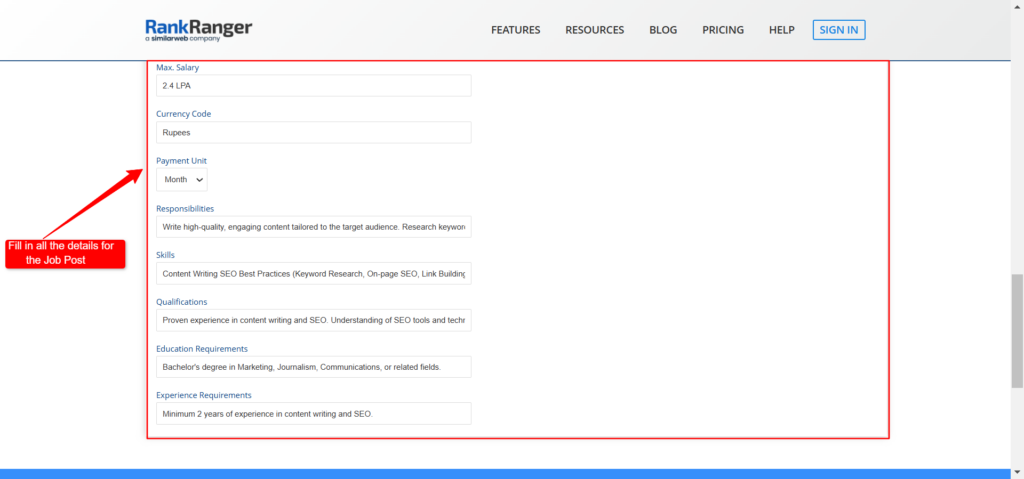
Then, add:
Responsibilities: Highlight the key duties for the role in simple, easy-to-understand terms.
Skills and Qualifications: List the must-have skills and qualifications required for the position.
Education and Experience: Specify the educational background and relevant experience needed to qualify for the job.
Screenshot 16: Filling details for the Job Post in Schema Generator
Step 2.3: Generate the Schema Code
Once all fields are completed, the Schema Code will be generated.
The tool will provide you with a custom JSON-LD schema code tailored to your job posting.
<script type="application/ld+json">{ "@context": "https://schema.org/", "@type": "JobPosting", "title": "Content Writer and SEO Analyst", "description": "We are seeking a smart, passionate Content writer and SEO Analyst to join our dynamic business Team. In this role, you will be responsible for writing content (Blogs, landing pages, case studies) and developing and implementing effective SEO strategies to enhance our website’s visibility, traffic, and overall performance. You should have: Proven content writing Experience: Demonstrated expertise in content writing, particularly for service-based pages, blogs, case studies, and landing pages. SEO expertise: Strong understanding of on-page SEO best practices, including keyword research, meta-tag optimization, and link-building strategies. Have experience in ranking keywords at the top of Search engines Analytical Skills: Ability to analyze content performance using tools like Google Analytics, SEMrush, or Ahrefs, and make data-driven decisions to improve SEO and engagement. Attention to Detail: Exceptional attention to grammar, style, and consistency, ensuring all content aligns with brand voice and messaging.", "identifier": { "@type": "PropertyValue", "name": "WPoets", "value": "Marketing" }, "hiringOrganization": { "@type": "Organization", "name": "WPoets", "sameAs": "https://www.wpoets.com/" }, "industry": "WordPress Design and Development Company", "workHours": "10am-7pm", "employmentType": "FULL_TIME", "datePosted": "2025-01-21", "validThrough": "2025-02-21", "jobLocation": { "@type": "Place", "address": { "@type": "PostalAddress", "streetAddress": "Central avenue road", "addressLocality": "Pune", "postalCode": "411006", "addressCountry": "+91", "addressRegion": "MH" } }, "baseSalary": { "@type": "MonetaryAmount", "currency": "Rupees", "value": { "@type": "QuantitativeValue", "unitText": "MONTH", "minValue": "2 LPA", "maxValue": "2.4 LPA" } }, "responsibilities": "Write high-quality, engaging content tailored to the target audience. Research keywords and optimize content for SEO. Develop SEO strategies to improve search engine rankings and organic traffic. Monitor and report on content performance using analytics tools. Collaborate with marketing teams to align content with business goals.", "skills": "Content Writing SEO Best Practices (Keyword Research, On-page SEO, Link Building) Data Analysis (Google Analytics, SEMrush, Ahrefs) Grammar and Style Expertise Attention to Detail", "qualifications": "Proven experience in content writing and SEO. Understanding of SEO tools and techniques. Ability to meet deadlines and manage multiple tasks efficiently.", "educationRequirements": "Bachelor's degree in Marketing, Journalism, Communications, or related fields.", "experienceRequirements": "Minimum 2 years of experience in content writing and SEO."}</script>
Code snippet 2: Code generated for Job Posting Schema in Rank Ranger Schema Markup Generator
Step 2.4: Add the Job Posting Schema JSON-LD Code to Job Post WordPress
Open the Job Post that we have created in step 2.1.
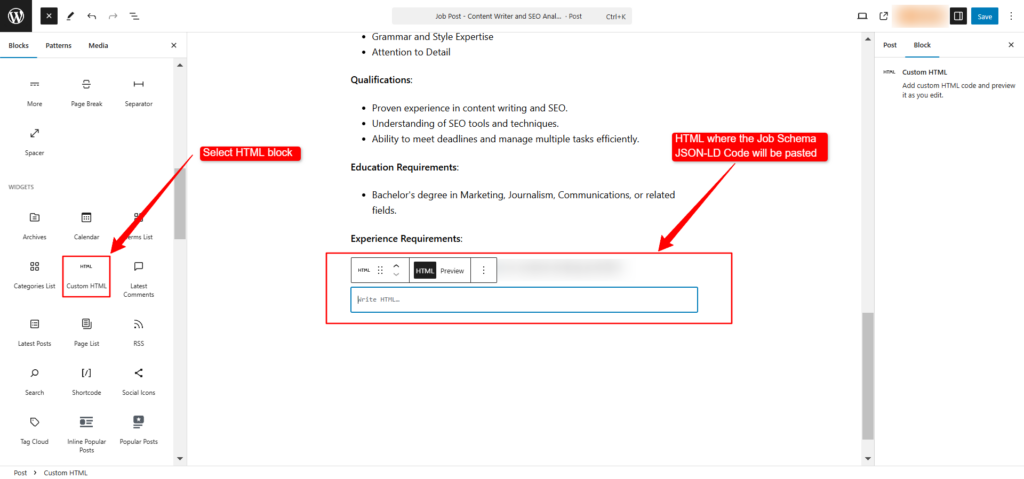
In the post editor, click on the + button to add a new block.
From the block options, select Custom HTML.
Screenshot 17: Adding an HTML Block to the Job Post
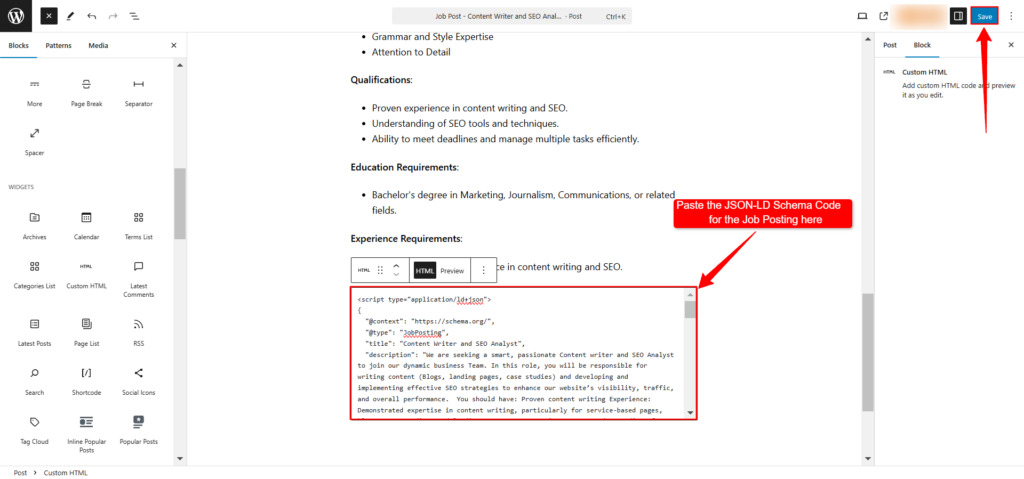
Paste the JSON-LD schema code that you copied into the Custom HTML block.
After pasting the code, click the Update button to save the changes to the job post.
Screenshot 18: Pasting the JSON-LD for Job Posting Schema in the HTML Block of Job Post
Validating & Testing Your Job Posting Schema Markup
After adding job schema markup to your WordPress site—whether through a plugin or manual integration—it’s crucial to test it to ensure everything is implemented correctly.
Proper testing helps search engines understand your structured data and display your job postings accurately in search results.
If any issues are detected, addressing them promptly will improve your chances of attracting the right candidates and boosting your visibility in search results. Here’s how you can validate your schema:
Tools to Validate Your Schema
1) Google’s Rich Results Testing Tool:
This tool checks if your structured data is set up correctly and whether your job postings are eligible for rich results.
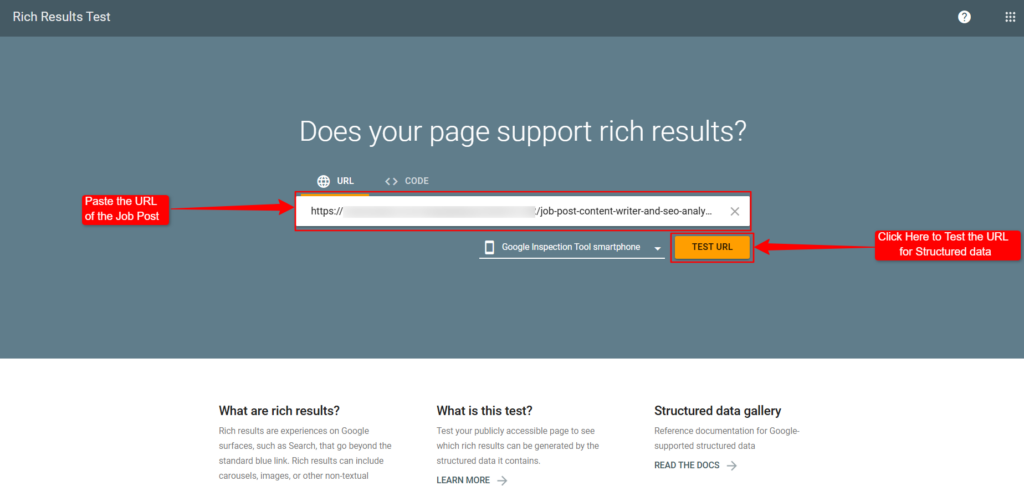
Enter the URL of your job post into the search bar.
Screenshot 19: Pasting the Job Post URL with Schema Markup Code in Google Rich Results Test
Click the “Test URL” button to start the validation process.
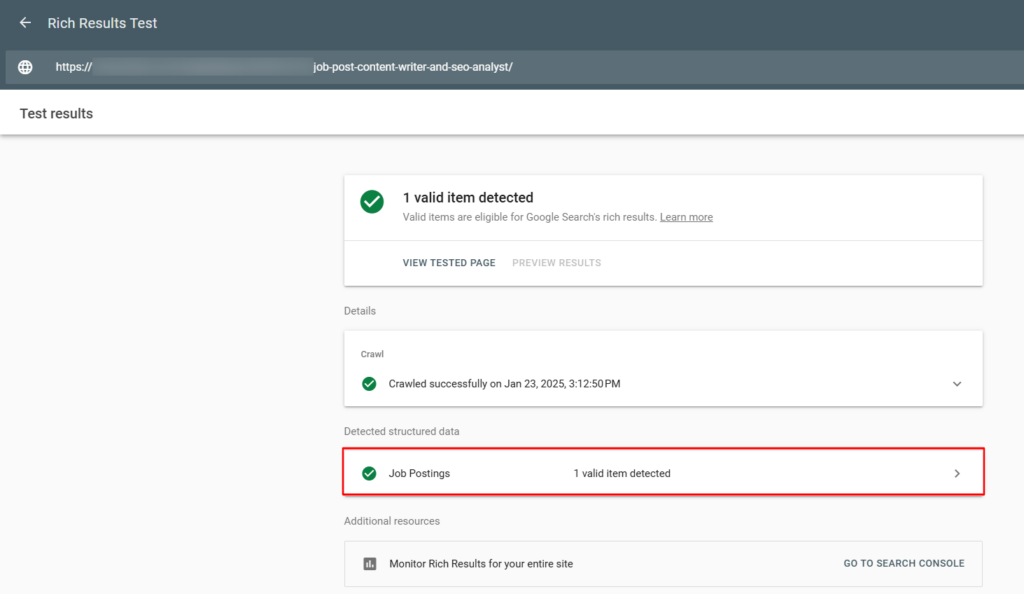
Screenshot 20: Testing the Job Post Schema Markup Code in Google Rich Results Test
Once the test is complete, you’ll see the results. If your job schema is valid, it will display as “Detected”. If there are any errors or warnings, they’ll be highlighted, making it easier for you to resolve them.
2)Schema.org Validator
This is another handy tool to verify your job schema. It’s designed to analyze different types of structured data, including job postings, and point out any issues.
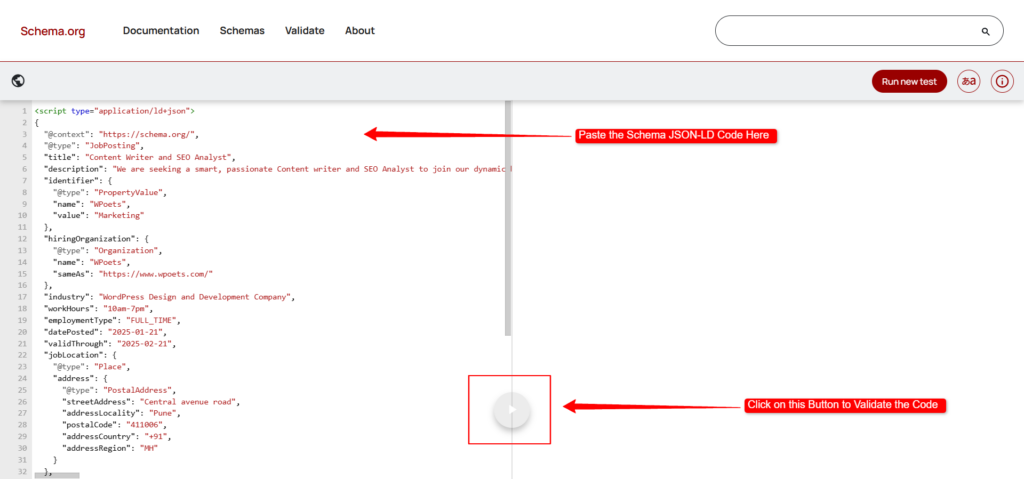
Paste the URL of your job post into the search box.
Screenshot 21: Pasting the Job Posting Schema Markup Code in Schema.org
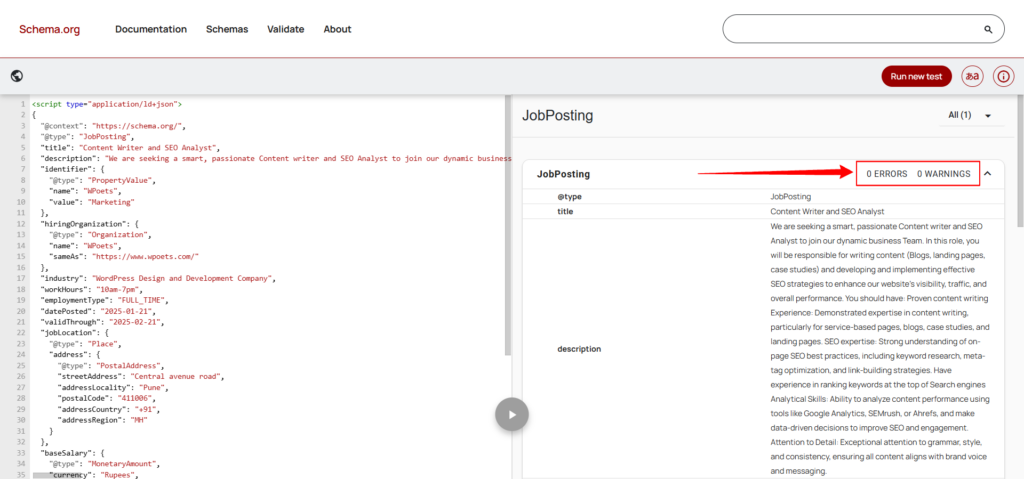
Click the Validate button (play icon) to analyze your schema markup as shown in screenshot 21.
Screenshot 22: Validating the Job Posting Schema Markup Code in Schema.org
The tool will generate a summary of the structured data on your page. If there are any syntax errors or missing elements, they’ll be listed so you can fix them immediately.
Tips to make your job postings stand out:
Use Clear Job Titles: Include keywords that match what candidates are searching for, making your posting easier to find.
Write Engaging Descriptions: Add relevant keywords and detail key responsibilities to attract the right candidates.
Mention the Location: Include the job’s location and use location-specific keywords to target local candidates.
Optimize URLs: Edit URLs to be clean, easy to read, and include relevant keywords.
Keep It Fresh: Regularly update your job posts and schema data to maintain visibility.
Conclusion
Adding job schema markup to your WordPress site significantly enhances the visibility of your job listings in search results, making it easier to attract the ideal candidates. Whether you use Rank Math for an easy setup of Job schema or manually add JSON-LD code, job schema improves the job-seeking experience.
To maximize the effectiveness of your job listings, be sure to optimize your titles, descriptions, and location information with relevant keywords. Regularly update your schema markup and use tools like Google’s Rich Results Testing Tool to validate it.
Elevate your job postings today by implementing schema markup and attracting more qualified applicants. For additional tips on optimizing your WordPress site, check out our blogs.
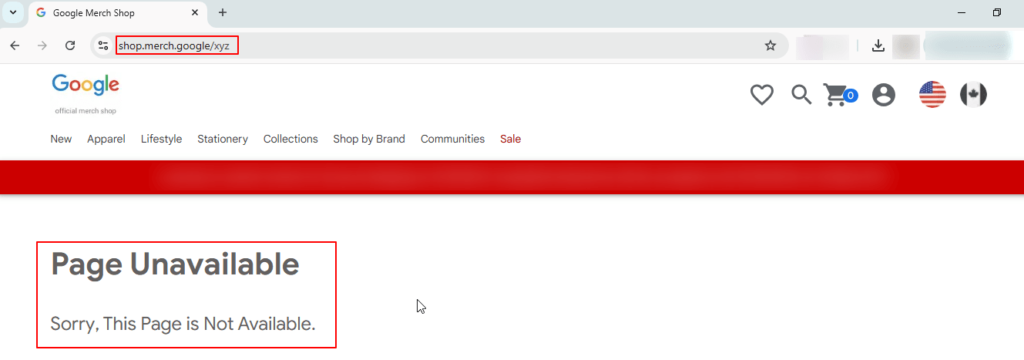
Enter the URL https://shop.merch.google/xyz and note down the 404 Page Title
Screenshot 1: Google Merchandise Store Page Unavailable
The title of the page says Page Unavailable.
Check the page title of your website’s 404 web page. Page not found is a common page title of 404 error pages.
Step 2: Setup and engagement report in Google Analytics 4
Login to Google Analytics 4 GA4
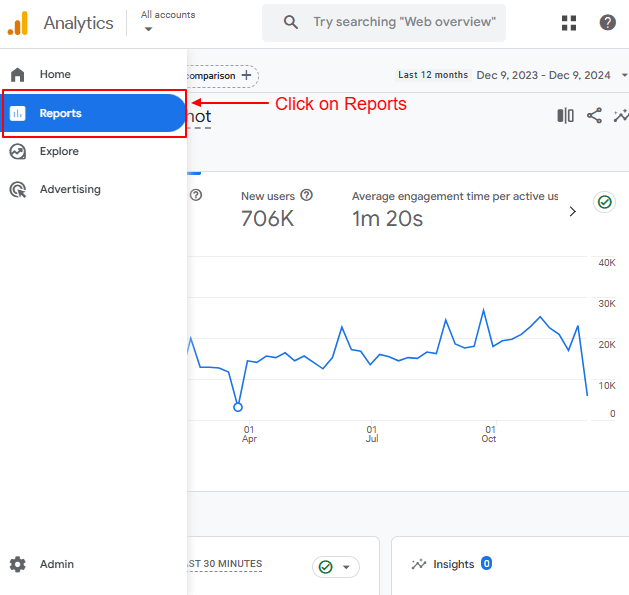
Navigate to Reports.
Screenshot 2: Click on reports
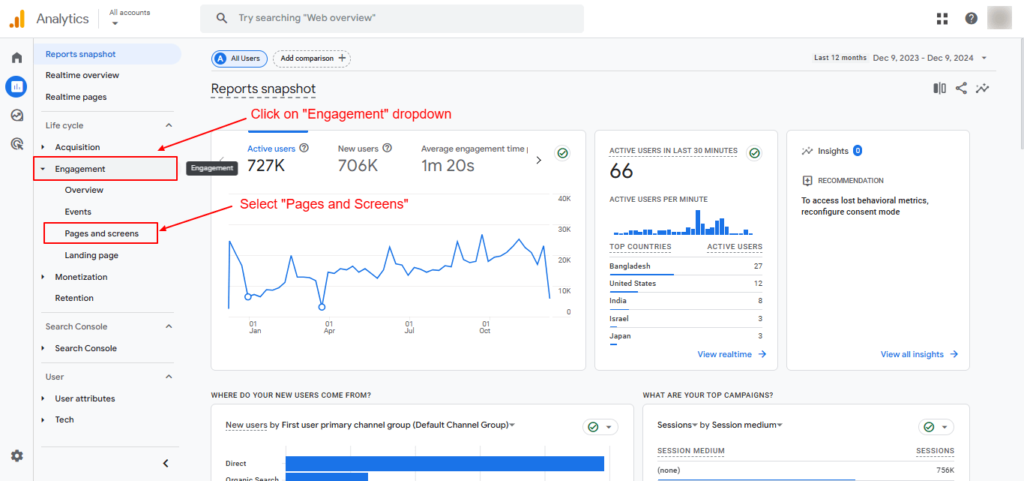
Click on the Engagement dropdown and select Pages and Screens.
Screenshot 3: Select Pages and Screens
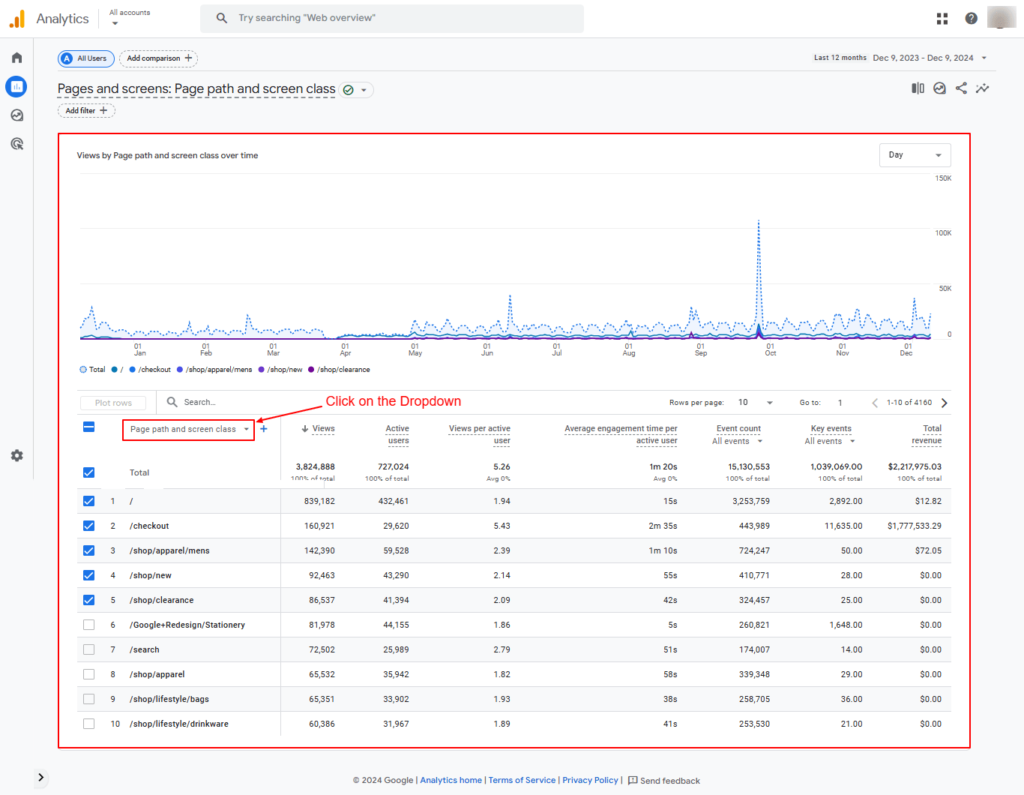
After clicking on Pages and Screens the following report will appear, as shown in the screenshot below.
Screenshot 4: Pages and Screens Report
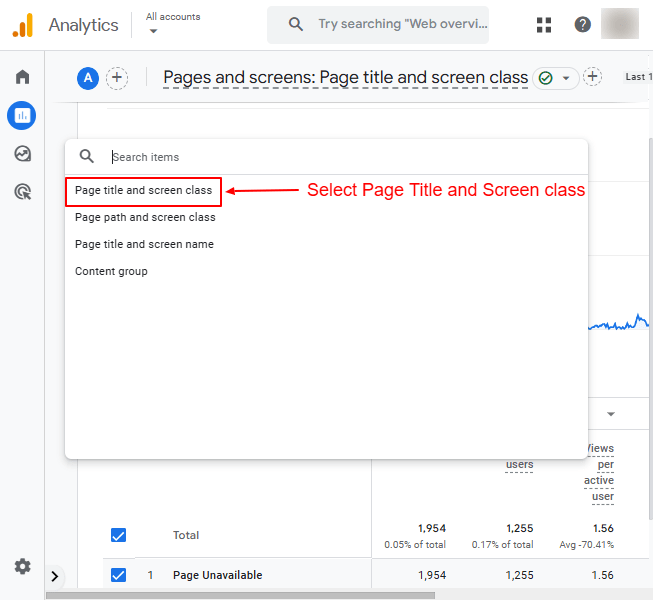
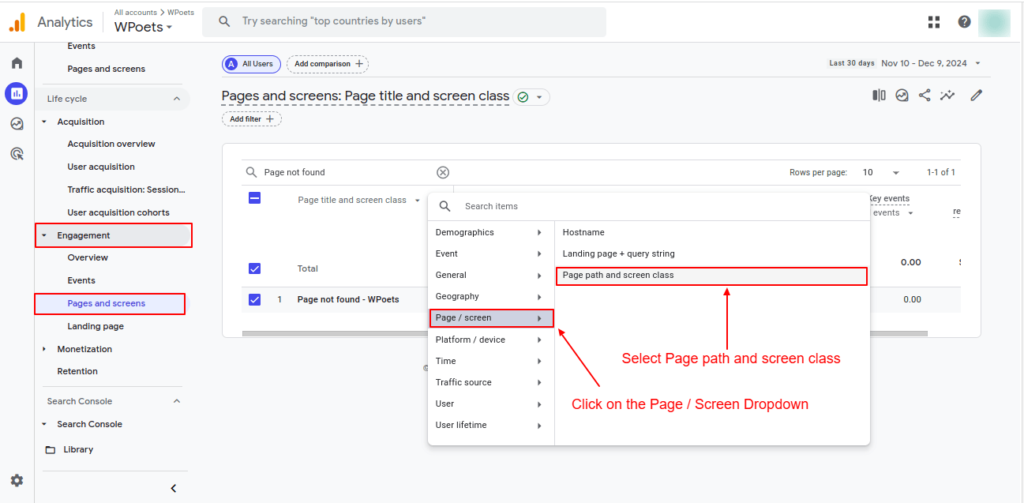
Select the Page title and screen class.
Screenshot 5: Select Page Title and Screen Class
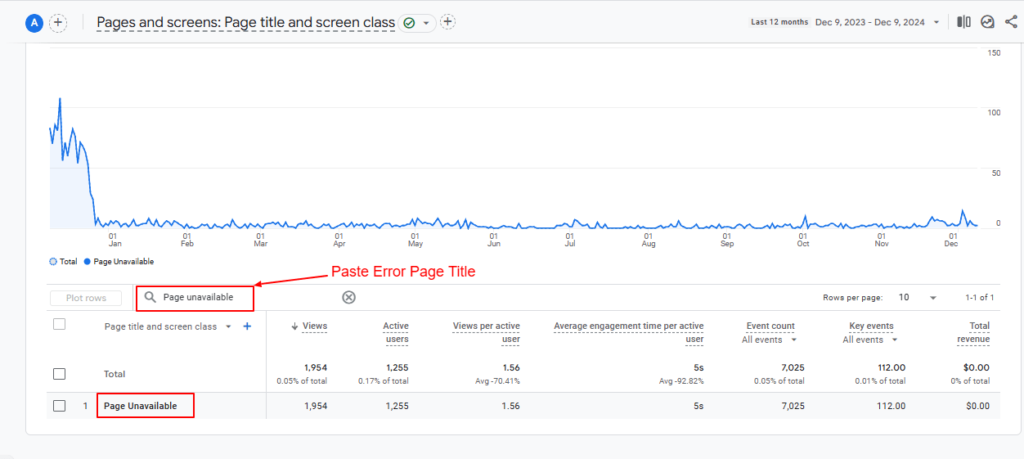
Click on the search bar as shown in the screenshot below.
Type the page title of the 404 page, which is “Page Unavailable,” and press enter.
Screenshot 6: Paste the Page Title of the 404 page
At this step, we got aggregated data of 404 pages.
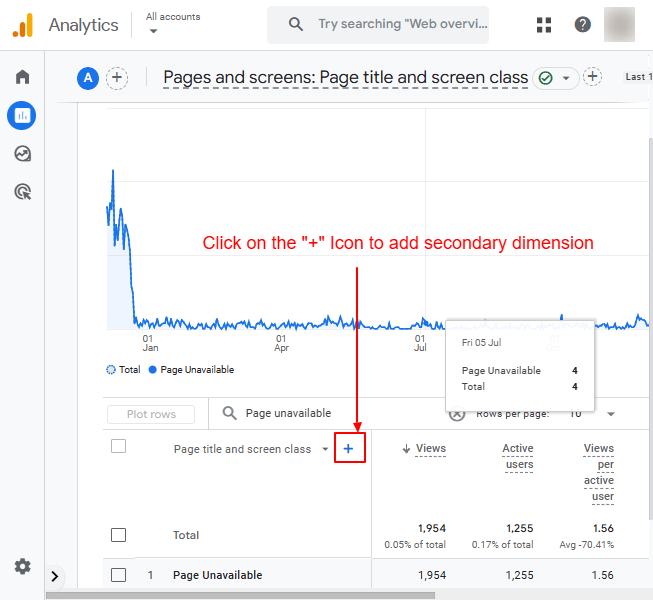
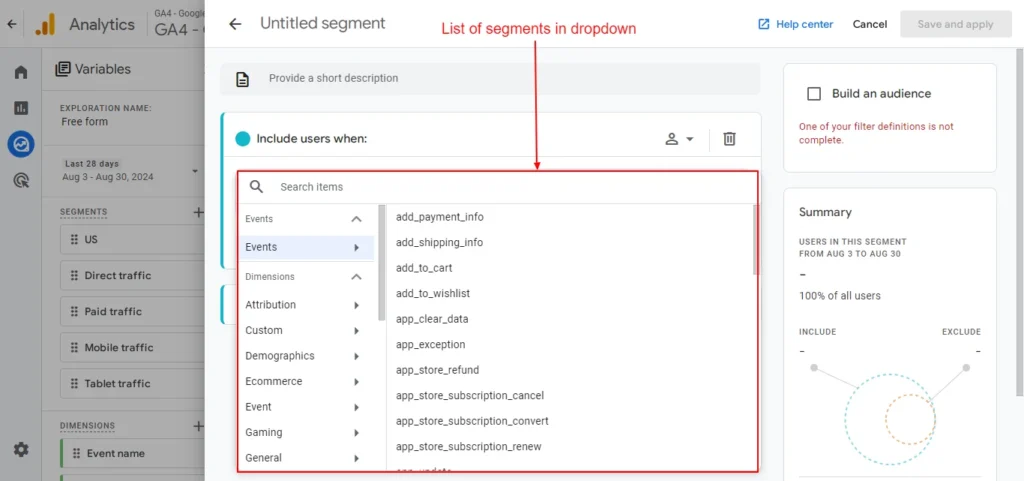
Click on the “+” icon as shown in the screenshot below and add a secondary dimension tothe Page path and screen class.
Screenshot 7: Click on the “+” Icon
Select the Page path and screen class as shown in the screenshot below.
Screenshot 8: Select Page path and screen class
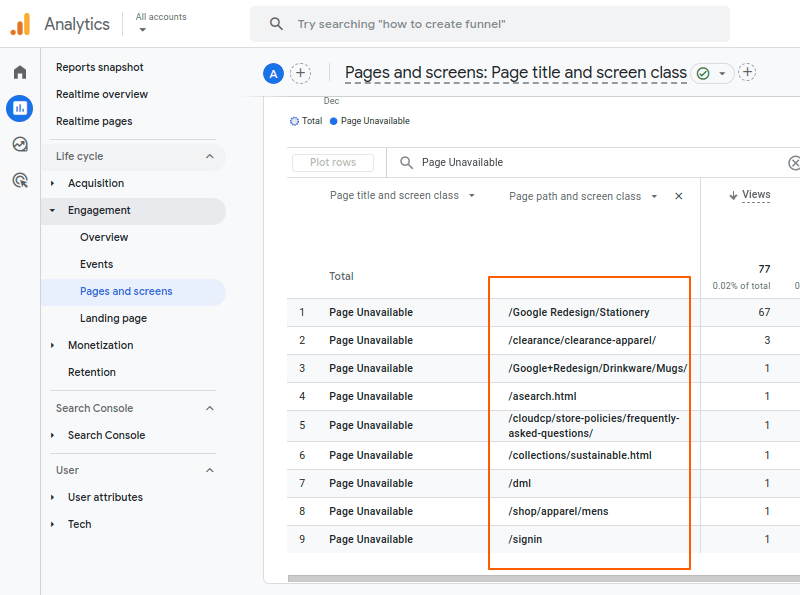
Once it’s done, you will see the list of 404 pages with the URLs shown in the screenshot below.
Screenshot 9: Ga4 engagement report List of 404 Pages with URLs
Method 2: Using GA4 free form exploration technique
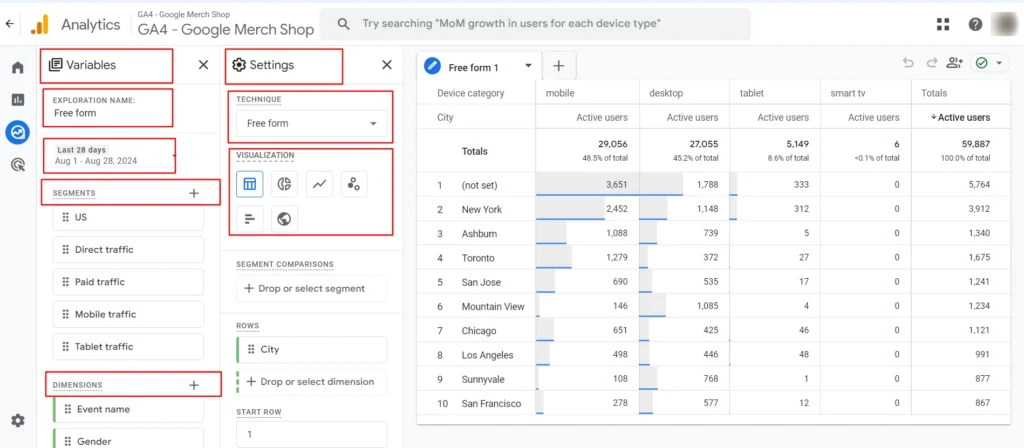
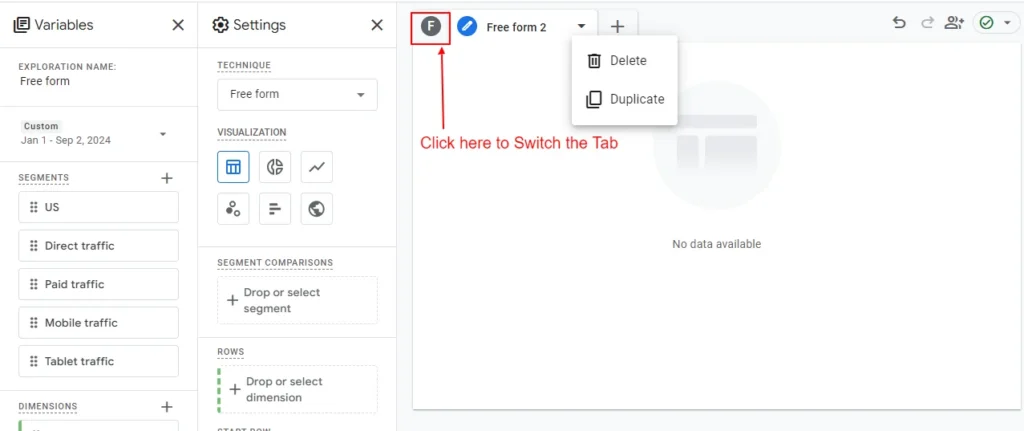
In this method, we use the free from exploration report tab under the explore menu.
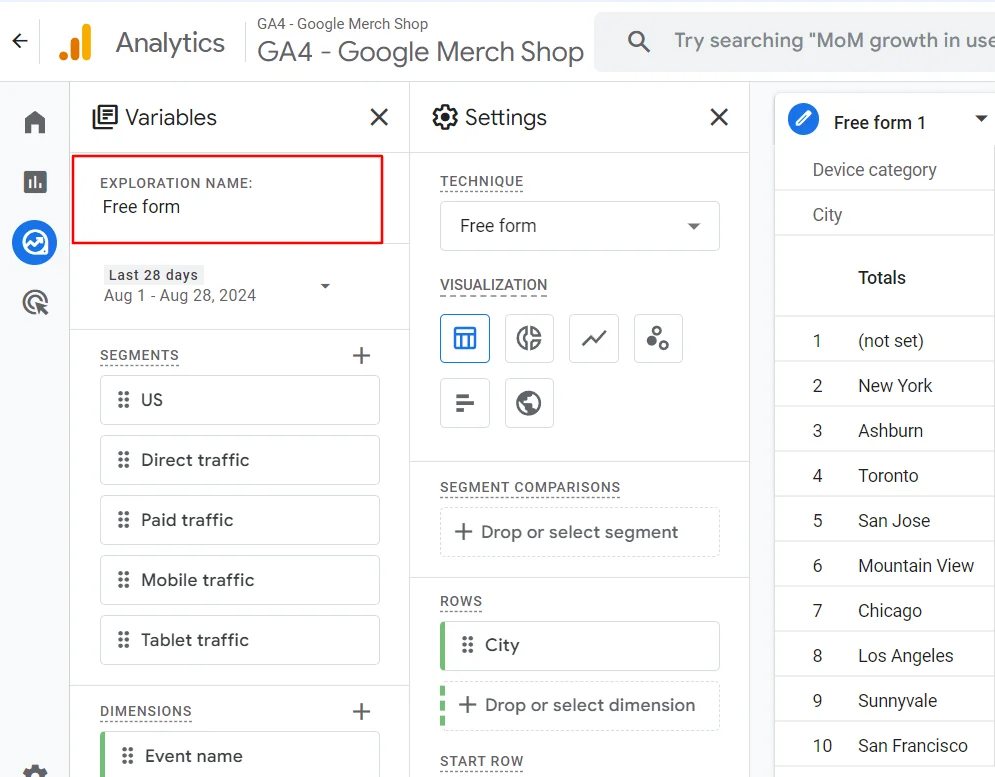
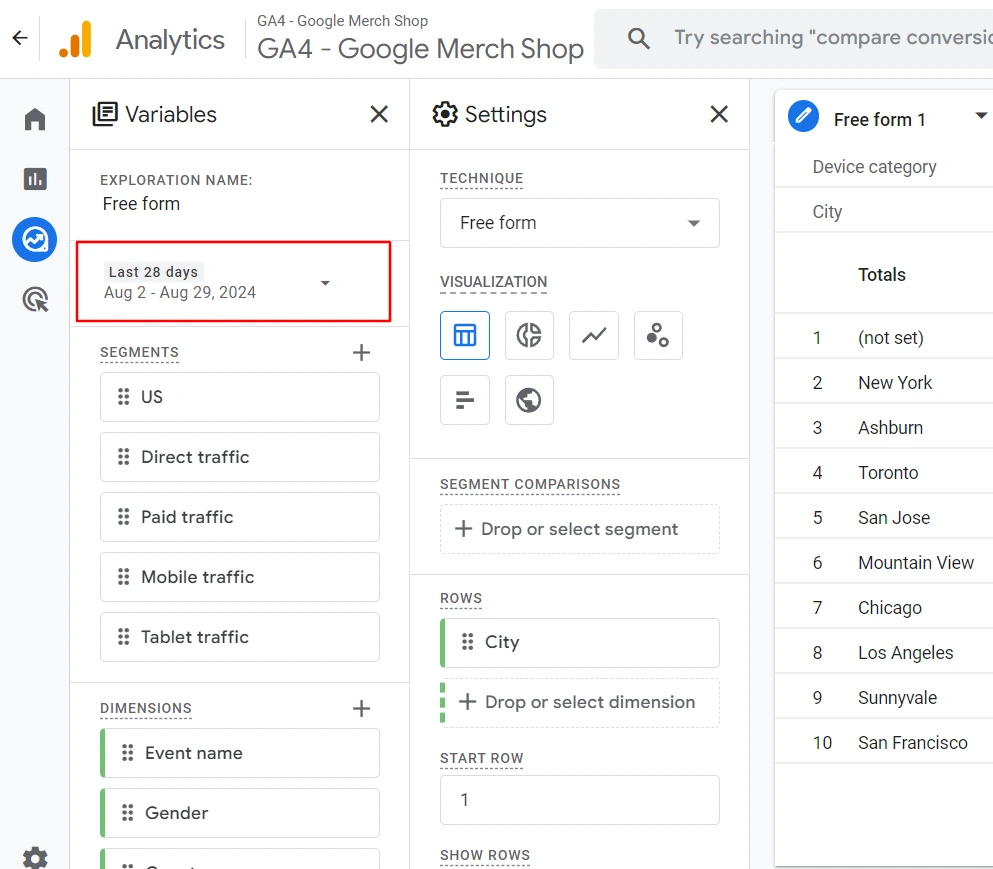
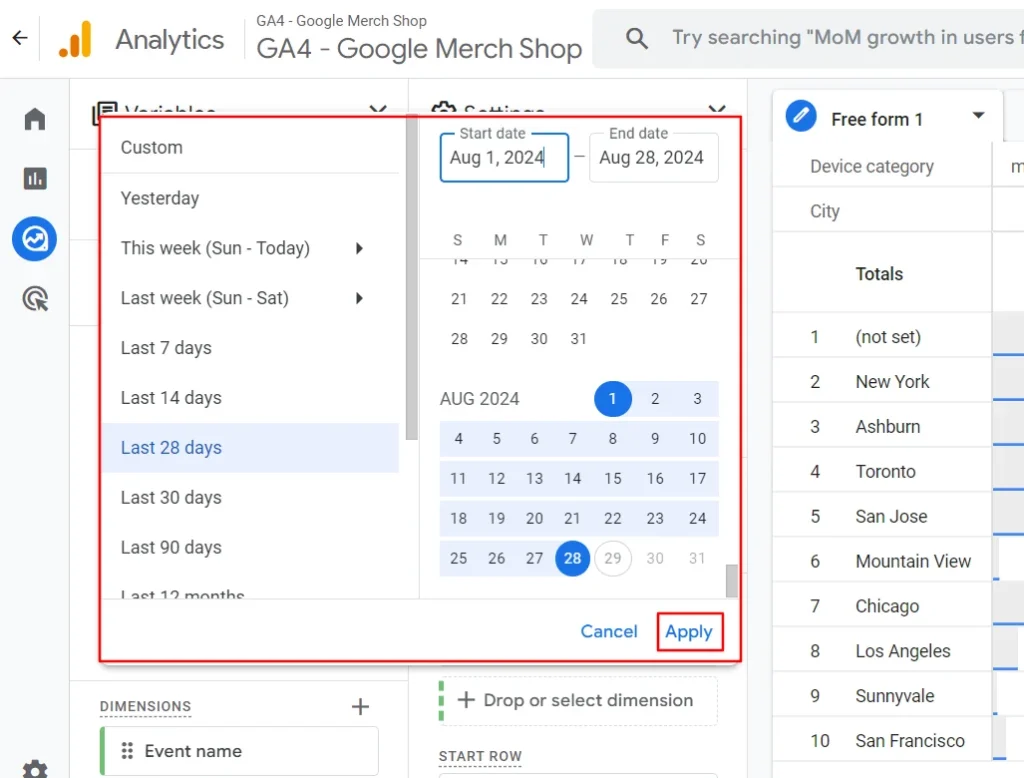
Step 1: Create a free from exploration
Logging in to your Google Analytics account
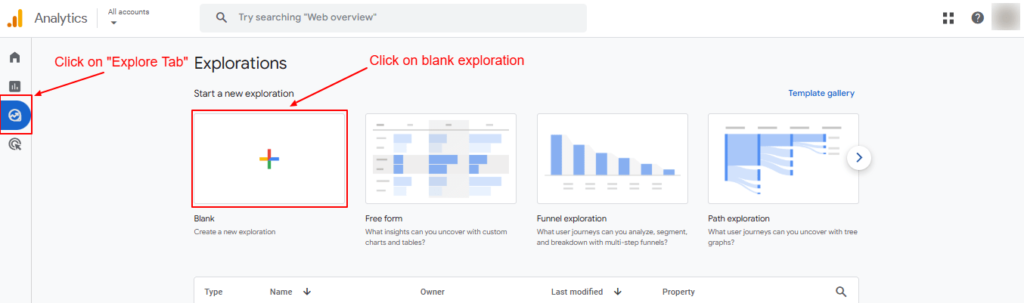
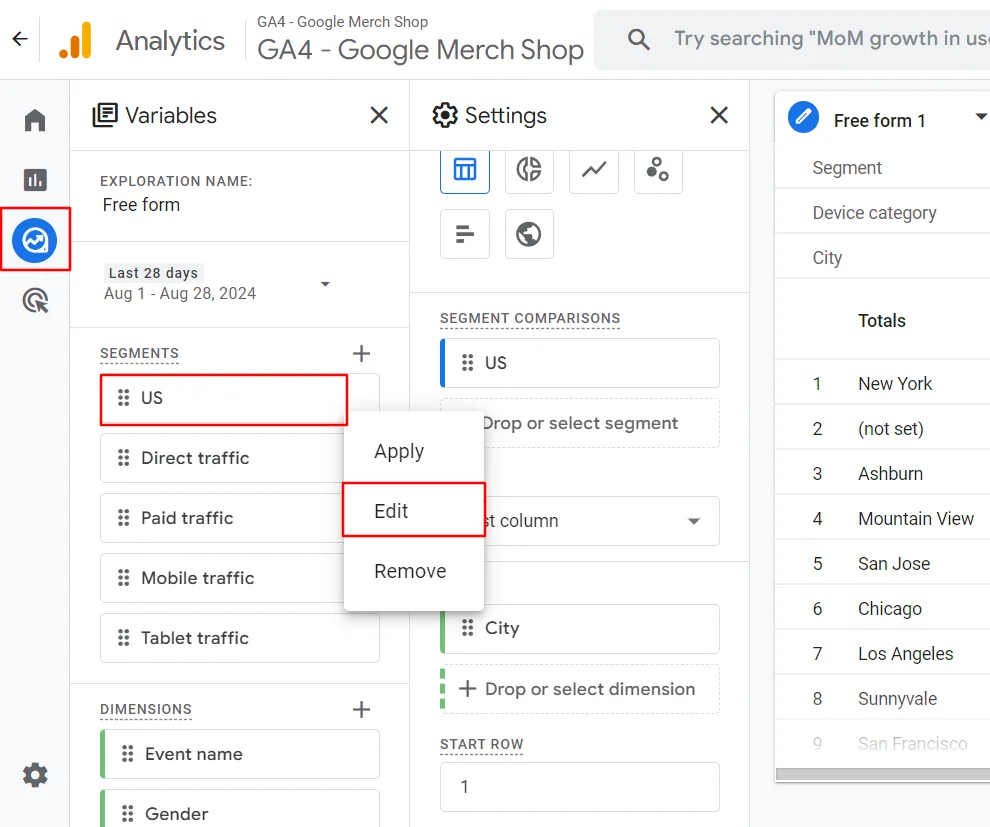
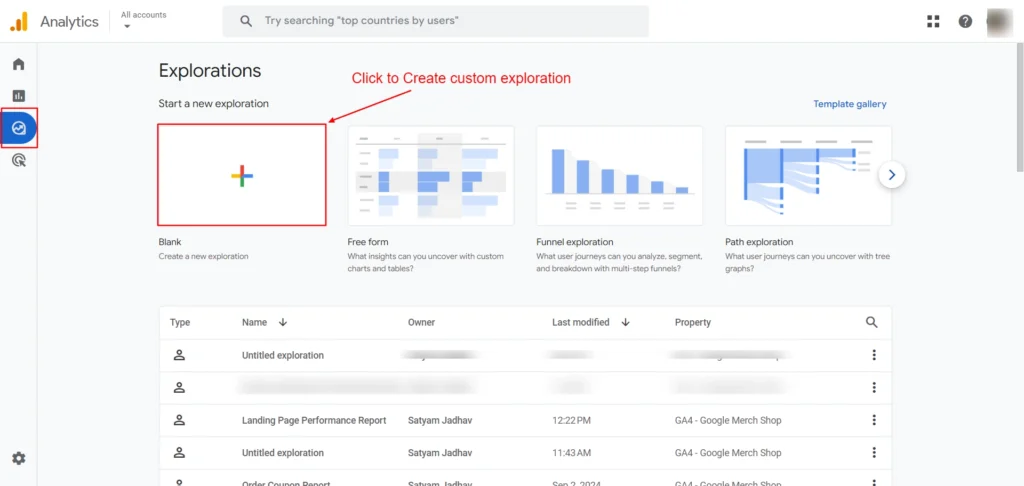
To start a custom report, click on the Exploration tab on the left-hand side
Click on the blank Exploration to start a new exploration.
Screenshot 10: Blank Exploration Report
Step 2: Add Dimensions
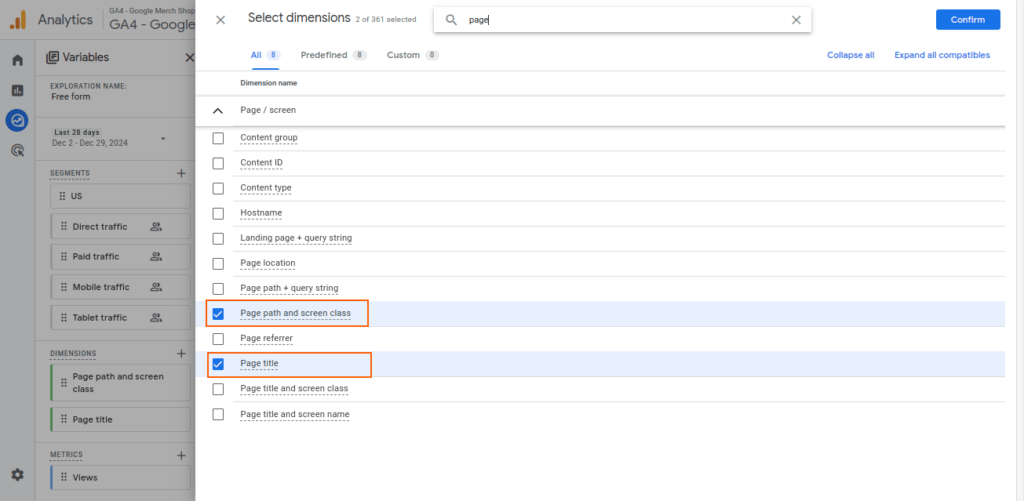
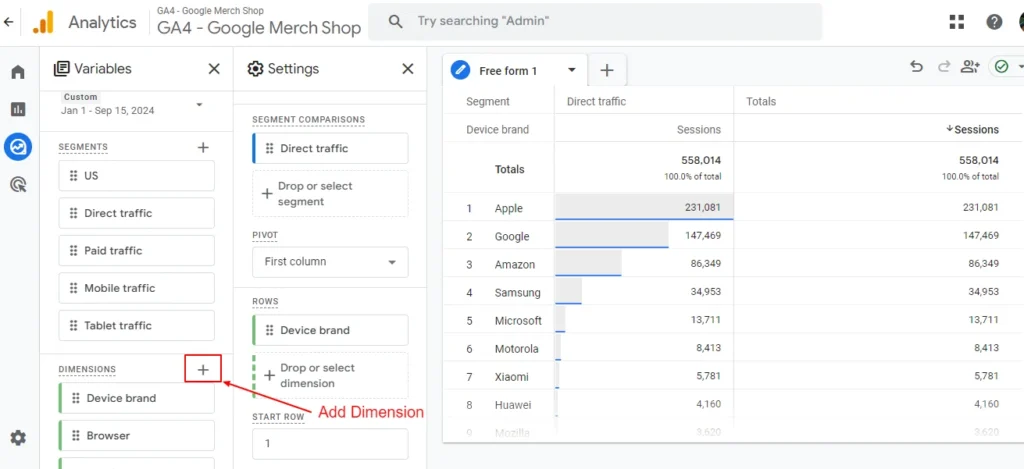
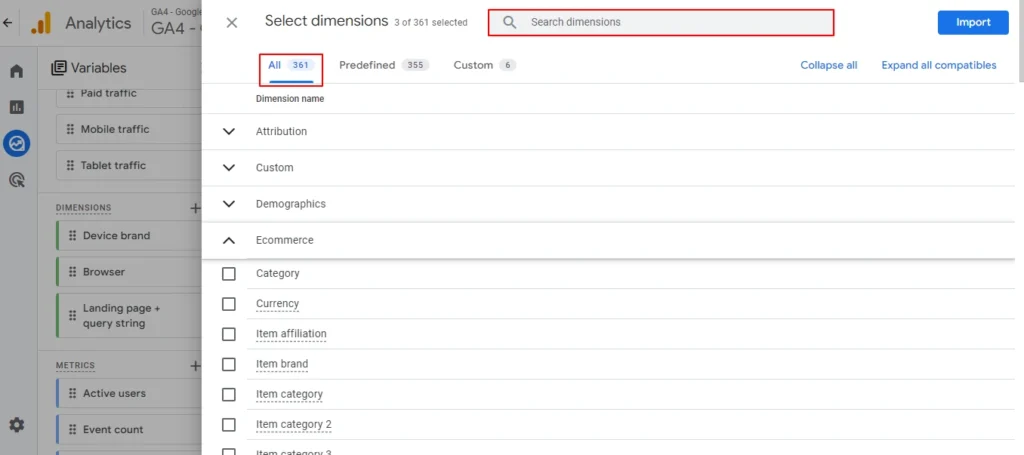
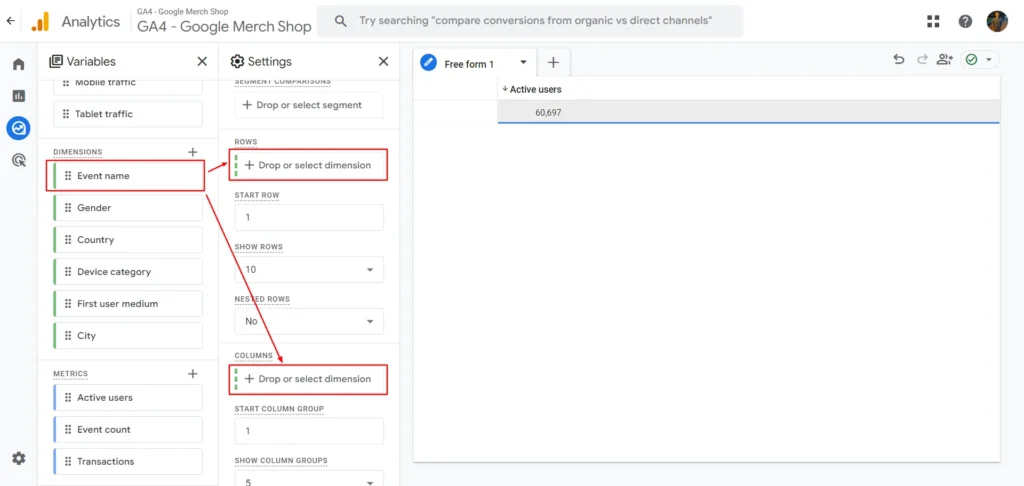
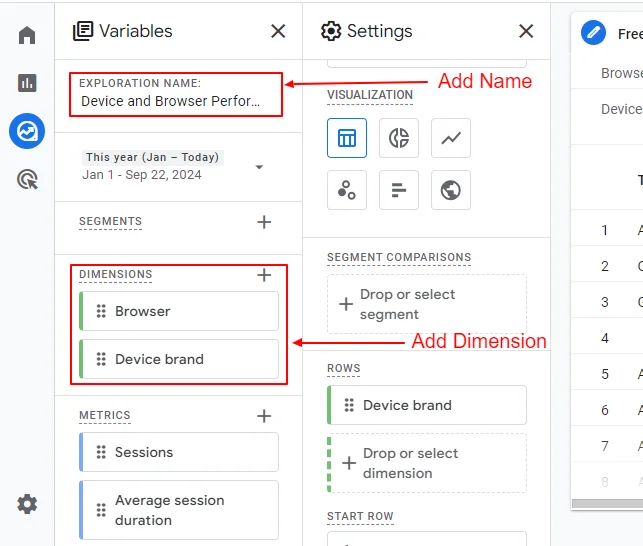
Let’s add Dimensions by clicking on the “+” icon.
On the search bar, type Page.
Select the following Dimensions and add it to Rows
Page path and screen class
Page title
Screenshot 11: Select Dimensions
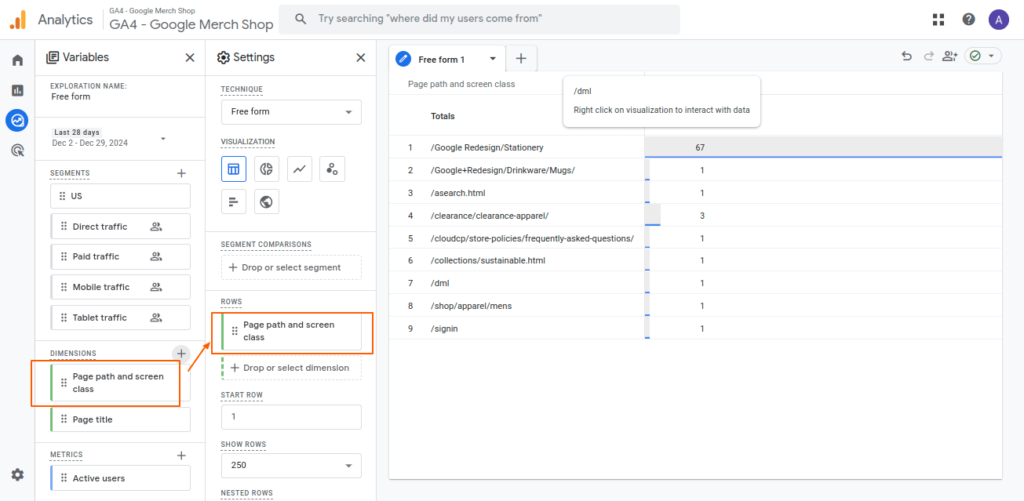
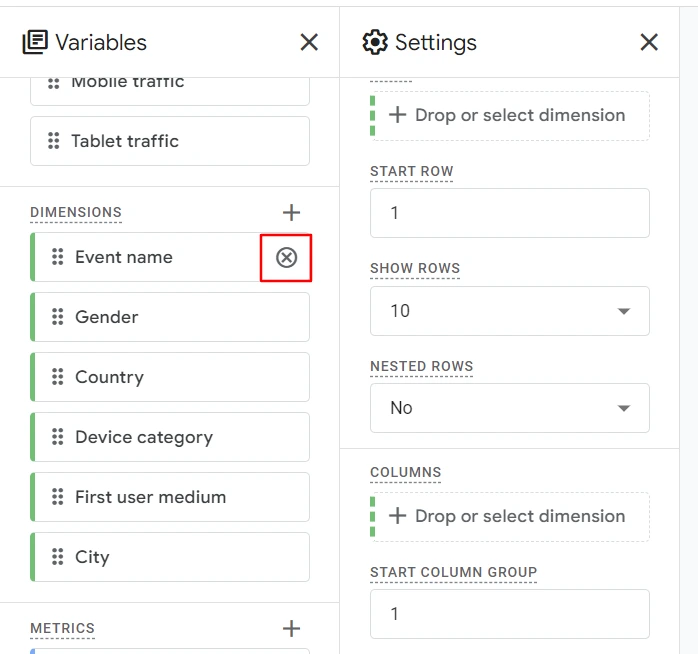
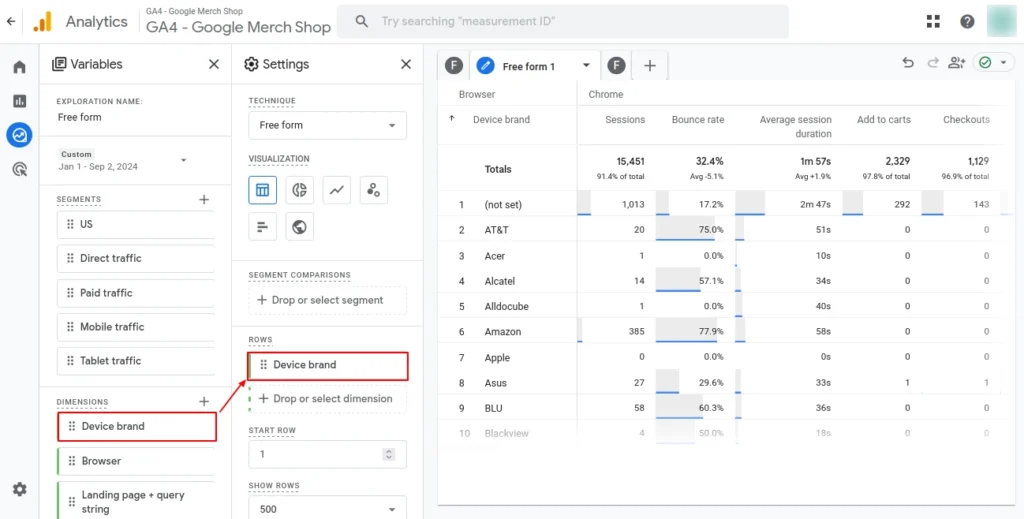
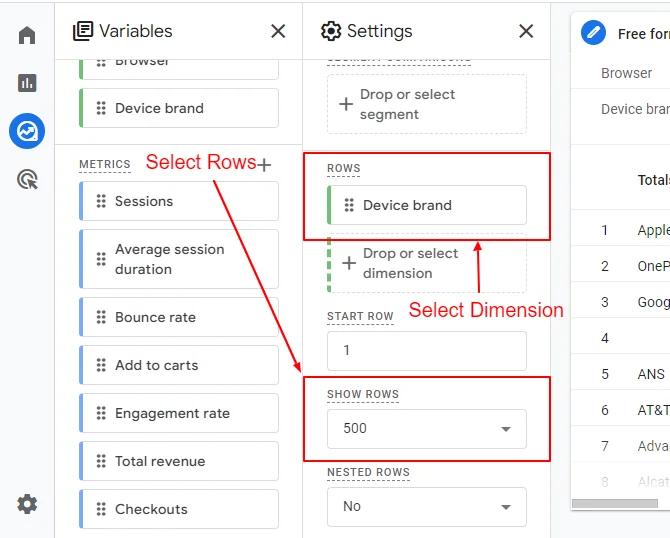
Now drag and drop or select the Dimensions from the Variable Tab to Rows in the Settings Tab.
Screenshot 12: Drop the Dimensions In Rows
Step 3: Add Metrics
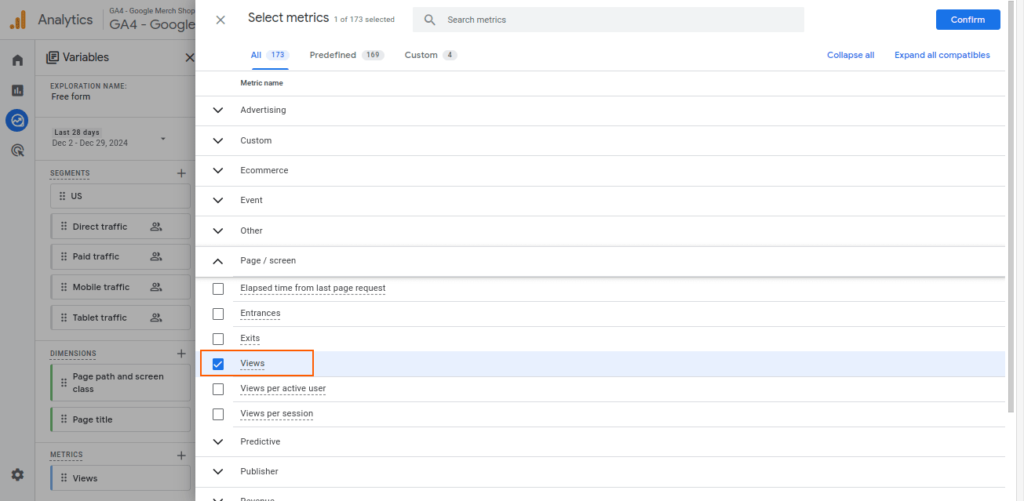
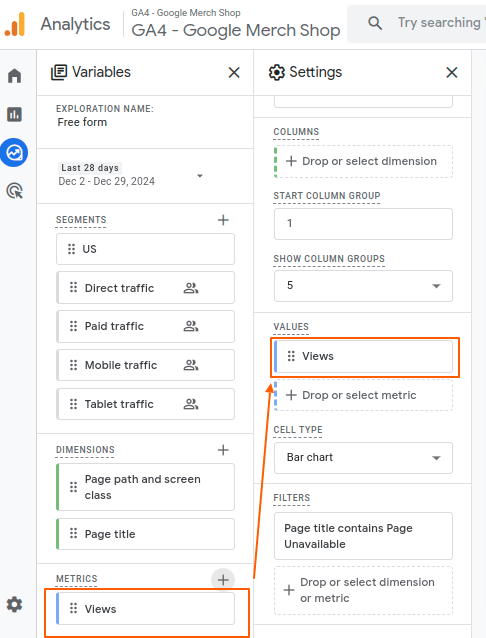
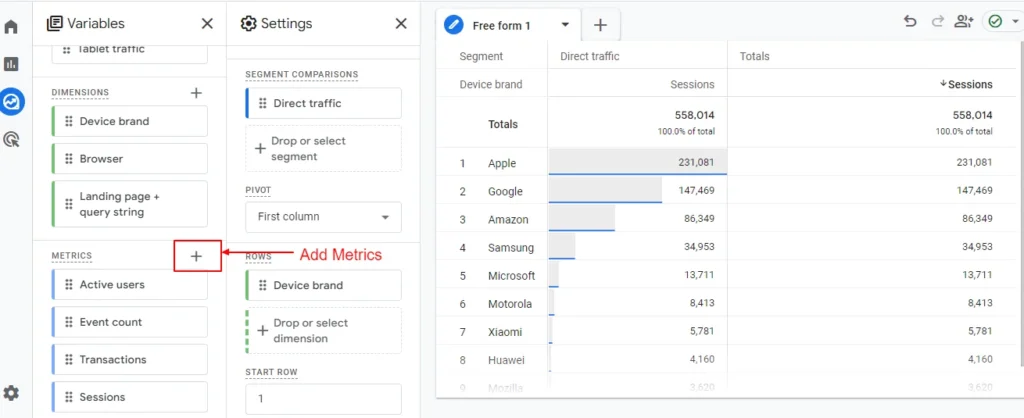
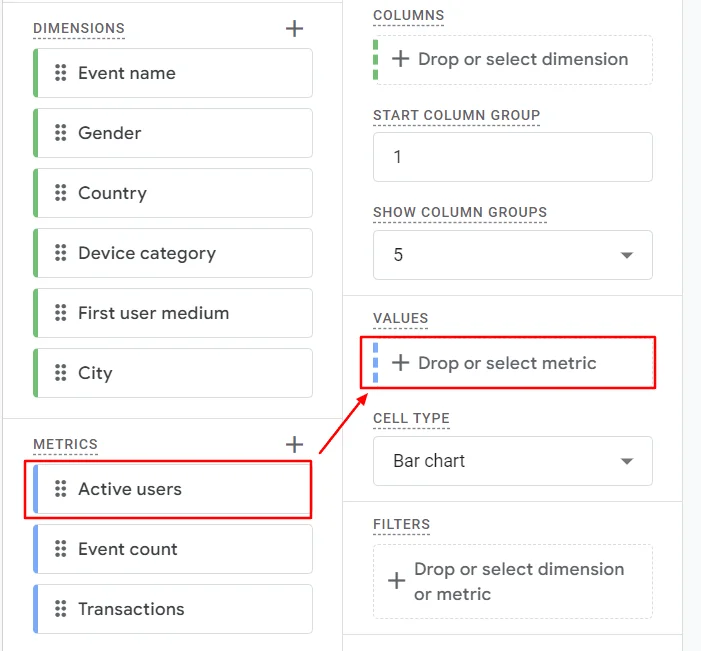
We will now head over to the Metrics, and add the view metric
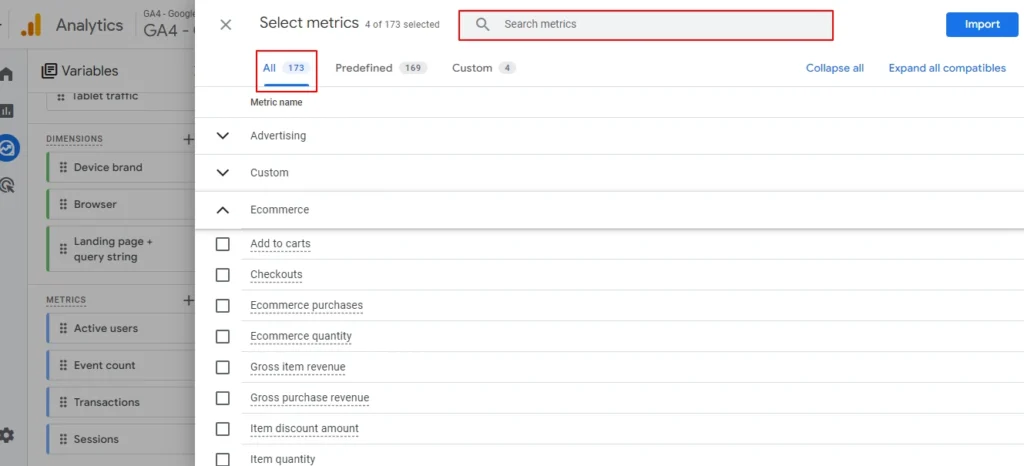
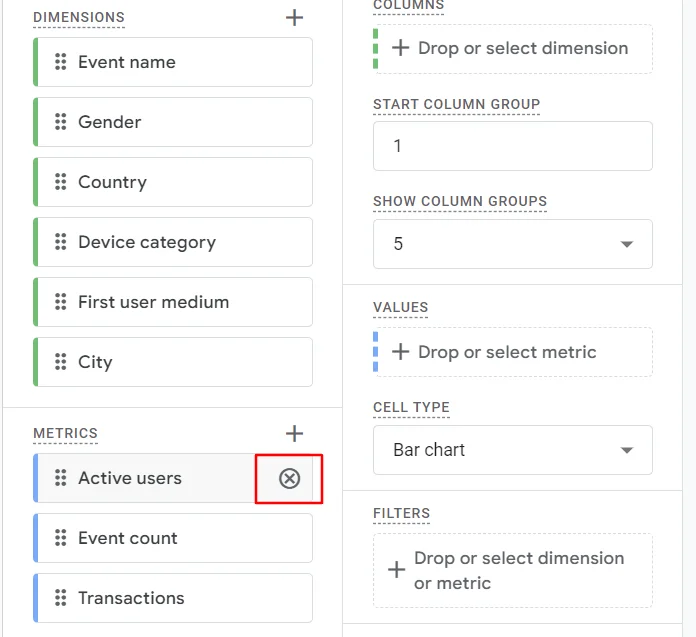
As we added the Dimensions do the same for the Metrics by clicking the “+” icon and then clicking on Confirm.
Screenshot 13: Select Views Metrics
Screenshot 14: Drop the Views metrics in Values
Step 4: Filter Data
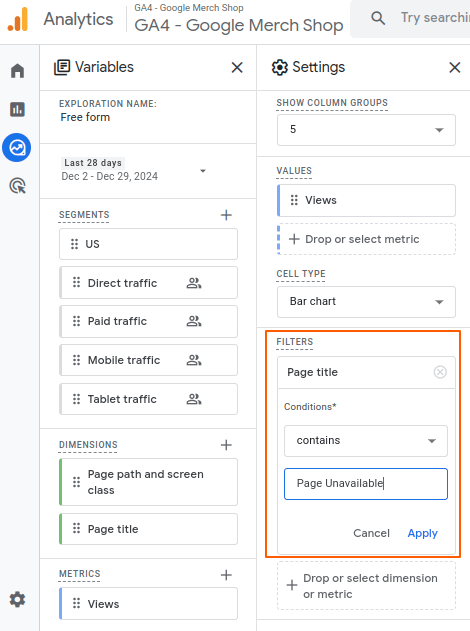
Next, we will filter the report by using Filters.
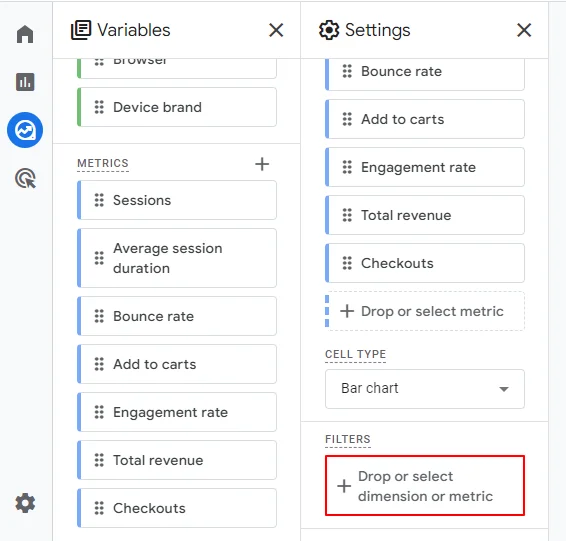
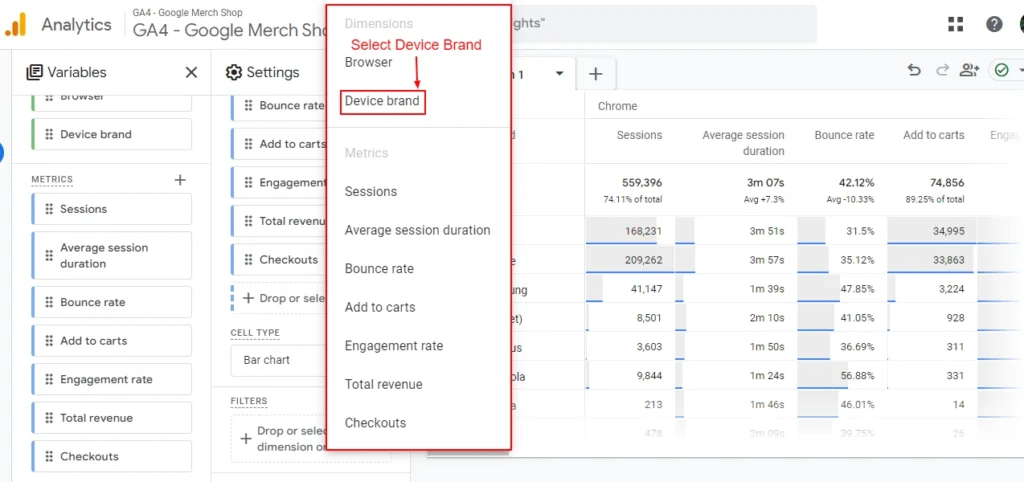
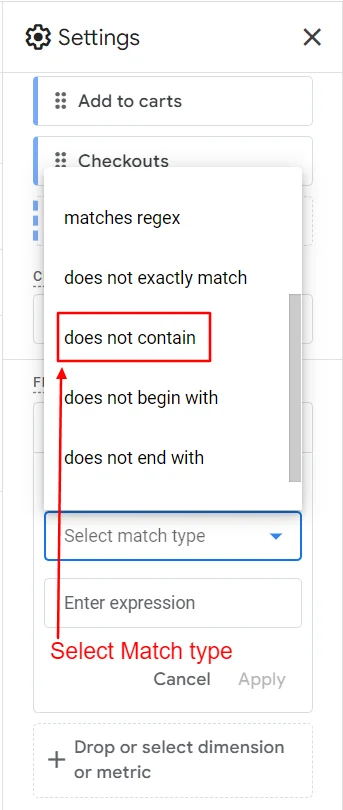
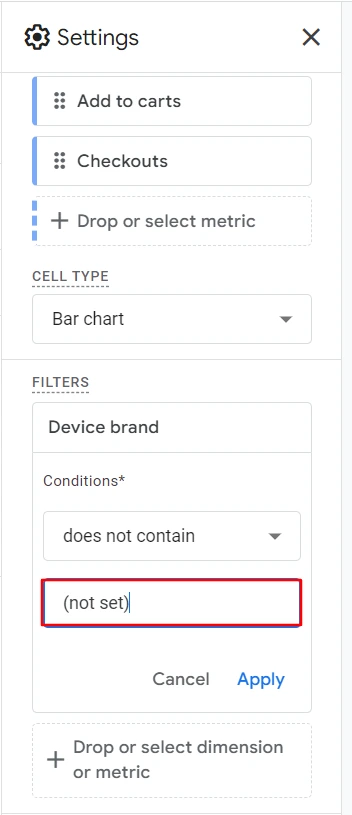
Select the Page Title in Filters. Select match type as contains.
In Enter expression text box, type the error page title. GA4 will autocomplete the text, and you will get a drop-down list of pages.
Select Page unavailable and click Apply.
Screenshot 15: Apply filters
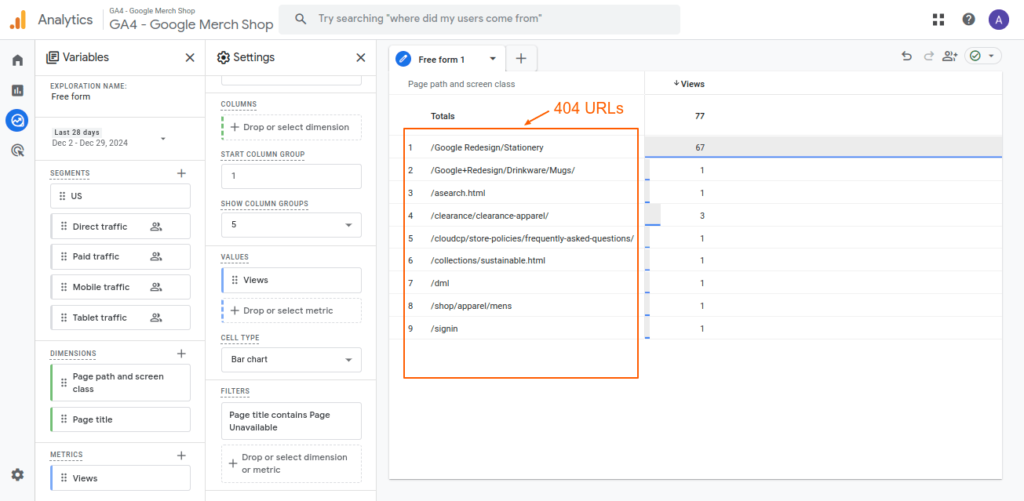
Below we will get the Final Custom Report of the Exploration.
Screenshot 16: 404 URLs in free form reports
Method 3: Using GA4 custom events via Google Tag Manager (GTM)
This method uses the Google Tag Manager data layer to send a custom event to GTM.
A few pre-requirements are that you must have installed GTM on your website and configured it. You can use Google Sitekit WordPress plugin to install GTM.
Step 1: Push a custom 404 event to the Google Tag manager
First, let’s push a custom event to Google Tag Manager (GTM) to track 404 errors.
To do that first, we have to add a custom script to the functions.php file in the WordPress theme. For this tutorial, we are using the WordPress Twenty Twenty-four theme.
A few things to consider when adding custom code to your theme
We recommend adding custom code to the child theme's functions.php file instead of the parent theme’s functions.php.
To know more about creating a child theme, go through the Themes Handbook.
Before making any changes to your site we recommend, that you should always back it up.
At the minimum, you should make a copy of your child theme’s functions.php (if you have already created it and edited it)since we are modifying it. If something goes wrong when you are adding code to it, then you can restore it.
Here is a script to add to your WordPress child theme‘s functions.php
An add_404_custom_event callback function is added to the wp_head hook. The script below will be added to the HTML head tag.
// Code for sending custom event to data layer function add_404_custom_event() {
// Ensure the script runs only on 404 pages if (is_404()) { ?> <script> wiindow.dataLayer = window.dataLayer || []; window.dataLayer.push({ 'event' : 'page_not_found_404' // Name it whatever you like }); </script> <?php } // is_404 check }
Inside the function, we first check if the page is a 404 page. If yes, we push a custom event page_not_found_404 to the data layer of GTM.
Once you have added the above code in the functions.php file, save it and upload it to the child themes folder.
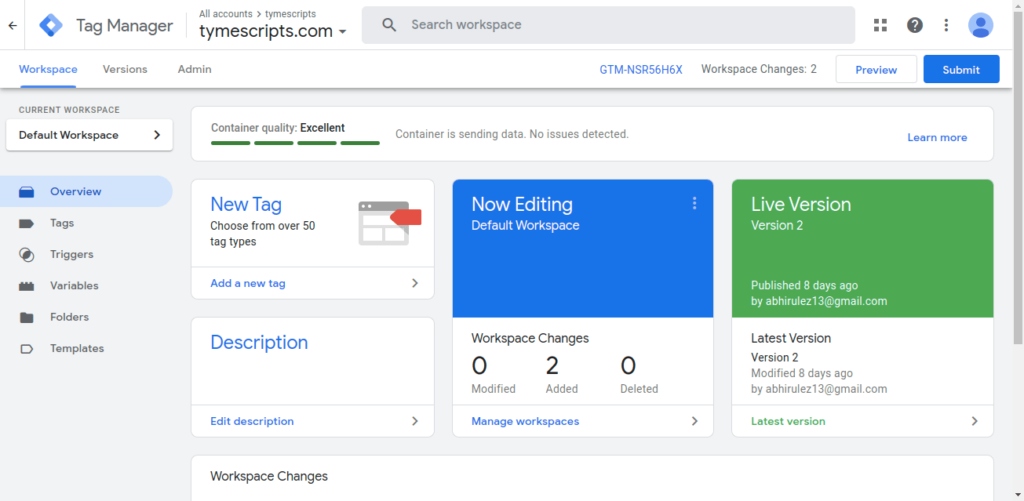
Next, head over to your Google Tag Manager’s Overview tab.
Click on the preview button on the toolbar, as shown in the following screenshot below.
Screenshot 17: Click on the Preview button
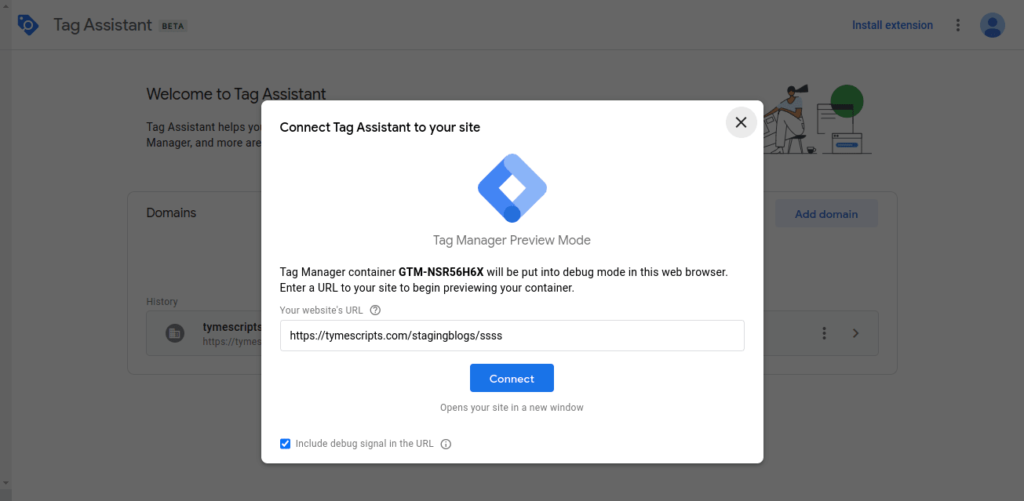
Screenshot 18: Tag Manager Preview Mode
In the Your website's URL textbox, enter the 404 error URL; for example, add ssss to your base URL, for e.g. yourwebsite.com/ssss
Uncheck the checkbox; include a debug signal in the URL.
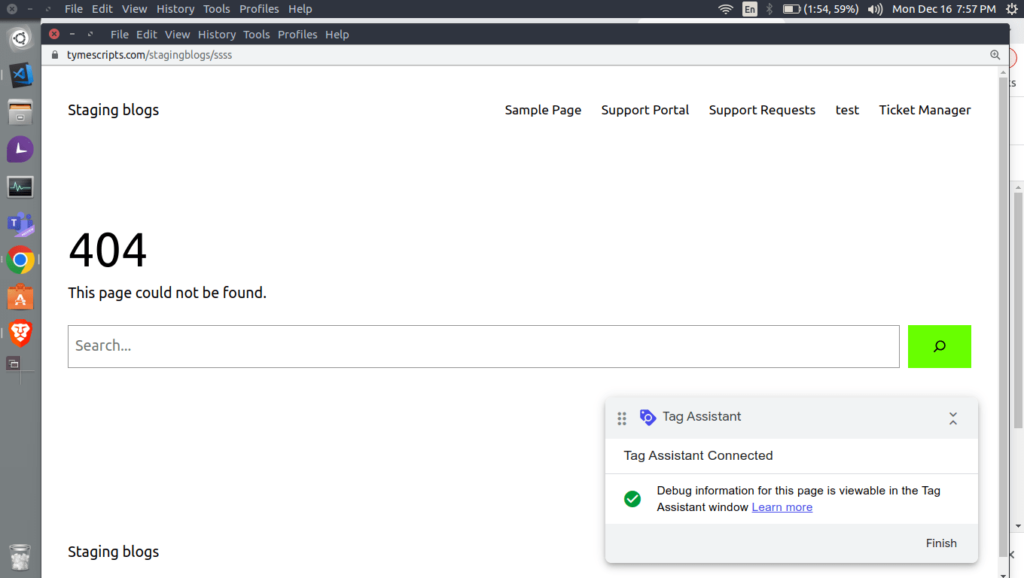
Click on Connect. This will open the entered URL in a new window, as shown in the below screenshot (number)
Note : Ensure you are not logged in as a WordPress user since the Google Sitekit plugin excludes logged-in users from tracking in Google Analytics 4 and GTM. Hence the custom event will not be fired and will not be available in Datalayer.
Screenshot 19: Tag assistant connected page in New Window
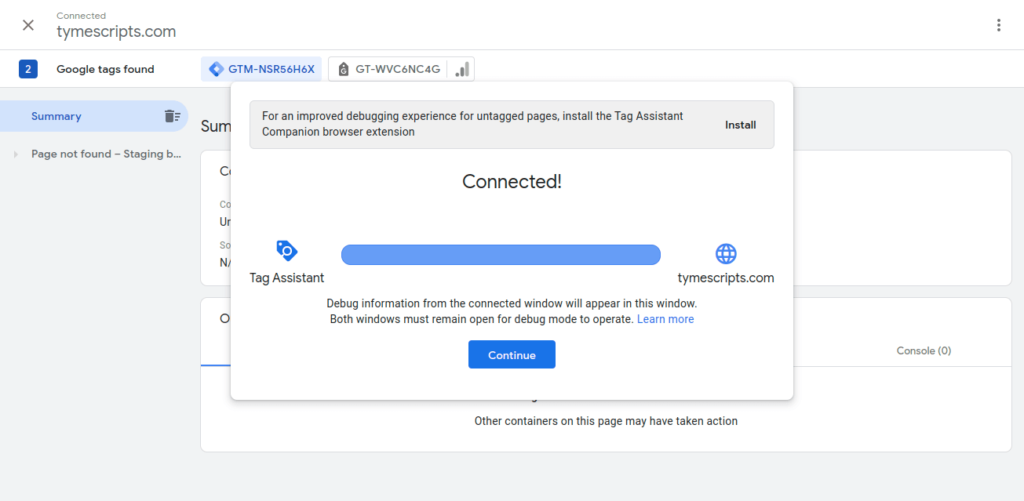
Screenshot 20: Tag manager connected Dialog box
Once Tag assistant is connected, click on the Continue button
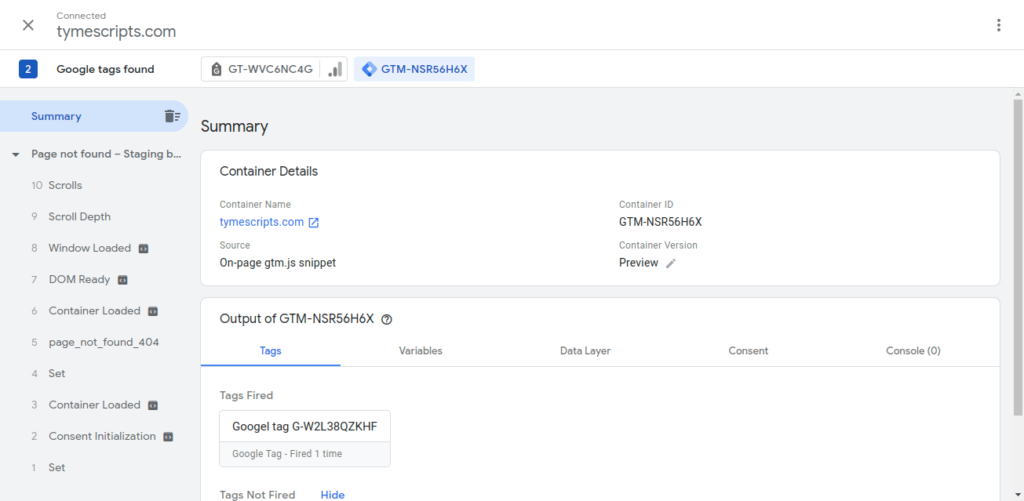
On the summary pane of the tag assistant screen, you will see the custom event fired.
Screenshot 21: page_not_found_404 event
Step 2: Send the 404 custom event to GA4 using the trigger
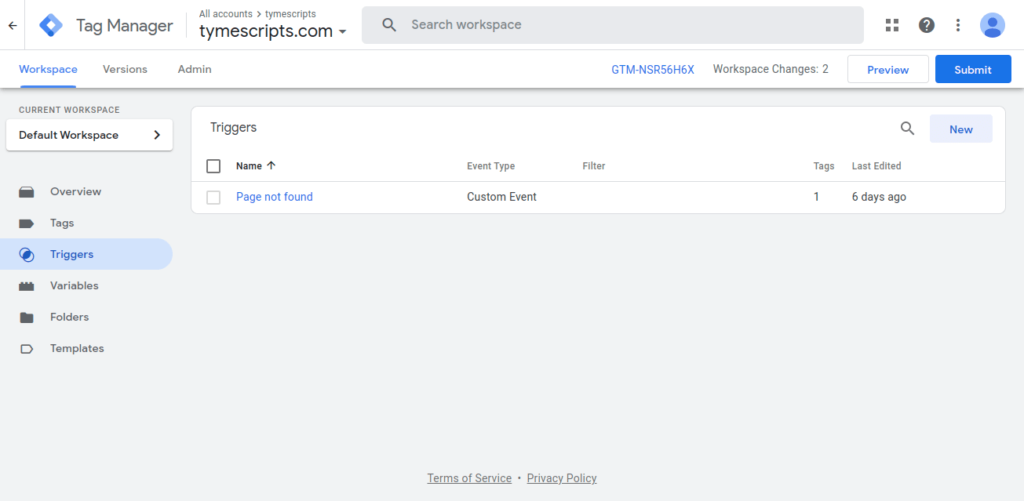
Go to the Trigger menu in the Google Tag Manager
Click on the New Button to create a trigger
Screenshot 22: GTM Workspace Triggers
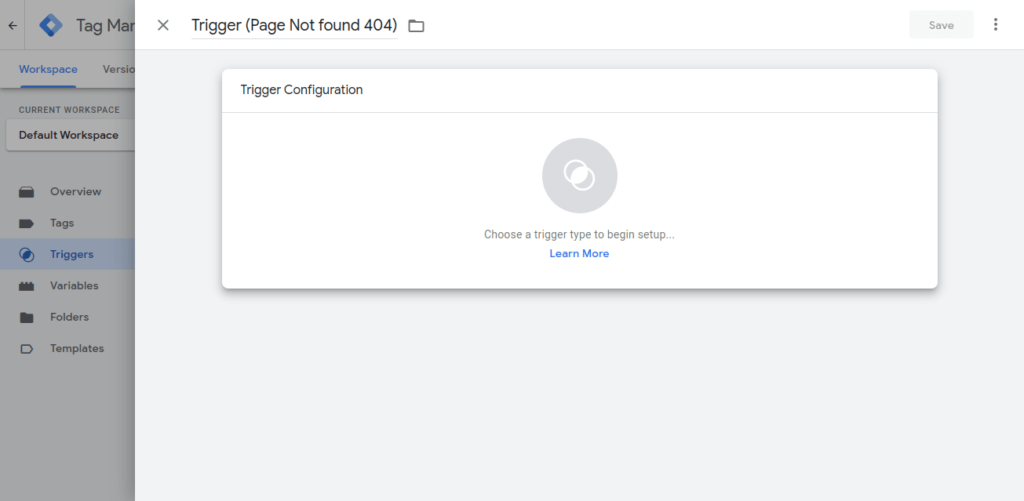
Screenshot 23: Name the Trigger
First, name the Trigger something descriptive. For example, Trigger (Page Not Found 404)
Next, click anywhere on the Trigger Configuration section to enable edit mode.
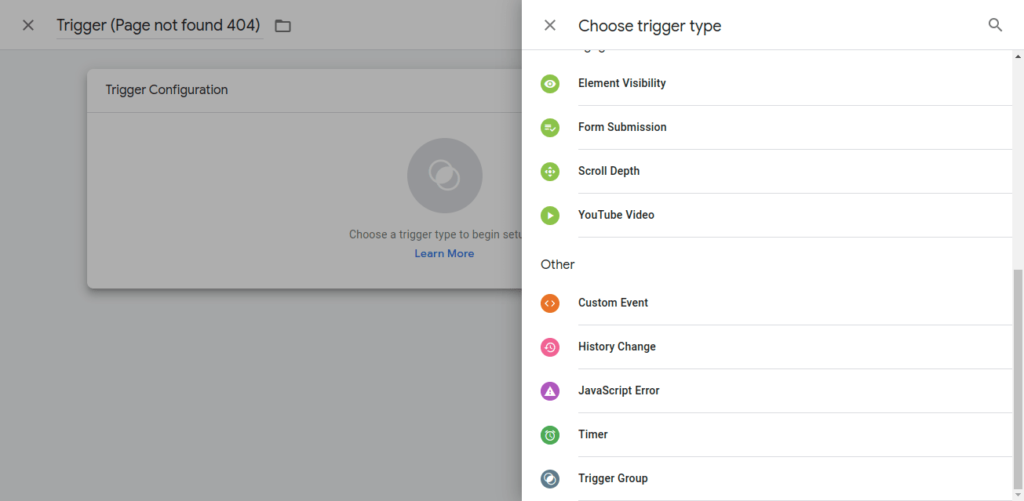
A Choose trigger type overlay panel will open up. Scroll down to the Other event group and select Trigger Type as Custom Event.
Screenshot 24: Set Trigger Type as a custom event
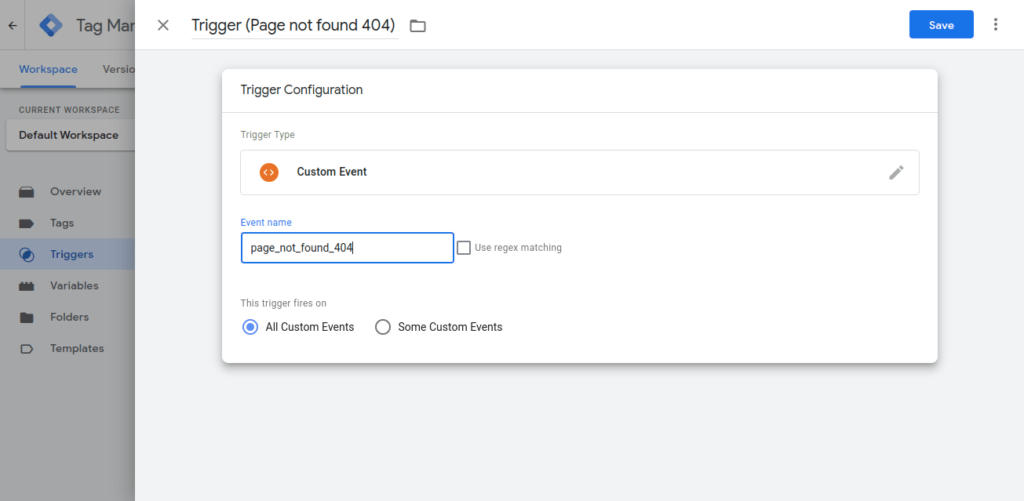
Screenshot 25: Trigger event as page_not_found_404
Enter the event name that you have added in the data layer (page_not_found_404).
Keep the radio selection of trigger fires on to All custom Events.
Click on the Save button.
Note: This step is crucial; make sure the event name you enter here exactly matches the event name that you pushed using the data layer push function.
Step 3: Setup a GA4 Event tag to send the custom event to Google Analytics 4
Head over to the tags sub-menu in the Tag Manager
Click on the new button to create a new tag
Screenshot 26: Create a new Ga4 event Tag
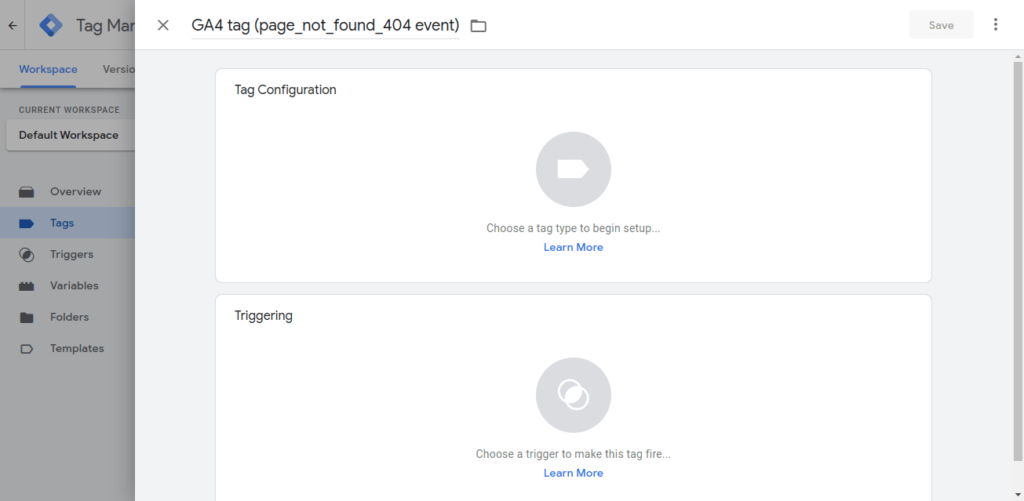
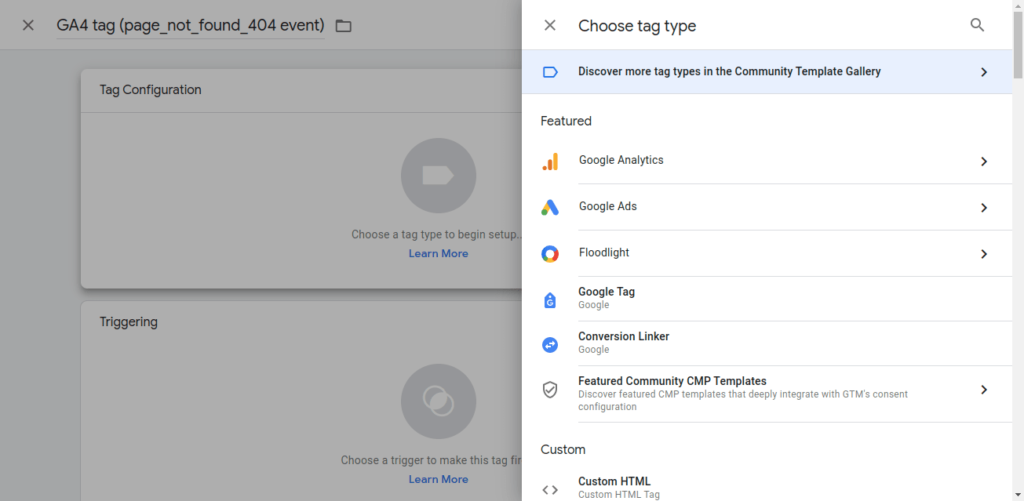
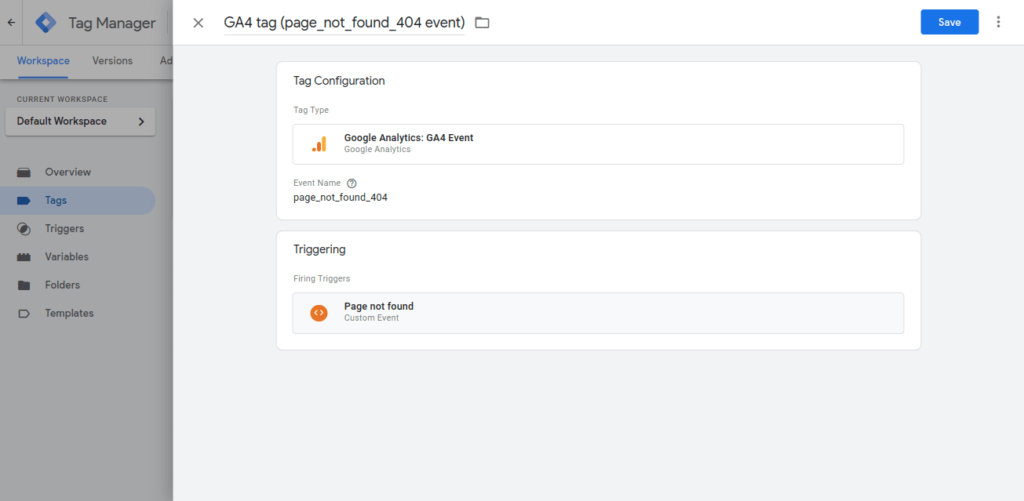
Name the tag to something relevant. For e.g GA4 tag (page_not_found_404 event)
Next, click anywhere on the Tag Configuration section to enable edit mode.
Screenshot 27: Click on the Trigger Configuration section to enable edit mode.
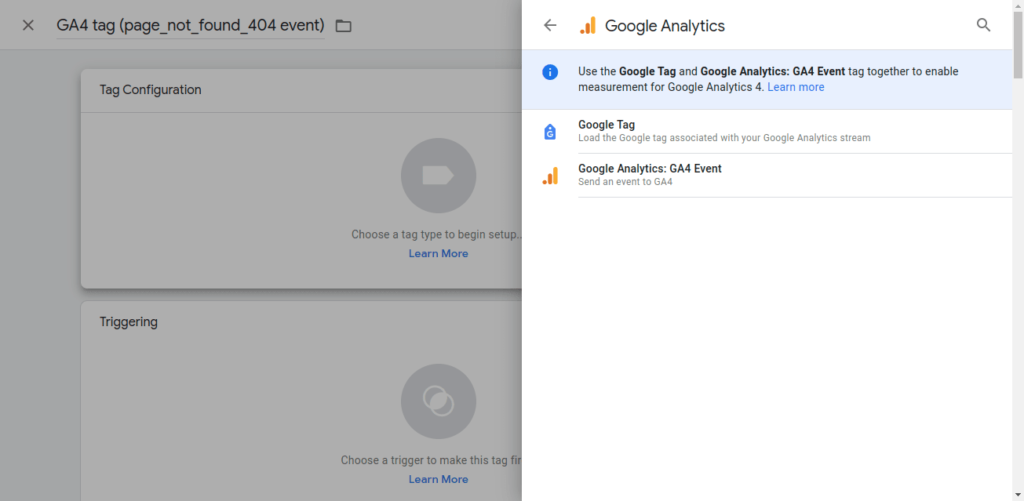
Screenshot 28: Choose tag type Google Analytics
Screenshot 29: Select Google Analytics: GA4 Event tag
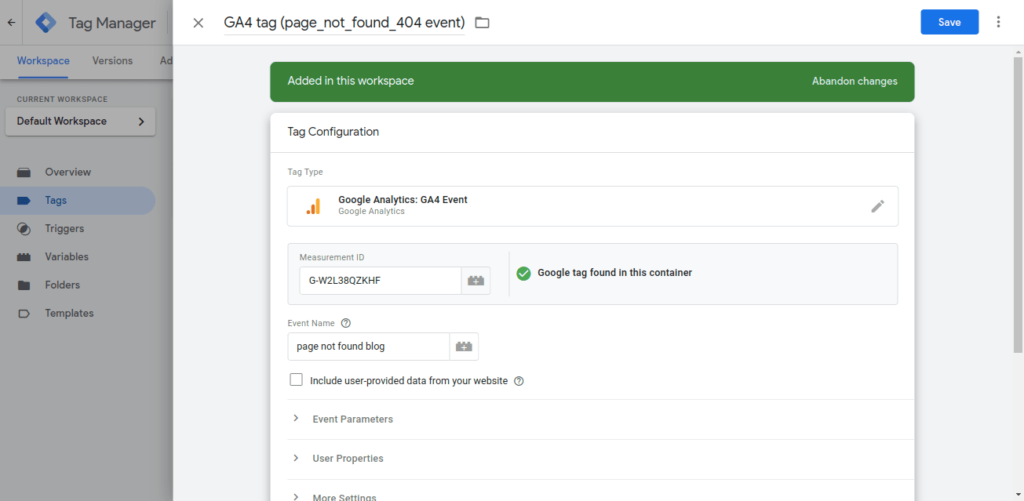
Enter the measurement ID of the Google Analytics Web stream to which you want to send the custom event.
Enter the event name, as page_not_found_404
Screenshot 30: Enter the measurement Id of the GA4 web stream
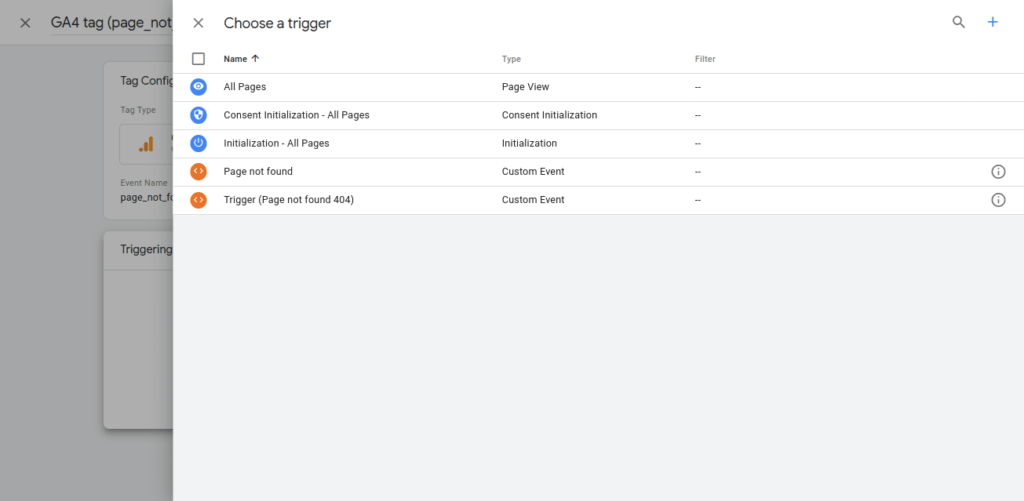
Choose the trigger that we created in Step 2. To do that, click anywhere on the Trigger section to enable edit mode.
Screenshot 31: Choose a trigger
Once the trigger is added, click on the Save button.
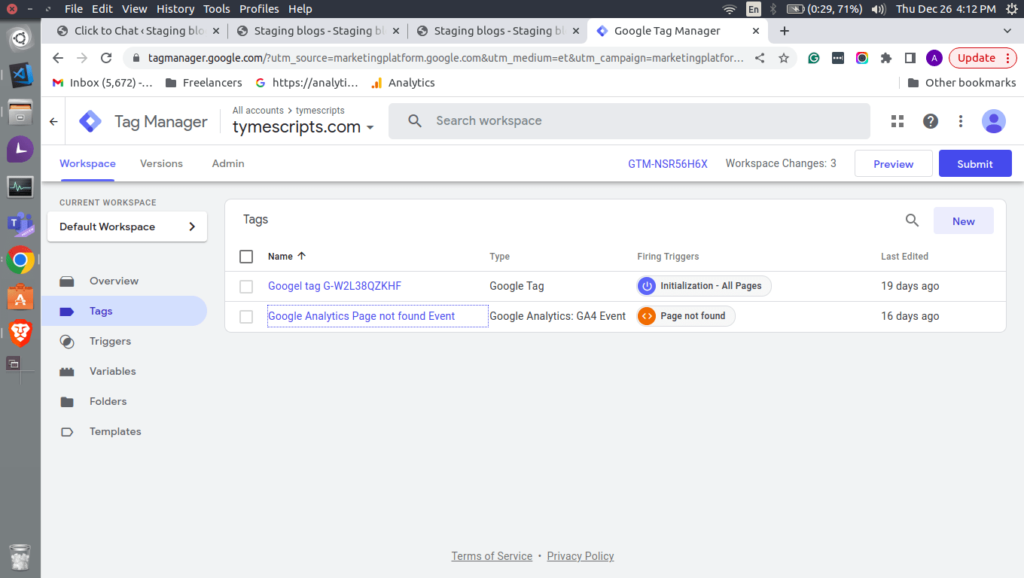
Screenshot 32: Page not Found trigger
Step 4: Test the custom GA4 event tag in the debug view
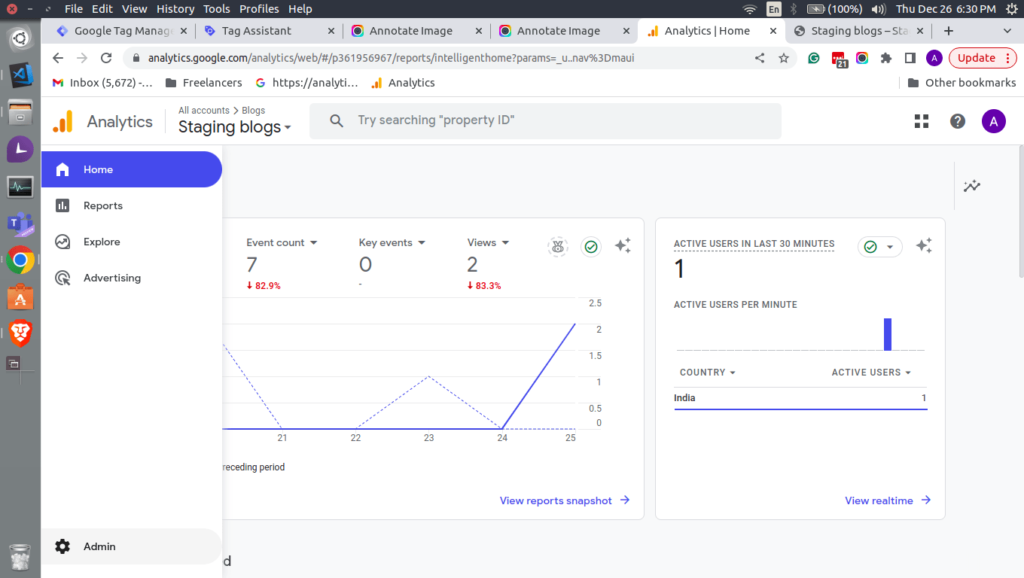
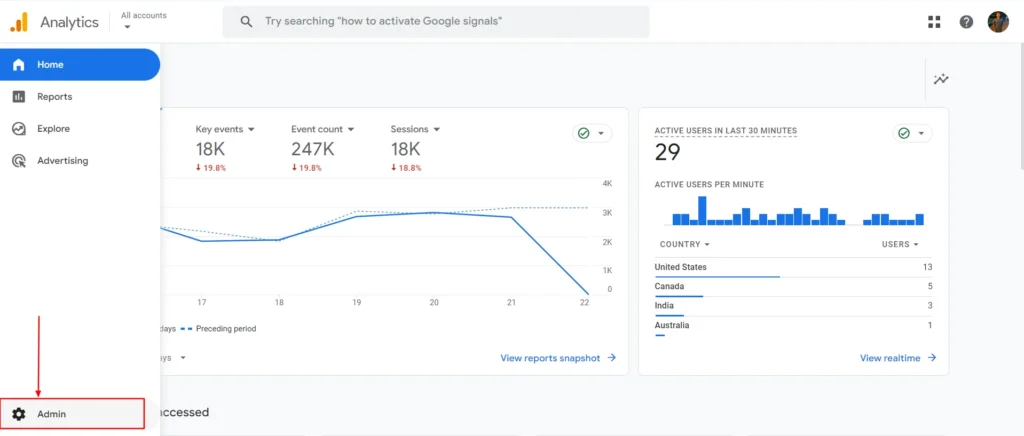
Go to the Admin menu.
Screenshot 33: Admin menu of Google Analytics 4
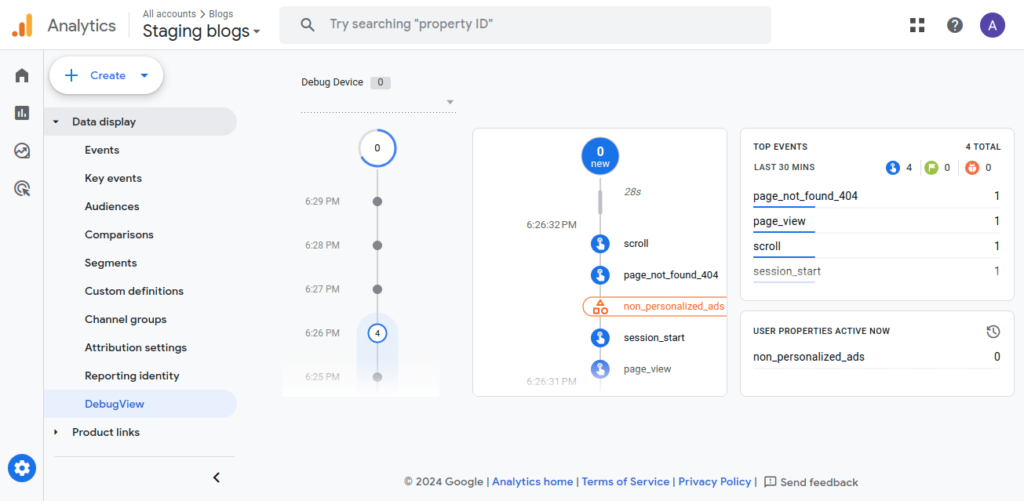
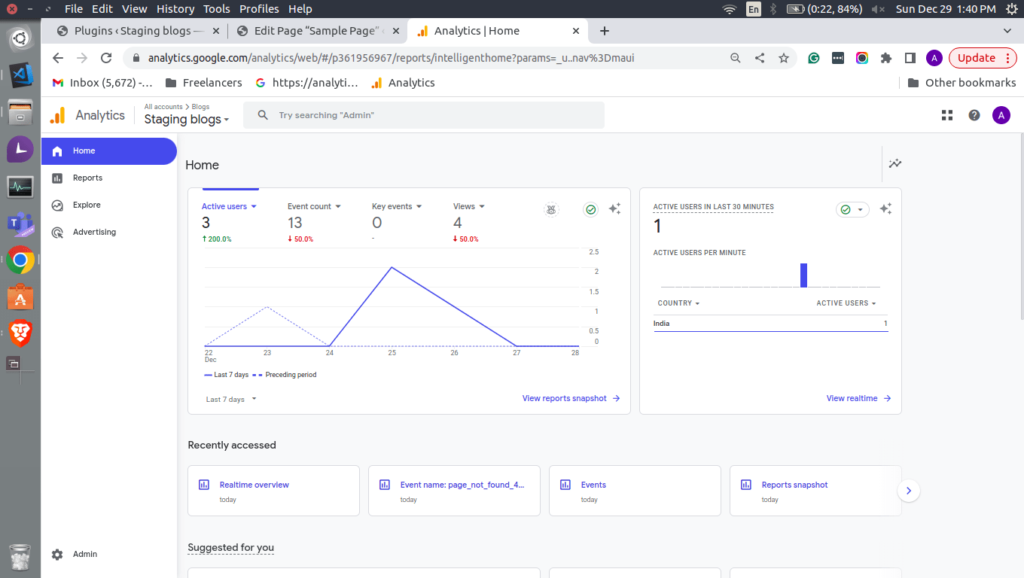
Next, head over to Data Display > DebugView. You will see the newly custom event page_not_found_404.
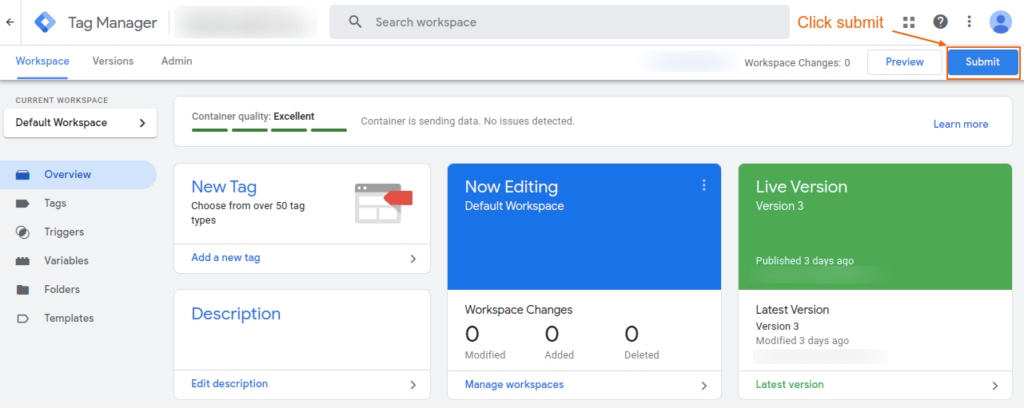
If everything works fine, publish your changes in Google Tag Manager by clicking the Submit button in the top right corner.
Screenshot 35: Submit workspace changes
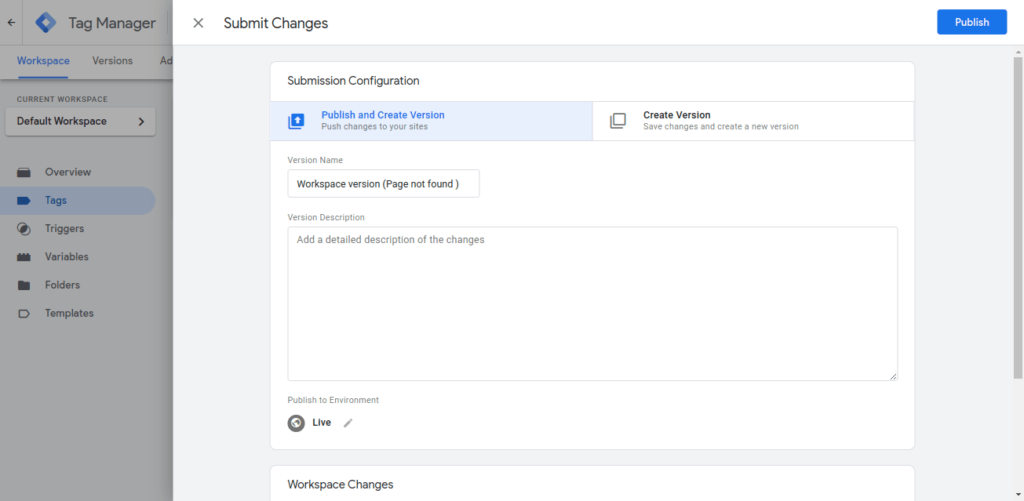
A Submit Changes overlay panel will show up.
Enter the version name for e.g. Workspace version (Page not found) along with the description.
Click on the Publish button.
Screenshot 36: Save Submission configuration
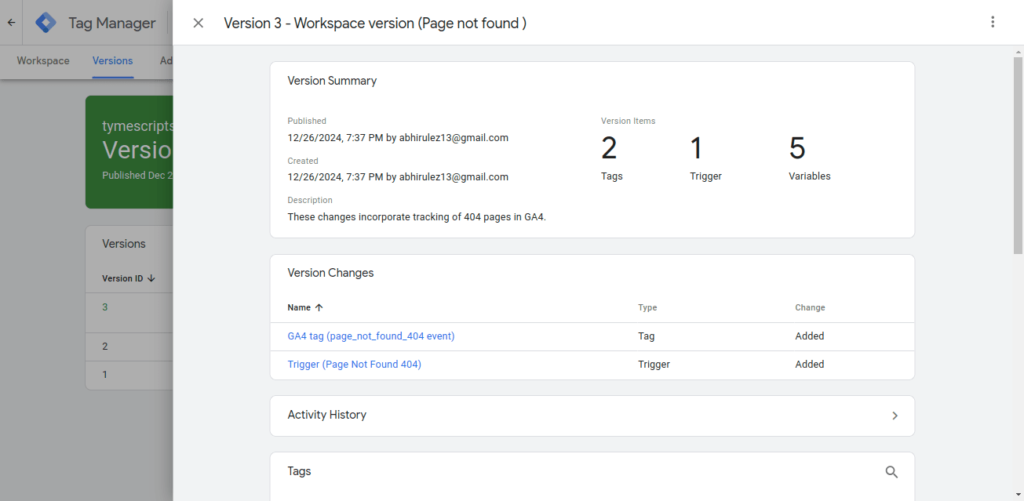
When the changes are submitted, you will see a Version Summary slide over panel, as seen in the screenshot below.
Screenshot 37: Version Summary of Published Workspace changes
That’s it. You have now added a custom event for 404 and sent it to the Google tag manager. Whenever a 404 page is hit, it will send a custom event, and we will use it to create reports for 404 links.
Step 5: Create a free form report in GA4 to view 404 pages
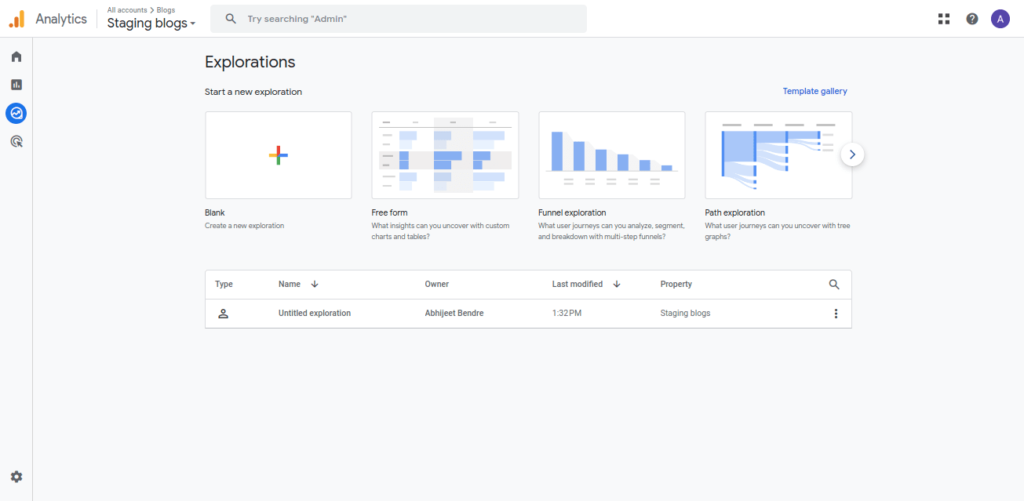
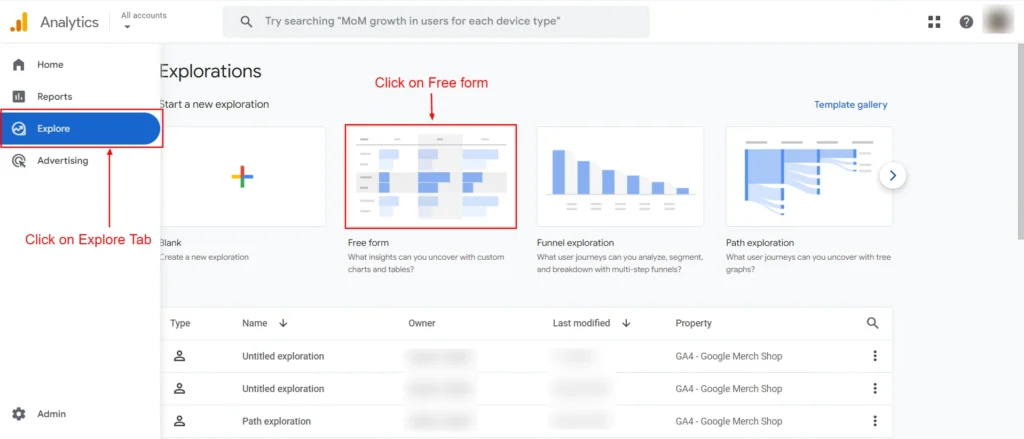
Screenshot 38: Explore menu in Google Analytics 4
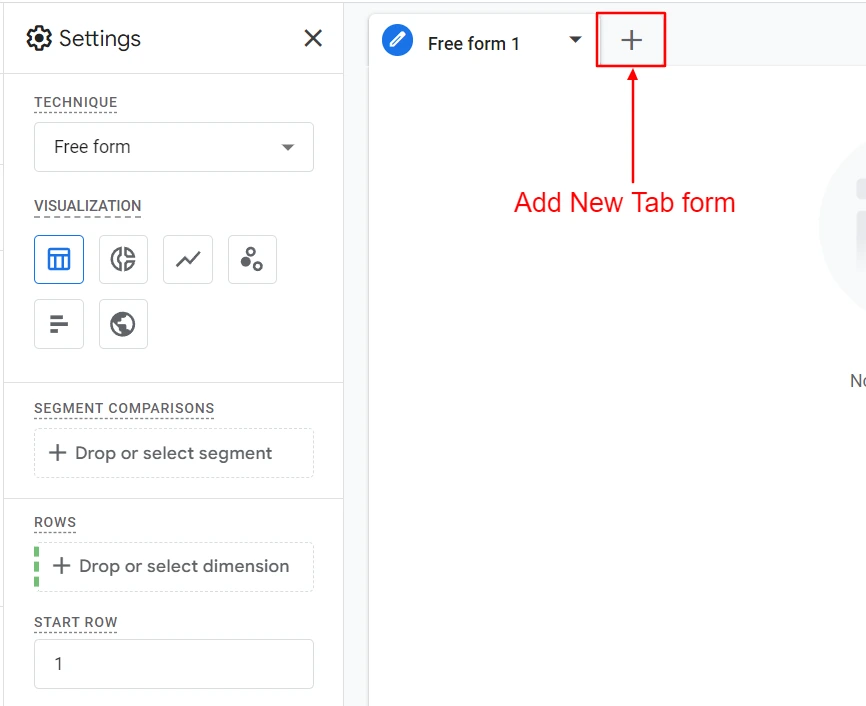
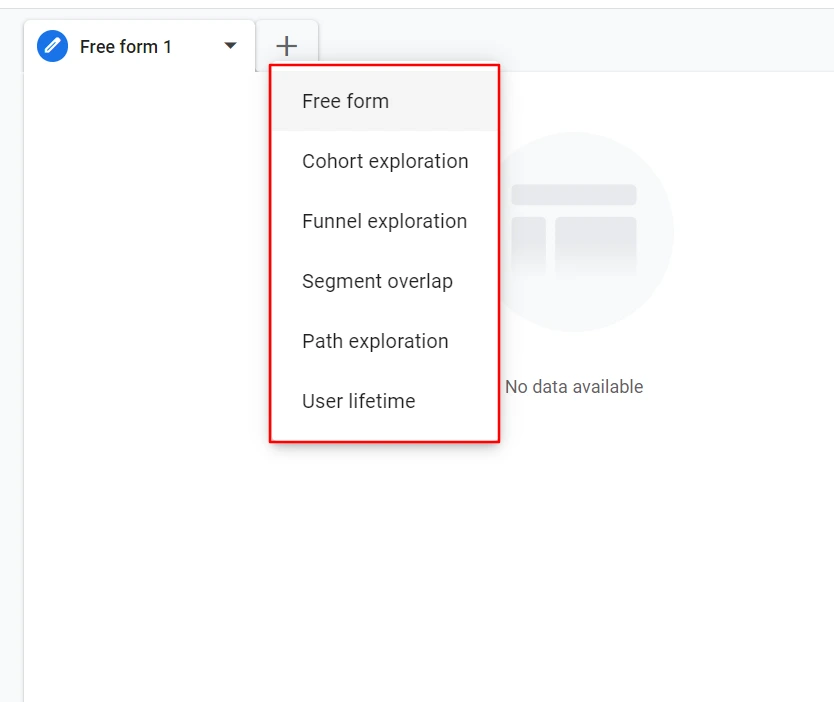
Click on Explore menu in Google Analytics 4.
Choose Free Form Exploration.
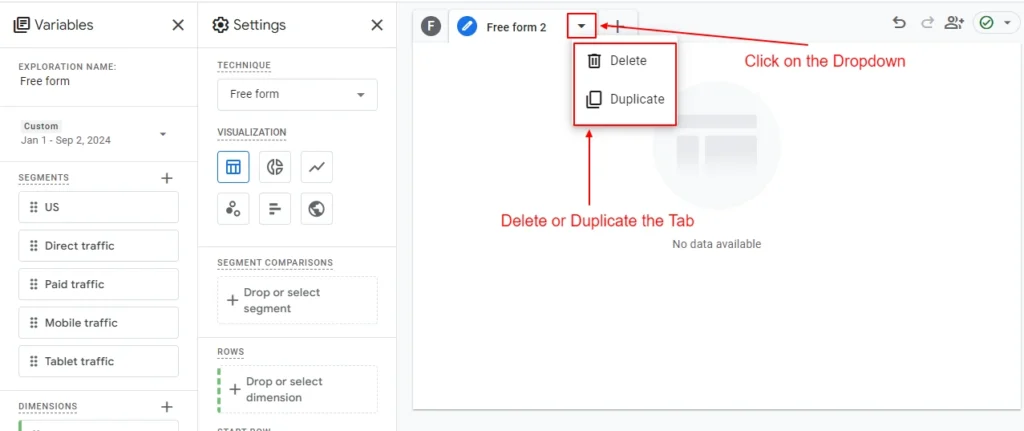
Screenshot 38: Free form Exploration
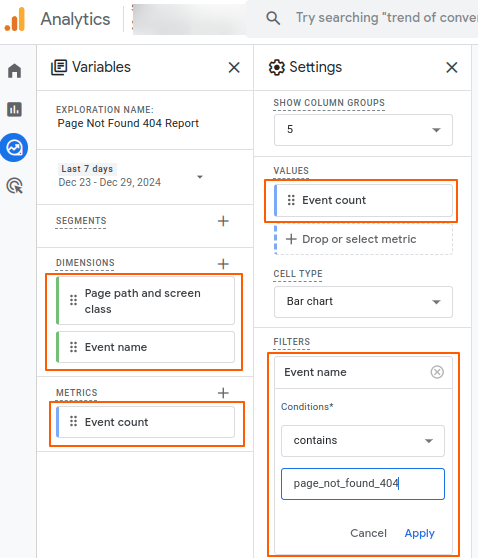
Name the exploration for e.g. Page Not Found 404 Report
Add the Dimension to the Rows
Page path and screen class
Event Name
Add Metrics to the Values
Event Count
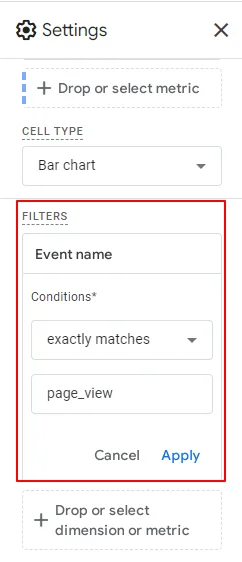
Add filter
Dimension: Event Name
Condition: exactly matches
Expression: page_not_found_404
Screenshot 39: GA4 GTM 404 variables and settings URLs
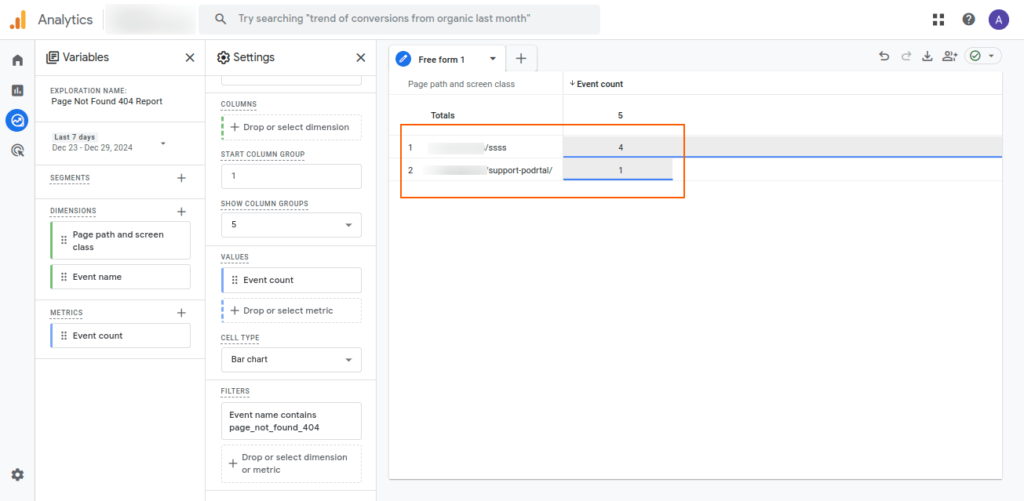
Screenshot 40: Page not found 404 links report
That’s it we can see page not found URLs in the Free Form report.
Conclusion
In Method 1 and Method 2, we found 404 errors using the Page title of the 404 error page, and in Method 3, we pushed a custom event to the Data layer of Google Tag Manager, which is then sent to GA4 using triggers whenever a 404 error page is found.
By regularly monitoring for broken links, you ensure that every visitor enjoys a frustration-free experience. An error-free website isn’t just good for your users—it’s great for your business.
In Part 2 of this 3 part Blog series, we covered the following sections of the support candy plugin
Ticket List
Agent Ticket List
Customer Ticket List
Email notification
Now, in Part 3 which is the final part of this blog, we will explore the settings sections of the SupportCandy plugin.
Settings
Step 1: General settings
Under this tab, you can configure the general settings.
Screenshot 1: Settings → General Tab
Ticket Status After Customer Reply: You can define the ticket status that will be set when a customer (the ticket creator) submits a reply. If you don't want the status to change, select the "Do not change" option.
Ticket Status After Agent Reply: You can specify the ticket status that will be applied when an agent submits a reply. To keep the status unchanged, select "Do not change."
Close Ticket Status: This status is applied when either an agent or a customer closes the ticket.
Ticket Alice: You can customize the name used for your tickets. For example, you might rename it to "Case," so tickets will be referred to as "Case #" in individual tickets, email notifications, and other communications.
Allow Close Ticket: You can determine who has permission to close a ticket. Agents from the selected roles must have the necessary access to enable the "Close" button within an individual ticket.
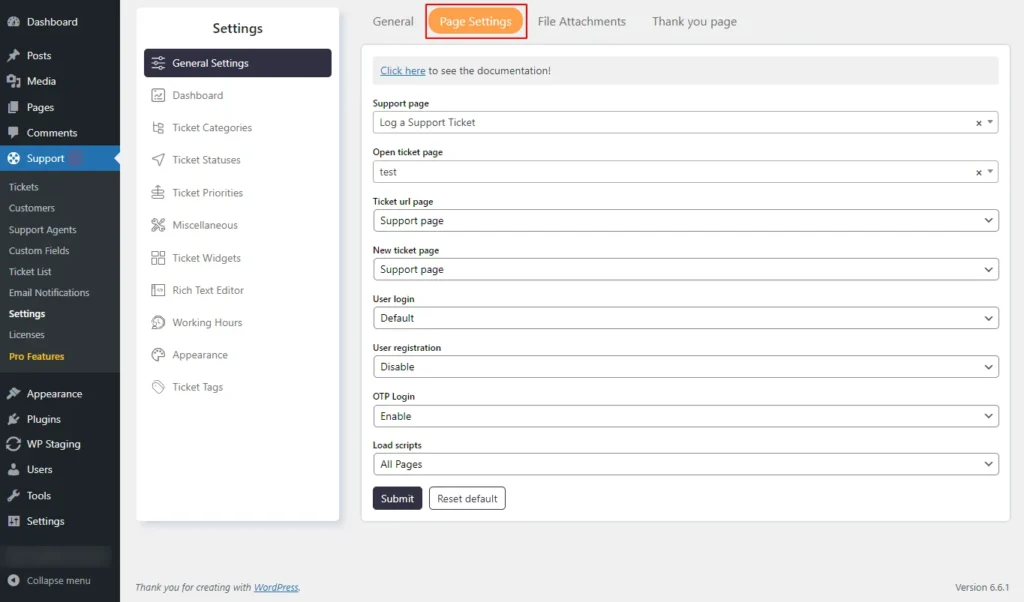
Page settings Tab
Here you can set the various pages such as user login and registration screens.
Screenshot 2: Support → Settings → General Settings → Page Settings tab
Support Page: The support page is where the [supportcandy] shortcode is used on the front end to display the support functionality.
User Login: This setting determines how users can log in to access the support forum on the front end. You can choose from Default, WP Default, or Custom URL options.
File Attachments
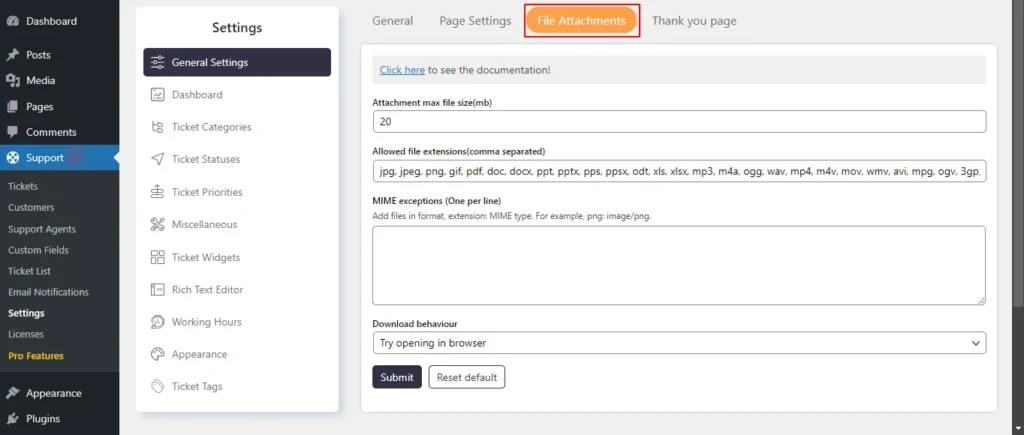
Go to Support → Settings → General Settings → File Attachments tab
Here you can set the max file size of the attachment along with its Allowed File Extensions.
Screenshot 3: File Attachments tab
Thank you page
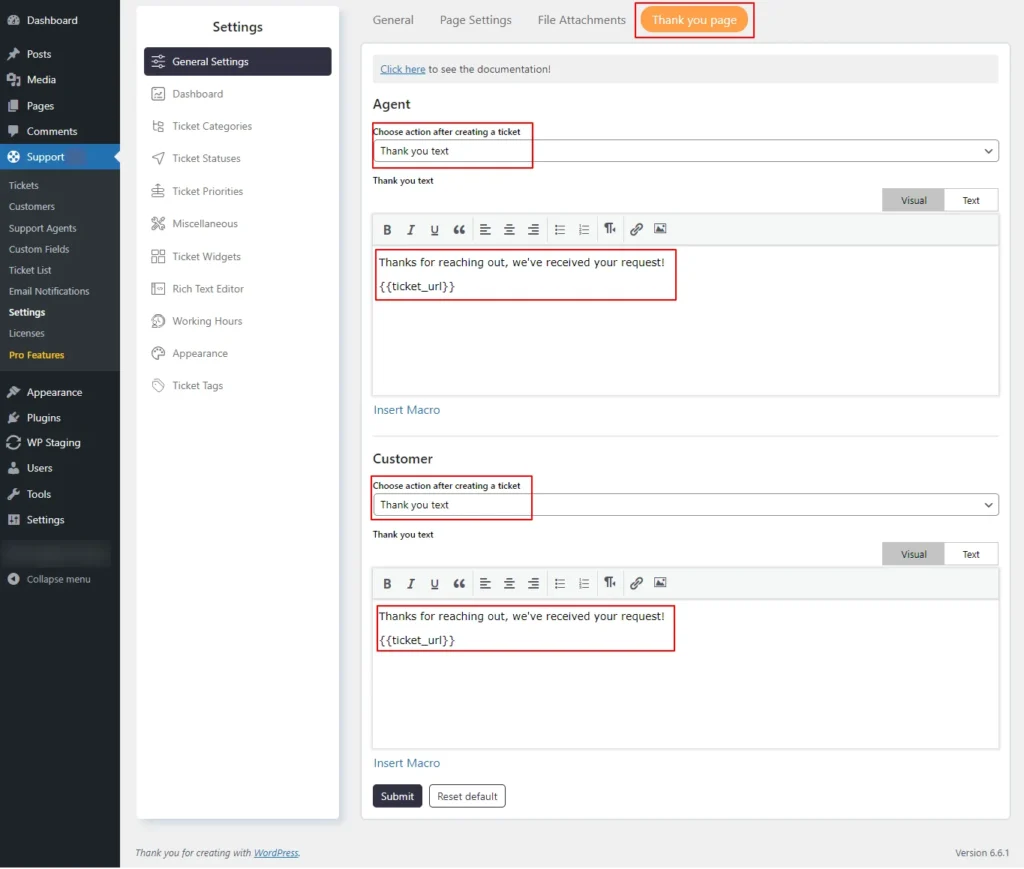
Here you can define what action should be taken after the customer or agent submits the ticket.
Screenshot 4: Thank You Page
You can show a thank-you text, redirect to the custom page, or open a ticket page.
Step 2: Dashboard
Dashboard in SupportCandy lets support agents quickly see important ticket information. This helps them plan their work and choose what to do first.
You can see how many new tickets, unresolved tickets, unassigned tickets, closed tickets, tickets assigned to the current agent (mine), tickets that are out of SLA, tickets that are due today, and tickets that are due tomorrow.
If an agent clicks any of these numbers they will be redirected to the respective categories list of tickets with the right filter in place.
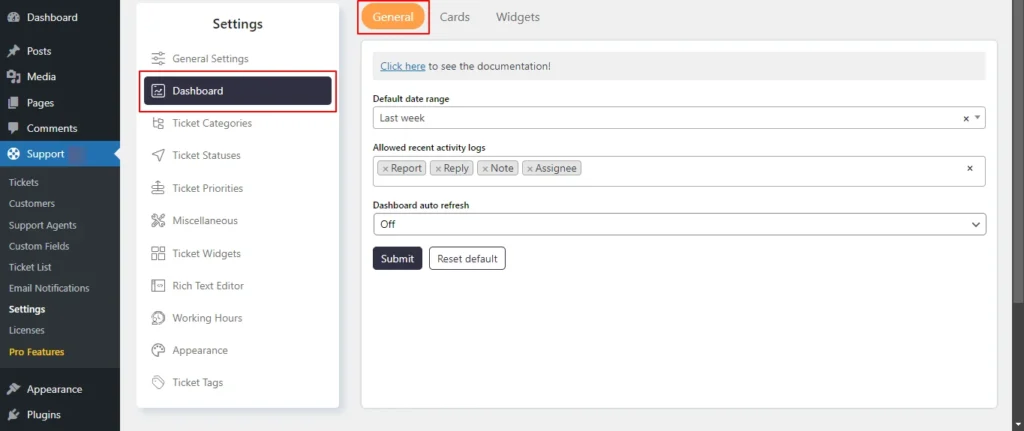
General
Here we define the general settings for the dashboard, such as the default date range and dashboard auto-refresh.
Screenshot 5: Dashboard General Tab
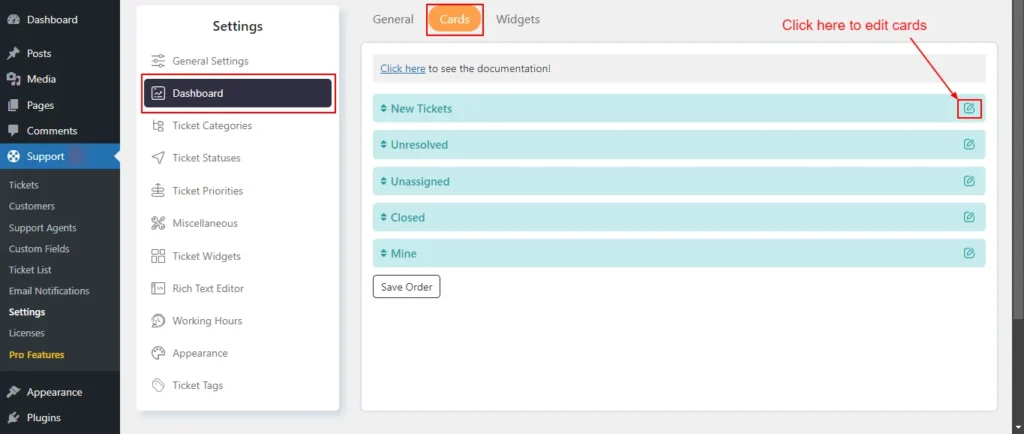
Cards
Under this tab, set the order of the tickets based on the ticket status.
Screenshot 6: Dashboard Cards
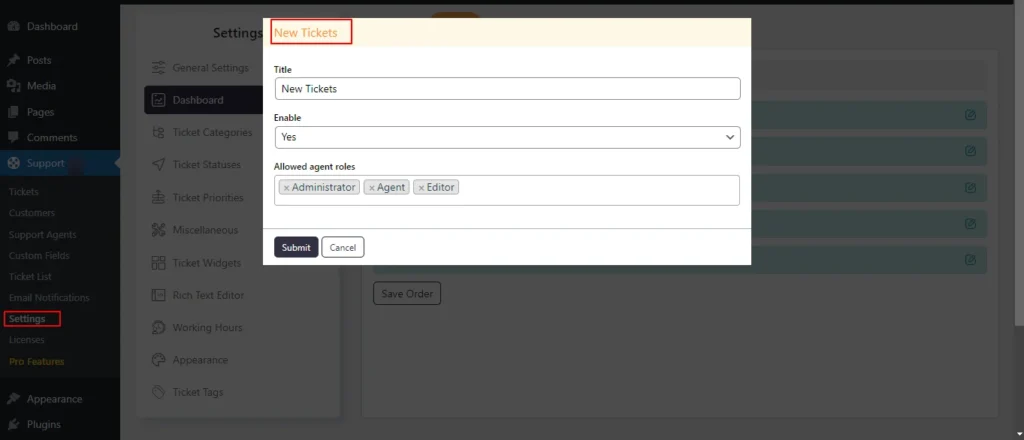
Click the Edit button next to that card, as shown in the screenshot below . You can change the Title, show/hide the card in the dashboard, and allow agent roles who can see the card info in the dashboard.
Screenshot 7: Edit the Cards
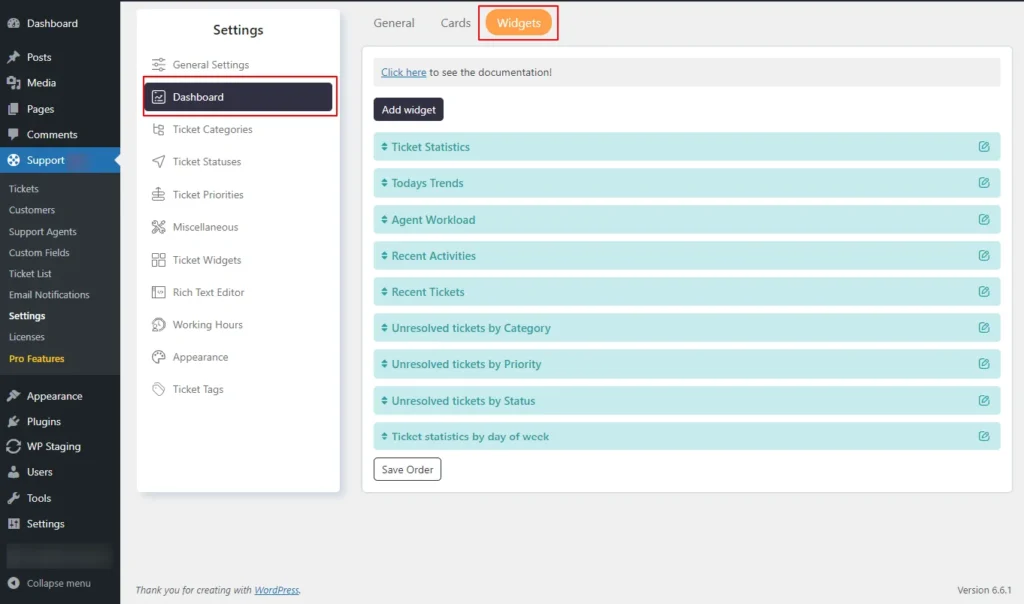
Widgets
The dashboard widgets give you a complete view of your support operations, with real-time information on new tickets and closed tickets, as well as full analytics on response times and communication gaps.
You can customize the dashboard to your needs by rearranging widgets based on priority.
Also, you can manage visibility for different agent roles by enabling or disabling widgets for specific roles.
Screenshot 8: Dashboard Widgets
Here is the List of widgets that are available by default
Ticket Statistics
Trends of Today
Agent Workload
Recent Activity
Recent Tickets
Unresolved Tickets by Type
Unresolved Tickets by Priority
List of Unresolved Tickets by Status
Response Delay
Ticket Closing Delay
Communication Gap
Ticket comments
Agent scores
Out of SLA Tickets
Active Timer
Usergroups
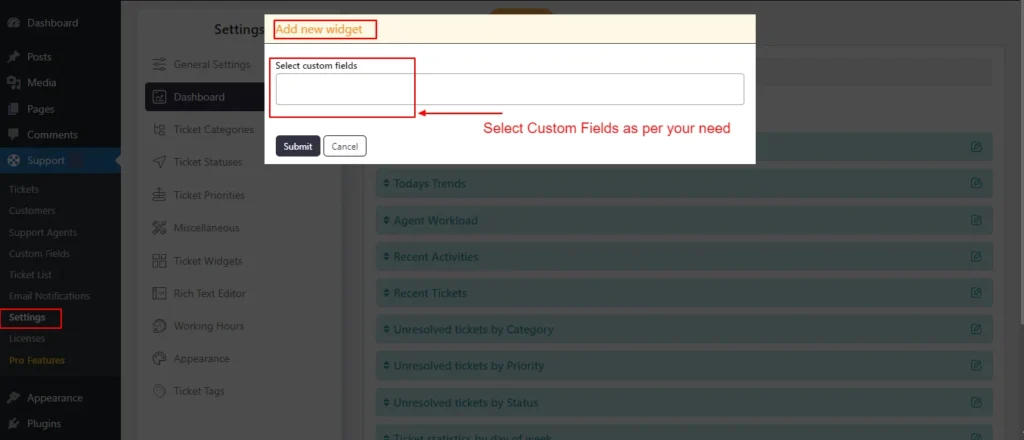
Adding a new widget
In the Widgets tab, locate the Add New Widget button and click on it.
Select the Custom field for which you want to add widgets. Click Submit to save changes.
Screenshot 9: Adding a new widget
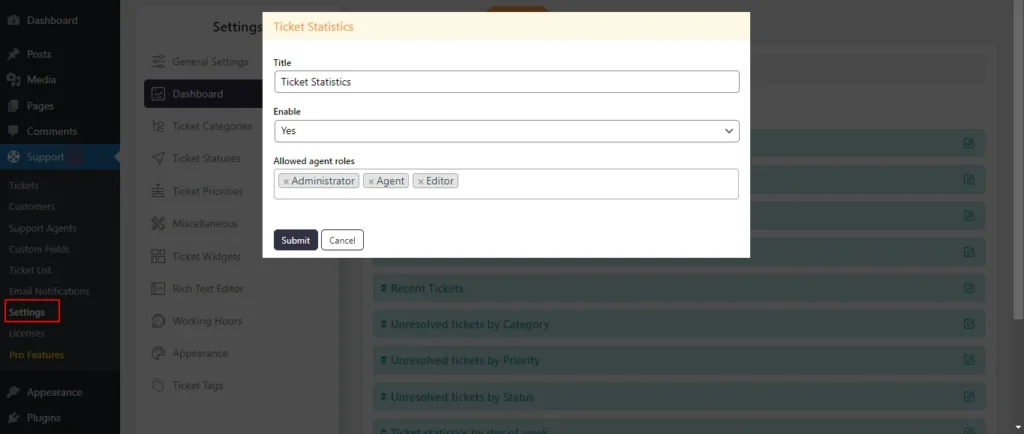
Editing the Widgets
Click on the edit icon beside the widget name.
You can change the title, show/hide the widget in the dashboard, and allow agent roles who see the widget in the dashboard.
Screenshot 10: Editing Widgets
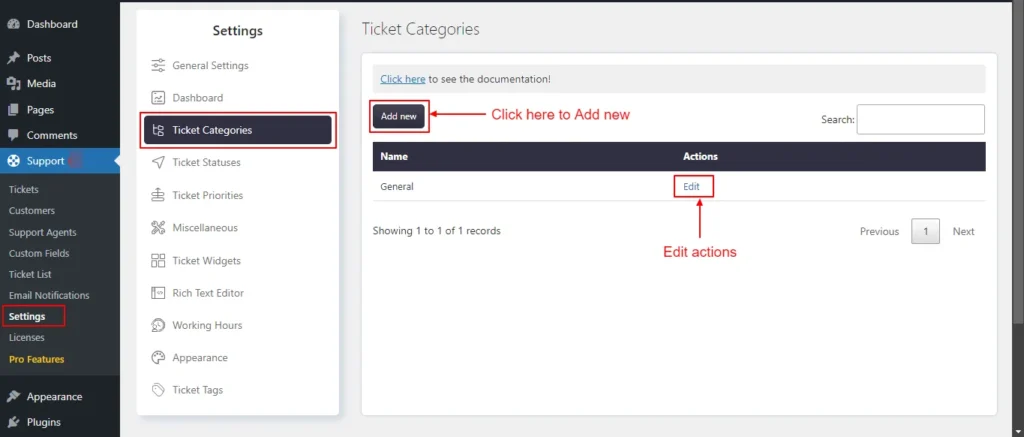
Step 3: Ticket Categories
Ticket categories let users and agents sort tickets into groups based on what they are about, which makes it easier to communicate and solve problems.
Screenshot 11: Ticket categories
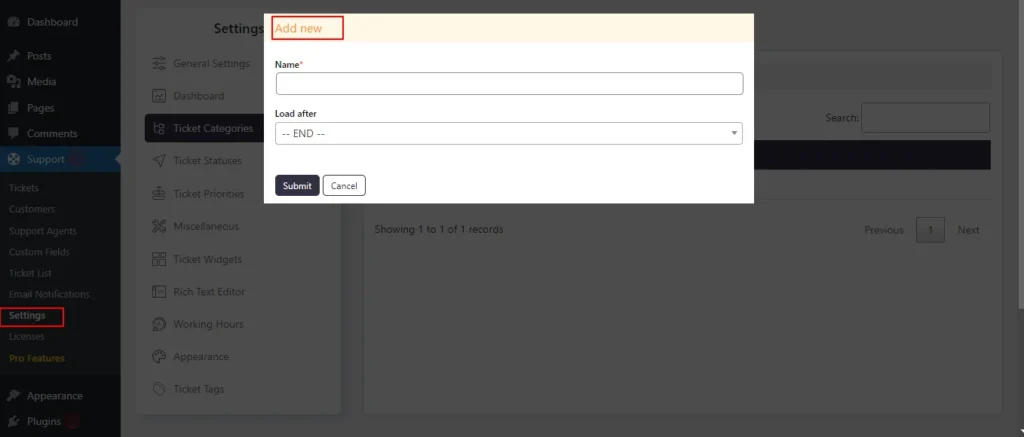
Adding a New Category
Users with the necessary permissions can create new ticket categories.
Navigate to Support → Settings → Ticket Categories
Click on Add New.
Give a name to the category.
Select the order of loading the categories by Load after dropdown.
Click Submit
Screenshot 12: Add New Ticket Category
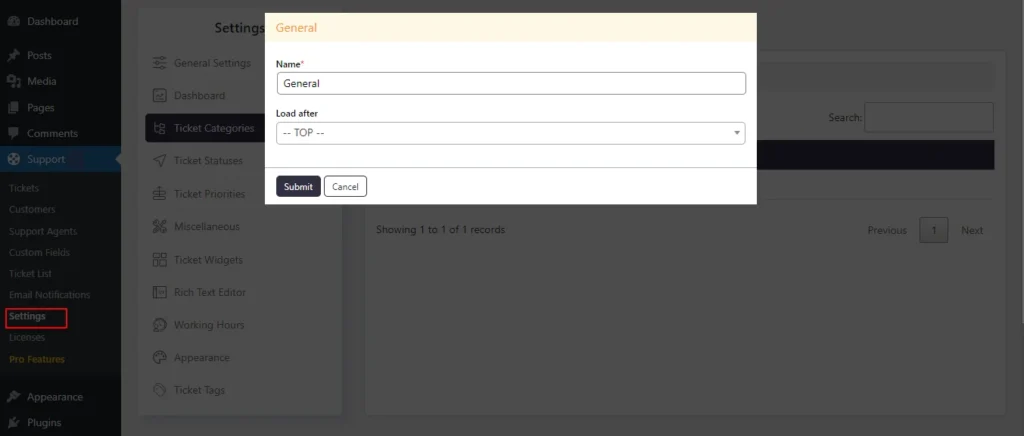
Edit Category
Click on the Edit option beside the name of the ticket.
You can change the name and loaf after settings.
Click Submit.
Screenshot 13: Edit Ticket Categories
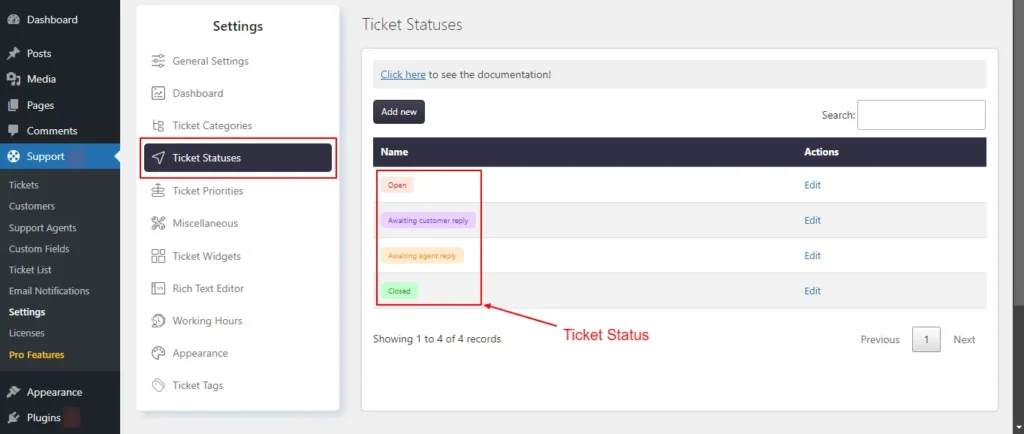
Step 4: Ticket Statuses
Under this tab you can set your own custom statuses to customize the process and life cycle of the tickets.
Customization includes the color patterns that go with each status, which show clearly what state the ticket is in.
Administrators can edit or delete statuses as needed.
Screenshot 14: Ticket Status
Adding Status:
Head over to Support → Settings → Ticket Statuses.
Click on Add New.
Enter a suitable name for the new status that you want to add.
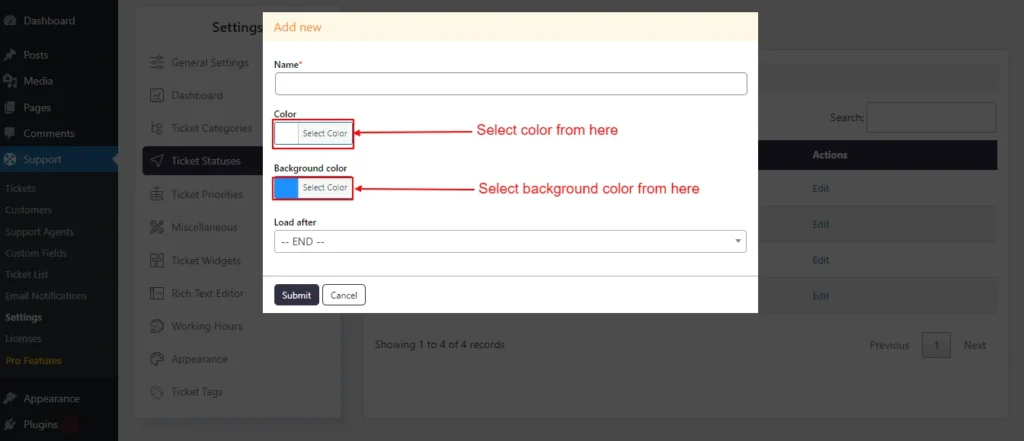
Choose a color and background color for visual identification.
Click Submit.
Screenshot 15: Adding status
Edit Status:
Click the Edit link beside the status name that you want to edit.
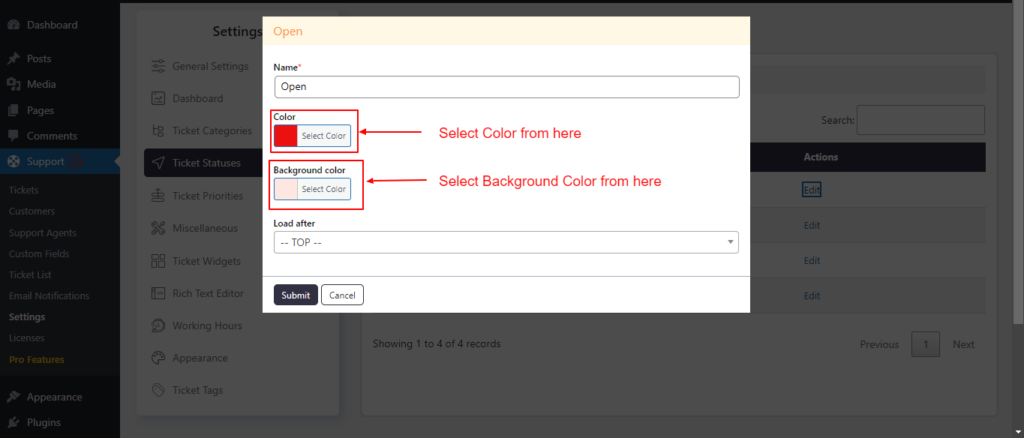
Edit the color, background color, and load after setting.
Click Submit.
Screenshot 16: Editing a Ticket status
Step 5: Ticket Priorities
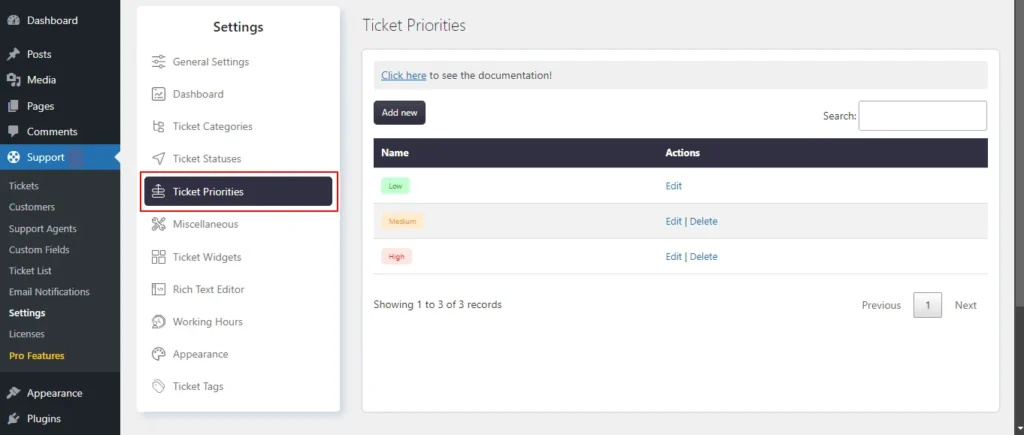
Using this setting, you can prioritize tickets based on urgency. You can create new priorities or edit existing ones (High, Medium, Low priorities).
Screenshot 17: Ticket Priorities
Adding a New Priority
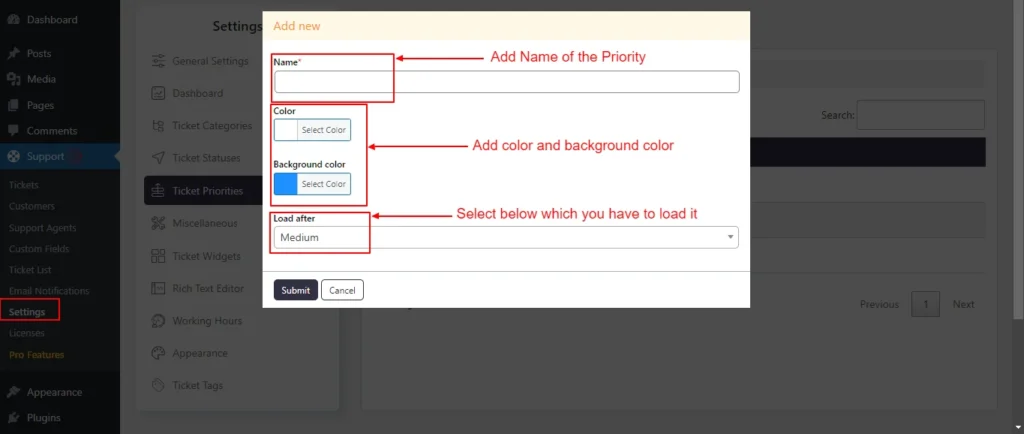
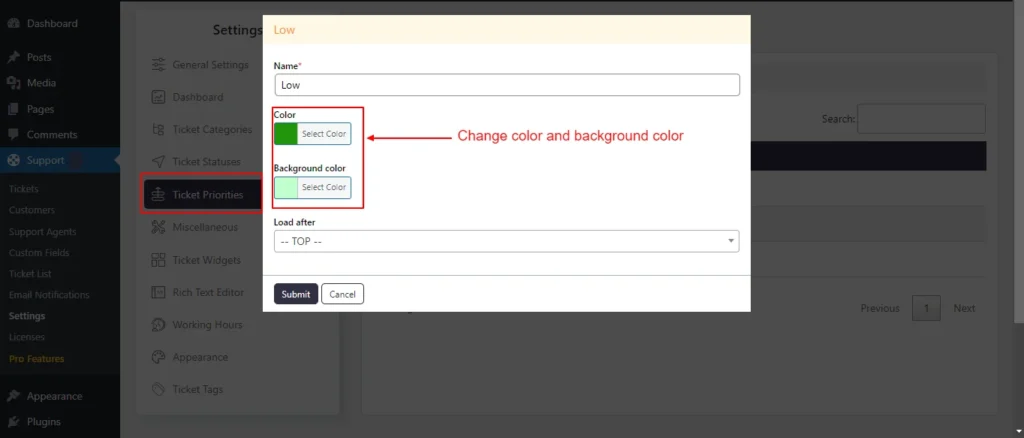
Go to Support → Settings → Ticket Priorities and click on Add New.
Enter a name and choose a color and background color for the priority based on its urgency.
Click Submit.
Screenshot 18: Adding a new Ticket Priority
Edit Priority
Click on the edit link for which you want to edit.
Click on the Edit option.
Edit the Name, Color, or Background color, Load after settings as per your needs.
Click Submit
Screenshot 19: Editing Ticket Priorities
Step 6: Miscellaneous
Under the Miscellaneous settings, you can set the following settings:
Term & Conditions
GDPR
reCaptcha
Advanced
Terms and conditions
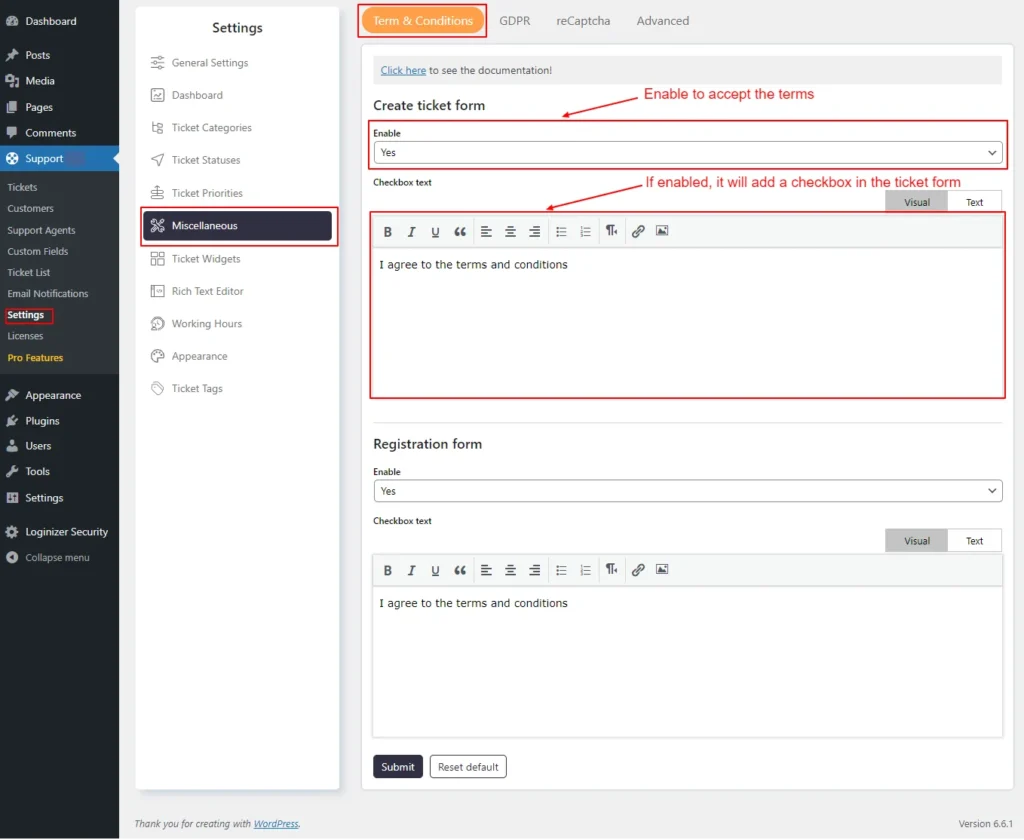
Enabling this feature will add a checkbox in the Create Ticket form and Registration Form prompting the user to agree to the terms and conditions.
The terms and conditions message can be customized as seen in the below screenshot no.. You can also add to link to your terms and conditions page.
Screenshot 20: Miscellaneous → Terms & Conditions
GDPR
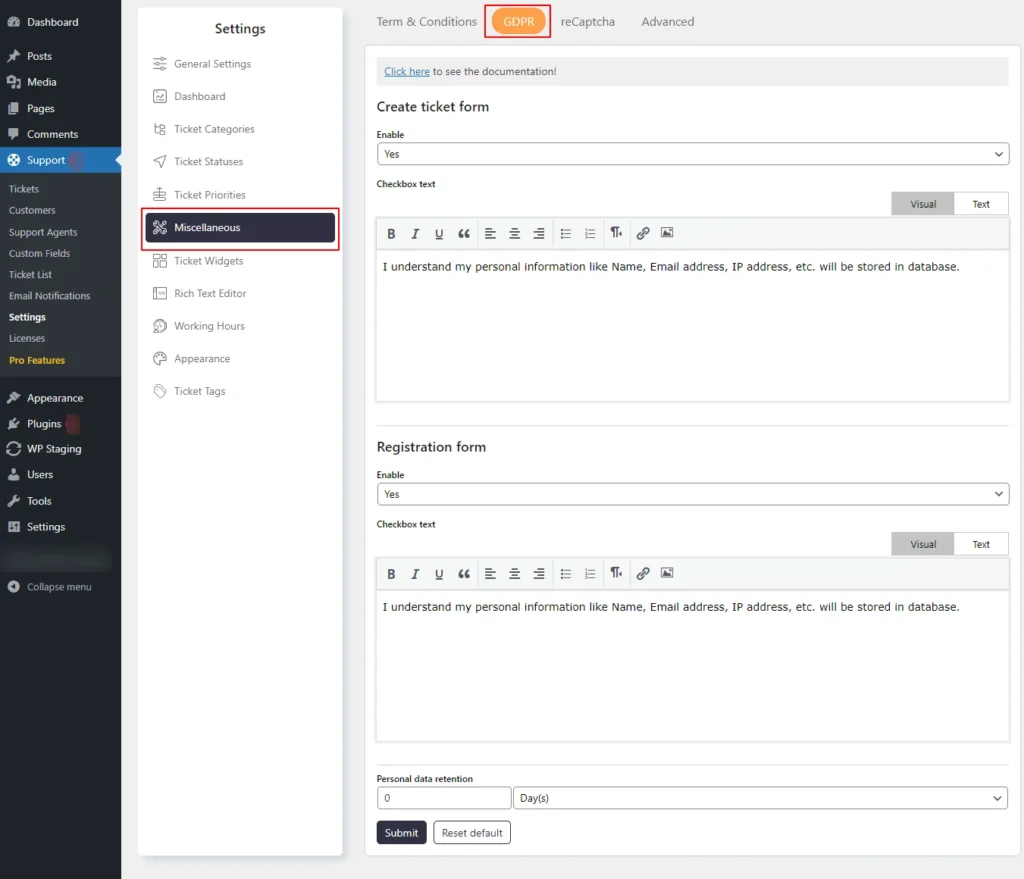
If enabled, it will add a checkbox in the Create Ticket form and Registration Form with a custom message letting the user know what information will be stored in the database.
You can also send the Personal data retention
It specifies the duration for which the system should retain personal information within the ticket. Once the retention period has passed, the database will either delete or anonymize personal details such as Name, Email Address, IP Address, and any custom fields marked as personal information, from the date of creation.
If you wish to retain personal information indefinitely, set the retention period to 0 days.
Screenshot 21: Miscellaneous → GDPR
reCaptcha
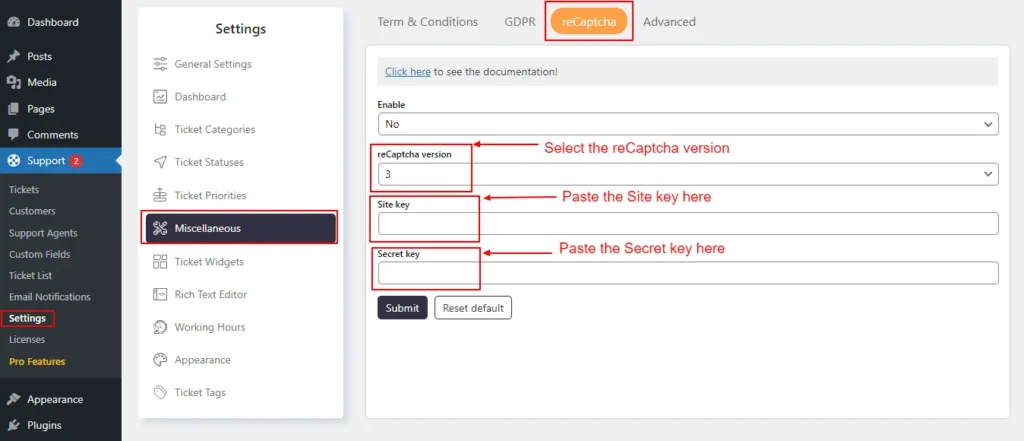
You can add Google reCaptcha to the ticket form, login and registration screen, profile screen, etc.
For that, you need to generate the Site key and Secret key from this link.
Screenshot 22: Miscellaneous → reCaptcha
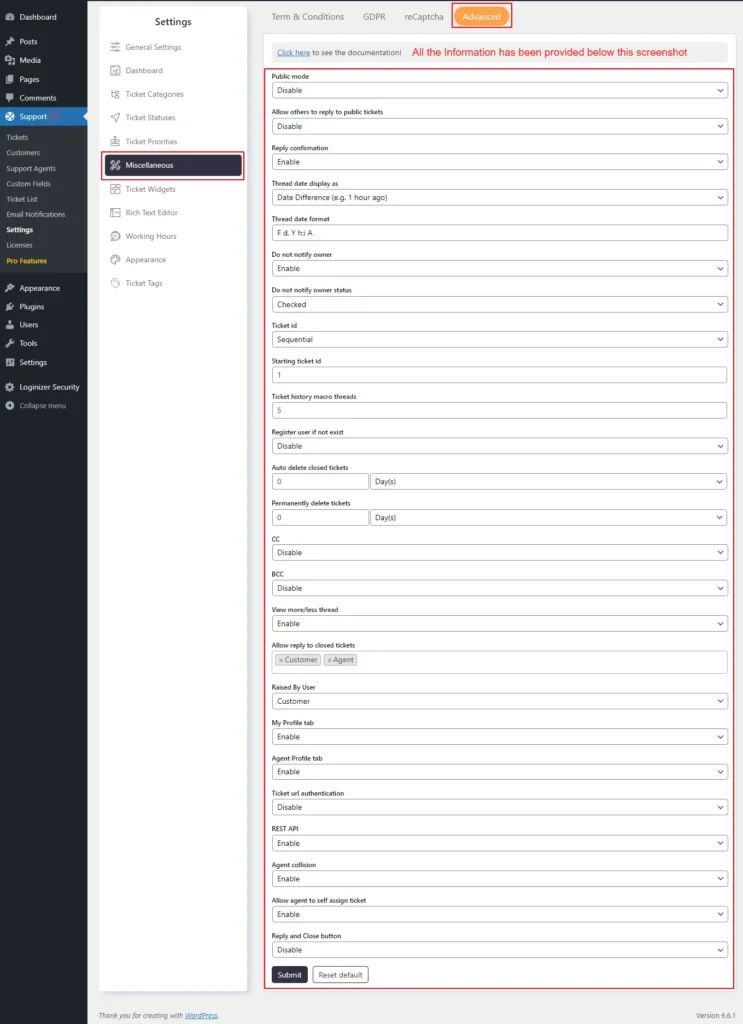
Advanced Settings
Here you can configure 25 types of advanced settings. We will discuss the main settings for now.
Reply confirmation: After clicking the reply button on a specific ticket, the system will prompt the user for confirmation.
Ticket ID: In this setting, you can choose whether new ticket IDs are assigned sequentially or randomly.
Starting Ticket ID: Within the Sequential Ticket IDs setting, you can specify the initial ticket ID to be used for new tickets.
Screenshot 23: Miscellaneous → Advanced settings
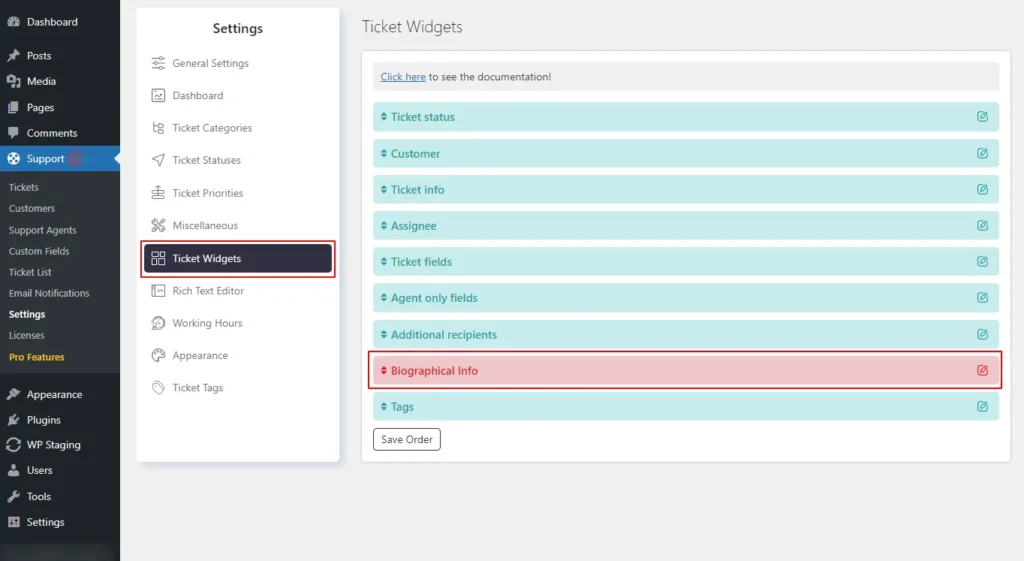
Step 7: Ticket Widgets
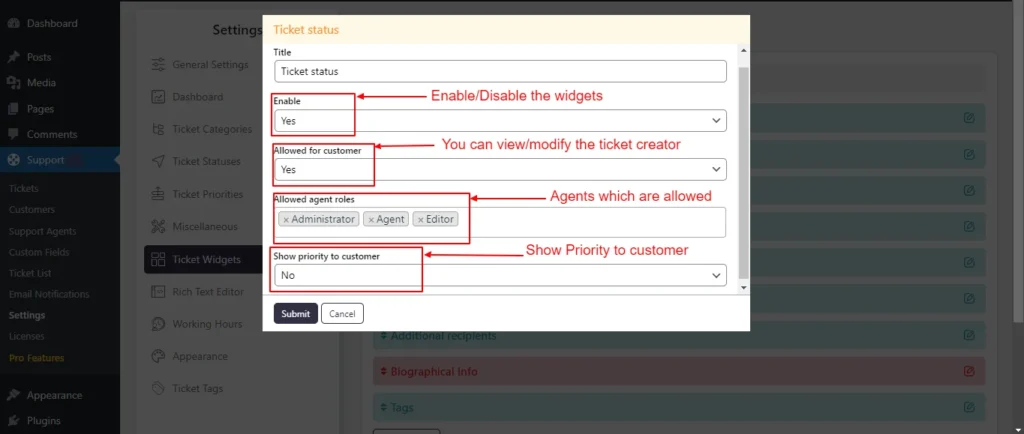
The Ticket widgets are displayed on the single ticket in the backend. You can manage the access levels for each widget, determining who can view or edit them.
Also, you can rename, enable, or disable, and change the order of the widgets from this settings tab.
Screenshot 24: Support → Settings → Ticket Widgets
Screenshot 25: Edit Ticket Widgets
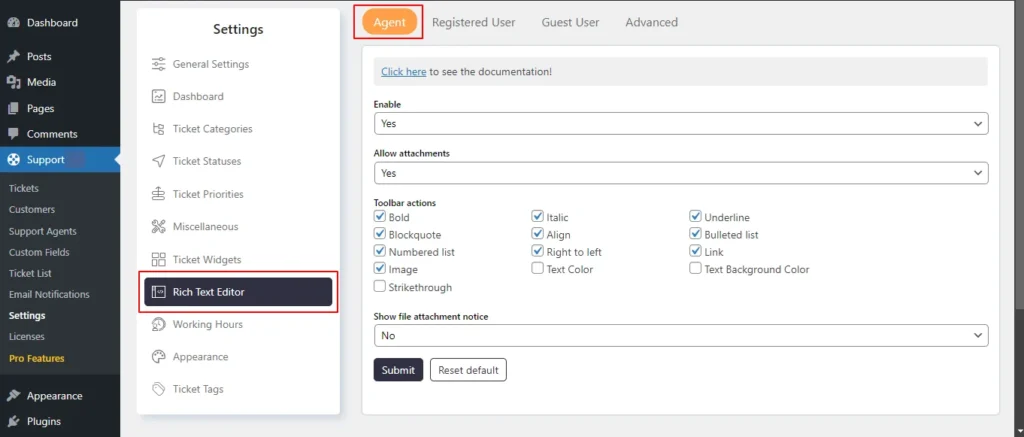
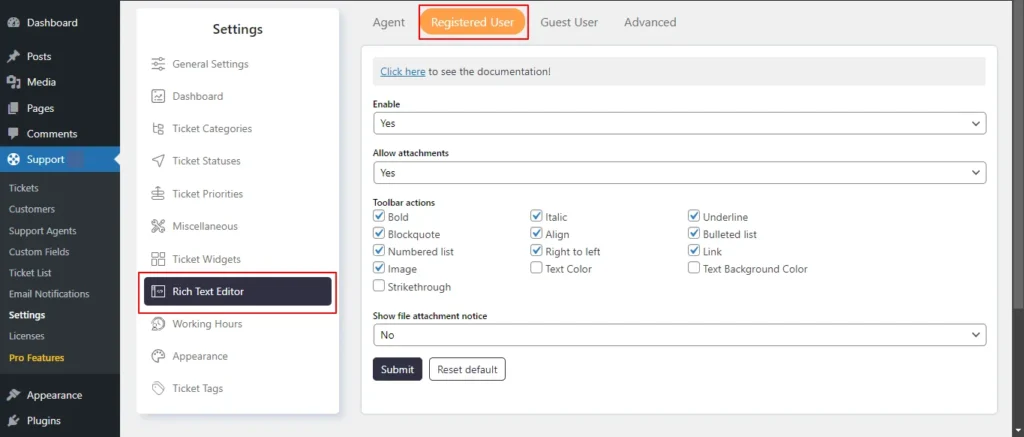
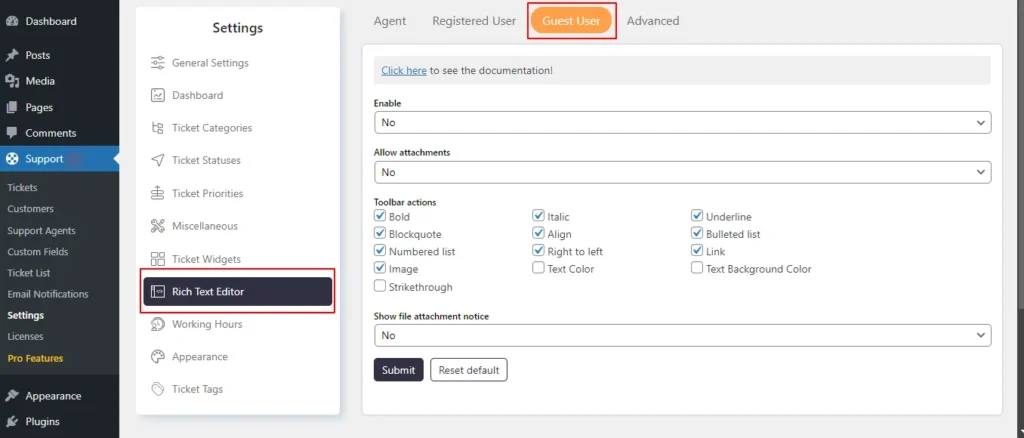
Step 8: Rich Text Editor
This setting allows you to manage the rich text editor configurations for Agents, Registered Users, and Guest Users.
Screenshot 26: Rich Text Editor Agent Tab
Screenshot 27: Rich Text Editor Registered User Tab
Screenshot 28: Rich Text Editor Guest user Tab
Enable: You can enable or disable the rich text editor for users.
Allow Attachments: You have the option to allow or disallow attachments in various areas such as ticket descriptions, reply descriptions, and note descriptions.
Toolbar Actions: The rich text editor allows you to select which actions to enable, including:
Bold
Block quote
Italic
Align
Right to left
Underline
Bulleted list
Link
Text background color
Image
Numbered list
Strikethrough
Show File Attachment Notice: You can choose to display information about file attachments, including allowed file types and sizes, to users. This can be configured in the user types setting.
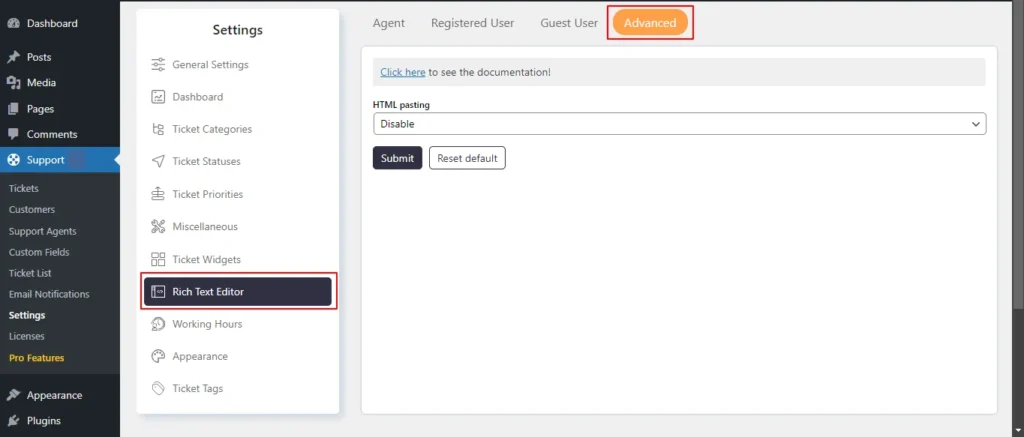
HTML Pasting: When activated, any text that is copied to the clipboard will be pasted with HTML.
Screenshot 29: Rich Text Editor Advanced Tab
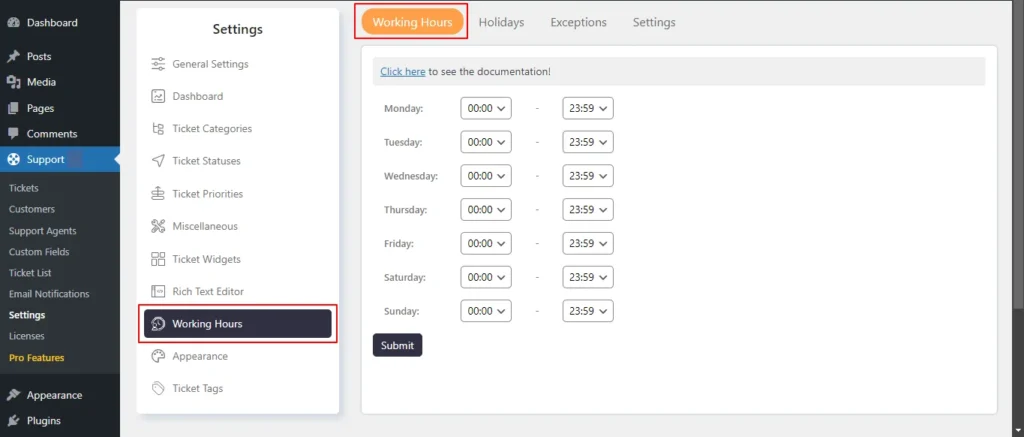
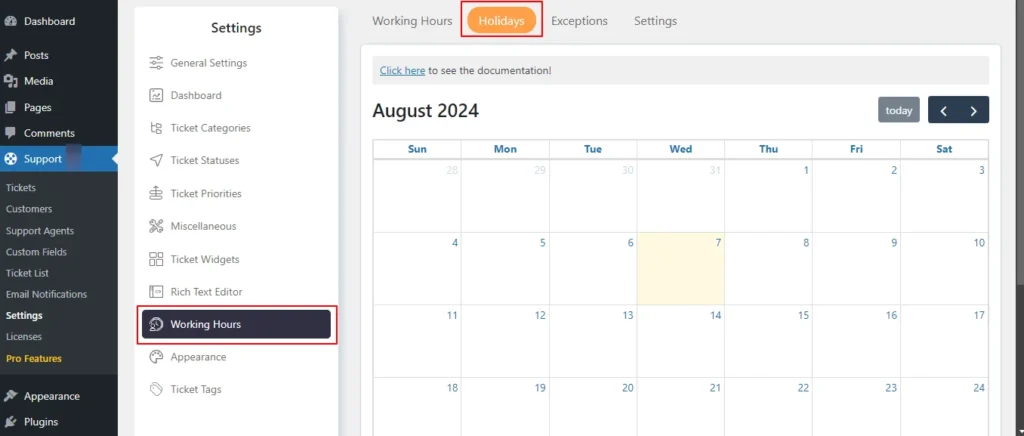
Step 9: Working Hours
This section allows you to choose the working hours for your company or organization. These specified hours will act as a standard template for the working hours of agents.
Screenshot 30: Support → Settings → Working Hours
Holidays
In this setting, you can add holidays for your company or organization,
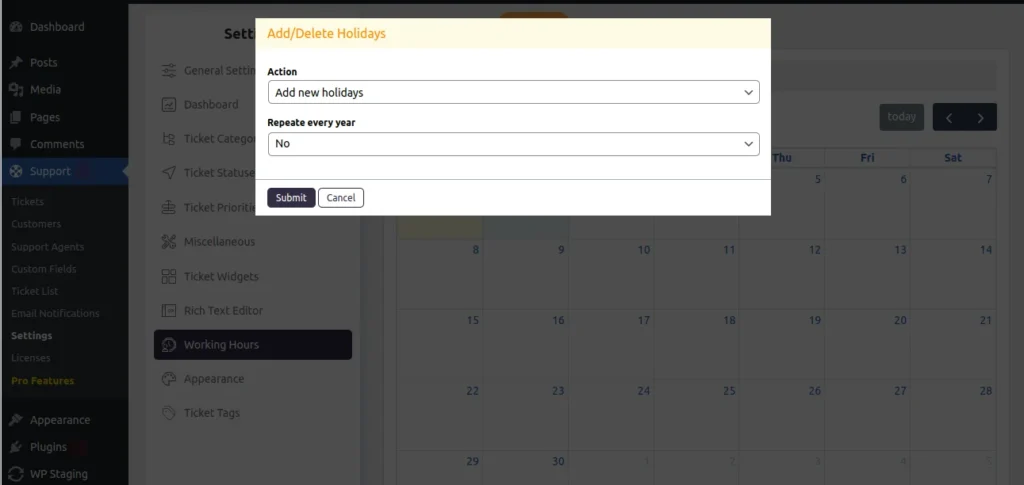
You can add a single holiday by clicking on a single date or multiple holidays by date range (selecting and dragging),
After electing choose the action Add new holidays.
If you want this to occur annually select yes in Repeat every year drop-down.
Similarly, you can delete holidays.
Screenshot 31: Holidays Calendar
Screenshot 32: Add/Delete Holidays
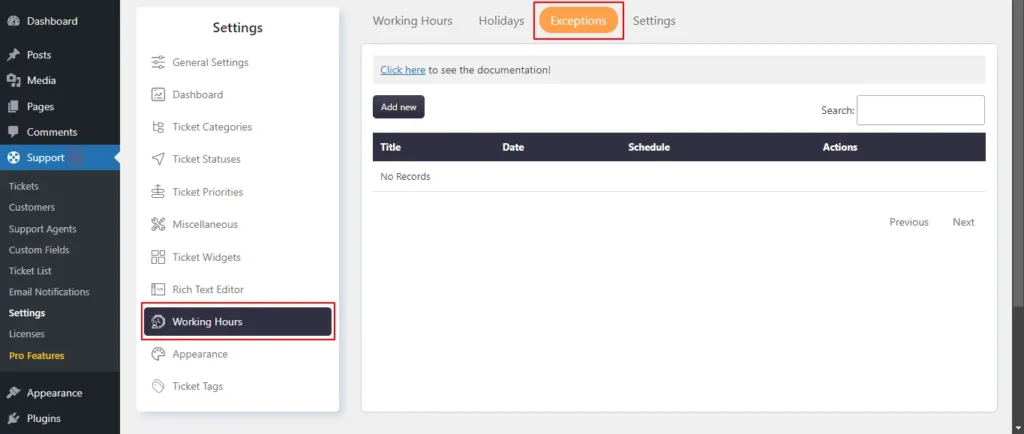
Exceptions
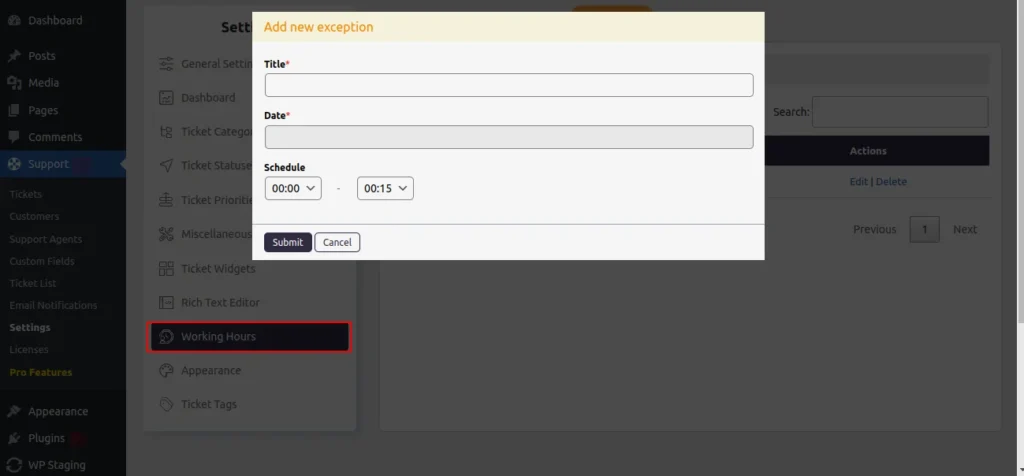
In some situations, you may want to modify the working hours for a specific day. You can do this by selecting that specific date and modifying the working hours.
This exception will apply only to the working hours set at the company or organization level.
Screenshot 33: Working hours → Exceptions list
Screenshot 34: Working hours → Exceptions → Add New
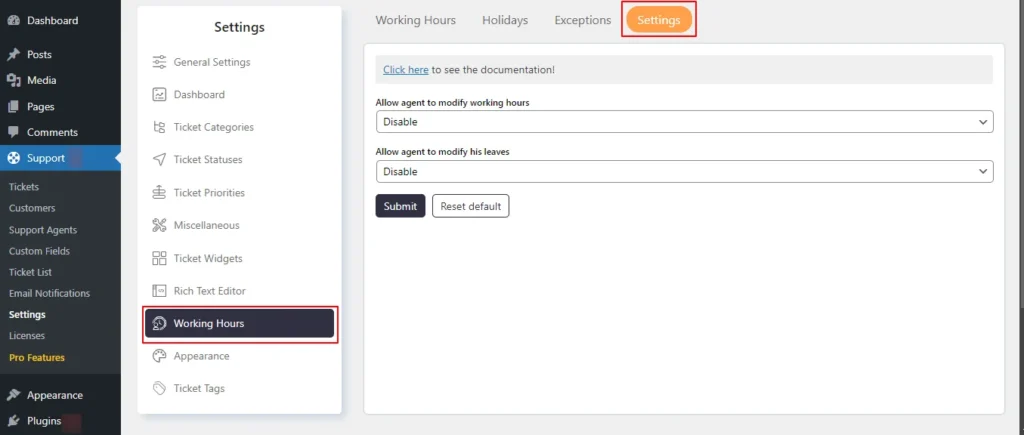
Settings
In the Settings Tab, you can Allow agents to modify working hours or you can Allow agents to modify their leaves.
Screenshot 35: Working hours → Settings Tab
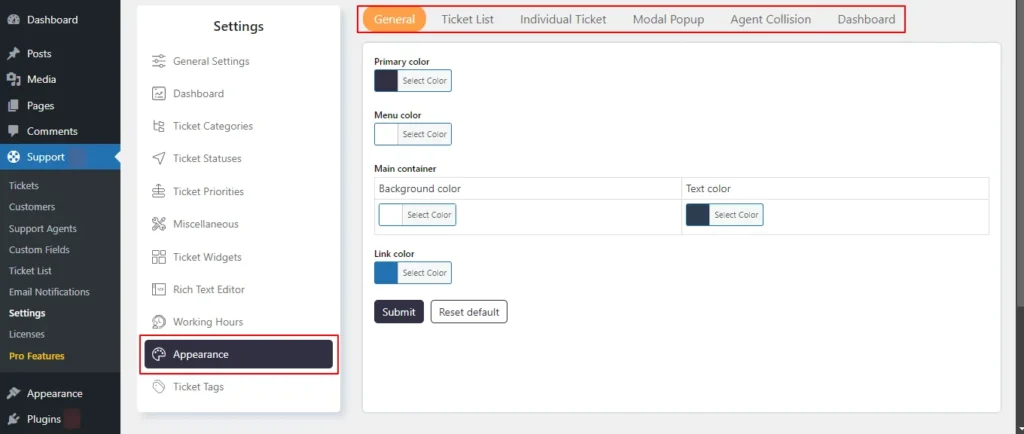
Step 10: Appearance
You can configure the appearance of General (overall look and feel), Ticket List, Individual Ticket, Modal Popup, Agent Collision, and Dashboard screens.
Screenshot 36: Appearance
Step 11: Ticket Tags
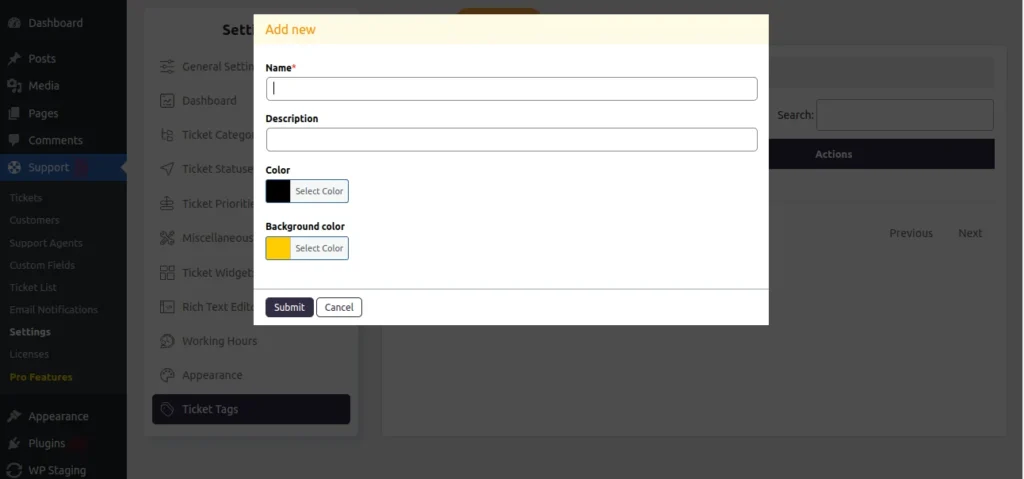
The Ticket Tag Setting feature allows administrators to add tags to the tickets.
To add a ticket tag enter its name and description, and select its color and background color.
Screenshot 37: Add new Ticket tag
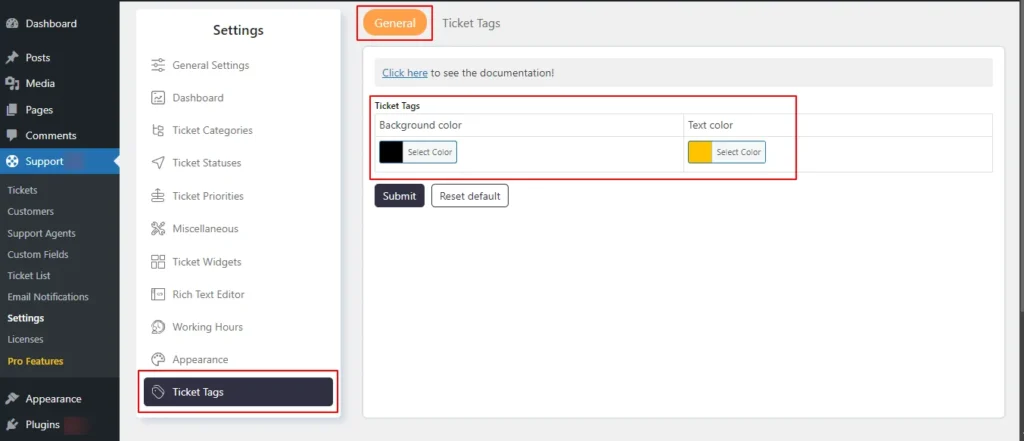
Under the same screen, you can customize Tag Appearance for ticket tags.
Screenshot 38: Ticket Tags General (Customizing Tag Appearance)
Conclusion
In this blog, we walked you through how to add a helpdesk and ticket system on WordPress using the SupportCandy plugin.
SupportCandy adds to your WordPress site the features of a complete help desk and customer support ticket system. It is one of WordPress's most popular helpdesk and customer support ticketing plugins.
That’s it for this article. Do more with your website. If you need any help related to WordPress, contact our WordPress experts.
In Part 1 of this 3 part Blog series, we covered the basics of setting up the Support Candy plugin, focusing on the following sections of the plugin
Installation and Setting up the Plugin
Tickets
Customers
Support Agents
Custom fields
Now, in Part 2 of this Blog, we will explore the following sections of the SupportCandy.
Ticket List
Agent Ticket List
Customer Ticket List
Email notification
Ticket List
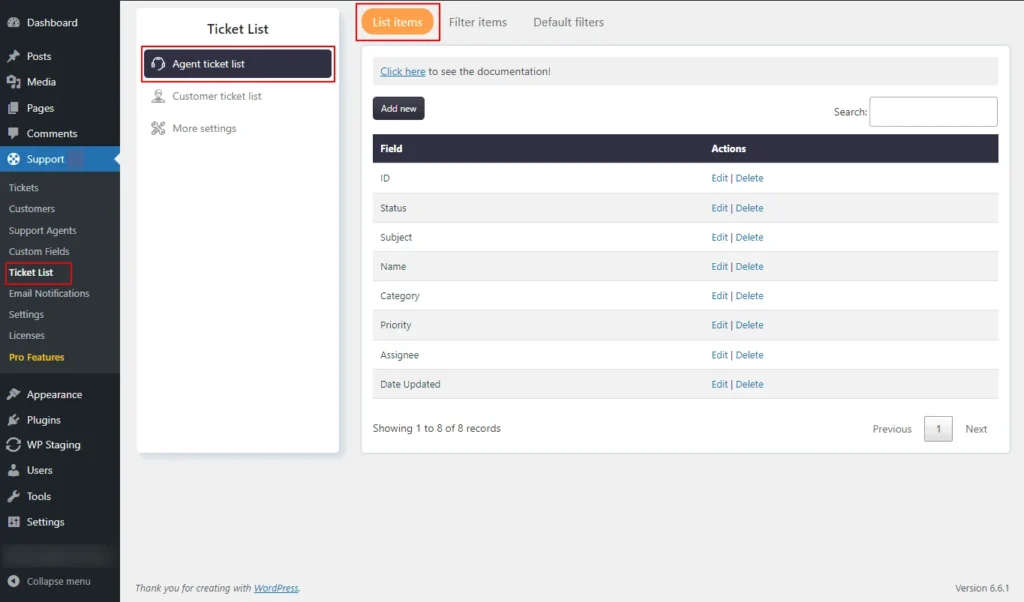
Ticket List section is used to define the columns that appear in the Admin and Agent dashboard under Tickets → Ticket List screen and Customer Tickets list on the front end.
You can add new columns from the existing list of items or rearrange the columns order in which they are displayed.
Step 1: Agent Ticket List
List Items tab
Go to the SupportCandy plugin menu.
Click on the Ticket List → Agent ticket list → List items
Customize the column order displayed in the ticket list.
Screenshot 1: Item Lists
Adding List Items (Coulmns) to Tickelt list table
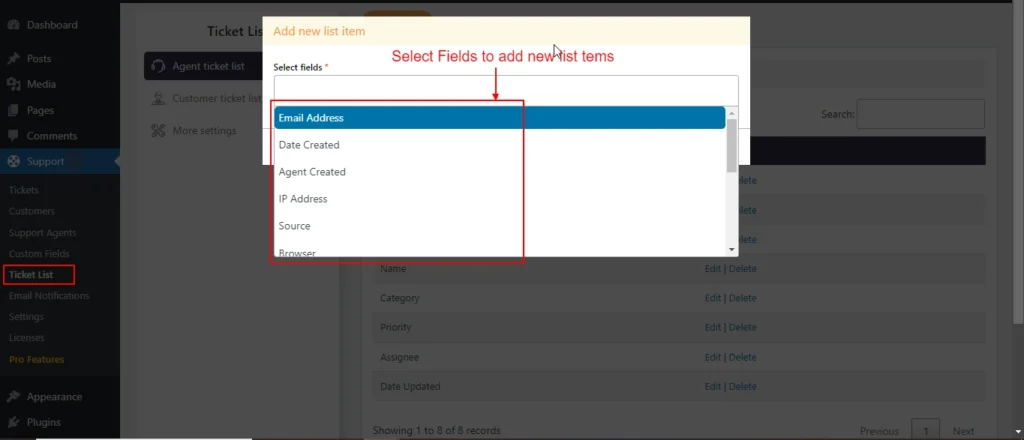
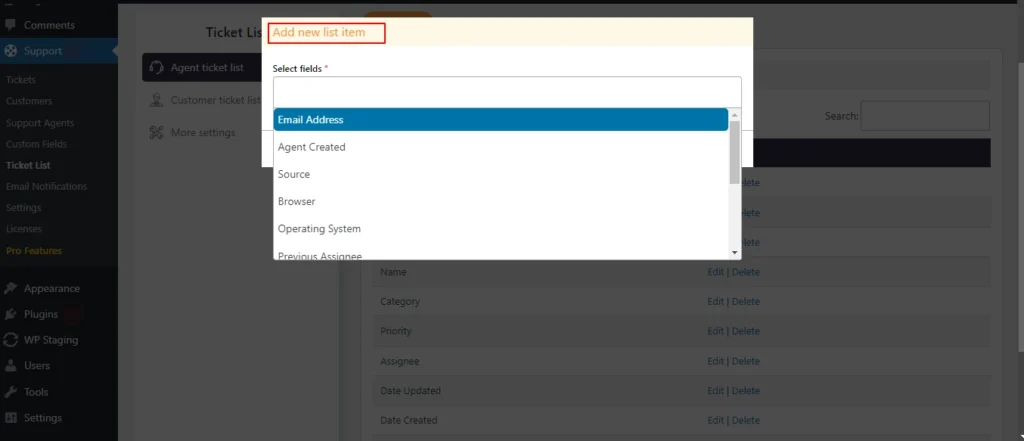
Click on Add new to Add new List items.
Select fields from the available list (e.g. date created, email address, etc) as shown in the below screenshot.
Hit Submit to save changes.
Screenshot 2: Adding New Column to Agent Ticket List table
Editing List Items
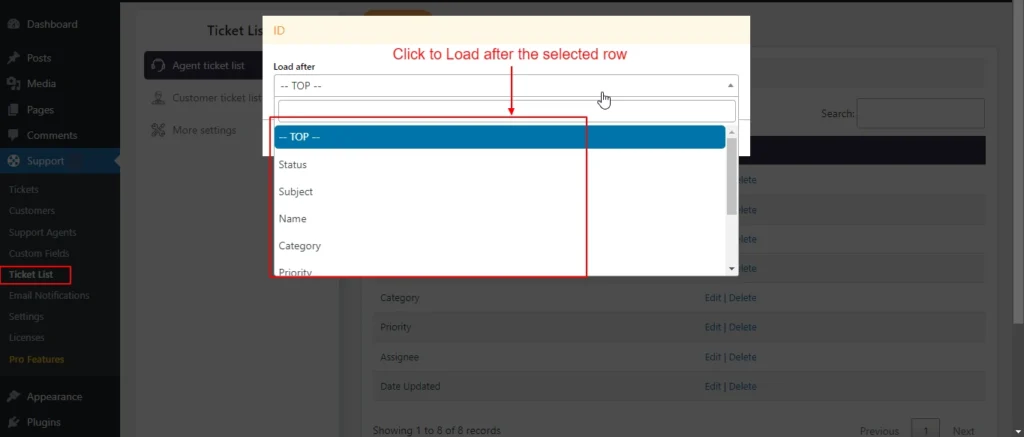
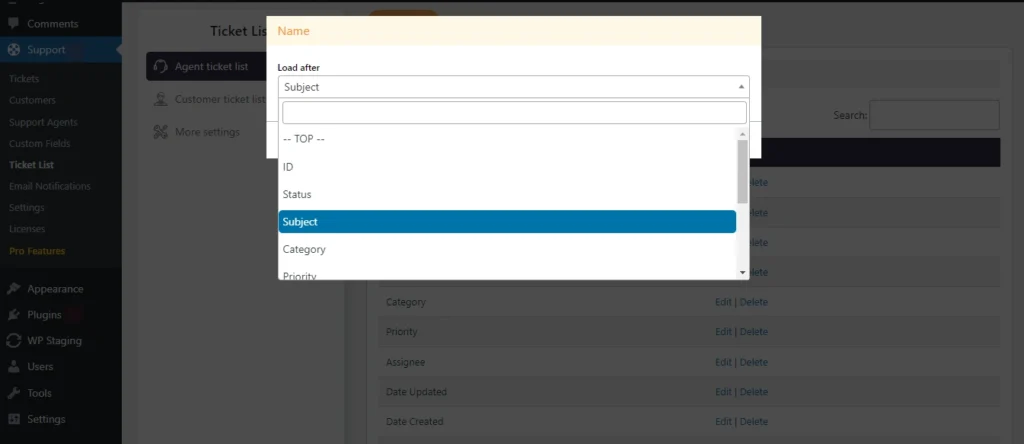
In the Agent Ticket List section, edit the column that you want to reorder.
Click Submit to apply your changes.
Screenshot 3: Edit List Items (reordering columns)
Filter Items
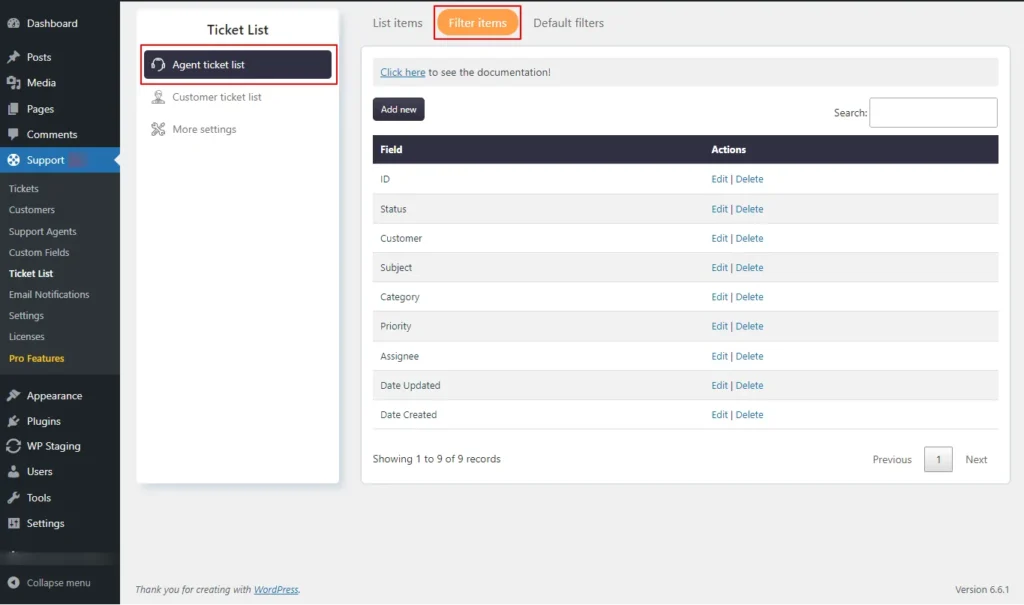
This screen allows us to add filter options for filtering tickets on the Agent Tickets list screen. You filter tickets based on their status, customer, subject, category, priority, and so on.
Screenshot 4: List of available filters in the Agent Ticket List
Add New Agent Tickets Filter Items
Go to the Ticket List → Agent ticket list → Filter items.
Add the filter options you want to filter tickets by, as shown in the screenshot below.
Click Submit to apply the filter settings.
Screenshot 5: Add New filter options to Agents Tickets
Edit Agent tickets Filter Items
Go to the Ticket List → Agent ticket list → Filter items. Click the Edit link beside the field.
You can only change the Load after setting
Click Submit to apply your changes.
Screenshot 6: Edit filter item for Agents Tickets
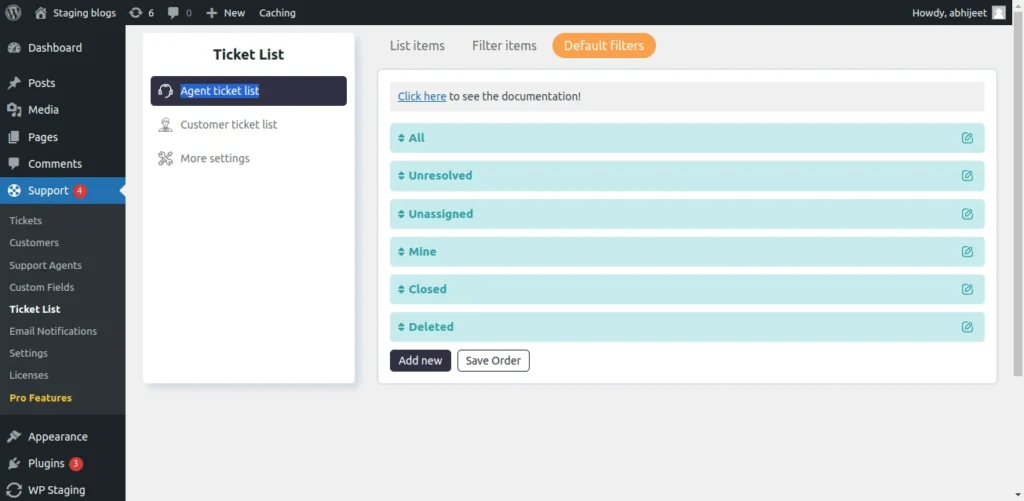
Default Filters
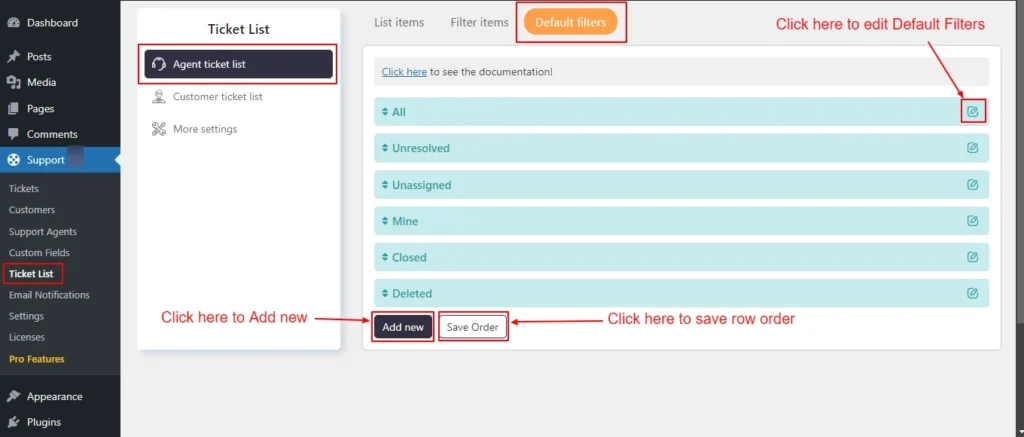
Default filters are filters on the ticket list. Here we choose the fields created in the above steps. These filters are available to agents.
Select the items for default filters drop down on the Ticket List page (e.g., All, Unresolved, Unassigned, Mine, Closed, Deleted, show only open tickets).
Drag and drop to reorder the fields as needed.
Screenshot 7: Agent Ticket List Default filters
Add new Agent ticket list Default Filters
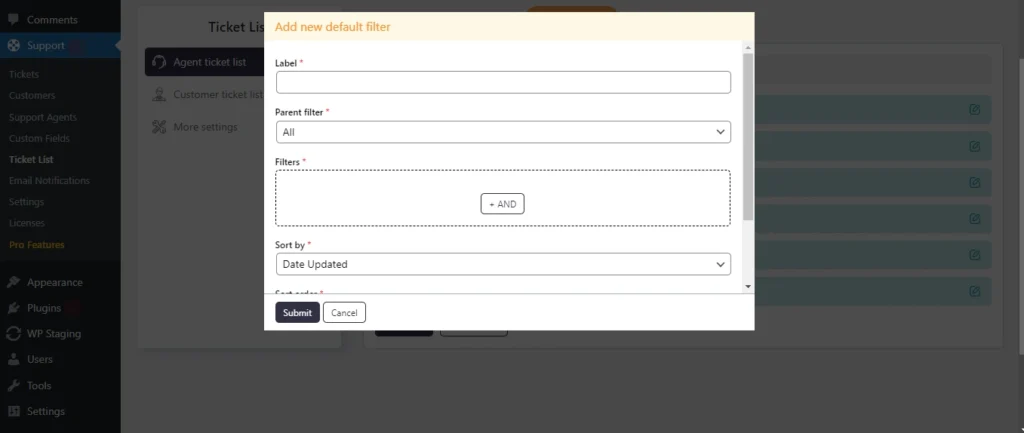
Go to Ticket List → Agent ticket list → Default filters
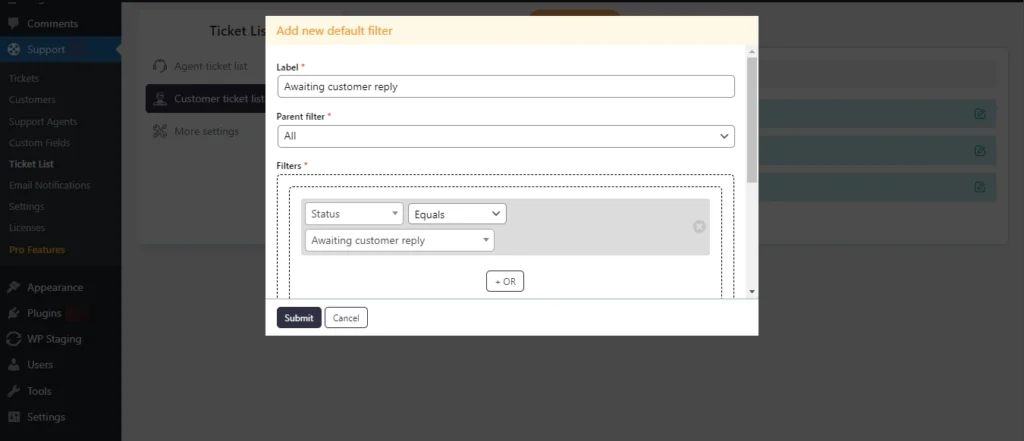
Enter the Label, choose the Parent filter if needed
If required apply conditional logic.
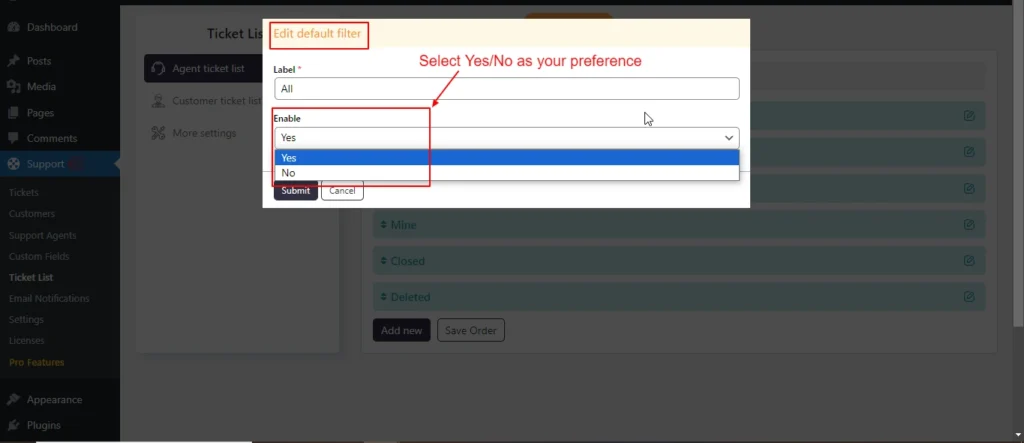
Set the Enable drop-down to Yes
Click Submit.
Screenshot 8: Add new Default filter
Edit Agent tickets Default Filter
Go to Ticket List > Agent ticket list > Default filters
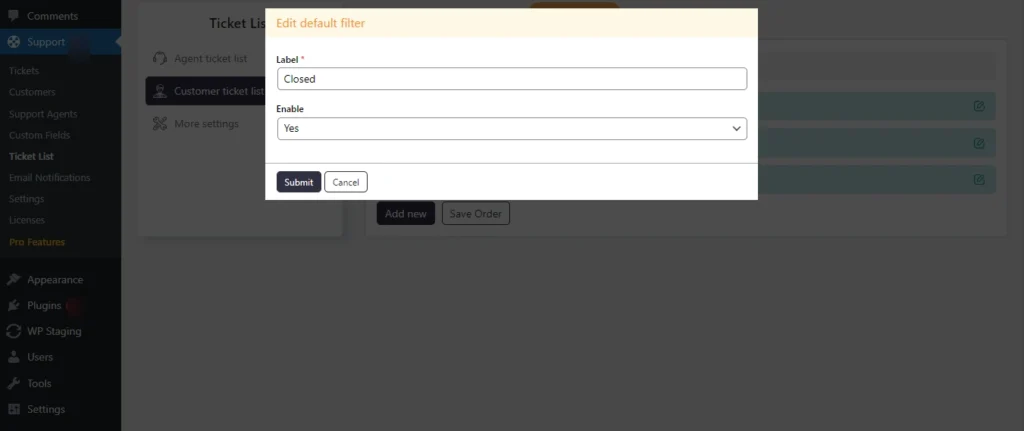
Click on the edit icon beside the filter name
You can only edit the Label and its Enable status.
Screenshot 9: Edit Default filters
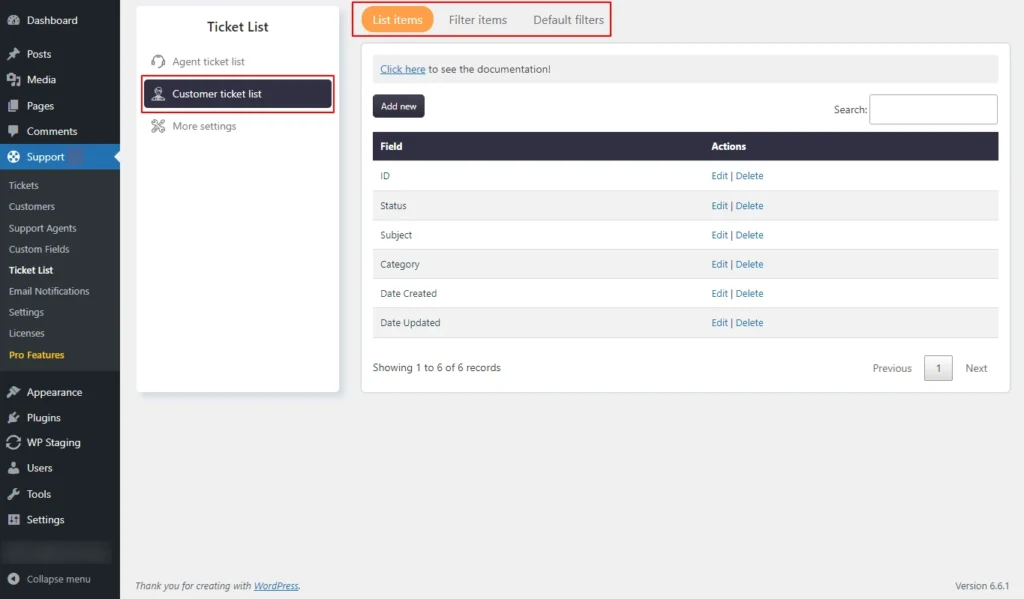
Step 2: Customer Ticket List
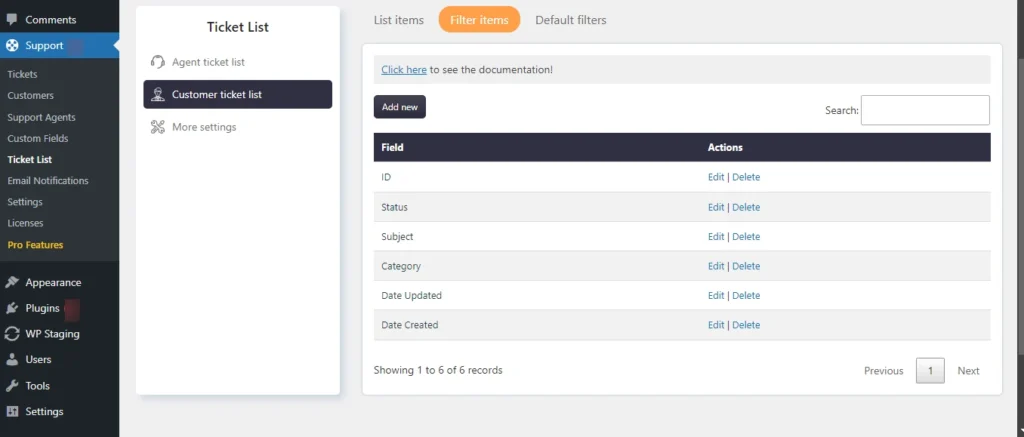
Similar to Agent ticket list we can define columns for the Customer ticket list and add new filters to it.
Screenshot 10: Columns displayed in the Customer ticket list
List Items
Go to the SupportCandy plugin menu.
Click on the Ticket List → Customer ticket list → List items
Customize the column order displayed in the ticket list.
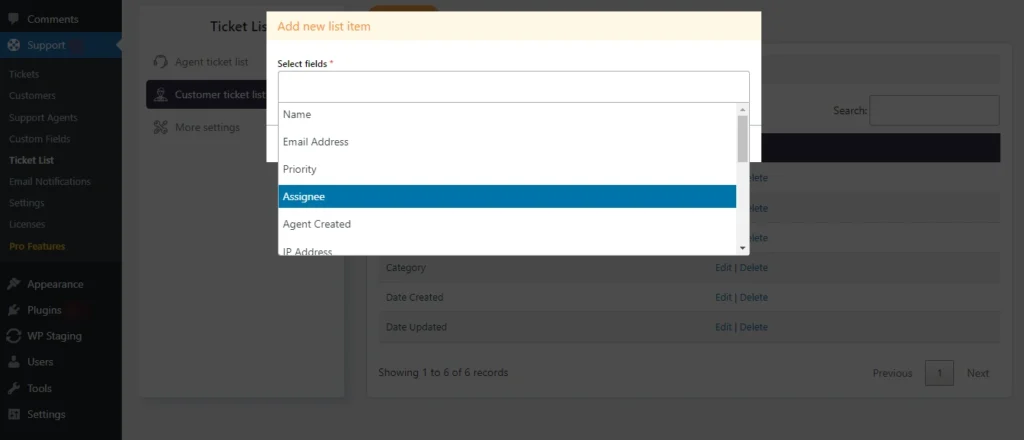
Adding List Items (Coulmns to Tickelt List Table)
Click on Add new
Select fields from the available dropdown (eg. Name, email address, priority, etc.) as shown in the below screenshot.
Hit Submit to save changes.
Screenshot 11: Custom ticket list → Add new list item
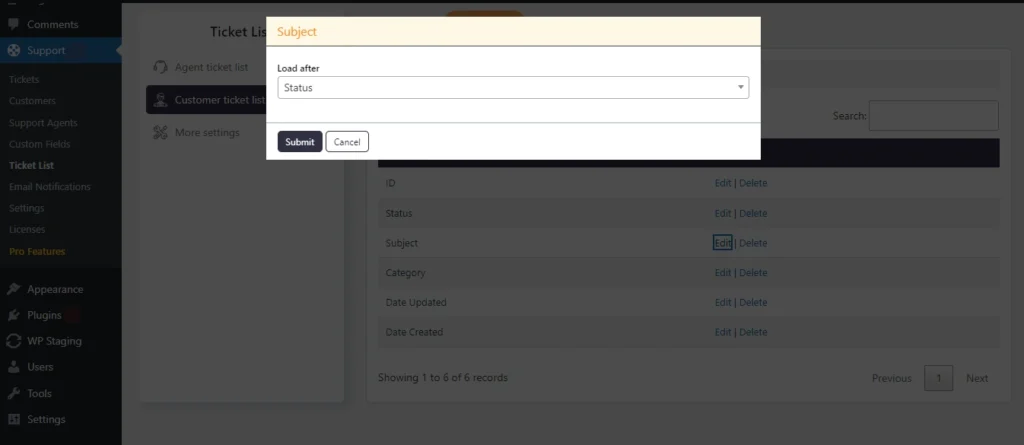
Editing List Items
In the Customer Ticket List section, edit the column that you want to reorder.
Click Submit to apply your changes.
Screenshot 12: Customer ticket list → Edit list item
Filter Items
This screen allows us to add filter options for filtering tickets on the Agent Tickets list screen. You filter tickets based on it’s status, customer, subject, category, priority, and so on.
Screenshot 13: Filter fields for Customer tickets (frontend)
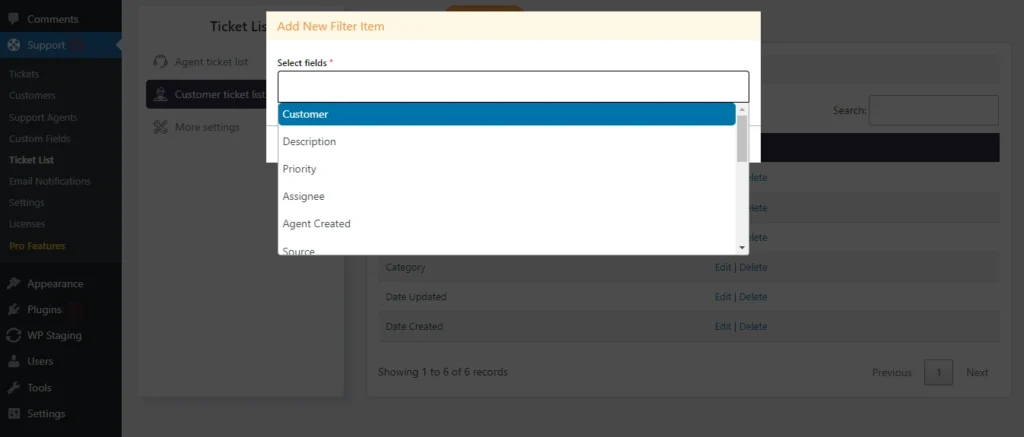
Add New Customer Tickets Filter Items
Go to the Ticket List → Customer ticket list → Filter items.
Add the filter options you want to filter tickets by, as shown in the screenshot below.
Click Submit to apply the filter settings.
Screenshot 14: Add New filter options to Customer Tickets
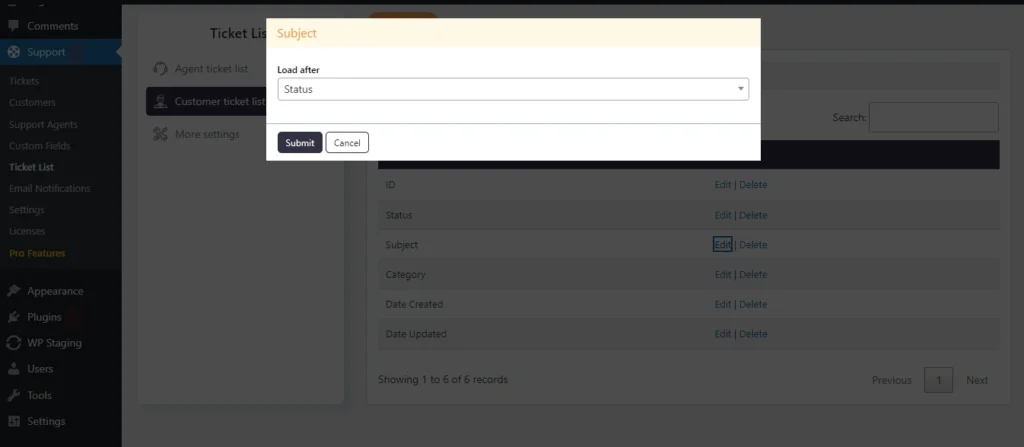
Edit Agent tickets Filter Items
Go to the Ticket List → Customer ticket list → Filter items. Click the Edit link beside the field.
You can only change the Load after setting
Click Submit to apply your changes.
Screenshot 15: Edit filter options to Customer Tickets
Default Filters
Go to Support → Ticket List → Agent ticket list → Default filters
You can set the default filters that appear in the customer tickets screen, similar to the Agent Agent tickets screen.
Screenshot 16: Default filters in the Customer Tickets list
Adding Default Filters to Customer Tickets
Go to Support → Ticket List → Agent Customer list → Default filters
Enter the label; choose the Parent filter if needed.
If required, apply conditional logic.
Set the Enable drop-down to Yes.
Click Submit.
Screenshot 17: Adding Default Filters to Customer Tickets
Edit Customer tickets Default Filter
Go to Ticket List → Customer ticket list → Default filters
Click on the edit icon beside the filter name.
You can only edit the Label and its Enable status.
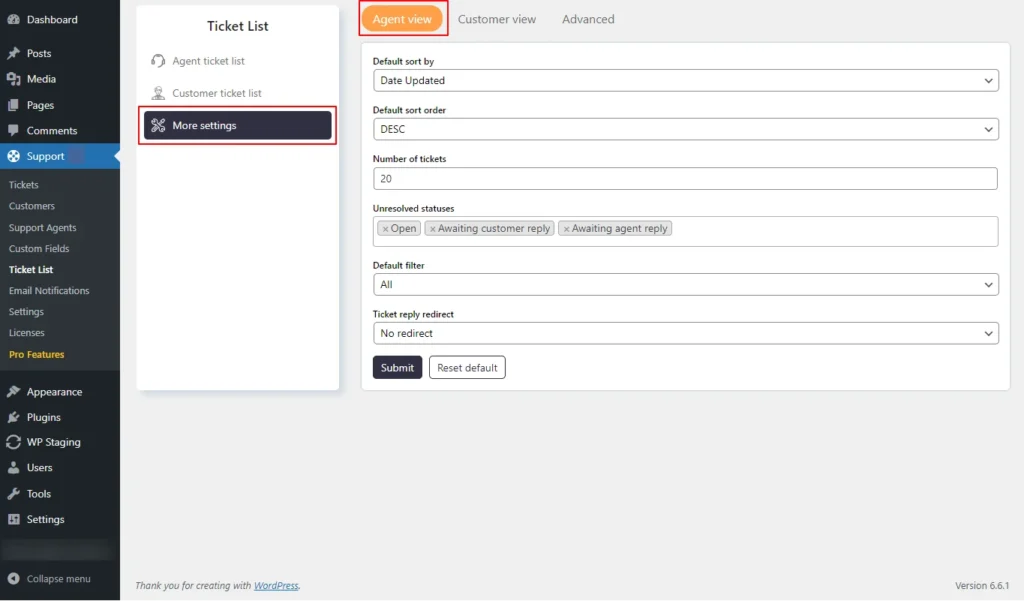
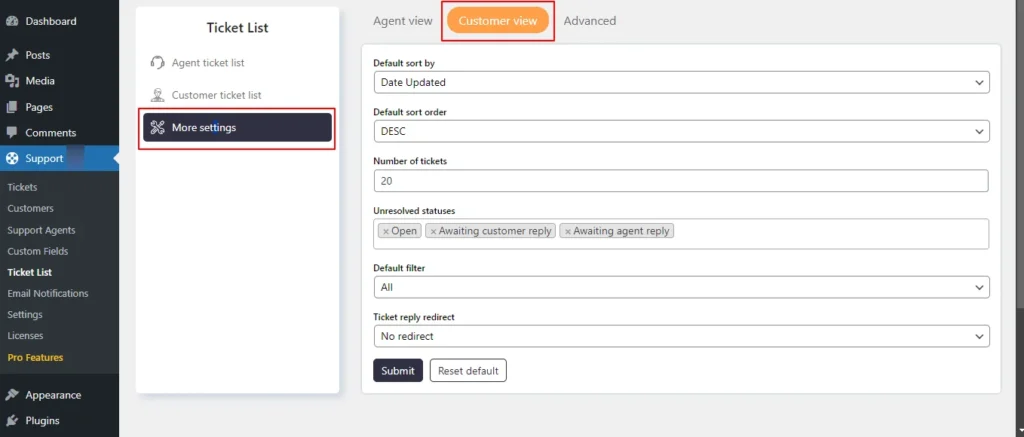
Using the More settings tab, you can customize how the ticket list behaves for both agent and customer views.
Here are the available settings for both:
Default Sort By: Choose the default field by which tickets will be sorted.
Default Sort Order: Set the default sort order (ascending or descending).
Number of Tickets: Specify how many tickets will be displayed per page.
Unresolved Statuses: Define the statuses that are considered unresolved.
Default Filter: Set the default filter for the ticket list. Agents can adjust this further in their profile settings within the ticket portal.
Ticket Reply Redirect: Choose what happens after a reply is added to a ticket. "No redirect" keeps the customer on the current ticket screen, while "Ticket list" redirects them back to the ticket list screen.
Agent view
Screenshot 19: More Settings Agent View
Customer view
Screenshot 20: More Settings Customer View
Advanced Tab
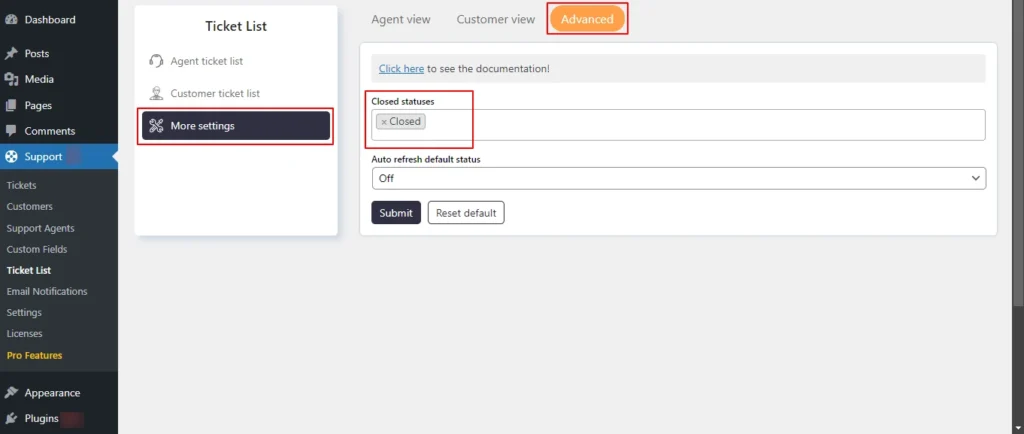
You can define a closed ticket status group, where tickets with statuses in this group are treated as closed.
Additionally, you can configure the default auto-refresh behavior for the ticket list. If enabled, the ticket list will automatically refresh every 10 seconds by default until you turn off this feature from the ticket list settings.
Screenshot 21: Advanced Tab
Email Notifications
Using this menu, you can set up email notifications.
Step 4: General Settings
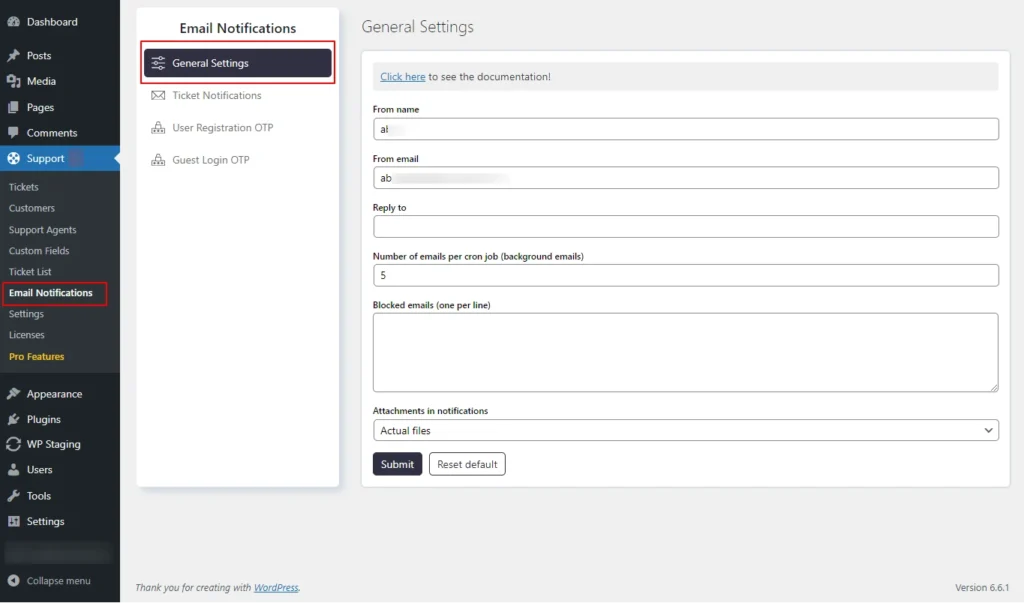
Go to the Email Notifications section under the Support menu.
Screenshot 22: Email Notification → General settings
Here, you can configure the following email settings:
From name – Sender's name.
From email – From which email address will the email be sent
Reply To – When a user replies to a notification, emails will be sent to the specified email address. If no address is provided, the "From" email address will be used as the reply-to address.
Number of emails per cron job – Set the maximum number of emails that should be sent in a batch.
Blocked Emails – Specify email addresses that should not receive email notifications.
Attachments in notifications – configure to send emails with attachments (links or actual files )
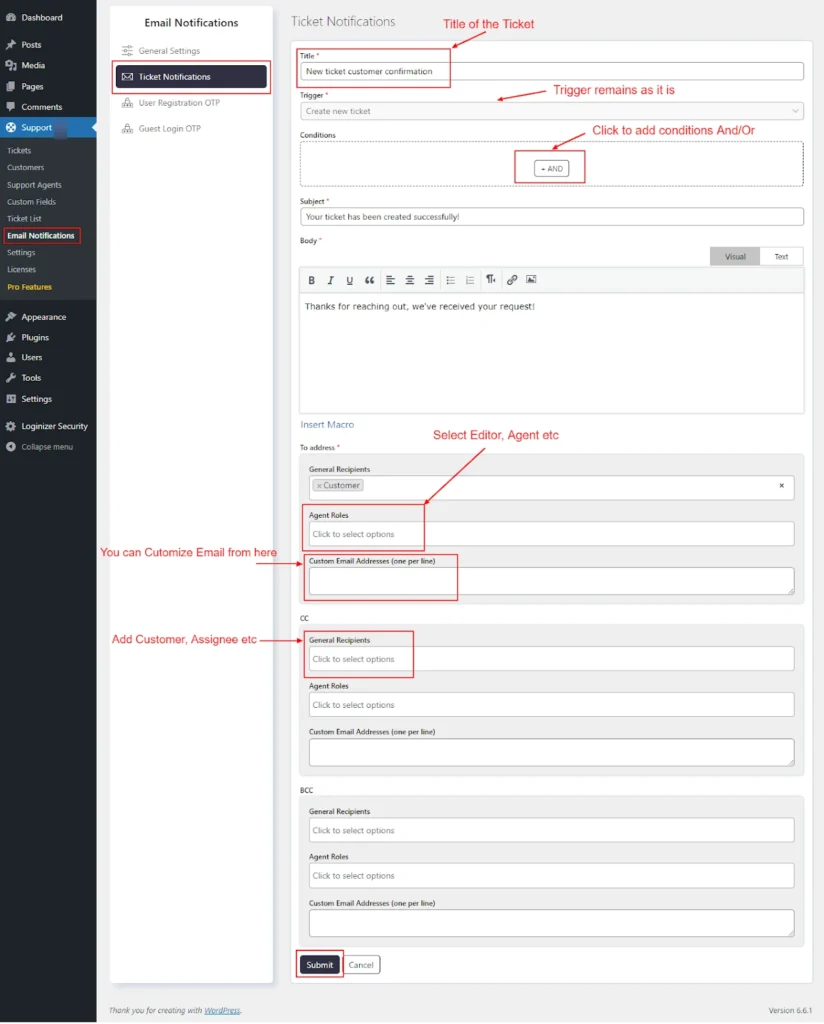
Step 5: Ticket Notifications
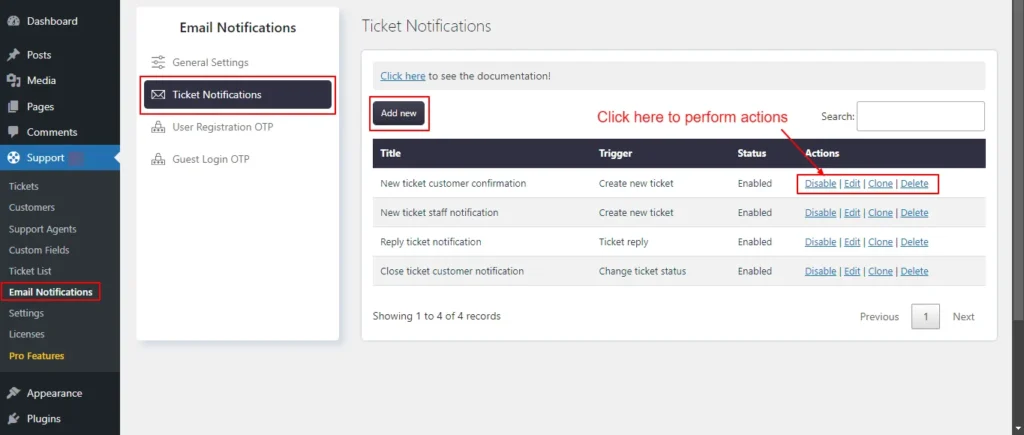
In this section, you can edit or create email notification templates.
Screenshot 23: Ticket Notifications
Adding New Ticket Notification
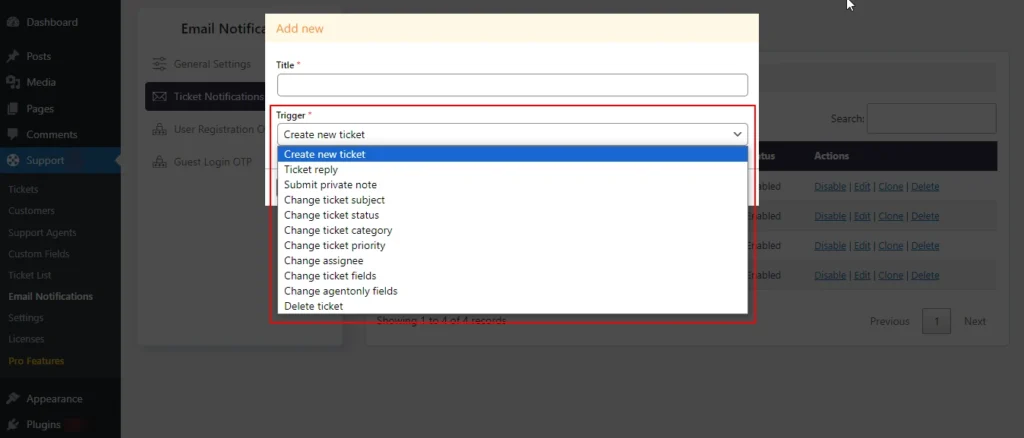
Screenshot 24: Add New Ticket Notification
Click on Add New.
Add Title and Select a Trigger
Following are trigger events that can be used to send email notifications
Cricket new ticket: When a new ticket is created
Ticket reply: When a ticket receives a new reply, relevant parties are notified to the new response.
Change ticket status: When the ticket status changes, for example, from Open to Awaiting customer reply, the activation occurs.
Change ticket category: When the category of the ticket is modified
Change ticket priority: When the priority of a ticket is changed
Change assignee: When the assigned agent of the ticket is changed, it will trigger a notification to the new assignee.
Delete ticket: When a ticket is deleted,
Submit private note: When a private note is added to a ticket
You must change the notification status to Enabled. Otherwise, this email notification won’t be sent.
You can use macros or placeholders within the Subject and Body.
Editing Ticket Notifications
Click on Edit button beside the template name for which you want to edit.
You can manually add recipients in To address (required), CC, and BCC using the following settings
General Recipients
Agent Roles
Custom Email Addresses (one per line)
Screenshot 25: Editing Ticket Notifications
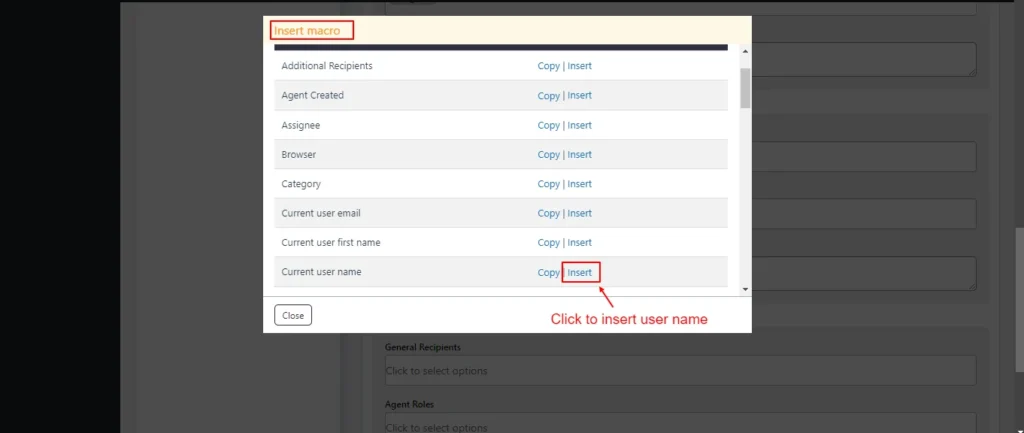
You can Insert Macro in the email body
Click on the Insert Macro button to view a list of available macros.
The list will include placeholders for various types of data, such as customer name, status, date created, etc.
Select the macro you wish to insert. For example, {{customer_name}} can be used to insert the customer's name dynamically.
Screenshot 26: Insert macro current user name
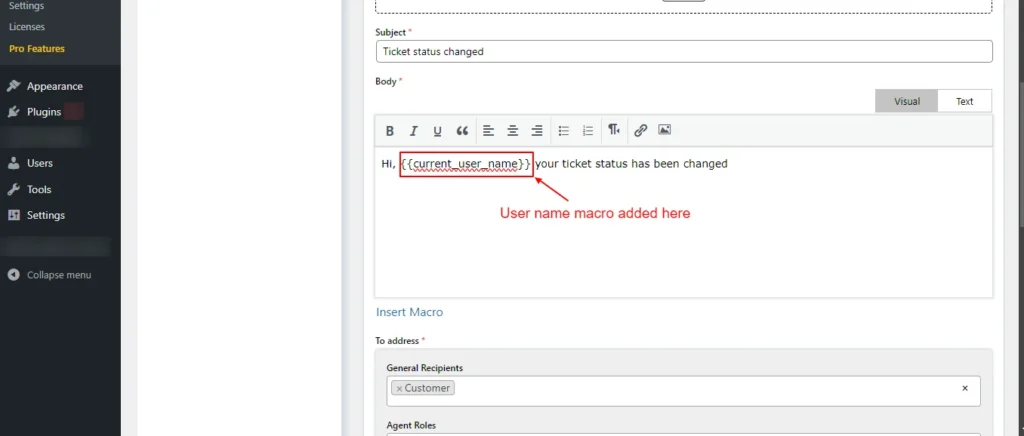
After clicking on the Insert button, the user name macro has been added under the body, as shown in the below screenshot.
Screenshot 27: User name Macro
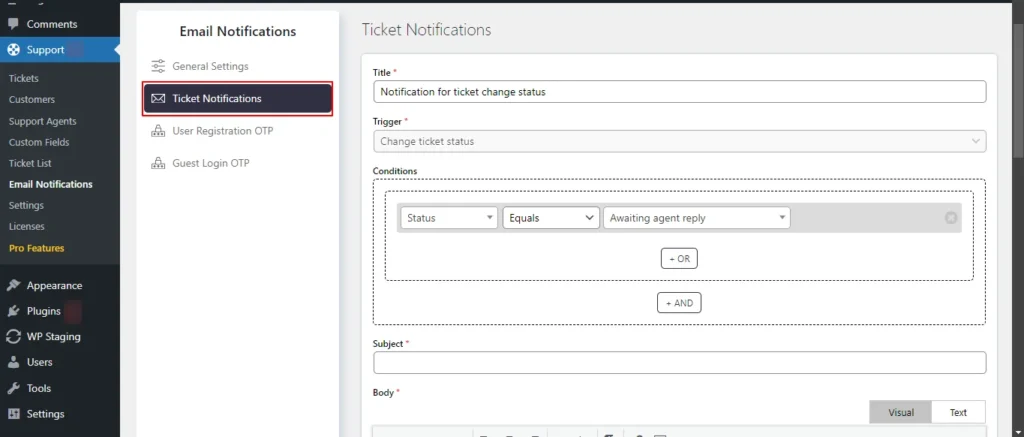
Conditions
You can add And/Or conditions, and when they are met, then only an email notification is sent
Let’s say that you want to send a notification for ticket change status to the Awating agent reply.
Click on Add New under the Email Notifications → Ticket Notifications section. Set the trigger to Change Ticket status
Under the Conditions section, set the Status equal Awaiting Agent reply.
Add the subject, body, and email addresses to which this notification should be sent.
Click Submit. Just now you configured that this notification should be sent when the status is Awating agent reply.
Sccreenshot 28: Setting Conditions in Ticket Notifications
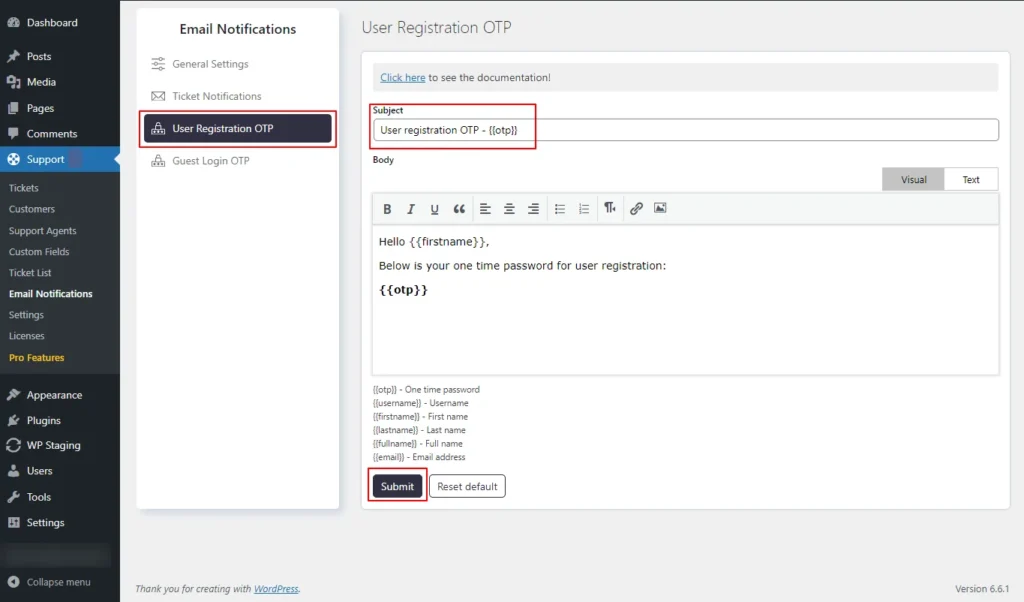
Step 6: User Registration OTP
This screen is to configure the email template for the Default registration of the supportcandy plugin. You can customize the email template that is used to send the OTP.
The user registration OTP is a single-use password that is sent to verify the user's email address when using the “Default” registration form.
Within the body section of the setting, you can utilize macros (placeholders) in the email subject and body as shown below.
Screenshot 29: User Registration OTP
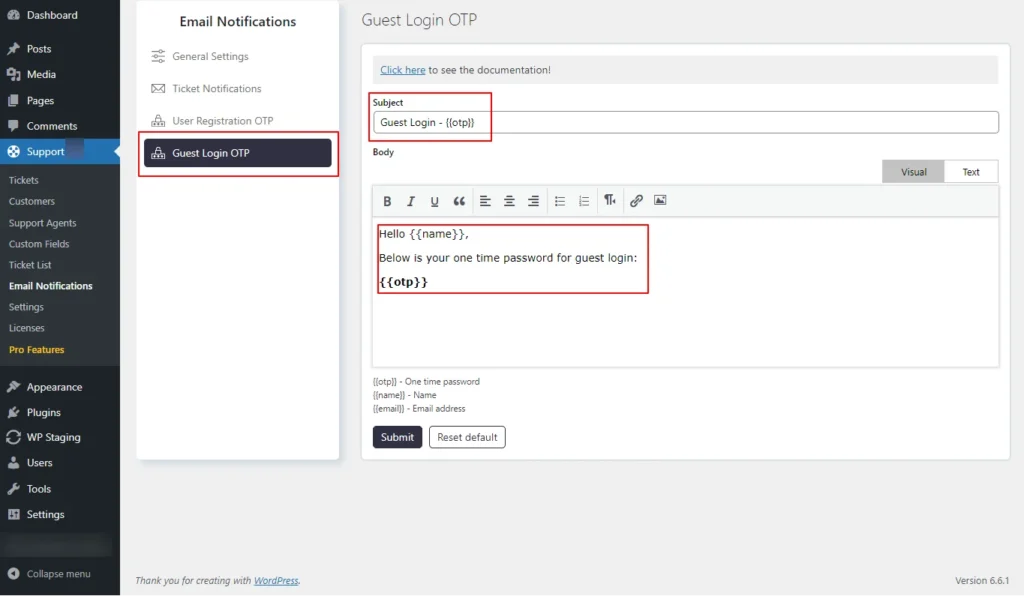
Step 7: Guest Login OTP
To allow guest users to access their ticket list, you can activate an OTP (One Time Password) login.
Keep in mind that OTP login is functional only when guest tickets are enabled. You can turn on this feature by navigating to Support → Settings → General Settings → Page Settings.
Under the Guest Login OTP setting, you have the option to change the email template used for sending the OTP.
On the same setting page, you can insert macros (placeholders) into the email subject and body.
Screenshot 30: Guest Login email notification template for OTP
Conclusion
In this blog (Part 2 of the 3 Part Blog series), we walked you through the Ticket List, Customer Ticket List, Agent Ticket List and Email Notifications Sections.
That’s it for this article.
In the upcoming Part 3 of this series, we'll explore even more advanced features to take your customer support to the next level.
If you need any help related to WordPress, contact our WordPress experts.
We use cookies to ensure that we give you the best experience on our website. If you continue to use this site we will assume that you are happy with it. Ok, understood