
Insights, ideas and inspiration. A go to wisdom hub right here.
Featured Posts


Tutorials
7 Min Read

Latest Posts
Tutorials
12 min read
How to integrate a Helpdesk and Customer Support Ticket System in WordPress using SupportCandy (Part 1)
Introduction
In today's competitive landscape, providing exceptional customer support is a top priority for businesses to maintain a loyal client base. Whether you run an online eCommerce store, a membership site, a product, or a service-based business, having a robust customer support system is essential for maintaining a positive customer experience.
Integrating a helpdesk and customer support ticket system directly into your WordPress website can be a game-changer.
In this step-by-step guide, we'll delve into the process of integrating a robust customer support ticket system into your WordPress website using the SupportCandy plugin.
This is a three-part blog series. In this Part 1 article, we discuss the following sections of the SupportCandy.
- Installation and Setting up the Plugin
- Tickets
- Customers
- Support Agents
- Custom Fields
The step-by-step process of adding a customer support system to WordPress using the SupportCandy
Step 1: Installing the SupportCandy plugin
- In the beginning, go to your WordPress homepage.
- For the Plugins tab, click on it.
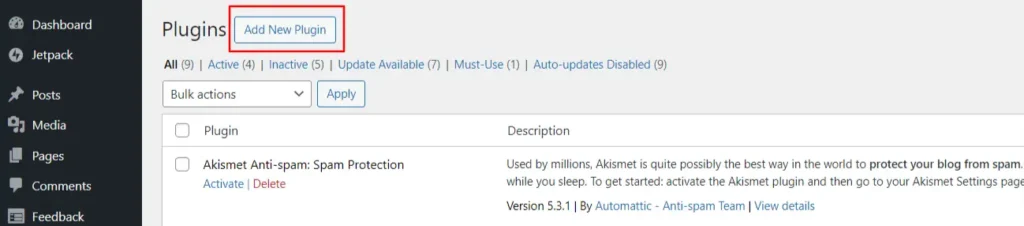
- Press the Add New button.
- Use the search bar to look for SupportCandy.
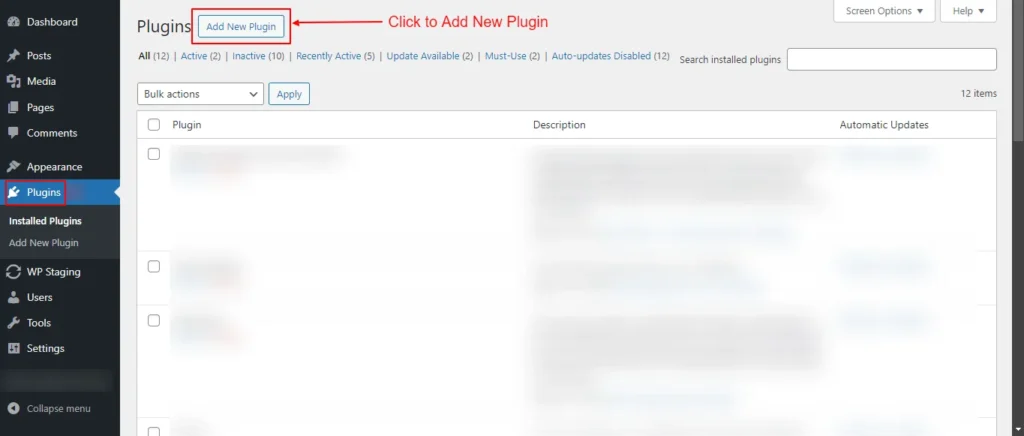
Screenshot 1: Click on Add New Plugin
- Click the Install Now button under the plugin SupportCandy—Helpdesk & Support Ticket System.
- Click the Activate button, and you are done!
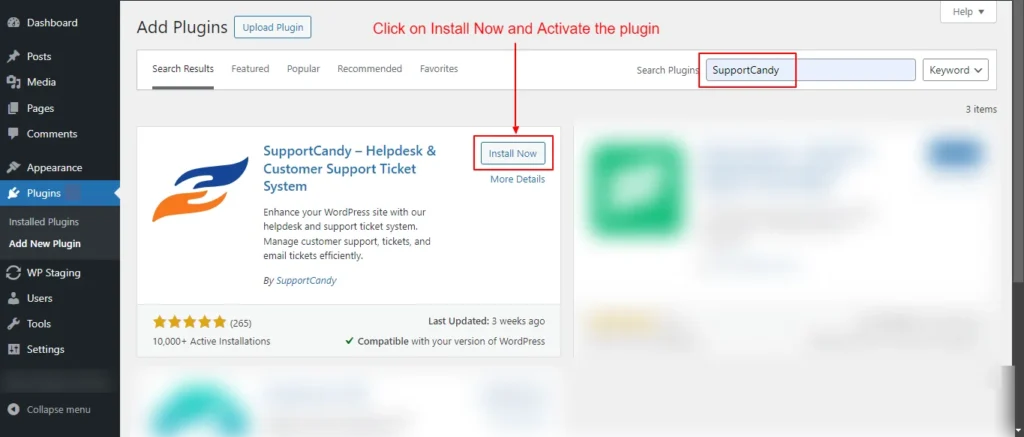
Screenshot 2: Install and Activate the Plugin
Step 2: Setting up Frontend Pages
Once the plugin is activated, we need to create web pages to embed SupportCandy shortcodes to display various support-related features and functionality.
Support requests Page
- Go to the WordPress Pages menu. Click on the Add New Page. Name the page Supports Requests.
- Add the shortcode ‘[supportcandy]’ to this page and save it.
- Go to the Support Candy menu Support → Settings → General Settings → Page Settings.
- Select the newly created page Support Requests under the Support page dropdown.
- Save the settings by clicking the Submit button.
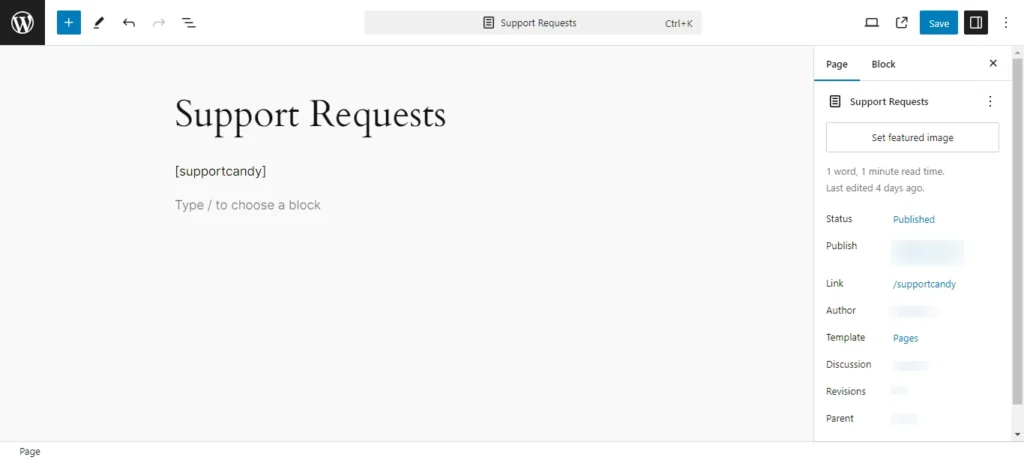
Screenshot 3: Create a New WordPress Page Support Requests
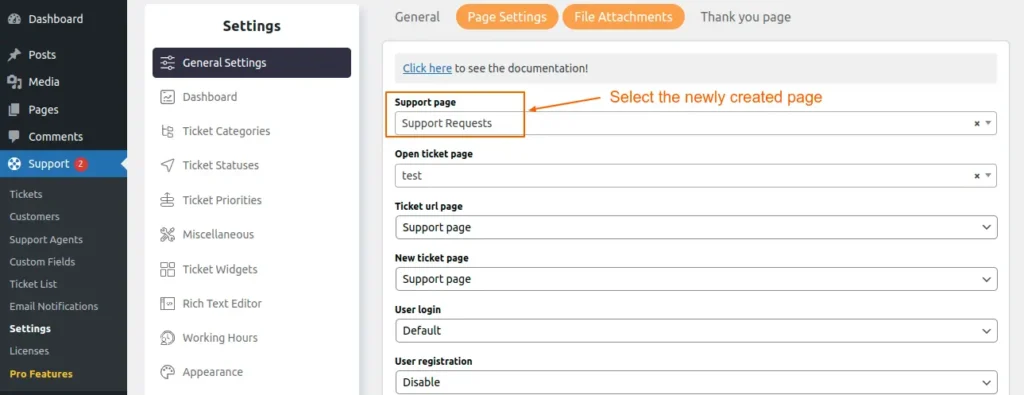
Screenshot 4: Add it to Support → Settings → General Settings → Page Settings
Tickets
Step 3: Ticket List (Viewing Tickets)
- Navigate to the Tickets section under the SupportCandy menu.
- Here you will see a list of all tickets.
- Use the filters and search bar to find specific tickets.
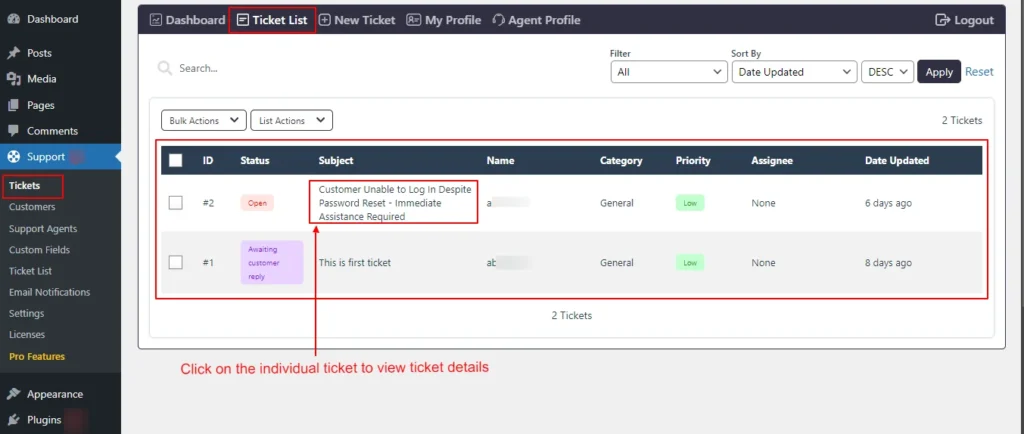
Screenshot 5: Ticket List
- Click on an individual ticket to view the ticket details, such as ticket status, ticket info, and comments, as shown in the below screenshot 6.
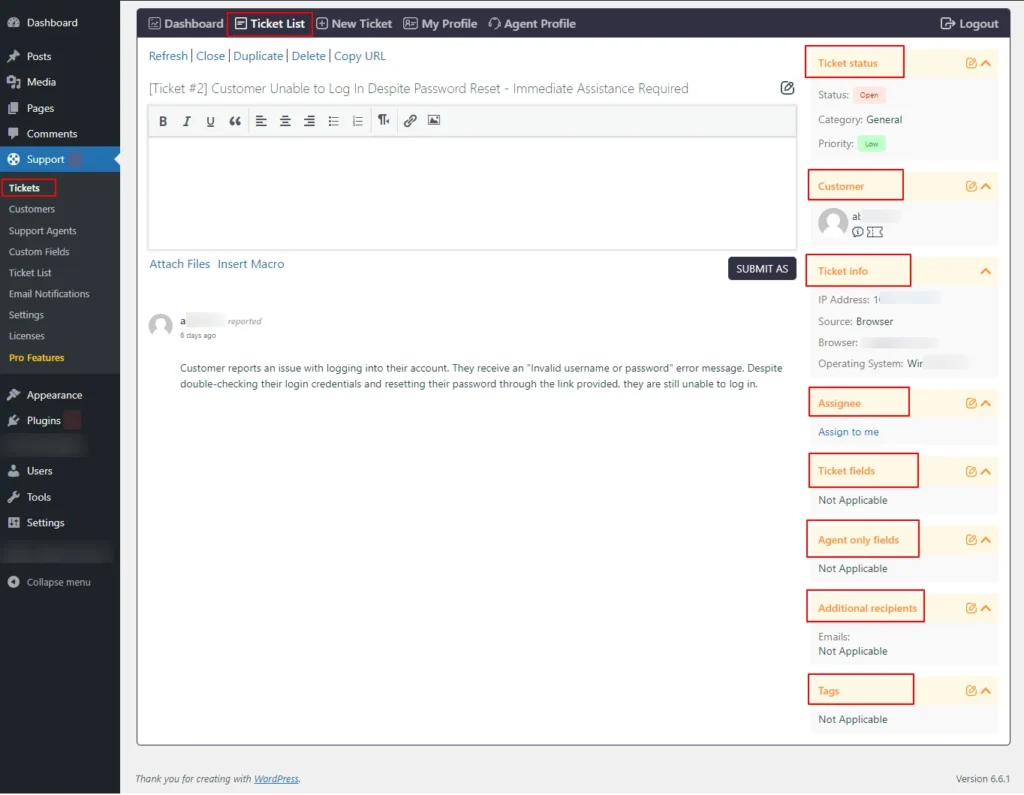
Screenshot 6: View single ticket details
Step 4: Viewing Dashboard
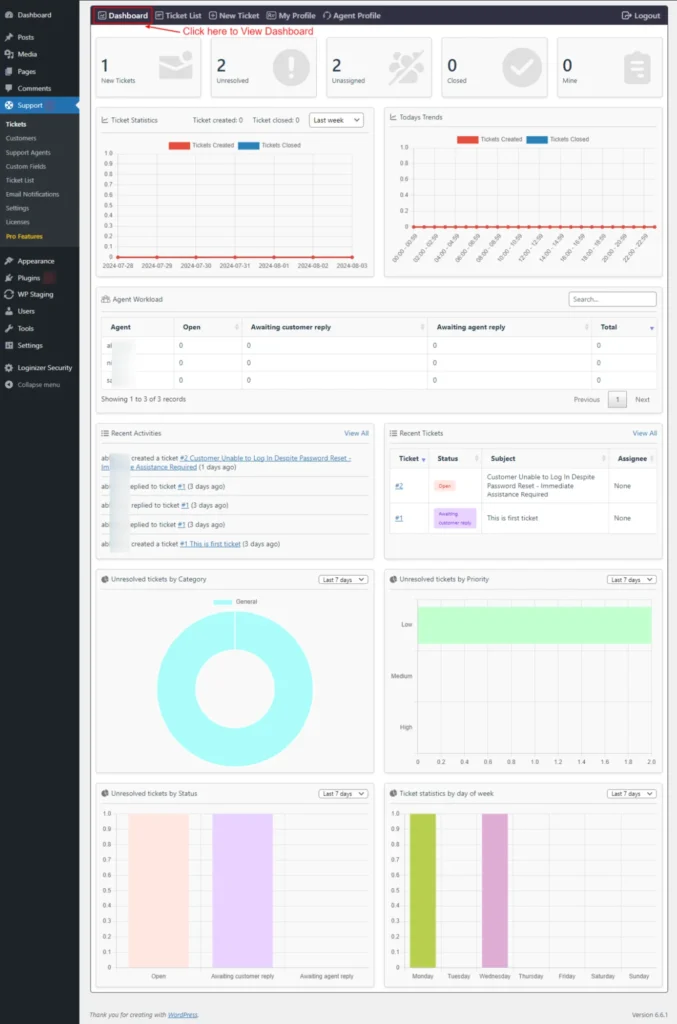
Screenshot 7: Dashboard
- At the top of the dashboard, we can see numbers of New, Unresolved, Unassigned, and Closed Tickets.
- Below that we can see various cards, such as
- Ticket Statistics
- Today's Trends
- Agent Workload
- Recent Activities
- Recent Tickets
- Unresolved tickets by Category, Priority, and Status (default: last 7 days data)
- Ticket statistics by day of the week
- You can choose which cards to display in this dashboard under the settings menu, which is discussed in the default tab under Agent Profile.
Step 5: Adding a New Ticket
Adding a New Ticket from Frontend
- Your customers can add a ticket from the front end.
- Go to the Support Requests page that we created in Step 2.
- Click on the hamburger menu on the right side of the ticket list.
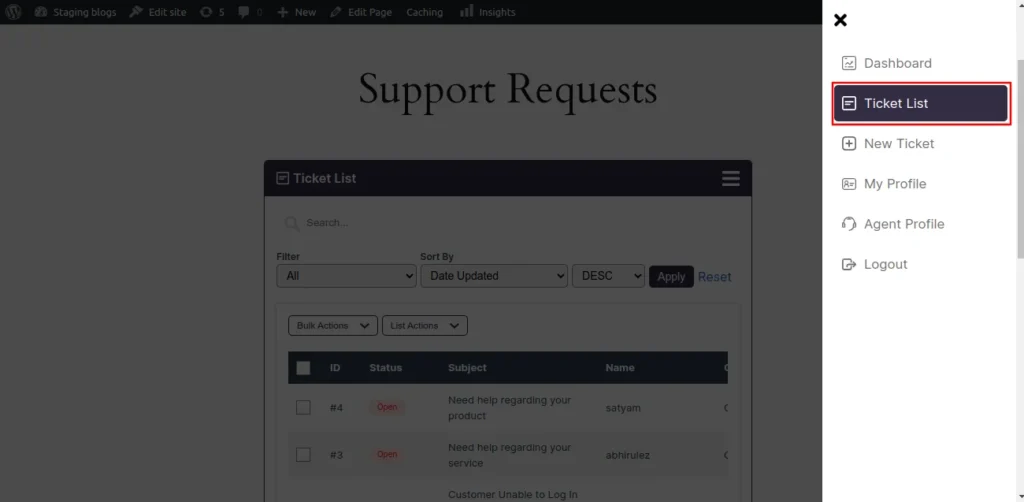
Screenshot 8: Slideover
- Click on New ticket.
- Add a subject or short description of the ticket.
- Add a detailed description of the ticket.
- Select the category.
- Agree to all terms and conditions.
- Click on Submit.
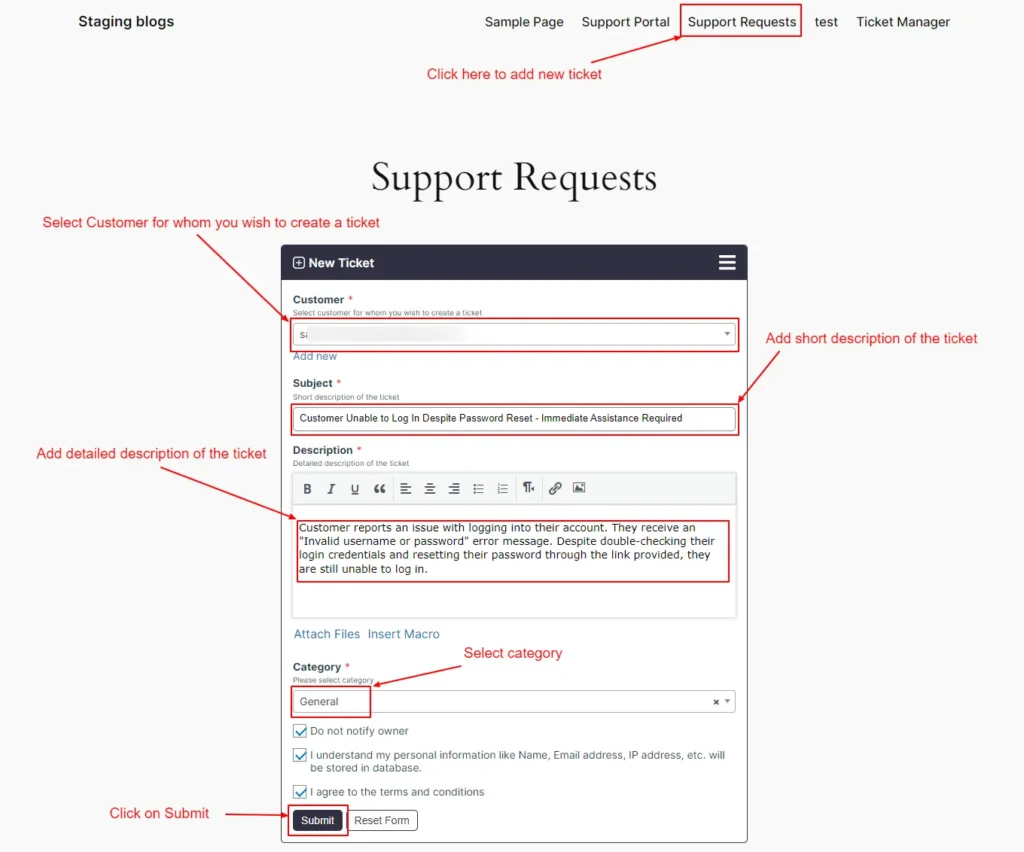
Screenshot 9: Adding a New Ticket from the Frontend
Adding a New Ticket from the backend
- In some situations, Support agents need to create tickets. Agents can add tickets from their accounts using this screen.
- Click on Support → Tickets.
- Click the New Ticket tab.
- In the Customer section, select the customer for whom you wish to create a ticket.
- Add a subject or short description of the ticket.
- Add a detailed description of the ticket.
- Select the category.
- Agree to the terms and conditions and click submit to save details.
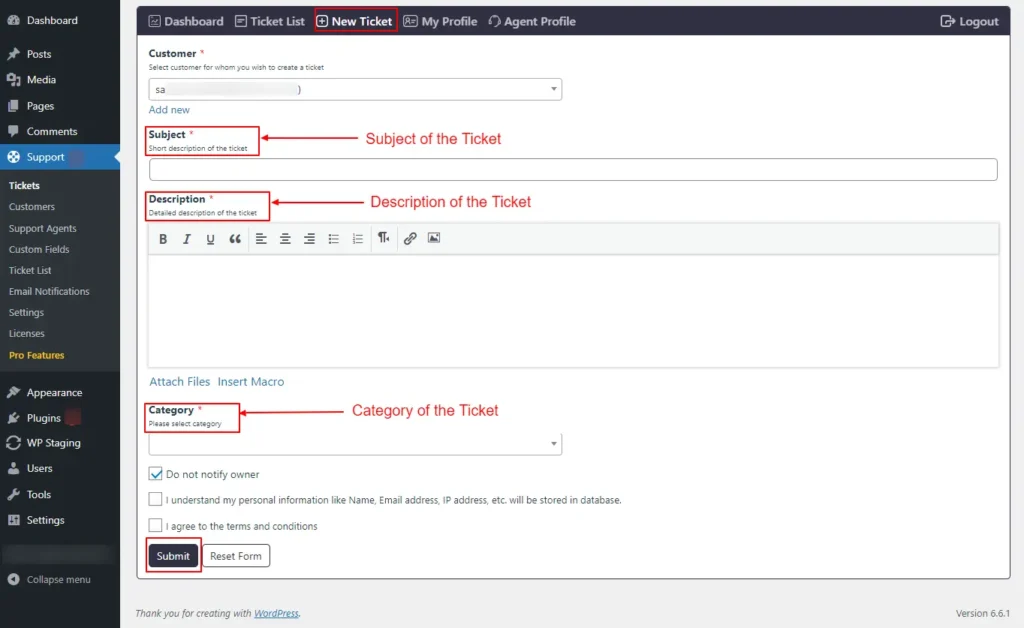
Screenshot 10: Adding a New Ticket from the Backend
Step 6: My Profile
- Since we have already logged in as administrators, we can view our profile.
- If you want to update your name, you can do it on the My Profile screen.
- Hit Save Changes to save your name.
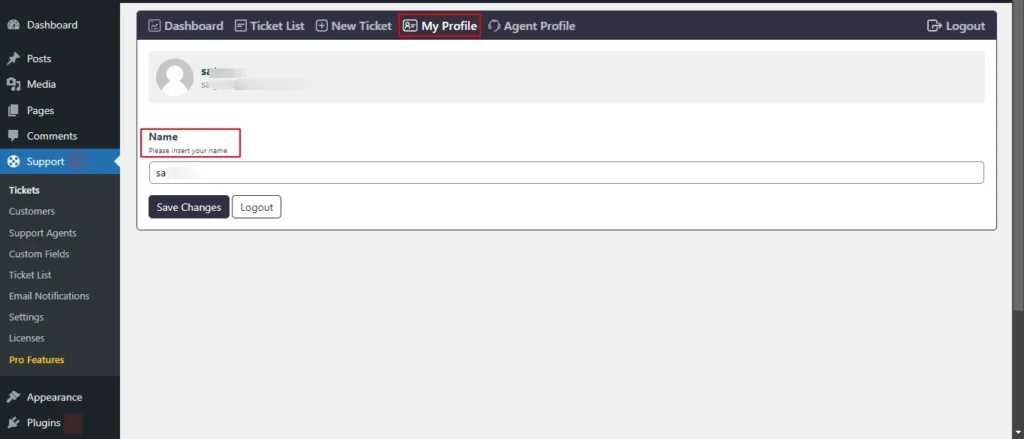
Screenshot 11: My Profile
Step 7: Agent Profile
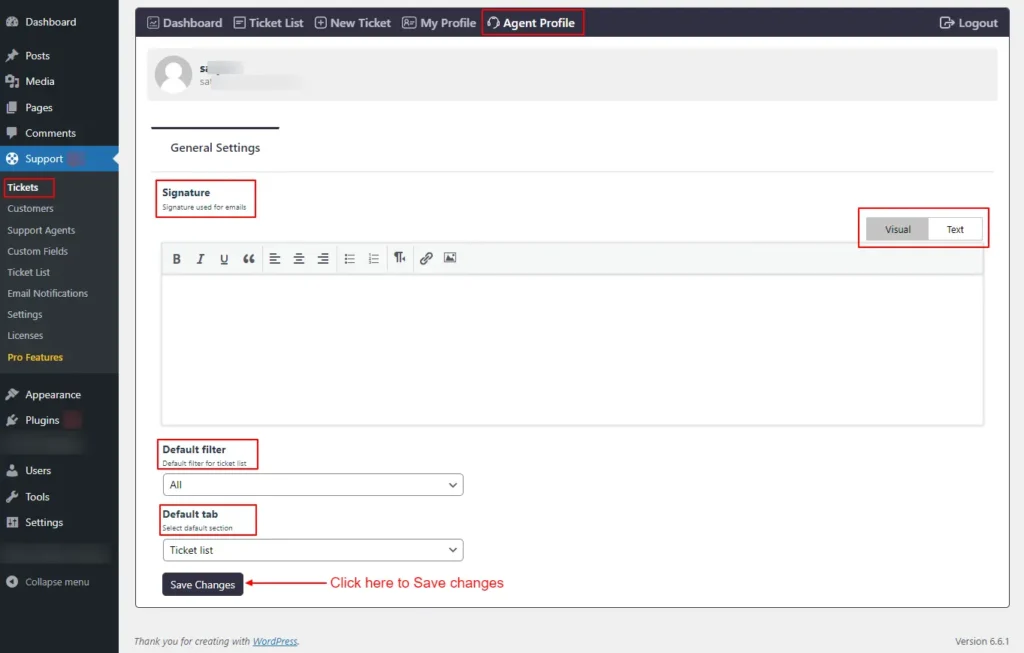
Screenshot 12: Agent Profile
- You can set the signature used for emails using the screen.
- Default filters on the Ticket List tab can be set from here. You can choose from Unresolved, Unassigned, Mine, Closed, and Deleted tickets.
- The default tab for the Support main menu can be set from here. You can choose from the available options Ticket List, Dashboard, and New Ticket.
Customers
Step 8: Managing Customers
- Go to the SupportCandy plugin menu.
- Click on the Customers, submenu.
- Here you will see a list of all registered customers.
- You can select between All Users or Users who have tickets to filter the customer list.
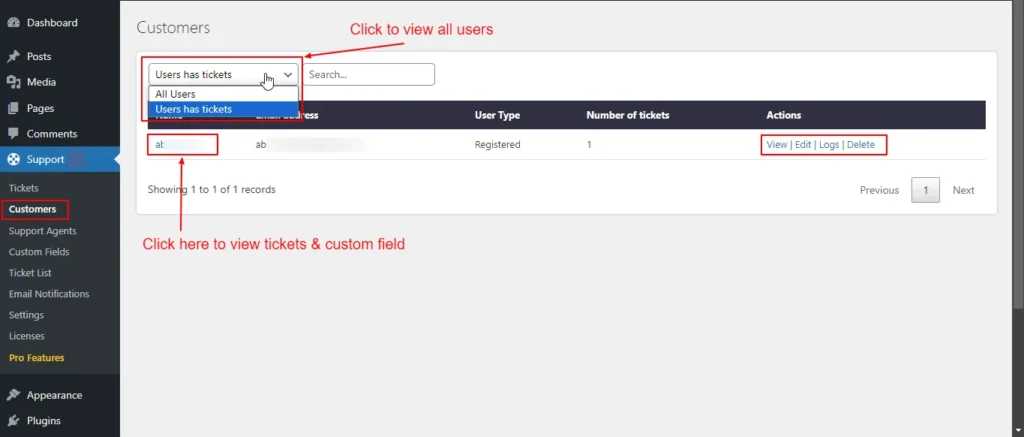
Screenshot 13: Filter Customers
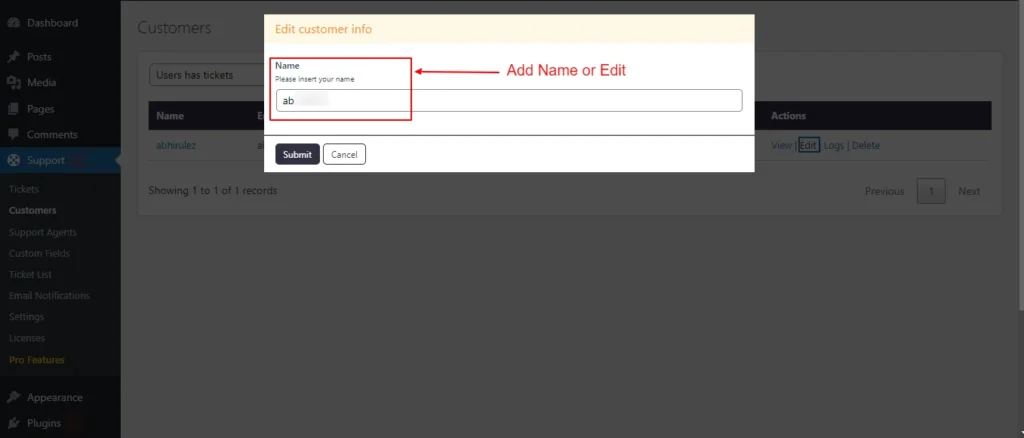
Screenshot 14: Edit Customer Info
- You can edit the customer information by clicking the edit button or view it by clicking the view button.
- When you click on the customer name, it will take you to his ticket list, as shown in the screenshot 15. There are 3 subtabs. Tickets, Custom Fields, Other.
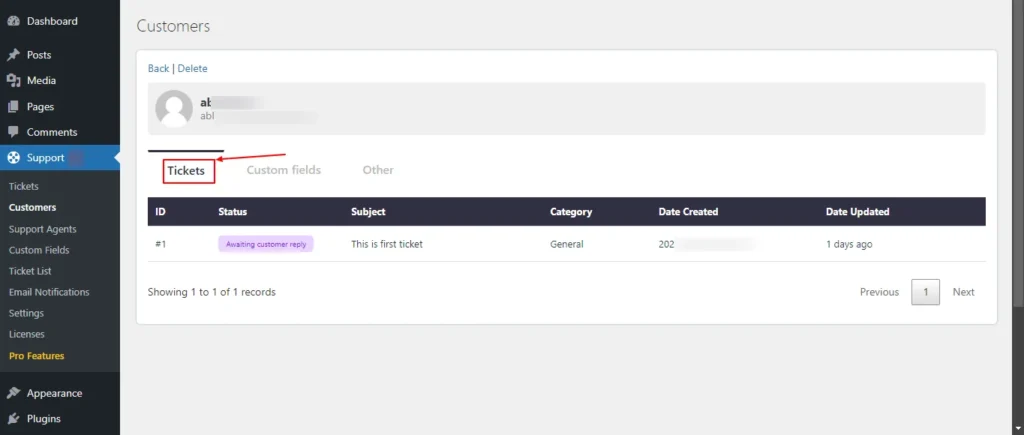
Screenshot 15: Customers → Tickets
- The Tickets tab shows all the tickets of a particular customer.
- Other tabs shows Recent Activities related to that customer.
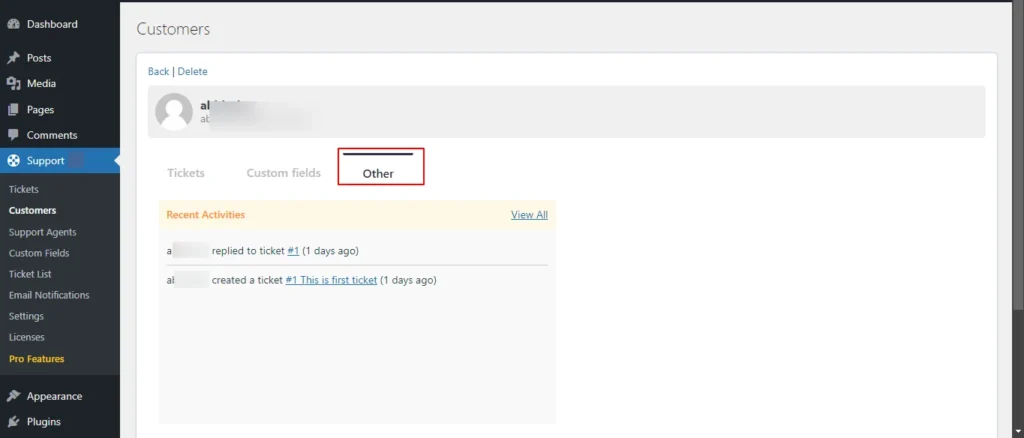
Screenshot 16: Customers Recent Activities
Support Agents
Step 9: Managing Agents
Adding a New Agent
- First, there should be a WordPress user account for the person to whom you wish to add an agent.
- Go to the SupportCandy plugin menu.
- Click on Support Agents.
- You can see all the agent lists in the screenshot 17.
- Click on Add New Agent.
- Search for the name from the list of WordPress users, for which you want to add as an agent.
- Select Role (Administrator, Agent, Editor, etc.)
- Click Submit.
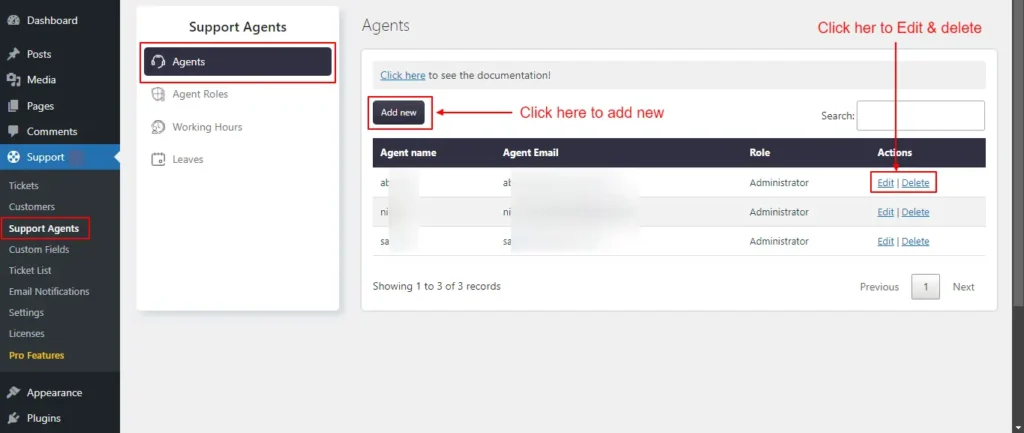
Screenshot 17: Agent List
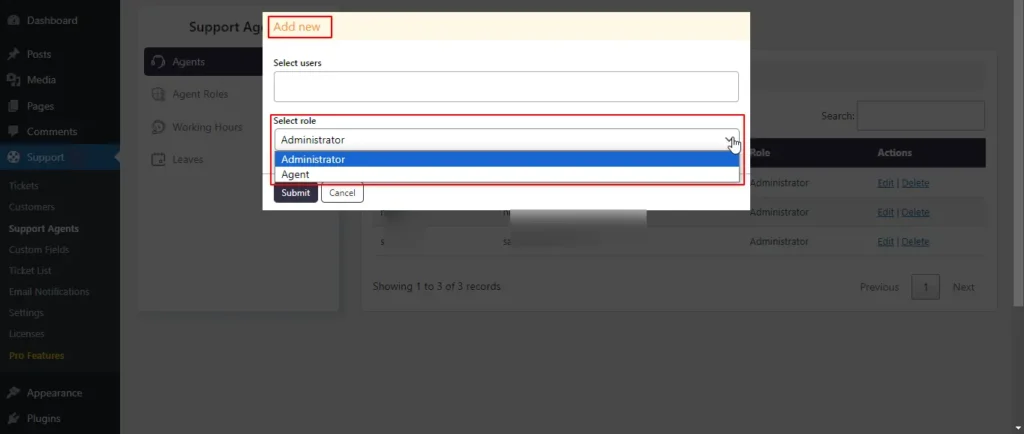
Screenshot 18: Adding a new Agent
- You can also edit the agent role from the edit link or delete an agent using the delete link.
- The Edit link allows update roles (Administrator, Agent, Editor, or any custom role that you have added).
Step 10: Agent Roles
You can create an agent role and set its capabilities on this screen. By default, there are two roles, as follows:
- Administrator: Has all possible capabilities.
- Agent has limited capabilities.
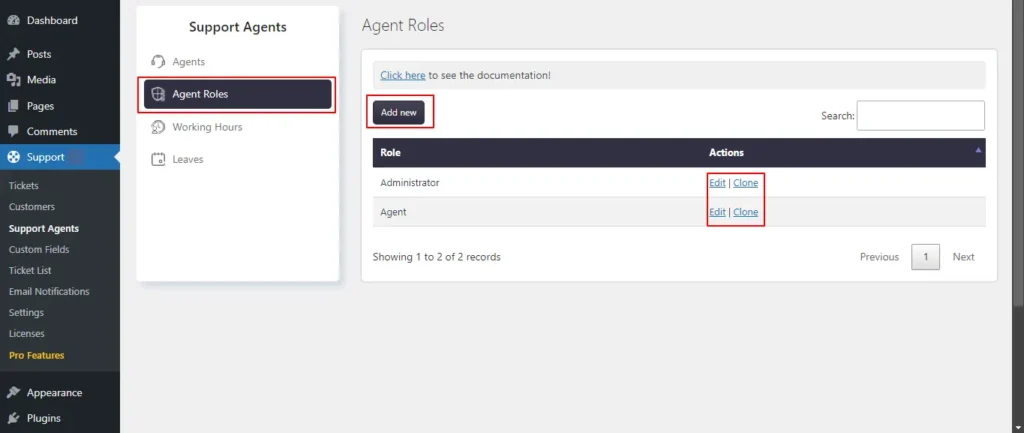
Screenshot 19: Agent Roles List
Adding a New Role
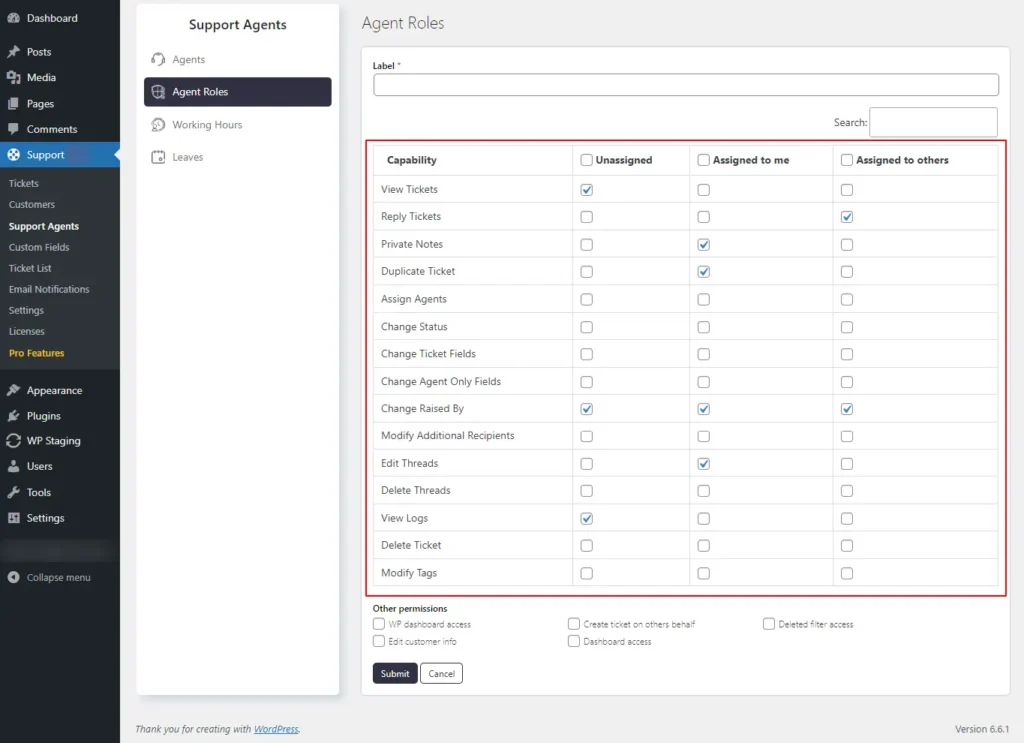
Screenshot 20: Assign agent capabilities
- Click on Add New Role.
- Specify the role name (label).
- You can grant permission for the following tickets:
- Unassigned: Tickets that have not been assigned to any agent or agent group.
- Assigned to me: Tickets that are specifically assigned to the current agent.
- Assigned to others: Tickets that are assigned to agents other than the current agent, but are not unassigned
- A few of the capabilities (actions that agents can perform)
- View Tickets: Controls read permission for applicable tickets. Agents who create tickets have read permission by default.
- Reply Tickets: Controls reply permission for applicable tickets. Agents who create tickets can reply by default.
- Private Notes: Controls permission to submit or read private notes on applicable tickets.
- Assign Agents: Controls permission to assign agents to applicable tickets.
- Change Status: Controls permission to change the status, category, and priority of applicable tickets.
- Change Ticket Fields: Controls permission to update ticket fields for applicable tickets.
- Change Agent-only Fields: Controls permission to update agent-only fields for applicable tickets.
- Change Raised By: Controls permission to update the ticket owner/creator for applicable tickets.
- Modify Additional Recipients: Controls permission to update additional recipients of applicable tickets. Ticket creators always have this capability.
- Edit Thread: Controls permission to edit/update threads of applicable tickets.
- Delete Thread: Controls permission to delete threads of applicable tickets.
- View Logs: Controls permission to view logs of applicable tickets.
- Delete Ticket: Controls permission to delete or restore applicable tickets.
- Here are additional permissions beyond ticket management:
- WP Dashboard Access: Grants an agent access to the WordPress dashboard. Without this, the agent can only view tickets from the front end, not the dashboard.
- Create Ticket on Others' Behalf: Allows an agent to create tickets on behalf of others.
- Deleted Filter Access: Allows agents to access the Deleted filter on the ticket list, enabling them to view deleted tickets. Without this, deleted tickets cannot be accessed.
- Edit Customer Info: Permits an agent to update customer information within individual tickets.
- Click Submit to save the new role.
Editing an Agent Role
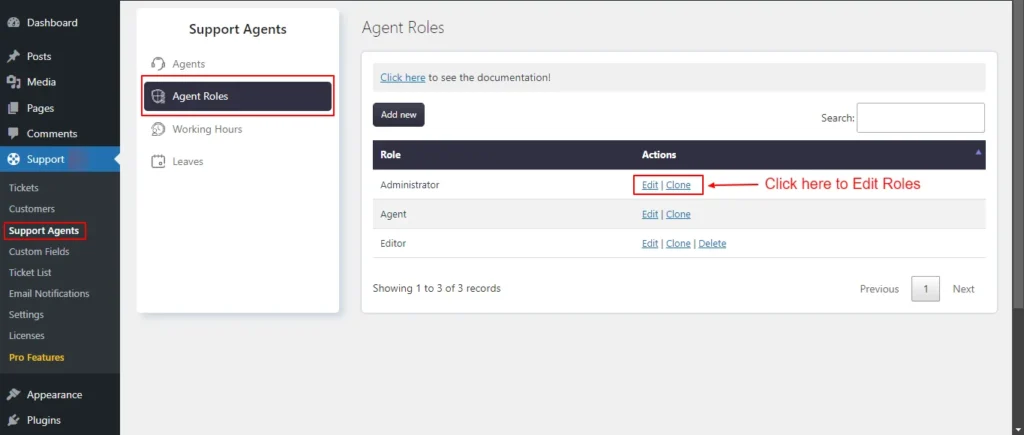
Screenshot 21: Edit Agent Roles
- Under the Support Agents tab, click on Agent Roles.
- Select a role and click Edit.
- Make the necessary changes.
- Click Save.
- You cannot delete Administrator and Agent roles as these are the default roles.
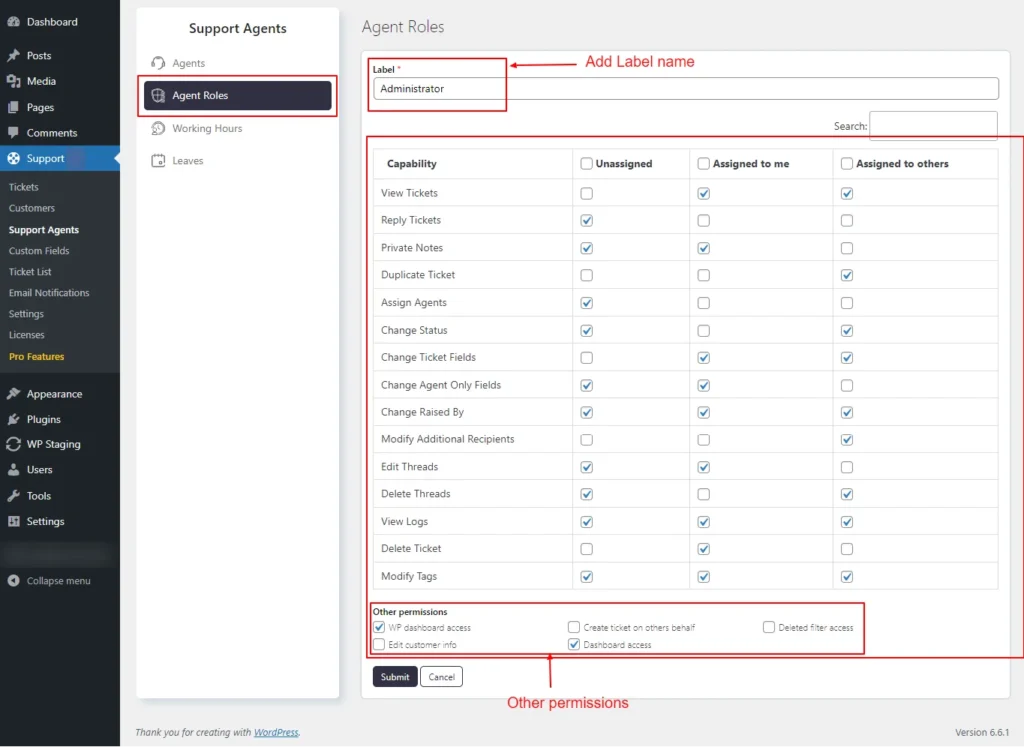
Screenshot 22: Edit roles and permissions
Step 11: Working Hours
Configuring Working Hours
- Go to the Support Agents → Working Hours tab.
- Select the agent from the dropdown and then set the working hours.
- Click Submit.
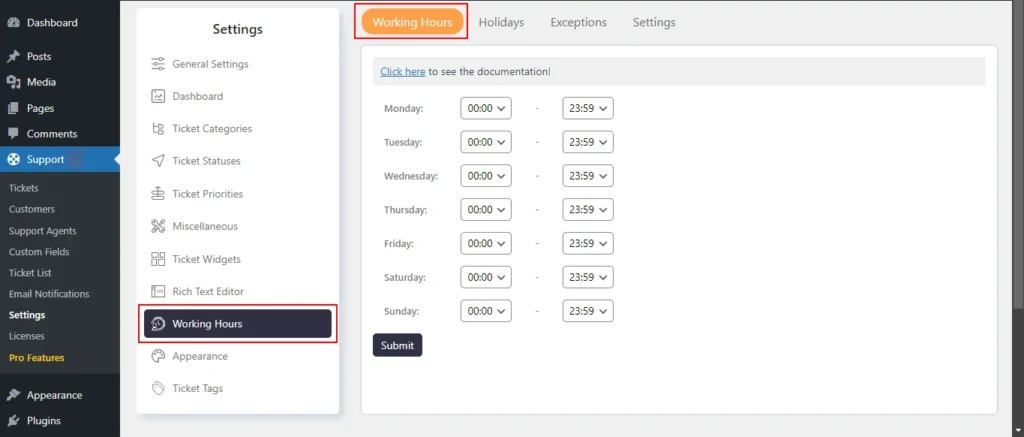
Screenshot 23: Working hours
Working Hours Exceptions
- Exceptions allow for adjustments to standard working hours on specific dates. For example, if your typical working hours on a Monday are from 9:00 a.m. to 6:00 p.m. but you need to work from 9:00 a.m. to 2:00 p.m. on a particular Monday, you can set an exception to reflect this change.
- The system will then prioritize these modified hours over the usual schedule.
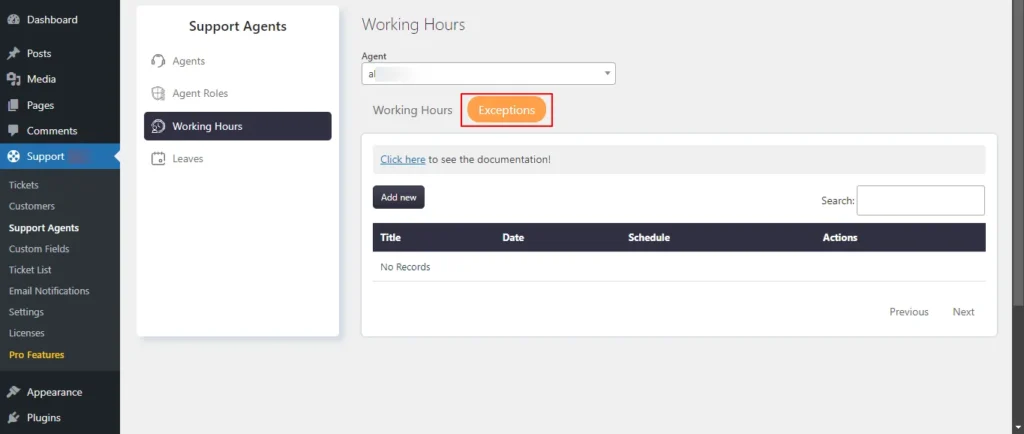
Screenshot 24: Exceptions
- Click on Exceptions.
- Add Title, Date, and Schedule
- Click Submit.
Step 12: Leaves
- You can set leaves or day-offs for the agents.
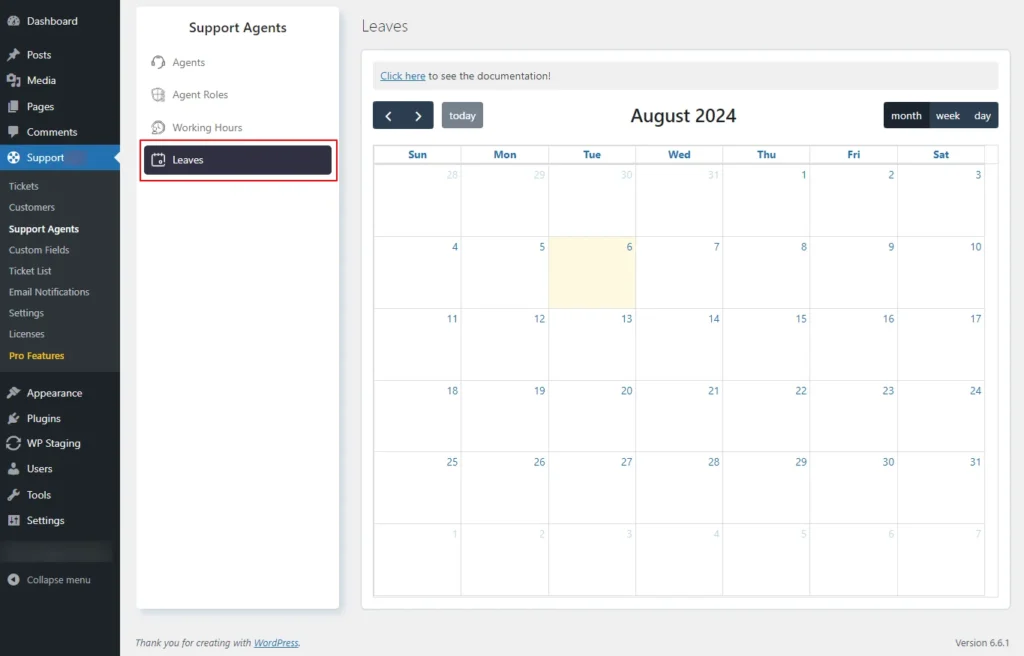
Screenshot 25: Leaves Calendar
- Click on the date for which you want to add leaves. Search for the agent name for which you want to grant leave and click submit.
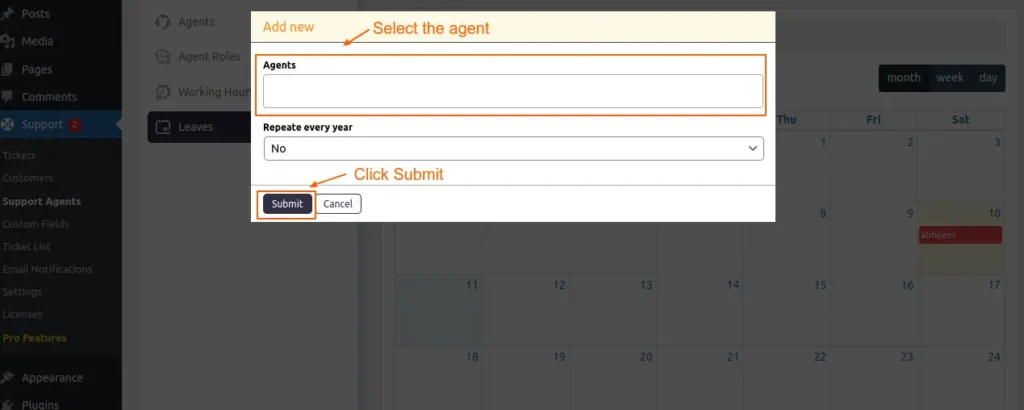
Screenshot 26: Add leaves
Custom Fields
Step 13: Ticket Form Fields
- The Ticket Form Fields are the fields that are displayed on ticket form. This section lets you add or remove fields from the submit ticket form.
- If you want to add new fields to this form, Go to Support → Custom Fields → Ticket Fields, which is discussed next.
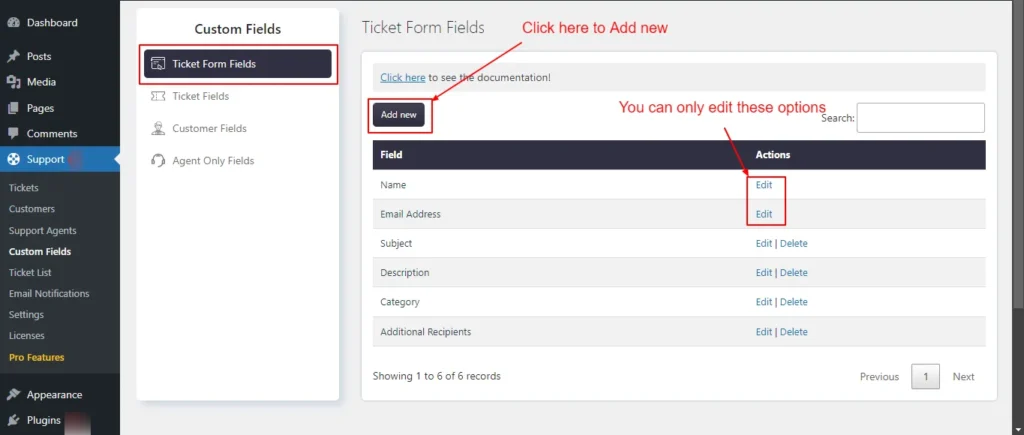
Screenshot 27: Ticket Form fields list
Add a field to the Ticket form fields
- Using Ticket Fields, Customer Fields, and Agent Only Fields you can add new fields to a ticket submission form.
- Ticket Fields: These are fields to collect more information from the customer (ticket subject, ticket description).
- Customer Fields: Fields to collect information about the customer. Name and email are default.
- Agent Only Fields: You can add fields specific to an agent.
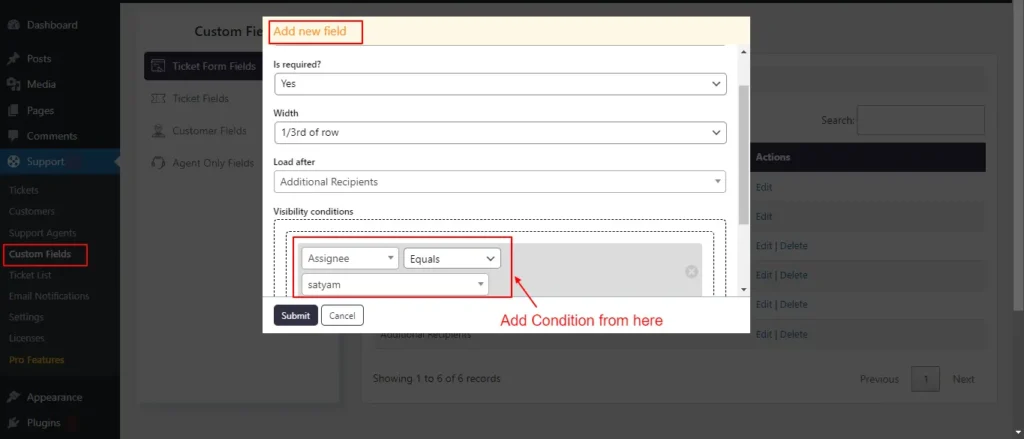
Screenshot 28: Add a new field to the Ticket form
- The Add New Field screen has the following settings to be configured
- Select field: You can choose which fields from the ticket fields and user fields you want to add.
- Is required: Deciding whether the selected field is essential is up to you. If a field is marked as mandatory, it must be completed before submitting the report.
- Width: Within the form, it's possible to adjust the width of the area. There are three choices available: one-third of the row, half the width of the row, and the entire width of the row.
- Load after: This choice lets you change the order of the fields.
- Visibility conditions: The selected field can be displayed only when a specific situation is met. The fields will remain hidden as long as the conditions are not met. Conditions can be set using both AND logic (where all conditions must be met) and OR logic (where at least one condition must be met).
Editing Ticket Form Fields
- Go to the Support menu.
- Click Custom Fields → Ticket Form Fields.
- Click the Edit button next to a field you want to change to make changes.
- Click Submit.
- The name and email address fields are default; hence, you can only change the Width and Load after settings. Also, you can't delete them.
- For the rest of the fields, you can edit and delete them.
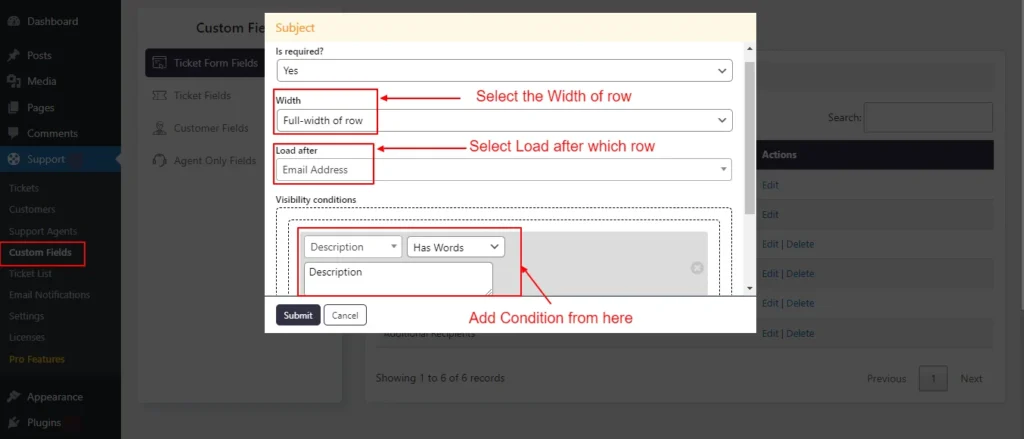
Screenshot 29: Editing the Subject Field
Step 14: Ticket Fields
- From the Ticket fields screen, you can create new fields to collect more information about tickets which can then be added to the New Ticket form.
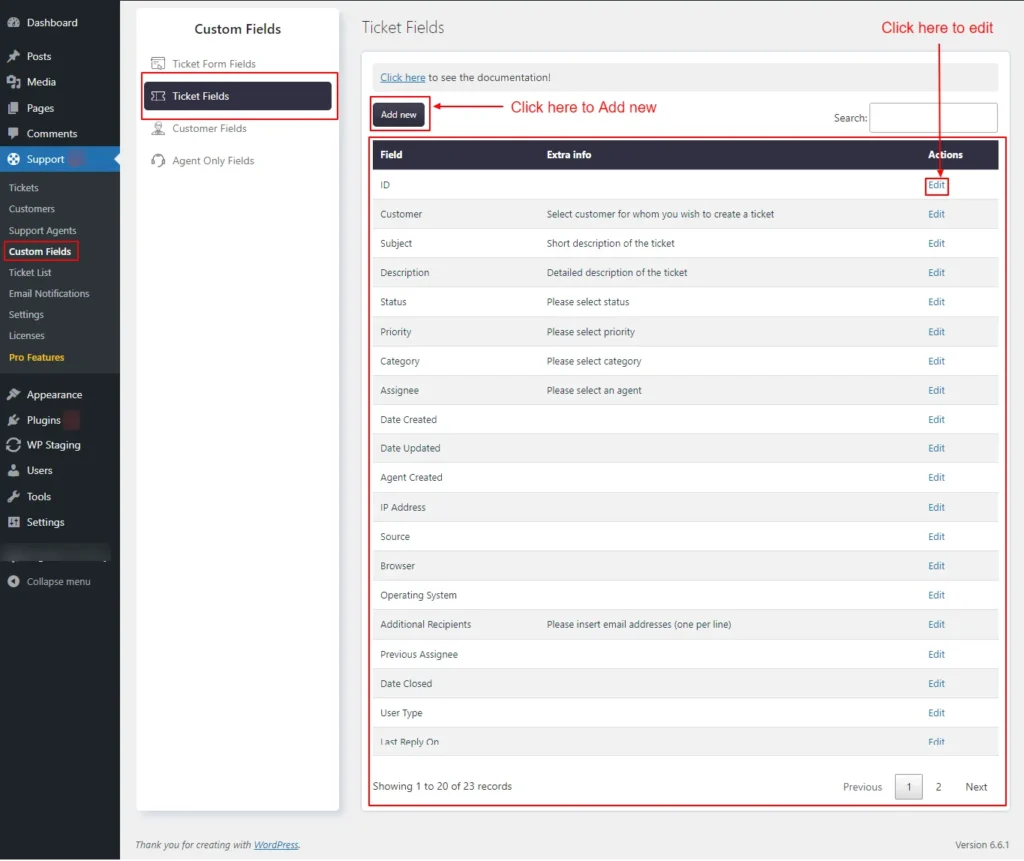
Screenshot 30: Ticket fields
Adding New Ticket Fields
- Click Add New to create a new ticket field.
- Enter the label.
- Choose where will be this field loaded after.
- Choose the field type (e.g., text, dropdown, checkbox). Based on the field type, it will show more configuration options, such as Extra Info, Default Value, Auto-fill in ticket form, Character limit, Placeholder, Has personal info etc.
- Click Submit.
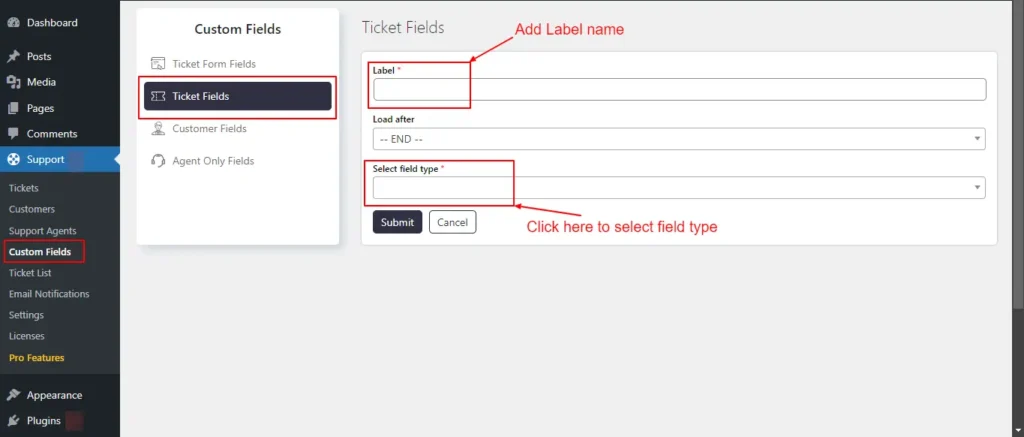
Screenshot 31: Adding New Ticket fields in the custom field
Editing Existing Ticket Fields
- Click Edit to edit a ticket field.
- Edit the field details such as Label, Subject, Load after, Extra info, Short description of the ticket, Default value, Not Applicable, Auto-fill in ticket form, Character limit, Placeholder, Ticket list width (pixels), etc.
- Once done Click Submit.

Screenshot 32: Editing Ticket fields in Custom fields
Step 15: Customer Fields
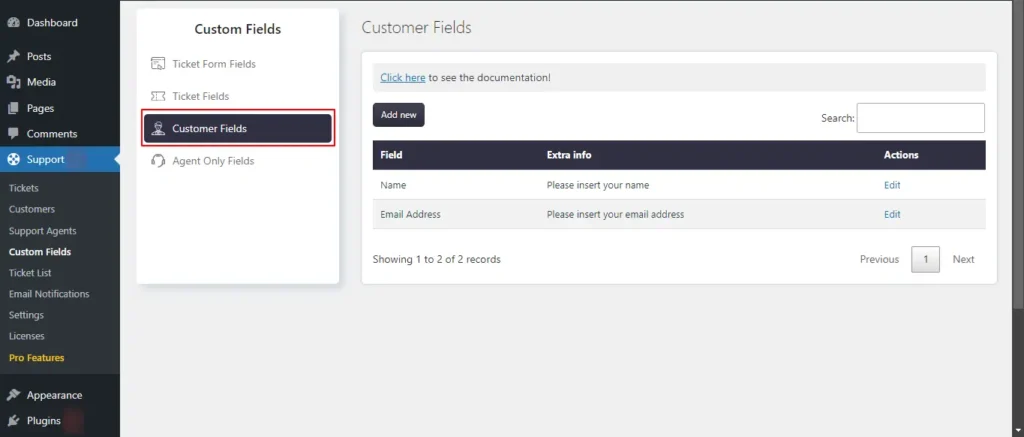
Screenshot 33: Customer Fields list
Adding New Customer Fields
- Click on the Add New button to create a new customer field.
- Choose the field type (e.g., text, dropdown, checkbox). Based on the field type, it will show more configuration options, such as Extra Info, Default Value, Auto-fill in ticket form, Character limit, Placeholder, Has personal info, Allow in my profile and Allow in ticket form, etc.
- Click Submit.
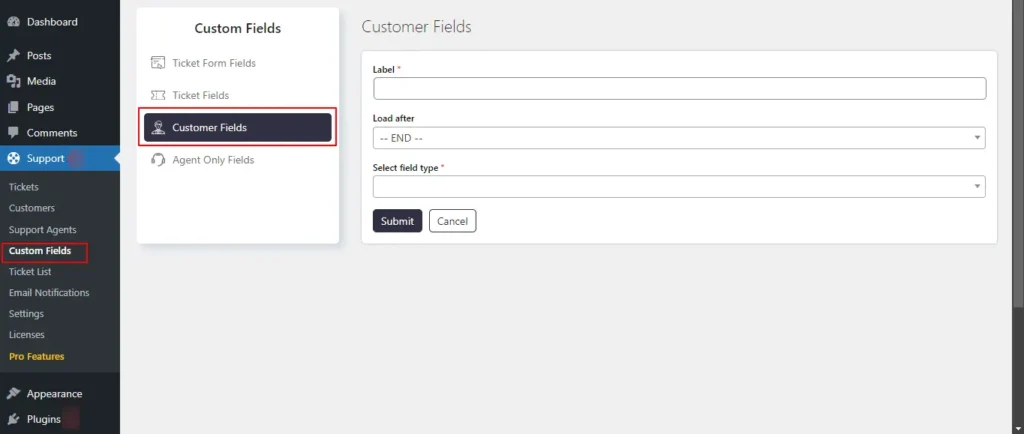
Screenshot 34: Adding New Customer Fields
Editing Customer Fields
- Click on Customer Fields.
- To edit an existing field, click on the Edit button next to the field.
- Make the necessary changes to the field settings.
- Click Submit.
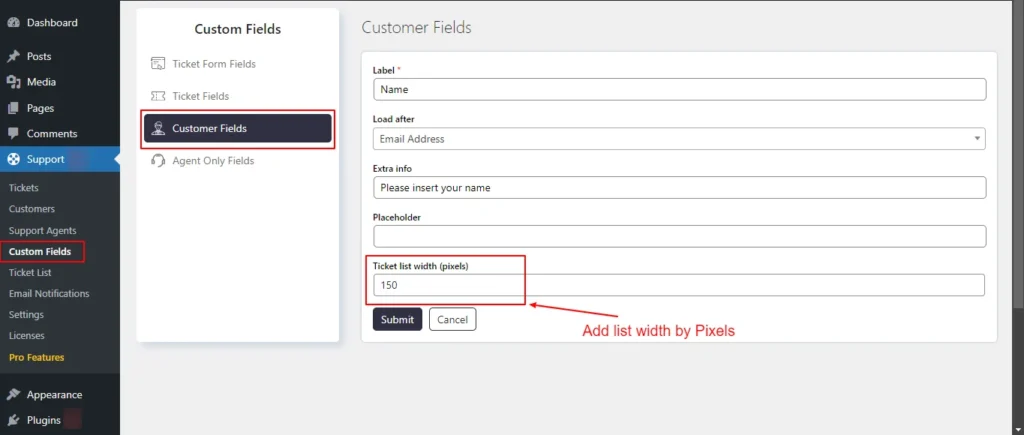
Screenshot 35: Editing Customer Fields
Step 16: Agent Only Fields
- Ticket fields and agent-only fields are essentially identical, with the sole distinction being that the latter is not viewable by customers.
- If agent-only fields are included in the customer ticket list items, customers have the ability to view them in the ticket list.
Adding New Agent-Only Fields
- Click Add New to create a new agent-only field.
- Choose the field type (e.g., text, dropdown, checkbox).
- Configure the field settings (Extra info, Default value, Character limit, Placeholder, Ticket list width, Has personal info etc.)
- Click Submit.
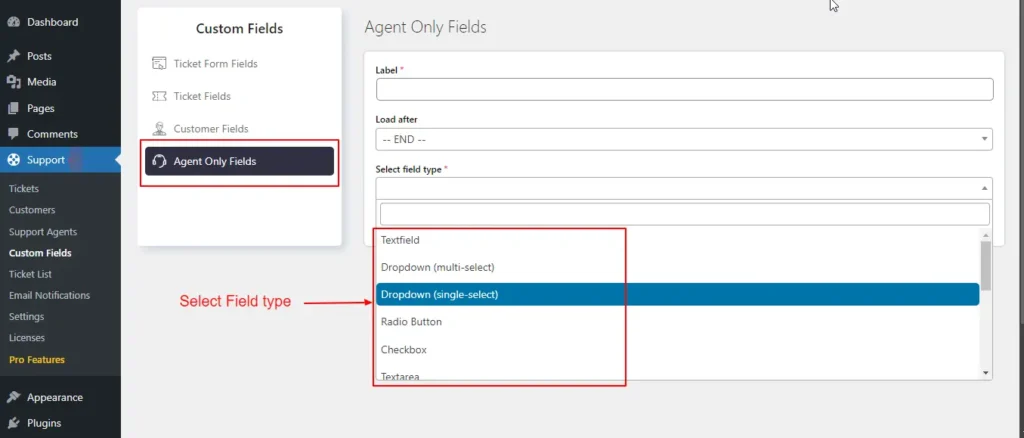
Screenshot 36: Adding New Agent Only Fields
Editing Agent Only Fields
- Go to the SupportCandy plugin menu.
- Click on Agent Only Fields.
- To edit an existing field, click on the Edit button next to the field.
- Make the necessary changes to the field settings.
- Click Submit.
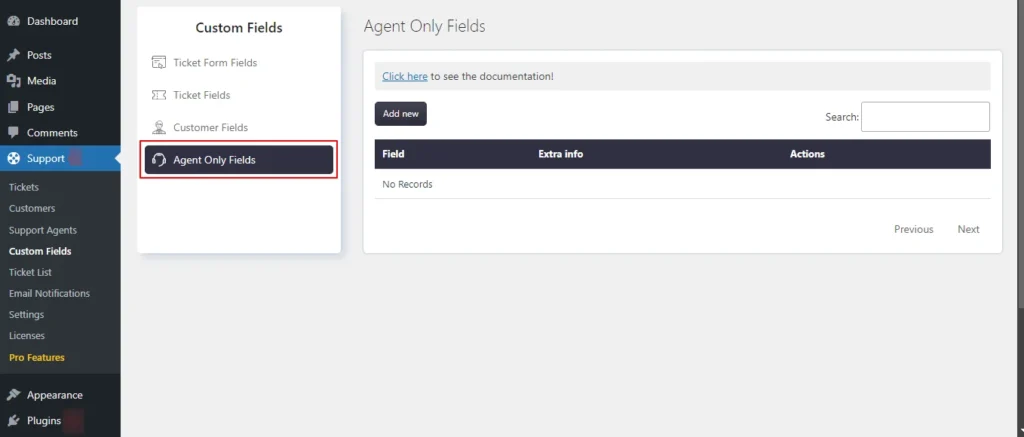
Screenshot 37: Editing Agent Only Fields
Conclusion
In this blog (Part 1 of 3 of the series), we walked you through how to add a helpdesk and ticket system on WordPress using the SupportCandy plugin.
SupportCandy adds to your WordPress site the features of a complete help desk and customer support ticket system. It is one of WordPress's most popular helpdesk and customer support ticketing plugins.
That’s it for this article.
In Part 2 of this series, we will dive deeper into other sections of SupportCandy.
If you need any help related to WordPress, please contact our WordPress experts.
Tutorials
4 min read
How to Create a Staging Site in WordPress using WP Staging plugin
Introduction
When managing a WordPress site, whether it's for blogging, e-commerce, or any professional use, ensuring a smooth, uninterrupted user experience is a must. Here, a staging site turns into a vital resource for WordPress users. By acting as a testing ground, a staging site enables developers and website managers to make and test changes without having an impact on the live website. This is especially crucial when updating WordPress core, themes, or plugins, as these changes may cause incompatibilities or break your website.
In essence, a staging site acts as a critical step in a professional web development workflow, enabling WordPress users to manage and implement website changes systematically and securely.
Why is a staging site important?
Is a staging site really necessary? The importance of a staging site in the context of web development, particularly for WordPress sites, cannot be overstated. A staging site serves several critical roles in ensuring the smooth operation, security, and continuous improvement of a website. Here are the key reasons why a staging site is important:
- Safe Testing Environment:
A staging site provides a safe and isolated platform where all types of changes, updates, and new features can be tested without affecting the live website. This means that any errors, bugs, or issues can be identified and fixed in the staging environment without risking the performance or functionality of the live site.
- Prevents Downtime:
By using a staging site to test changes, you significantly reduce the risk of your live site going down due to a faulty update or incompatible plugin. Downtime can be costly, especially for e-commerce sites or businesses that rely heavily on their online presence.
- Quality Assurance:
Staging sites allow for thorough testing and quality assurance before changes are made live. This includes checking for visual consistency, functionality, compatibility with different browsers and devices, and the overall user experience.
- Update Verification:
WordPress regularly releases updates for its core software. Also, themes and plugins are regularly updated. A staging site enables you to test these updates to ensure they work seamlessly with your site’s customizations and existing setup.
- Secure Development:
Developing directly on a live site can be risky, as it can expose your site to security vulnerabilities. A staging site ensures that development is done in a secure environment, reducing the risk of security breaches.
- Collaboration and Feedback:
For teams, a staging site offers a collaborative environment where developers, designers, content creators, and other stakeholders can work together. It’s easier to gather feedback and make iterative improvements without disrupting the live site.
- Performance Testing:
Staging sites allow you to test the performance impact of your changes. This is particularly important for large-scale sites, where even minor changes can have a significant impact on loading times and overall site performance.
- Backup and Rollback:
In case something goes wrong during the update process, having a staging site means you have a recent backup of your site. This makes it easier to roll back changes if necessary.
Setting Up a Staging Site
Everything is easy in WordPress using plugins, isn’t it? Let’s discover how we can use the WP Staging plugin to set up a new staging site.
Step 1: Search and install the WP Staging plugin
- Search and install the WP Staging plugin on your WP Dashboard. After installation, activate the plugin.
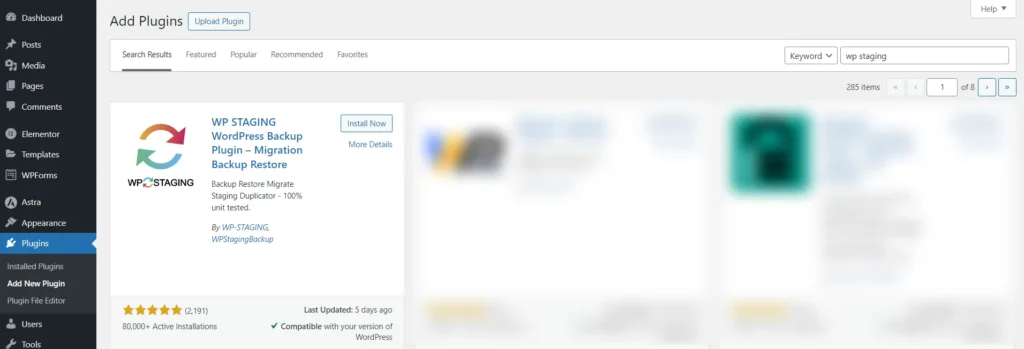
Screenshot 1: Install WP Staging Plugin
- Allow and continue to enable security alerts.
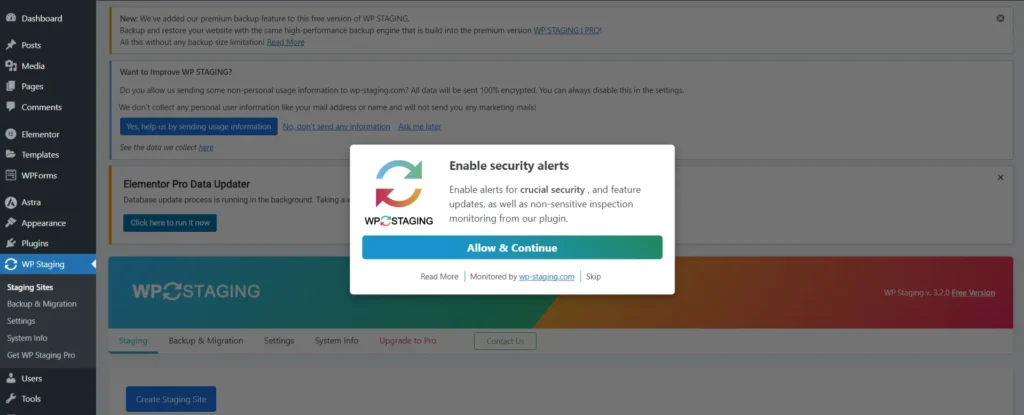
Screenshot 2: Enable security alerts.
Step 2: Create a Staging Site
- Click on Skip and Start WP Staging link. You will be redirected to Staging sites submenu.
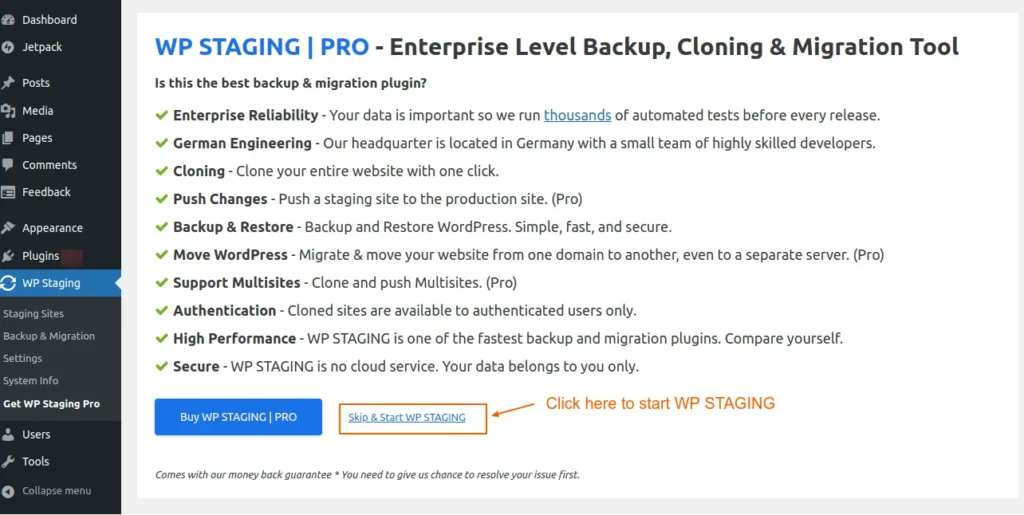
Screenshot 3: Skip and Start WP Staging
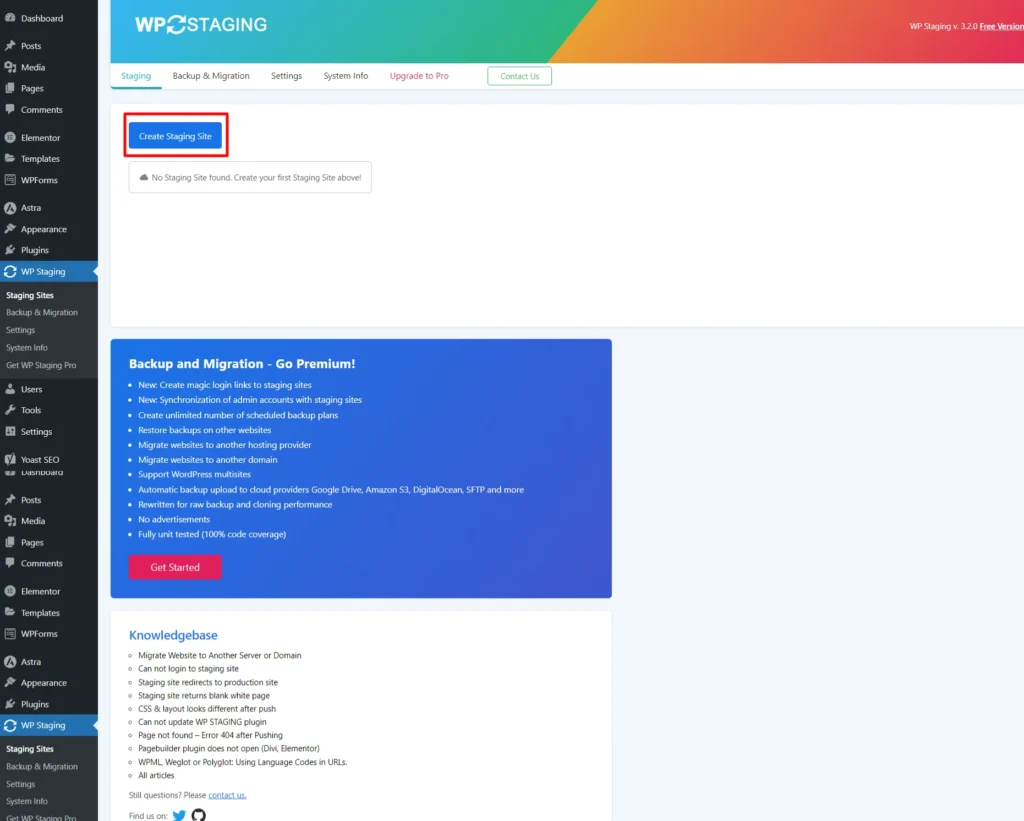
Screenshot 4: Click on Create Staging Site
- Next, click on “Create Staging Site”. Enter the name of the staging site that you want to create. (This is an optional step).
- Here, the database tables and files are selected by default. However, you can unselect some tables or files if you don't want to clone them.
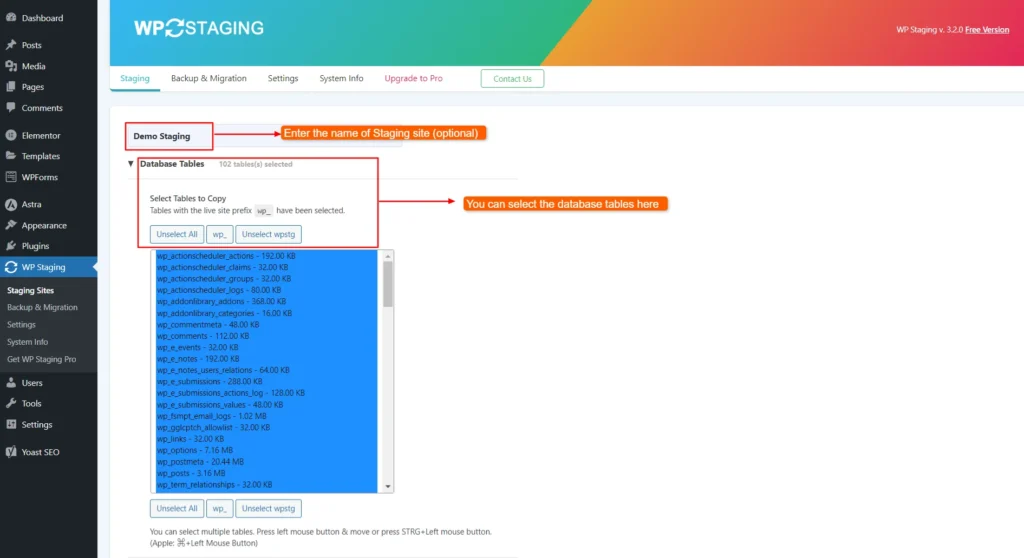
Screenshot 5: Selecting Database Tables
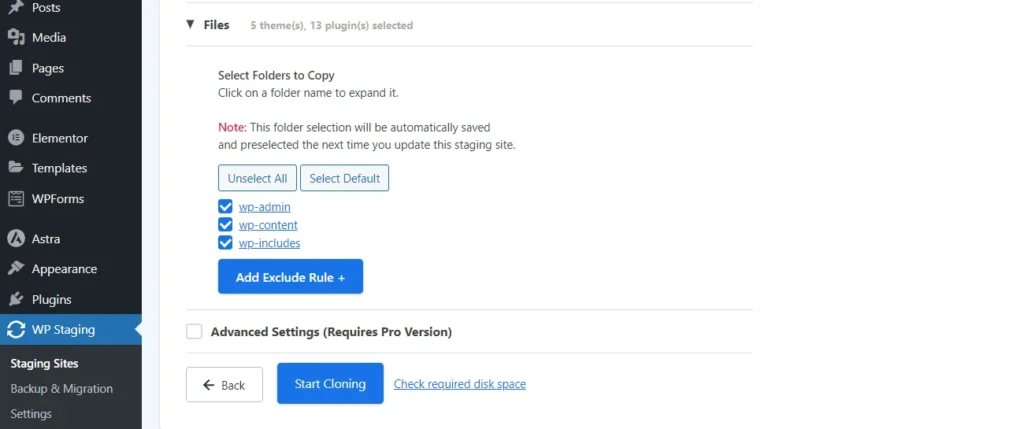
Screenshot 6: Selecting Files
- Click on “Start Cloning.” A display would show the current status of the staging site's progress.
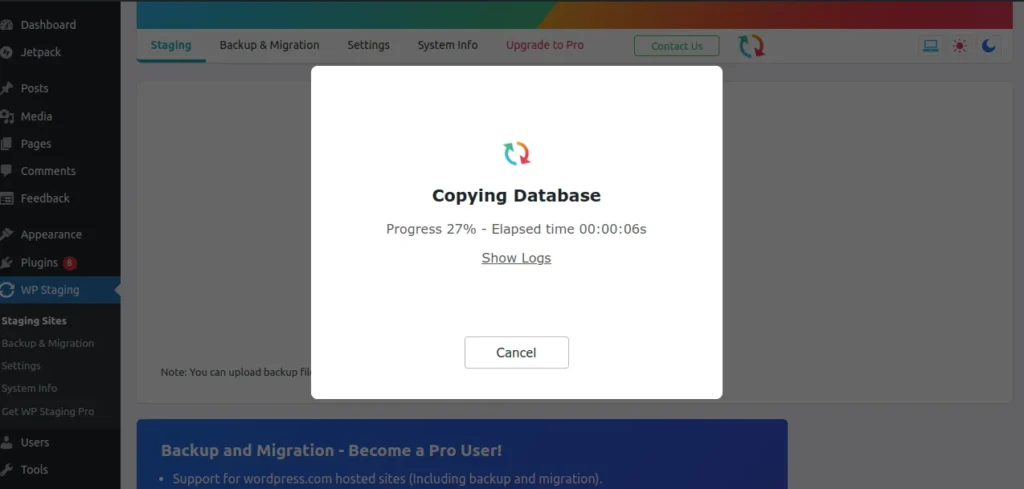
Screenshot 7: Staging site creation
- When the data is processed, the staging site is ready and the URL is displayed.
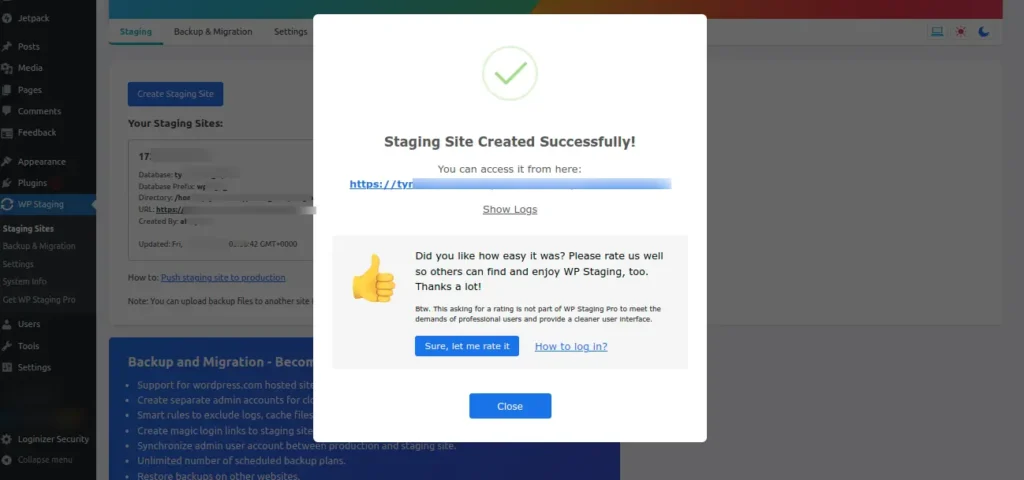
Screenshot 9: Staging Site Created Successfully
- If you click on Show Logs, you can see the entire process of logging that was done to create the staging site.
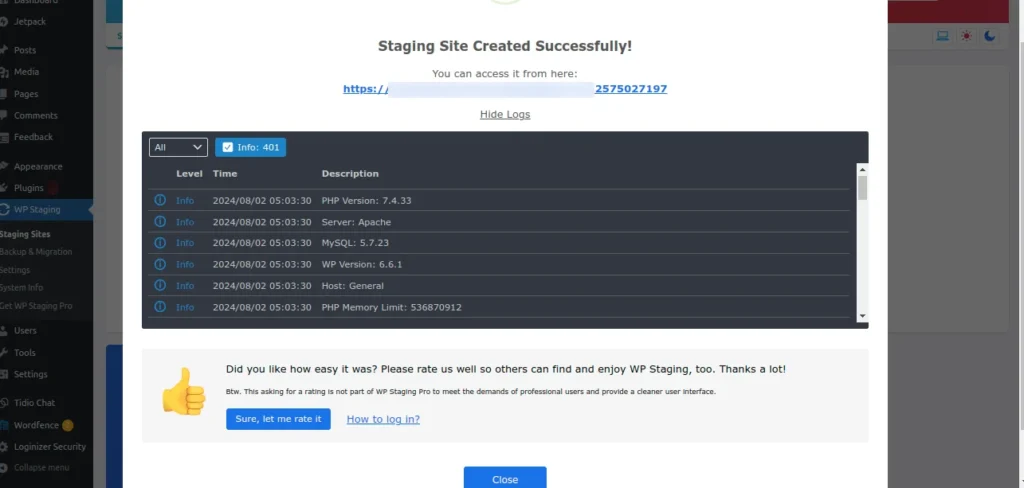
Screenshot 10: Logos
- When you click on the URL of the staging site, you’ll be required to login to the staging site. Use the same credentials as your site.
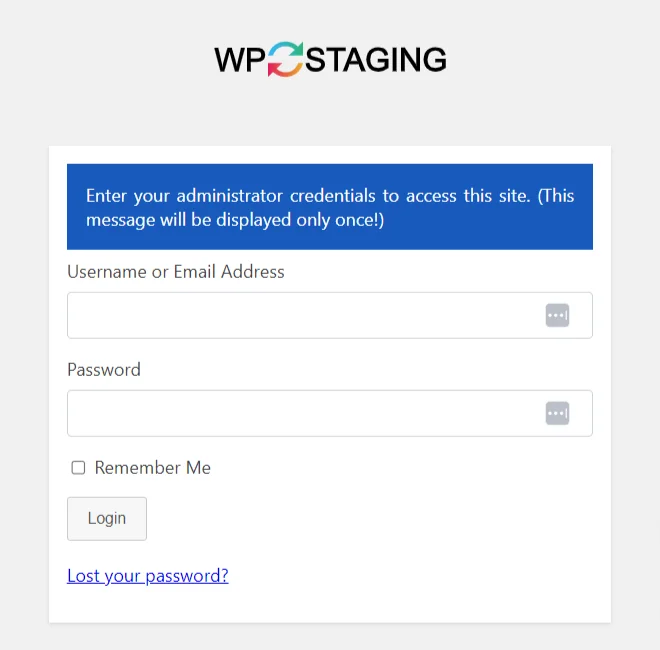
Screenshot 11: Login Page of Staging Site
- Enter the details, and your staging site is ready to use! You can access your staging site at any time from WP Staging.
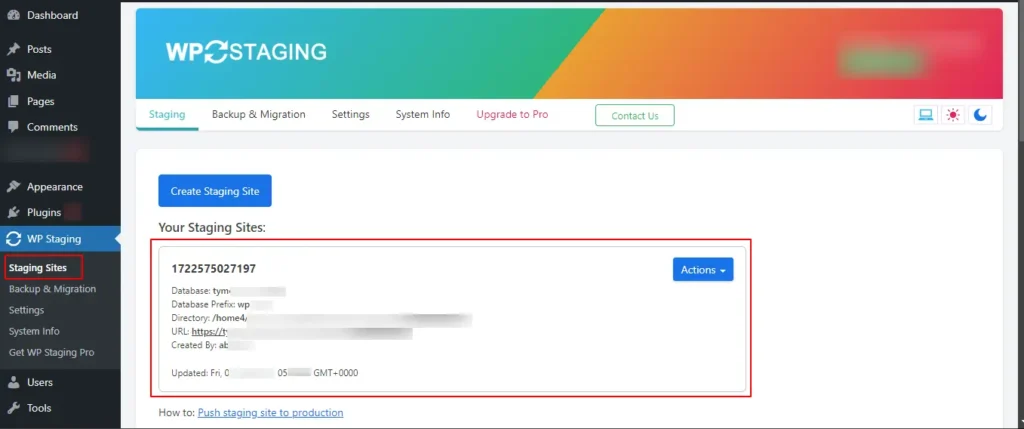
Screenshot 12: Access your staging site from WP Staging
Conclusion
In conclusion, setting up a staging site is a crucial step in website development and maintenance.
The WP staging plugin simplifies the process, making it accessible even to those with limited technical knowledge. Remember that a staging site is your best ally in ensuring that your live website runs smoothly, efficiently, and without interruptions.
Tutorials
9 min read
How to Secure Your Enterprise WordPress Website Using Wordfence (Part 2)
Introduction
This blog is Part 2 of our series, exploring how the Wordfence plugin can help secure your enterprise website. In the previous post, Part 1, we installed and configured the plugin, understood the Wordfence Dashboard, and configured the Wordfence Firewall.
In Part 2, we discuss the following sections of the Wordfence plugin,
- Wordfence Scan
- Wordfence Tools
- Wordfence Login Security
Wordfence Scan
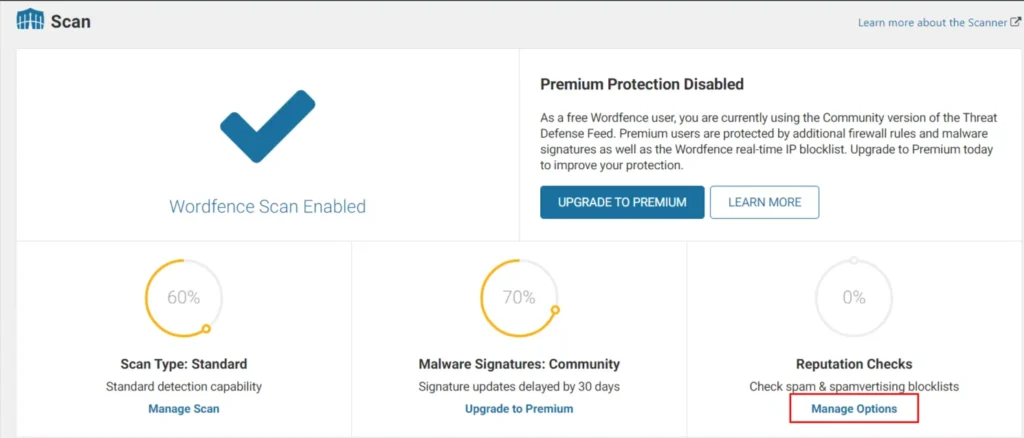
Step 1: Scan
Wordfence checks your WordPress site for hidden threats like malware, backdoors, and suspicious URLs, all in one scan.
- Once you have configured the firewall, go to Scan.
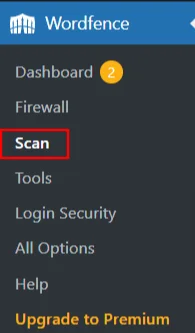
Screenshot 1: Scan
- The dashboard of Scan shows various aspects such as Scan Type, Malware signatures, Reputation checks, Scan options, and Scheduling.
- It also displays a detailed report of your scan.
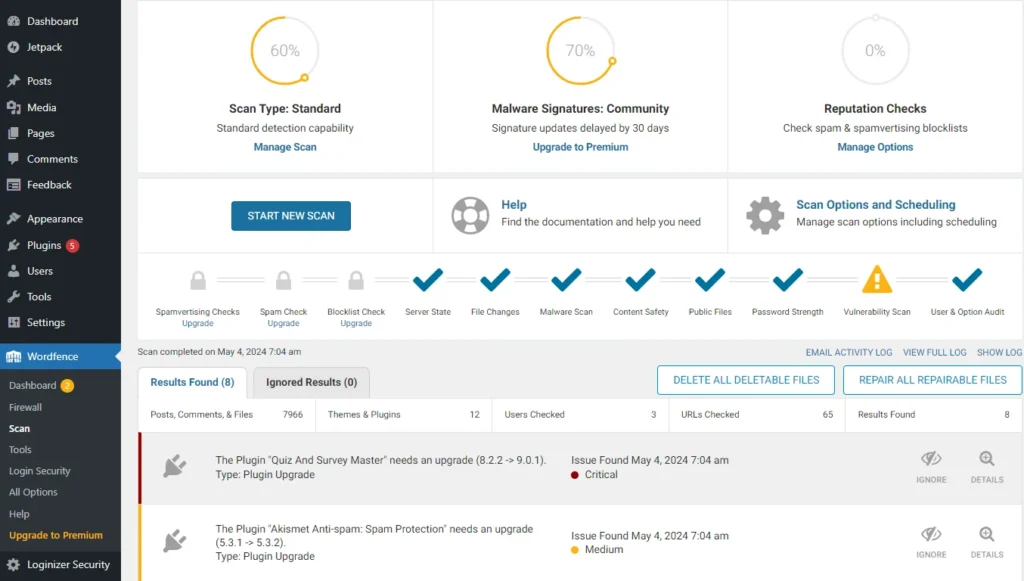
Screenshot 2: Wordfence Scan Dashboard
Step 2: Manage Scan
- Click on Manage Scan on the Wordfence Scan dashboard.
Screenshot 3: Manage Scan
- Click on Scan Scheduling to Enable or Disable Wordfence Scheduled Scans. By default, it is enabled.
- You can choose either automatic scans scheduled by Wordfence or scan manually (premium feature).
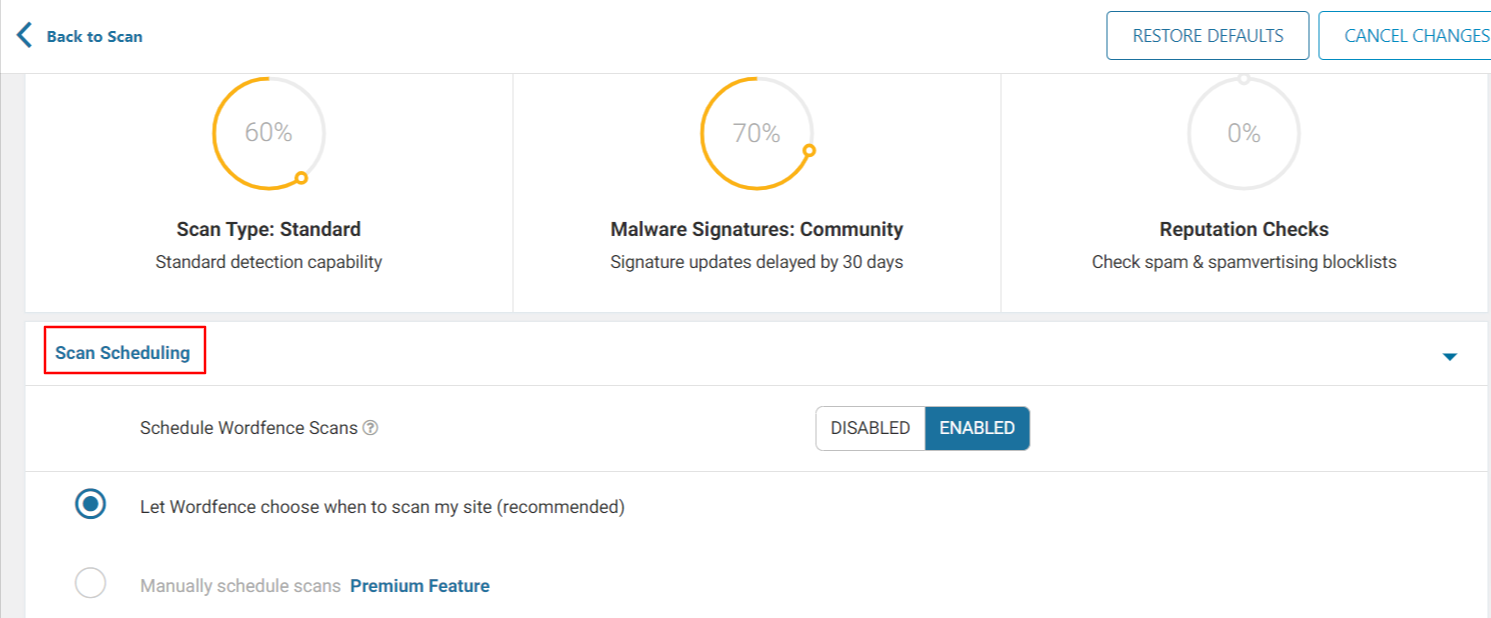
Screenshot 4: Scan Scheduling
- After you have selected how to schedule your scans, you can choose the Basic Scan Type options.
- Depending on the type of your requirement, you can select the type of scan:
- Limited Scan: Designed for entry-level hosting, this plan provides a basic level of threat detection without using many server resources.
- Standard Scan: Selected by default, this option is recommended by Wordfence for all websites.
- High sensitivity: This is a more in-depth scan ideal for those who believe their site may have been breached, but be aware it might identify some safe actions as potential threats.
- Custom Scans: Automatically chosen after you adjust General Options for this site.
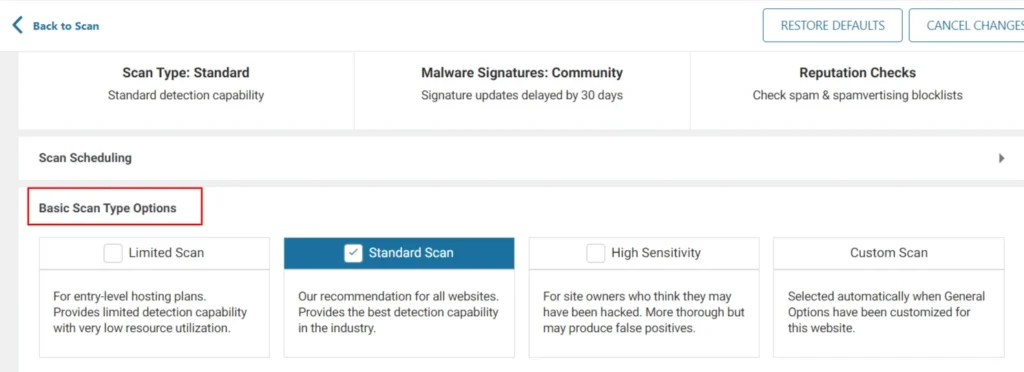
Screenshot 5: Basic scan Type Options
- After you have chosen the Basic Scan Type option, go to General Options.
- Here you can choose what to scan on your website.
- This includes Spamvertising Checks, Spam Checks, Blocklist Checks, Server State, File Changes, Malware Scans, Content Safety, Public Files, Password Strength, Vulnerability Scans, and User & Option audits.
- Some options are selected by default, but you can customize it further by choosing the options that best fit your requirements.
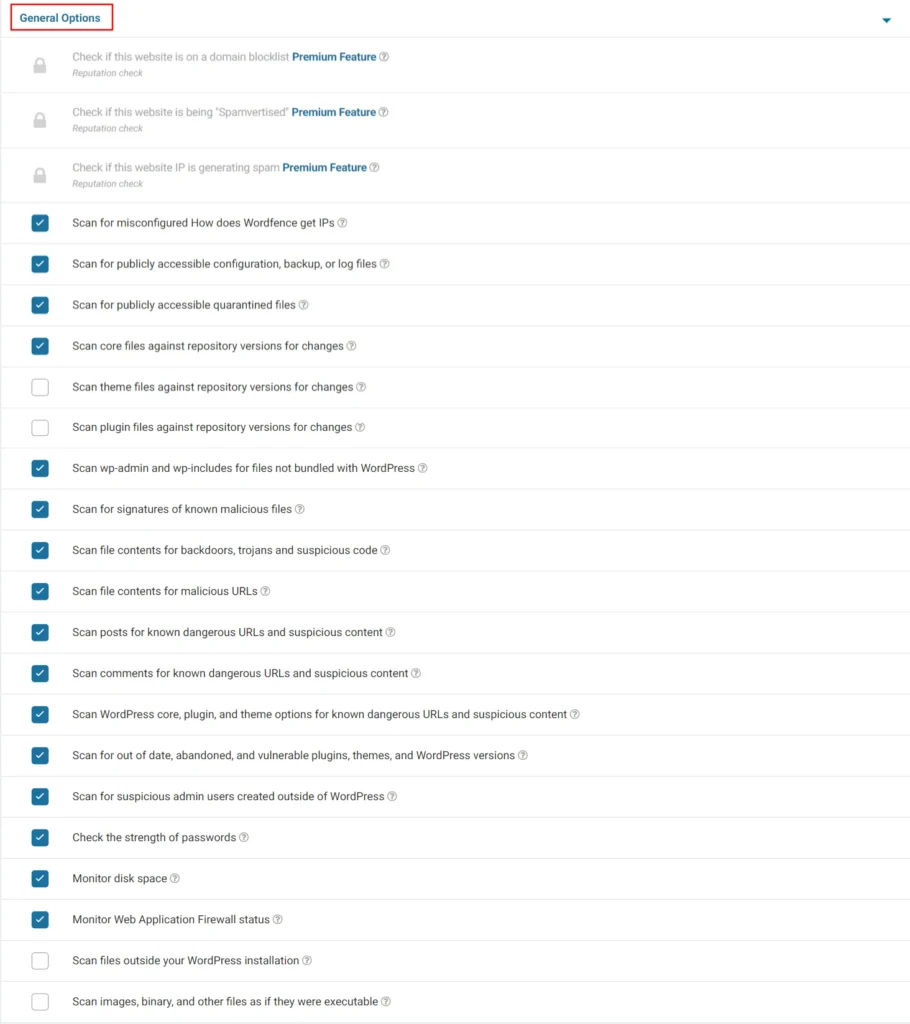
Screenshot 6: General Options
- After you have selected General Options, go to Performance Options.
- Here you can optimize the server performance by choosing to Use Low Resource Scanning, Limit the number of issues sent in the scan results email, Time limit that a scan can run in seconds (by default it is three hours), How much memory should Wordfence request when scanning (256 by default), and Maximum execution time for each scan stage.
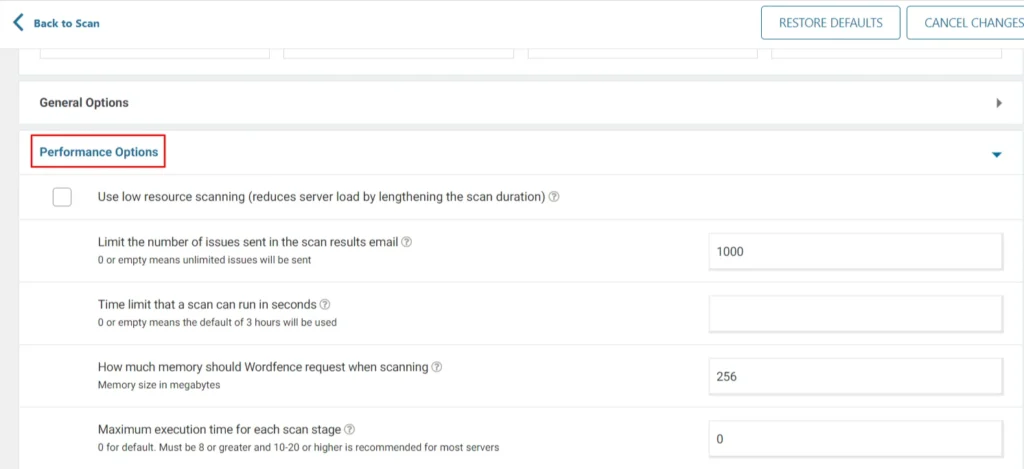
Screenshot 7: Performance Options
- Go to Advanced Scan Options to:
- Exclude files from scan that match these wildcard patterns: If you have large, safe files like backups that Wordfence keeps getting hung up on, this feature lets Wordfence to ignore certain file extensions.
- Additional scan signatures: This section lets you define custom scan signatures that the scanner will use to identify malware during checks. However, this is an advanced option that only works well if you understand how malware signatures are built and how they function.
- Use only IPv4 to start scans: Check this if you want to avoid connecting your site to IPV6.
- Maximum number of attempts to resume each scan stage: Internal connection problems can make Wordfence scans fail. It retries 2 times by default (up to 5). You can disable retries by setting it to 0.
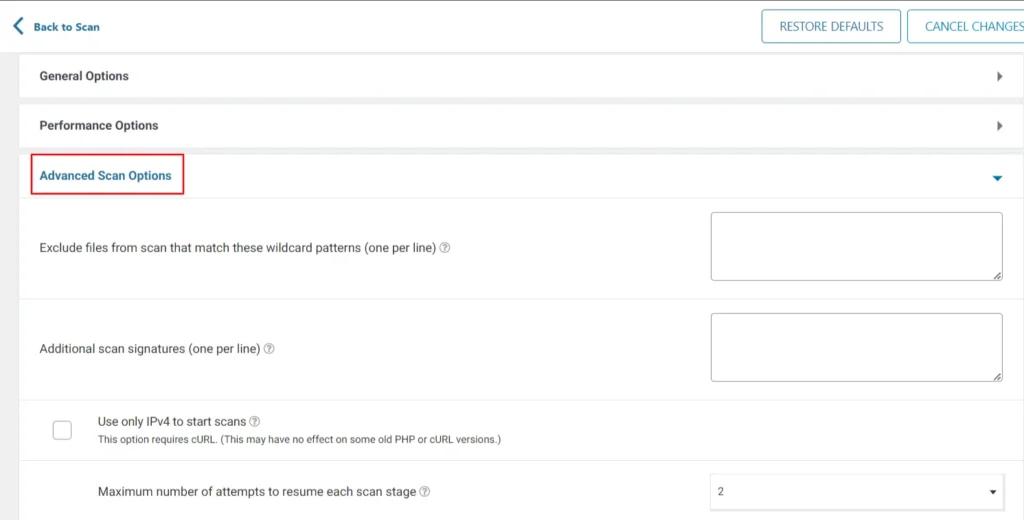
Screenshot 8: Advanced Scan Options
Step 3: Manage Options (Reputation Check)
- Wordfence's Reputation Check feature monitors your website's reputation on known databases of compromised and dangerous sites. It checks if your website is listed on three blacklists, and alerts you if your domain or IP is blacklisted. (Premium Option)
- Under the status circle of Reputation Check, you’ll see Manage Options.
- This will take you to the General Options covered above under Manage Scan Step 8.
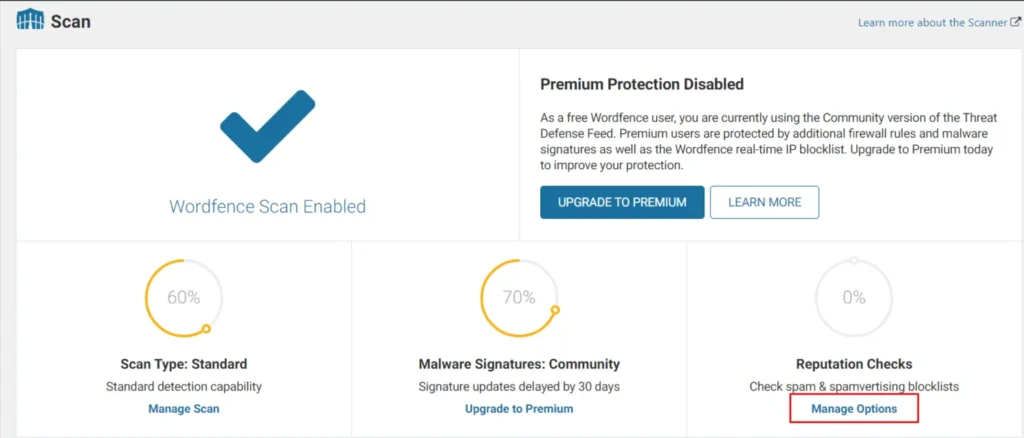
Screenshot 9: Manage Options
Step 4: Scan Options and Scheduling
- Wordfence's Scan Options and Scheduling dashboard allows users to set up automatic or manual scans.
- Clicking on this link will take you to Scan Scheduling, Scan options and Scheduling already covered above in Manage Scan.
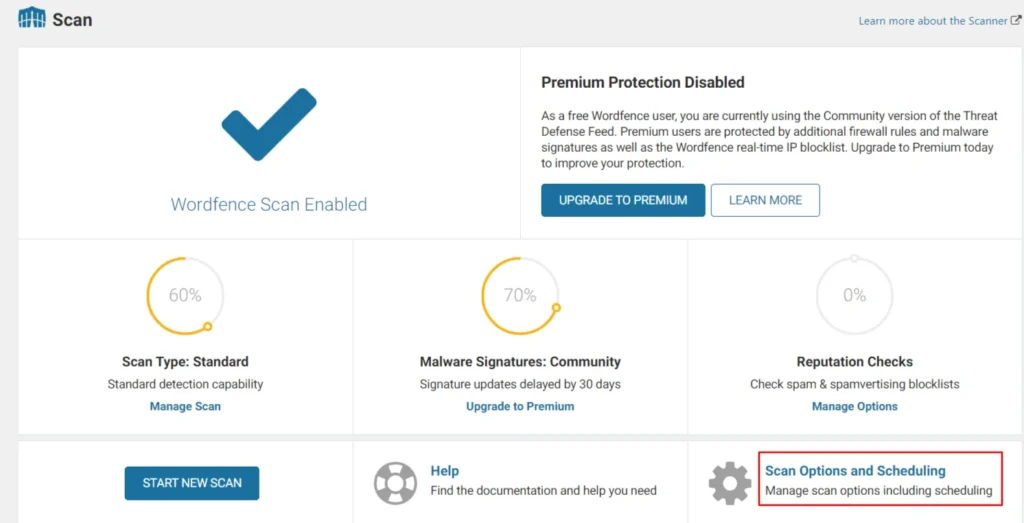
Screenshot 10: Scan Options and scheduling
Step 5: Start New Scan
- After you are done customizing, you can Start New Scan.
- By default, scans are enabled to run automatically. The free version of Wordfence runs a quick scan every day and a full scan every 72 hours, while the Premium version runs a quick scan daily and a full scan every 24 hours.
- However, if you wish to scan again, you can select this option.
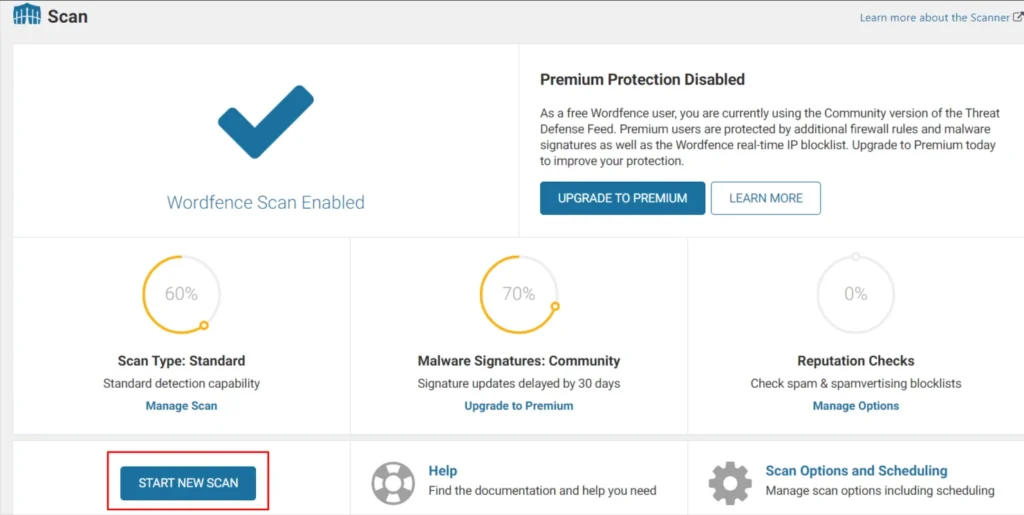
Screenshot 11: Start New Scan
Step 6: Scan Stages
- Wordfence scans your site in stages, with icons showing progress and any problems found. A blue check means all is clear, while a yellow warning means something needs attention.
- The stages include Spamvertising Checks, Spam Checks, Blocklist Checks, Server State, File Changes, Malware Scans, Content Safety, Public Files, Password Strength, Vulnerability Scans, and User & Option audits.
- The settings for these can also be found in General Options under Manage Scan.

Screenshot 12: Scan Status
Step 7: Handling Scan Results
- The result of a Wordfence scan will vary depending on what it finds on your website.
- The report shows Results Found and Ignored Results (false positive results).
- It also shows the numbers for Posts, Comments, & Files, Themes & Plugins, Users Checked, and Results Found.
- You can take action by clicking on Delete all Deletable Files and Repair all Repairable Files.
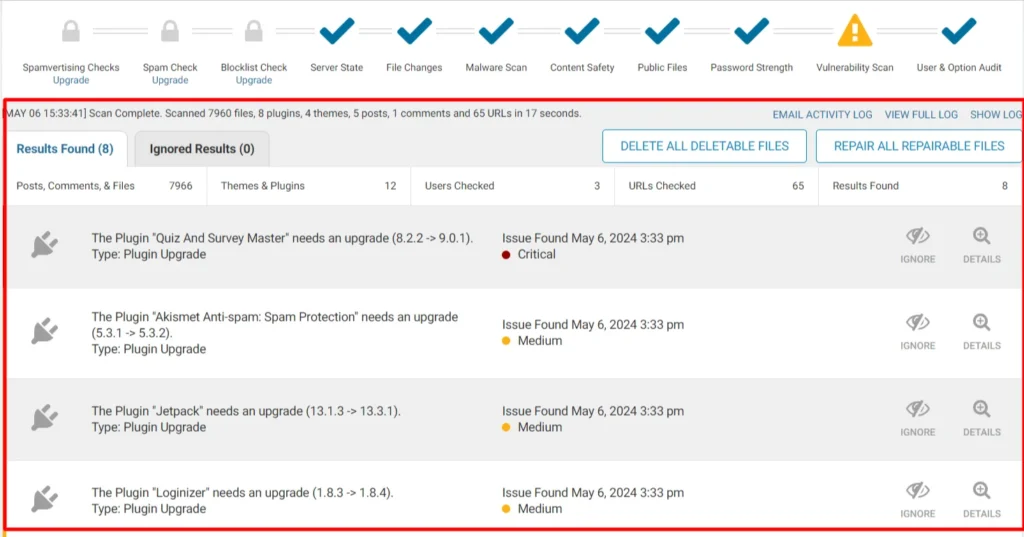
Screenshot 13: Scan Result
Wordfence Tools
Step 8: Tools > Live Traffic
- Go to Wordfence> Tools.
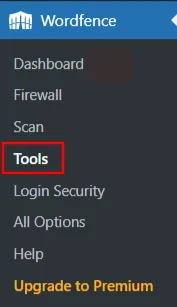
Screenshot 14: Tools
- The screen will display Live Traffic.
- Wordfence "Live Traffic" gives you a real-time view of your website activity, including things missed by analytics tools. It tracks everything happening at the server level, so you see visits from bots, crawlers, and even hack attempts, not just human visitors with Javascript enabled.
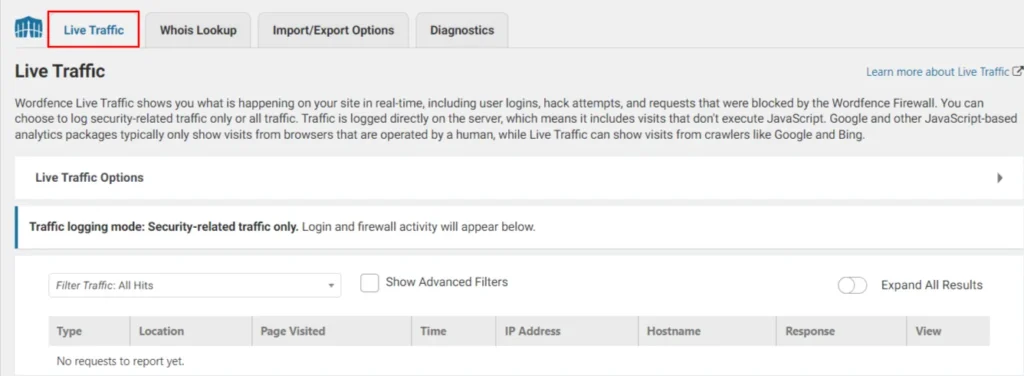
Screenshot 15: Live Traffic
- Select Live Traffic Options to choose which traffic to log or ignore some types of visitors, and other options.
- This functionality provides granular control over traffic logging. You can define which visitor interactions are recorded based on access level, user credentials, IP address, or browser type.
- You can choose options like Don't log signed-in users with publishing access, List of comma separated usernames to ignore, Browser user-agent to ignore, and others (refer to screenshot below).
- For high-traffic websites where real-time monitoring might not be practical, the Traffic logging mode can be adjusted to Security Only to prioritize security-related events.
- You can also check to Display Live Traffic menu option.
- Click on Save Changes at the end.
- Click on Restore Defaults to restore the default options.
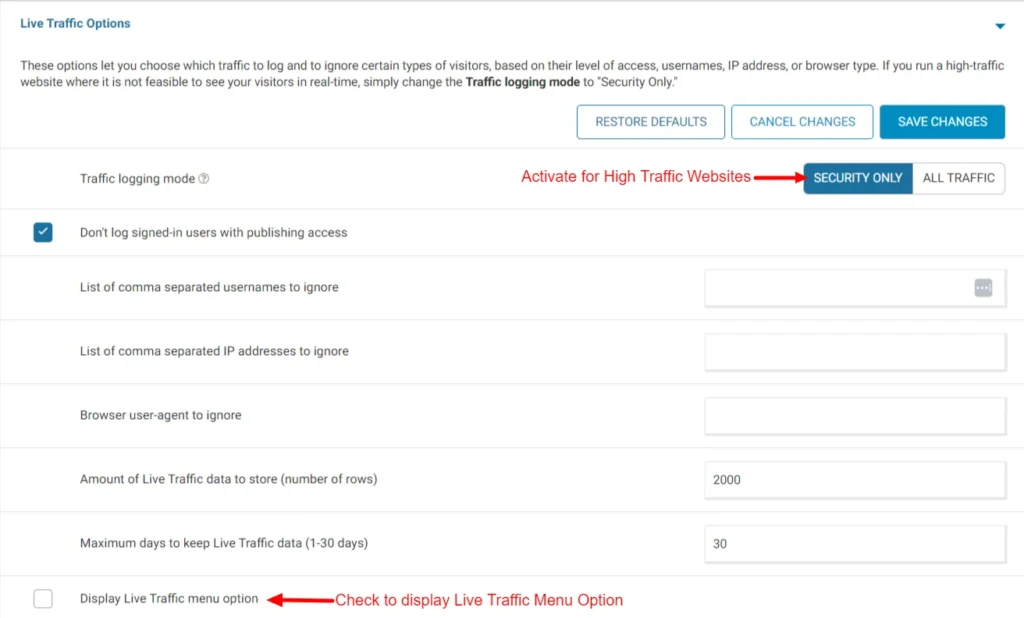
Screenshot 16: Live Traffic Options
- You can filter Live Traffic data based on various filters like All Hits, Humans, Crawlers, Registered Users, Page Not Found, Blocked by Firewall, and others.
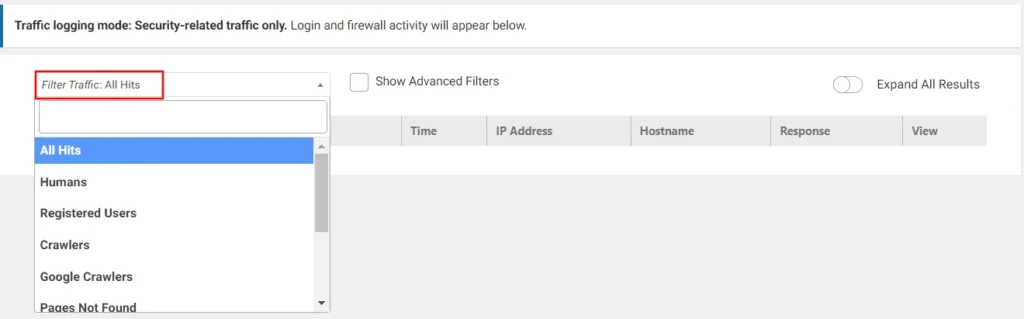
Screenshot 17: Filter Traffic
- Check Show Advanced Filters to customize your Live Traffic data.
- In this, you can have advanced filters like Username, Google Bot, IP, URL, and many others. You can also add your filter by clicking on Add Filter.
- You can set the time period for which you want to view the traffic.
- Select the Group By to view the traffic according to the option selected.
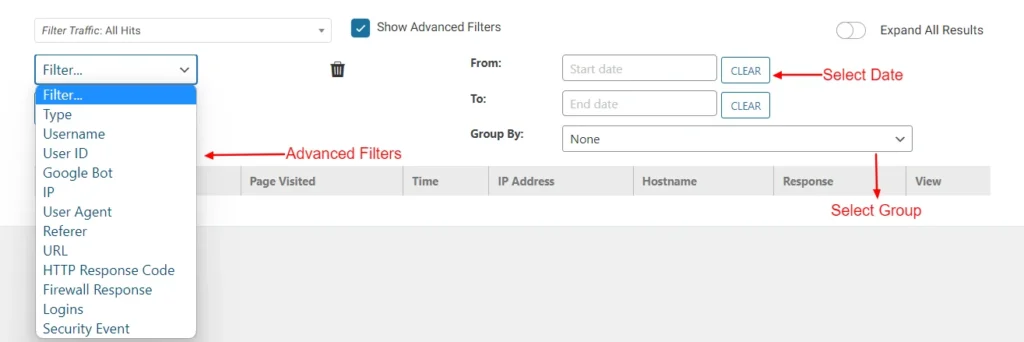
Screenshot 18: Advanced Filters, Select Date, and Select Group
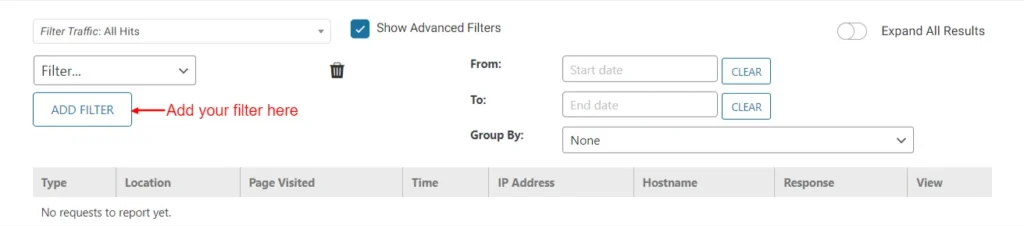
Screenshot 19: Add Filter
Step 9: Tools > Whois Lookup
- Whois Lookup helps to identify the owner behind an IP address or domain name. This is particularly useful for investigating suspicious website visitors or malicious activity.
- To utilize this feature, simply enter the desired domain name and initiate the lookup process. This will provide details such as registration date, expiration date, registrant information, and potentially associated contact email addresses.
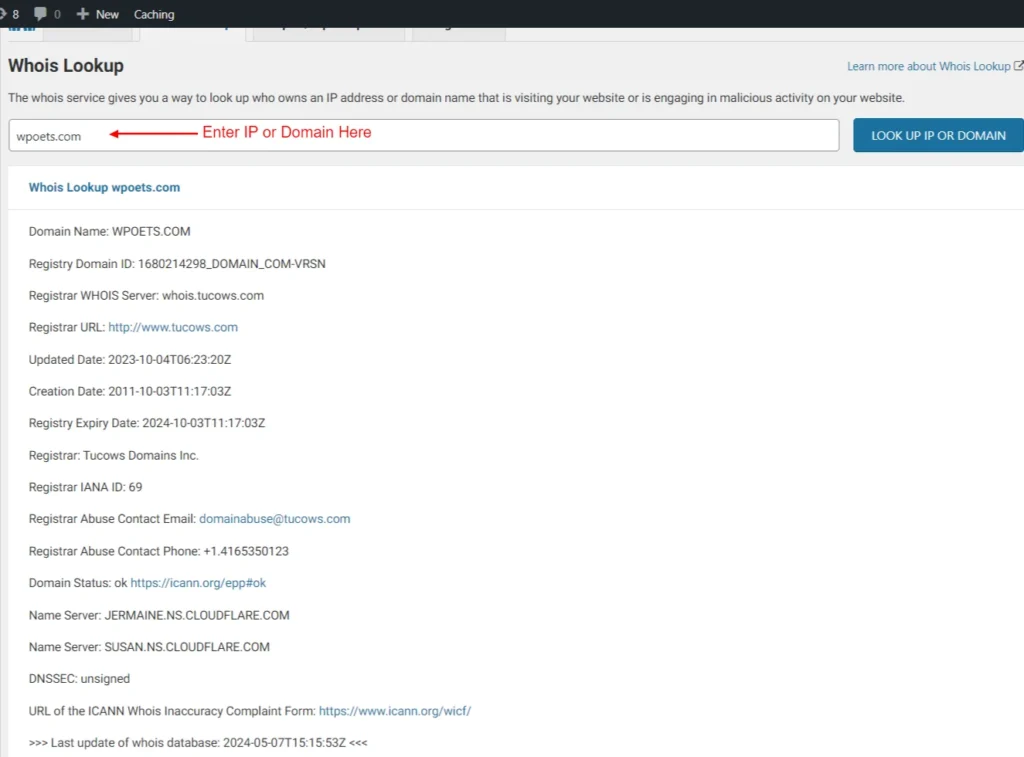
Screenshot 20: Whois Lookup Tool
Step 10: Tools> Import/ Export Options
- Go to Import/ Export Options to establish cloning across multiple sites.
- You can either Export this site's Wordfence options for import on another site or Import Wordfence options from another site using a token.
- The export and import process generates a token, a unique alphanumeric string. This token should be treated with the same level of confidentiality as your login credentials.
- Unlike other systems, Wordfence tokens are permanent, ensuring the continued availability of your exported settings.
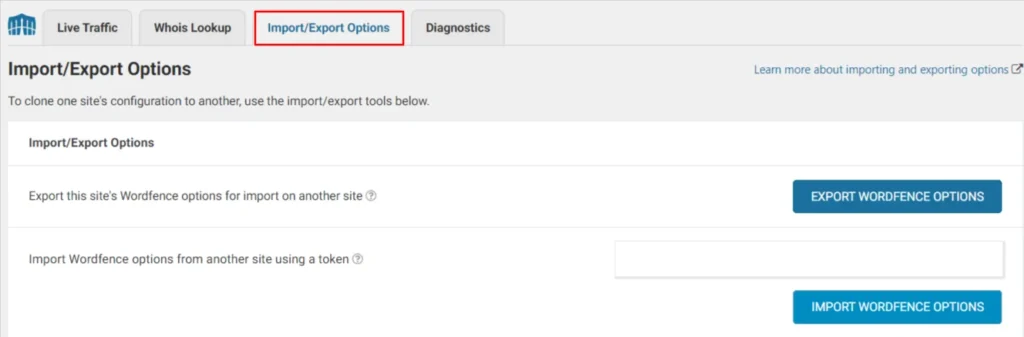
Screenshot 21: Import/ Export Tool
Step 11: Tools> Diagnostics
- Go to Tools> Diagnostics to access information when you are facing issues with Wordfence and need troubleshooting.
- This guide assists in troubleshooting conflicts, configuration issues, or compatibility problems with plugins, themes, or your hosting environment.
- You will have access to information about Wordfence installation, current WAF configuration, PHP version, Database version, status of installed themes, and many others.
- You can choose to Export or Send Report by Email.
- Click on Expand All Diagnostics to view all information at once.
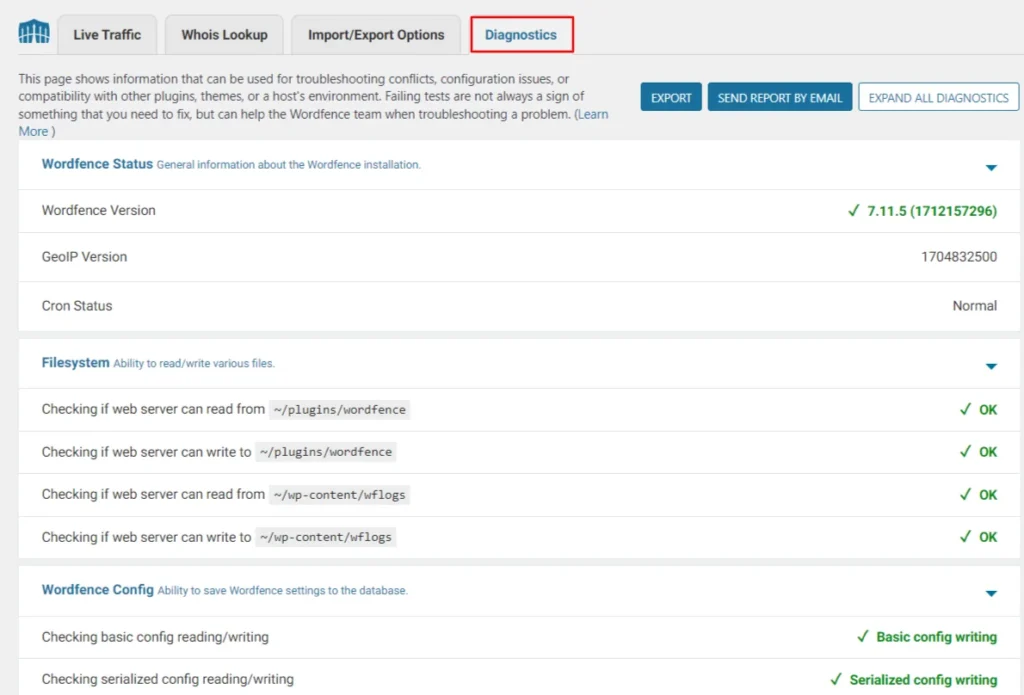
Screenshot 22: Diagnostics Tool
Wordfence Login Security
Step 12: Login Security
- Go to Wordfence> Login Security for 2-factor Authentication.
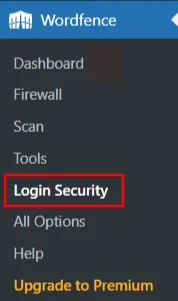
Screenshot 23: Wordfence> Login Security
- This option enables Two-Factor Authentication for your Wordfence.
- To add your account in the authenticator app, Scan the QR code displayed, or enter the code.
- The authenticator app will generate a code, which is to be entered to verify and activate Two-Factor Authentication.
- If you face any issues logging into your authenticator app, Wordfence provides you with 5 recovery codes. Each of these codes can be used only once.
- Click on Activate.
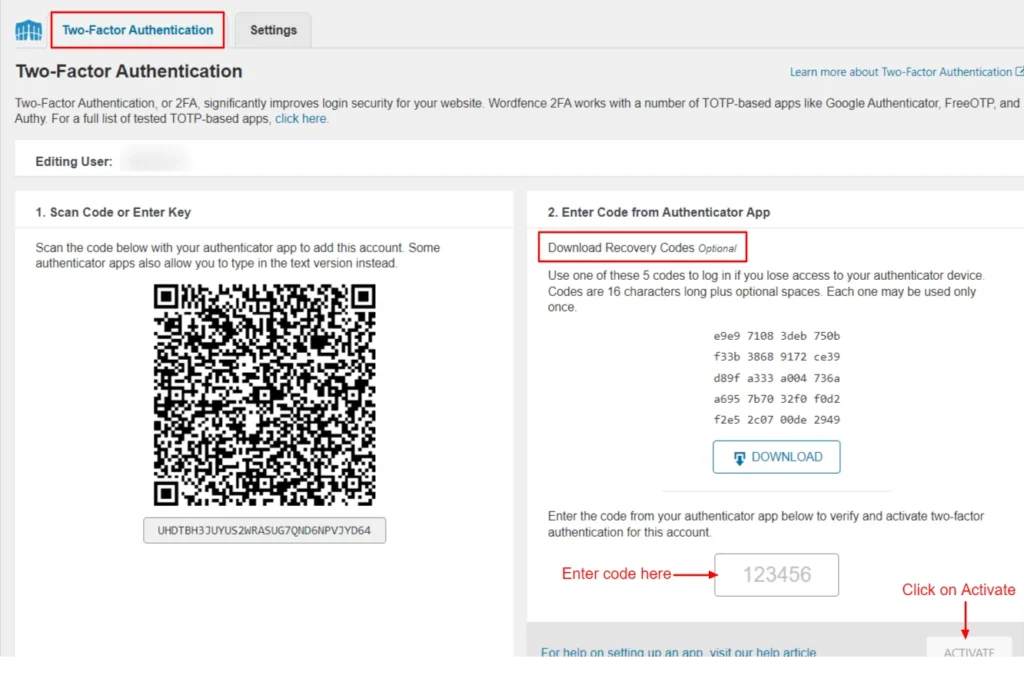
Screenshot 24: Two-Factor Authentication
- Go to Login Security> Settings.
- This Login Security page offers functionalities to enhance login security, including two-factor authentication (2FA) and reCAPTCHA.
- The report begins with a User Summary, providing a breakdown of users who have activated two-factor authentication (2FA) and those who haven't.
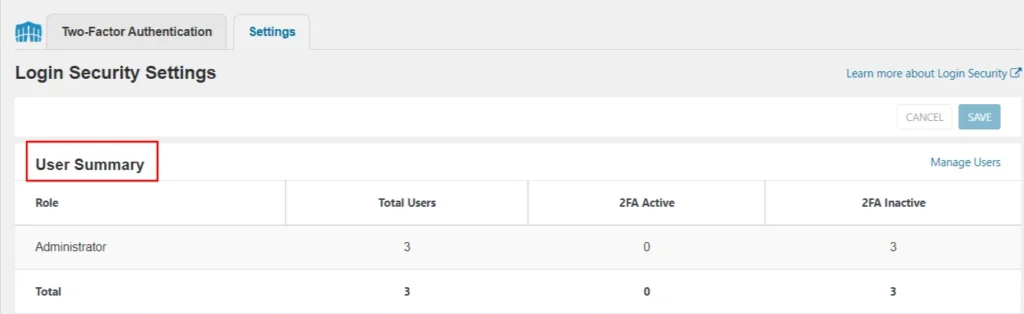
Screenshot 25: User Summary
- By default, only admins (or super-admins in multisite) can use 2FA. You can extend it to other roles:
- Required: Enforces 2FA for specific roles (with a grace period).
- Optional: Allows, but doesn't require, 2FA for certain roles.
- Disabled: Prevents 2FA usage for a role (except Admin).
- Users manage their own 2FA devices through a dedicated "Login Security" menu (visible when enabled for their role).
- 2FA enforcement includes a grace period for required roles, preventing immediate lockouts.
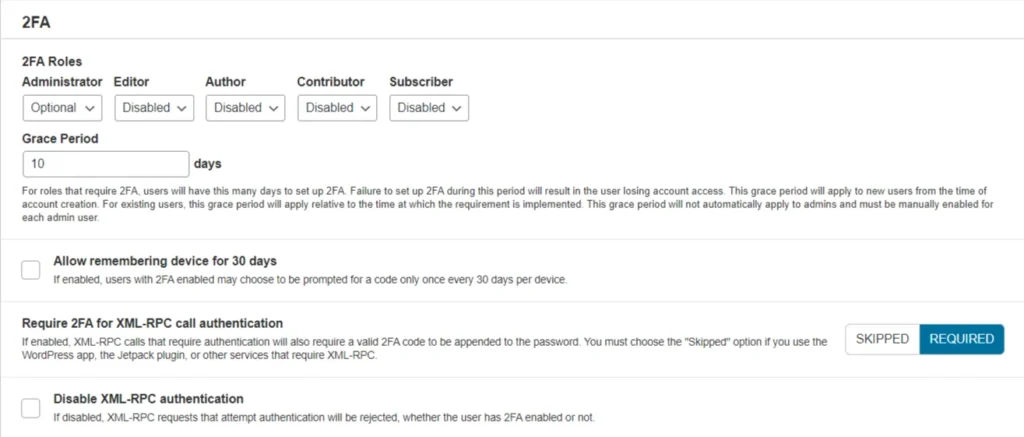
Screenshot 26: 2FA Settings
- Check WooCommerce Integrations if you have the WooCommerce plugin activated.
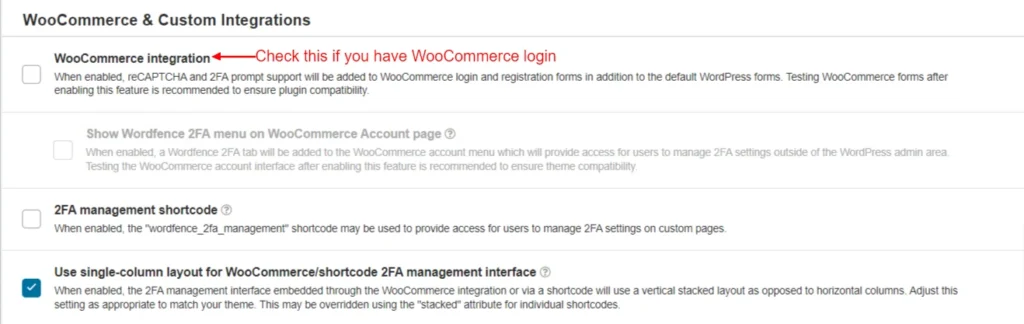
Screenshot 27: WooCommerce and Custom Integrations
- Check Enable reCAPTCHA on the login and user registration pages box for enhanced security and enabling reCAPTCHA.
- Activate by entering the site key.
- For optimal balance, fine-tune the captcha's threshold (default 0.5) based on your site's score history.
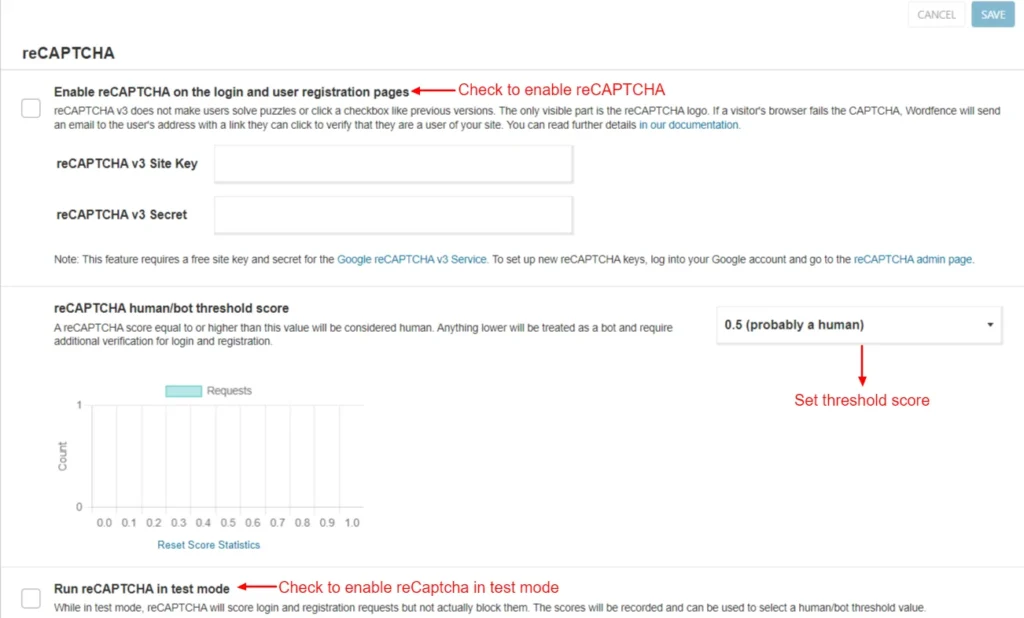
Screenshot 28: reCAPTCHA
- The General settings have the inclusion of Allowlisted IP addresses that bypass 2FA and reCAPTCHA, NTP Protocol (Network Time Protocol), last login timestamp, and deletion of security settings and of 2FA upon deactivation of the plugin.
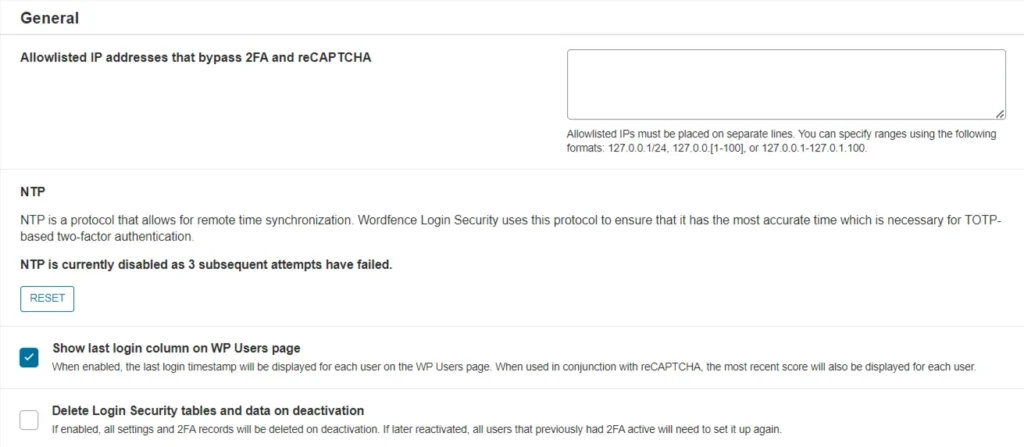
Screenshot 29: General Settings
Wordfence All Options
The All Options section of Wordfence includes Wordfence Global Options, Firewall Options, Blocking Options, Scan Options, and Tool Options.
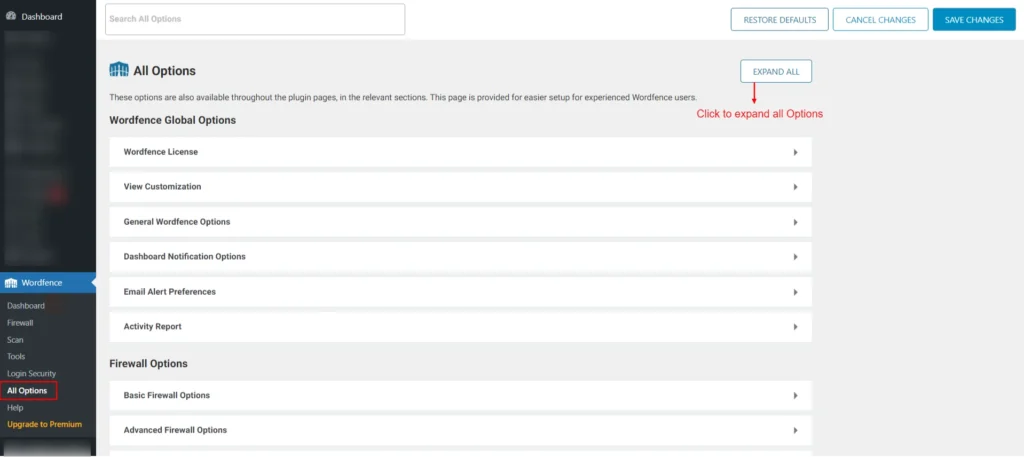
Screenshot 30: All Options
Conclusion
By now, you have gained insight on why security is important to your enterprise website, and how Wordfence is a good fit for it. With its comprehensive features and user-friendly interface, Wordfence empowers you to take control of your website security and keeps your enterprise website well-protected.
We hope this guide has equipped you with the knowledge and resources to secure your website. Remember, website security is an ongoing process. Stay vigilant, keep your software updated, and leverage tools like Wordfence to maintain a strong defense against ever-evolving threats.
Tutorials
10 min read
How to Secure Your Enterprise WordPress Website Using Wordfence (Part 1)
Introduction
Website security is no longer a luxury for businesses; it's an essential foundation. Enterprises today rely heavily on their websites to conduct business, communicate with customers, and store valuable information. A secure website is critical for protecting this data and maintaining trust with your audience.
For enterprises, the consequences of a website breach can be severe. Hackers can steal sensitive customer data, like credit card numbers or personal information, leading to financial losses and legal repercussions.
The most damaging impact may be on your brand reputation. A security breach can erode customer trust and make it difficult to regain their confidence.
Taking website security seriously is key to safeguarding your enterprise. By implementing the right tools and strategies, you can prevent these risks and build a strong foundation for success.
This guide will explore how the Wordfence plugin can help you secure your enterprise website and ensure its ongoing protection.
This is a two-part blog series. In Part 1, we discuss the following sections of the Wordfence plugin
- Wordfence Dashboard
- Wordfence Firewall
Understanding the Security Threats Faced by Your WordPress Website
While WordPress offers a powerful platform for building websites, it's important to understand the potential security risks involved. Here's a breakdown of some common threats faced by WordPress sites:
- Hacking Attempts: Malicious actors may try to gain unauthorized access to your website through various methods. This could involve brute-force attacks where they guess your password repeatedly, or exploiting vulnerabilities in outdated plugins or themes.
- Malware Injections: Hackers might inject malicious code into your website. This code could steal sensitive data from your visitors, like credit card information or login credentials. It can also redirect users to fraudulent websites or disrupt your website's functionality.
- Security Vulnerabilities: Outdated WordPress core software, plugins, and themes can contain vulnerabilities that hackers can exploit. These vulnerabilities can act as backdoors for unauthorized access or allow malicious code execution.
Now, let's talk about the potential consequences of a security breach on your enterprise website:
- Data Breaches: A security breach can expose sensitive customer data like names, addresses, and credit card information. This can lead to financial losses for your company and legal trouble from regulatory bodies.
- Website Downtime: Malware or a denial-of-service attack can take down your website, preventing customers from accessing your products, services, or information. This can lead to lost revenue and damage your brand reputation.
- Loss of Trust: A security breach can erode customer trust in your brand. If customers believe their data is not secure on your website, they may be hesitant to do business with you. Regaining their trust can be a long and challenging process.
By understanding these security threats and their potential consequences, you can appreciate the importance of taking proactive measures to safeguard your enterprise website. The good news is that plugins like Wordfence can help!
Step-by-Step Process of Securing an Enterprise Website with Wordfence
Step 1: Install Wordfence
- Go to the dashboard and click on Plugins to add a new plugin.
- Search for the Wordfence plugin.
- Click on Install and Activate.
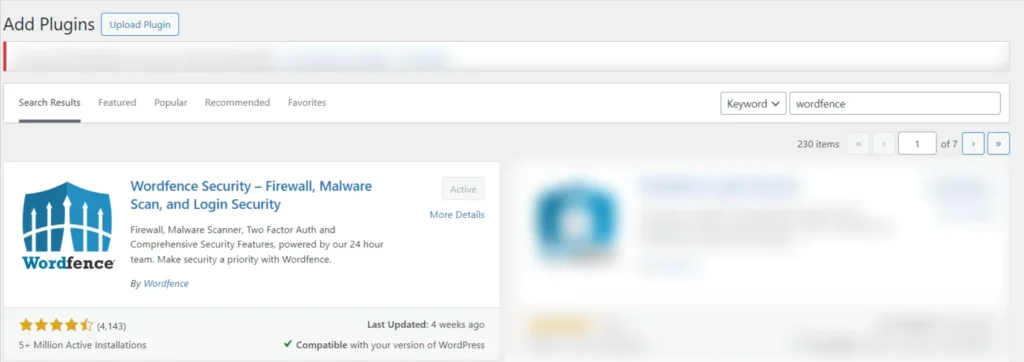
Screenshot 1: Install and Activate the Wordfence Plugin
Step 2: Getting the License
- On installing the plugin, you’ll be prompted to register and get the license to use the plugin. You’ll be redirected to the official website of Wordfence to register.
- Enter your email ID and you get your license. There’s no extra cost for that.
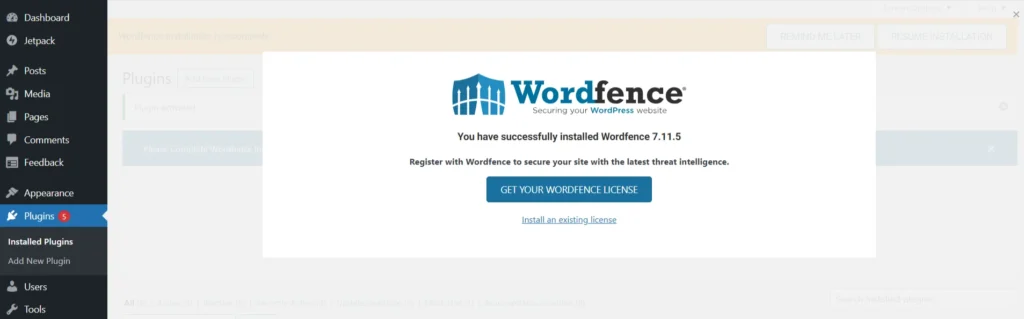
Screenshot 2: Get WordFence license
Step 3: Activating the Wordfence License
- Enter the email ID and the license that you got on your mail.
- Click on Install license.
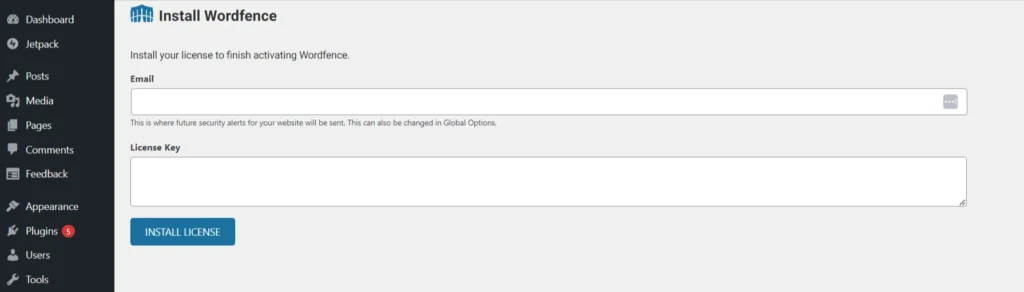
Screenshot 3: Install Licence
Wordfence Dashboard
Step 4: Understanding Wordfence Dashboard
- The Wordfence dashboard indicates the status of your installation.
- The Firewall and Scan indicate how much your site is protected in percentage. The features and settings that you have activated determine the degree of protection.
- When you first install Wordfence, you’ll see below the Firewall status circle, “WAF Currently in Learning Mode”. This status will automatically change after 7 days. This allows the firewall to get adjusted to your website.
- In learning mode, the firewall is not fully active and does not block any attacks.
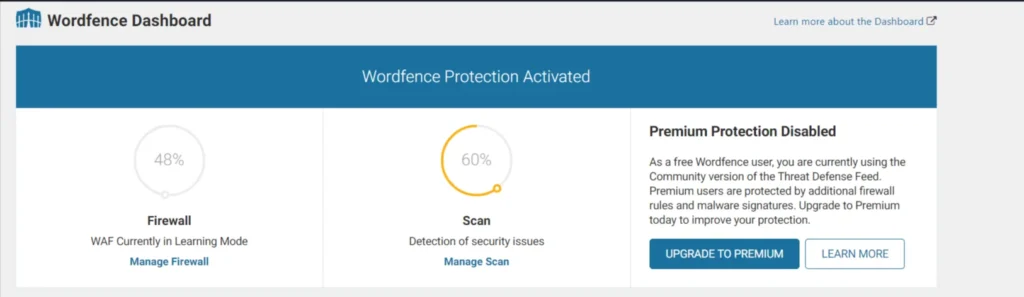
Screenshot 4: Wordfence Dashboard
- On a computer, move your mouse cursor over a status circle. On a mobile device, simply tap it. Either way, a tooltip will appear, explaining what steps you need to take for full protection.
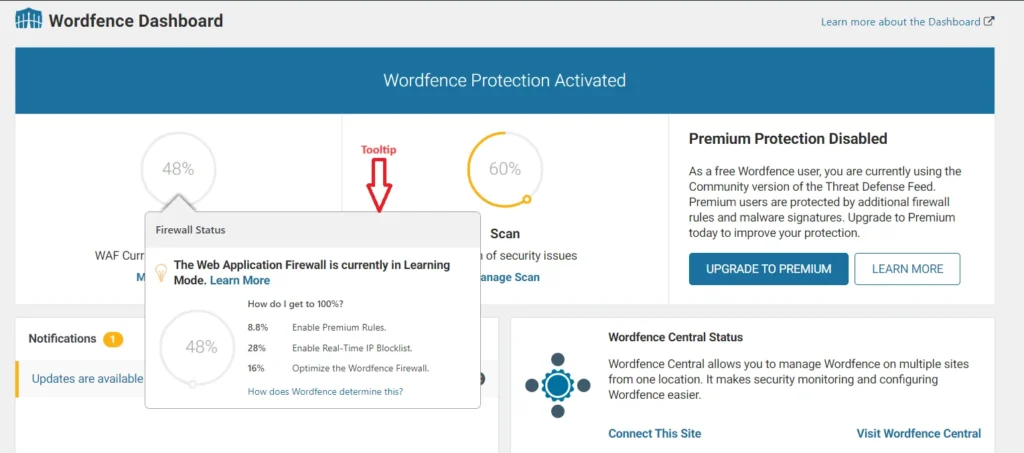
Screenshot 5: Firewall Status Tooltip
- The Notification section indicates which actions are to be taken.
- You’ll get notified about required updates, security alerts, product updates, promotions, blog highlights, etc. Please note that some of these notifications are only available in the premium version.
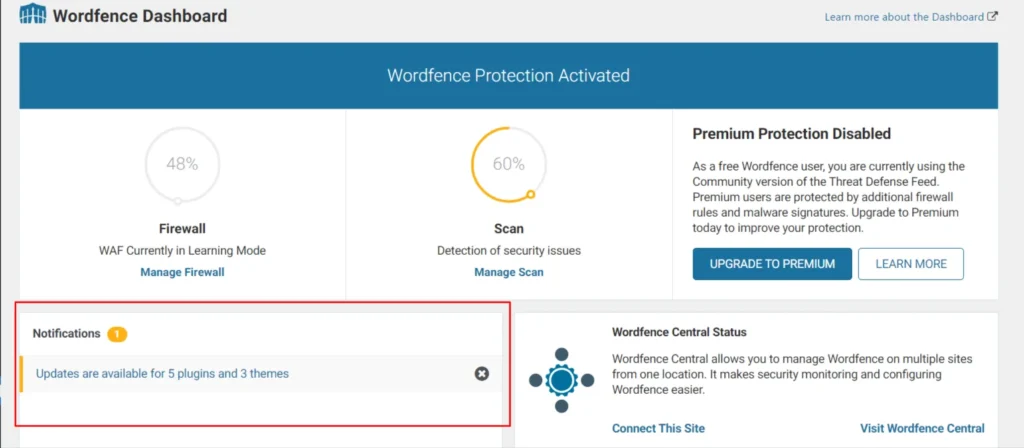
Screenshot 6: Notifications
- The Wordfence Central Status section shows if your site connects to Wordfence Central. This tool lets you manage security for multiple WordPress sites in one place. A free account gets you started, while a Premium license unlocks additional features (login required).
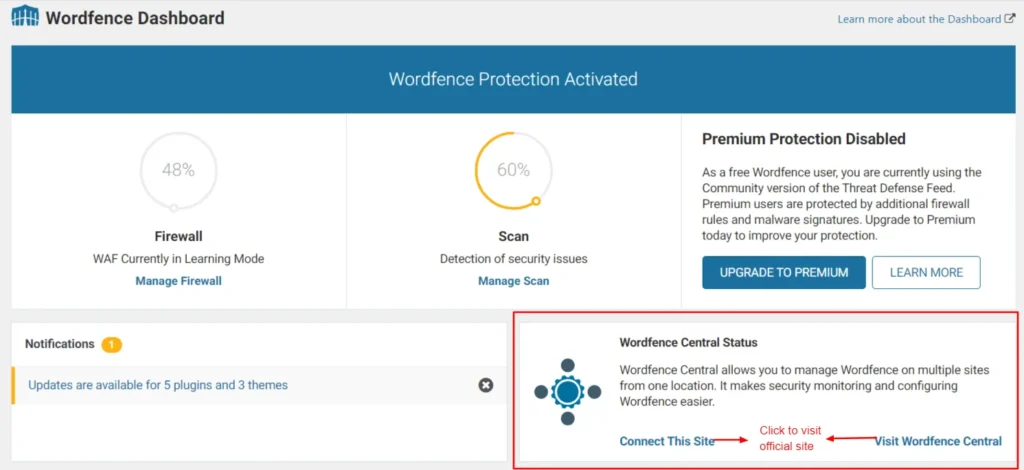
Screenshot 7: Wordfence Central Status
- In addition to the main menu, you'll find sections for Tools, Help, and Global Settings. Global Settings lets you configure Wordfence overall, including how it sends alerts (email address), what triggers alerts, and what kind of notifications appear on the Dashboard.
- You can also find the Tools section in the menu bar of Wordfence, as indicated in the following screenshot.

Screenshot 8: Tools, Help, and Global Options of Wordfence Dashboard
- The Firewall Summary section details the recent attacks blocked by your website's security measures, categorized by the type of attack. This is not visible in Learning Mode.
- The Total Attacks Blocked graph visualizes the overall attack volume targeting your site, and compares it to attacks detected across the entire Wordfence security network.
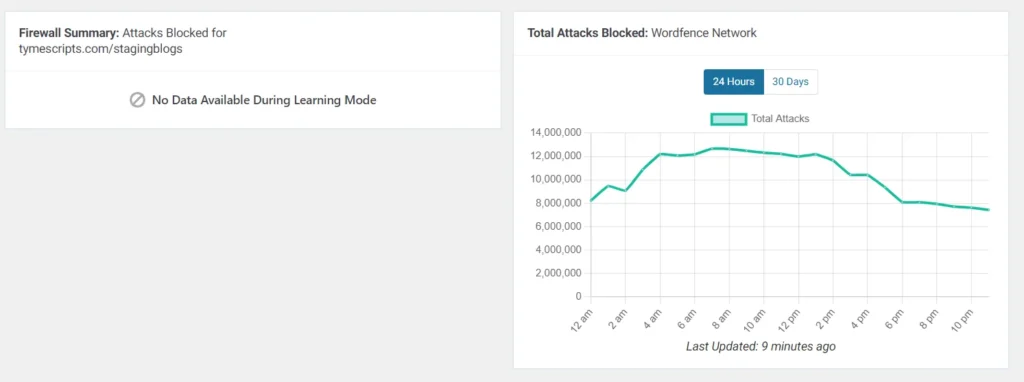
Screenshot 9: Firewall Summary and Total Attacks Blocked.
Wordfence Firewall
Step 5: Firewall Configurations
Wordfence WAF shields your WordPress site from both general web attacks and those targeting WordPress itself. It acts as an early defense system, filtering threats before vulnerable code from plugins or themes can be exploited.
- Once you understand how to read the dashboard, click on “Firewall” to configure it.
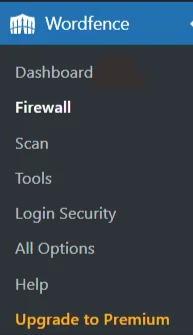
Screenshot 10: Click on “Firewall”
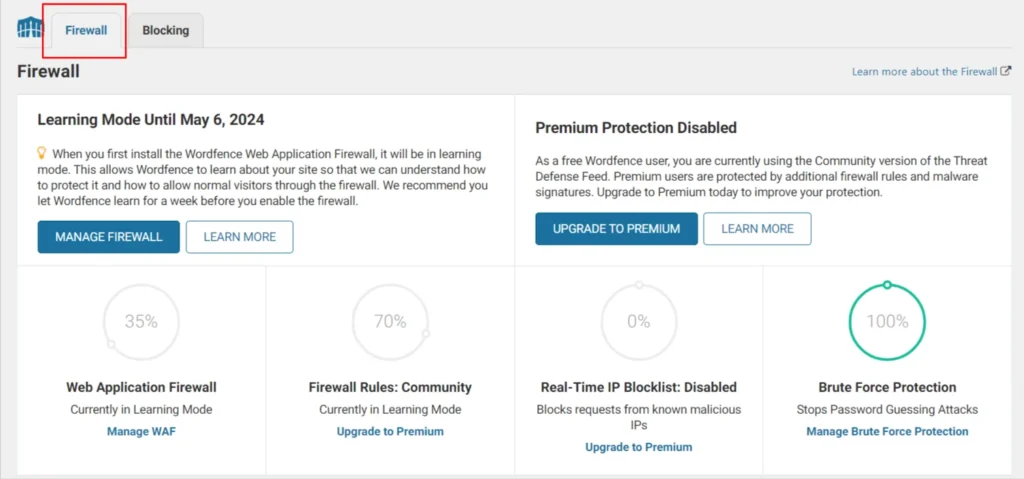
Screenshot 11: Firewall Section of Wordfence
- When you go to the Firewall section, you’ll see the status of your protection.
- The colored circles show how well your firewall is protecting you right now. Gray circles mean the firewall is either in learning mode or turned off. If you click on a circle, a tooltip will pop up explaining what you need to do for the best possible protection (100% rating).
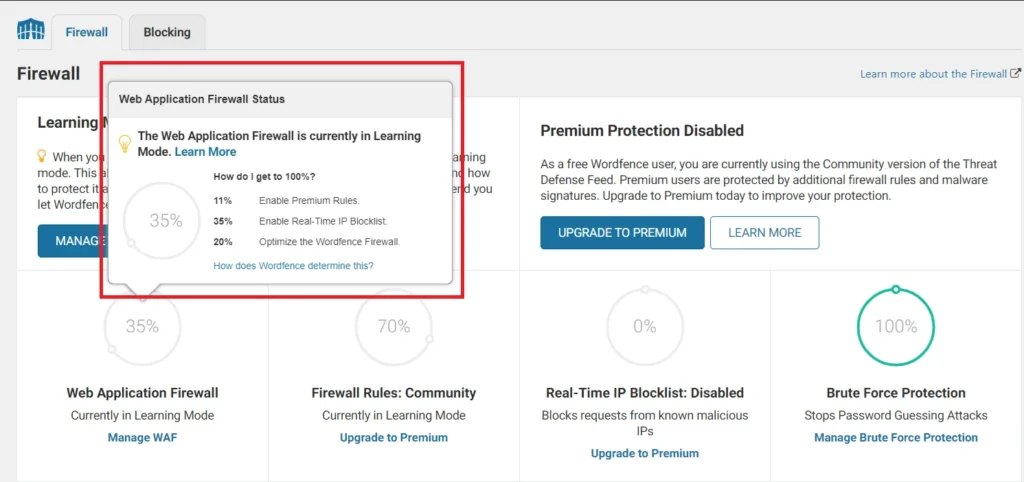
Screenshot 12: Firewall Status Circle and Tooltip
Step 6: Firewall Status Circle Check
- For all your firewall circles to be completely filled (at 100%), you need to make sure the following things are done:
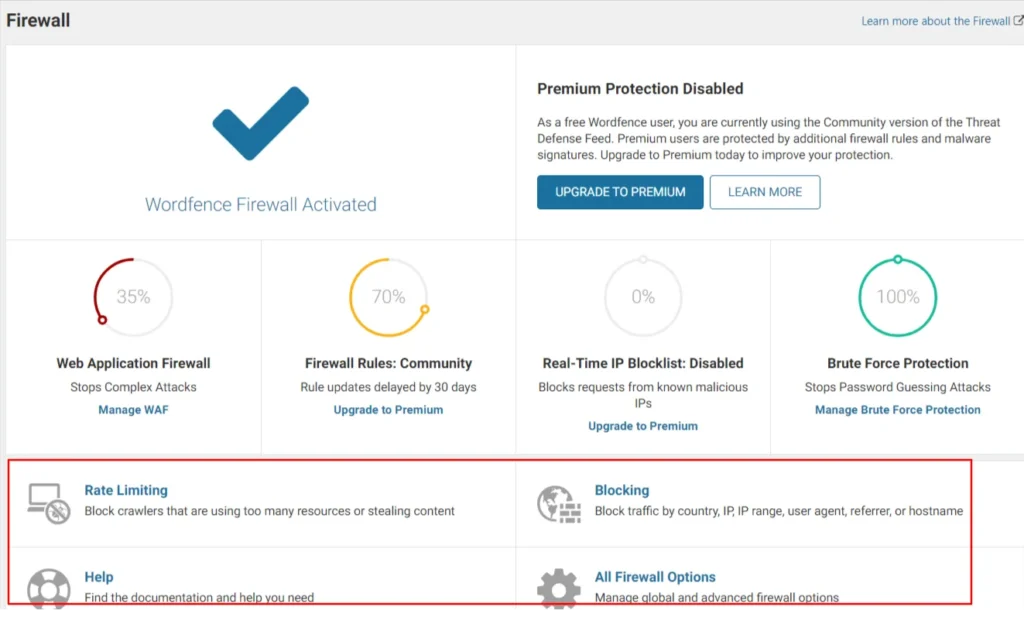
Screenshot 13: Firewall Settings to get 100% Status Circle Check
- Rate Limiting: By default, this feature is turned on. It's located on the "Firewall Options" page under "Rate Limiting". The rate limiting settings include configurations about how we should treat Google's crawlers, if anyone's requests exceed or if a crawler's page views exceed, and so on.
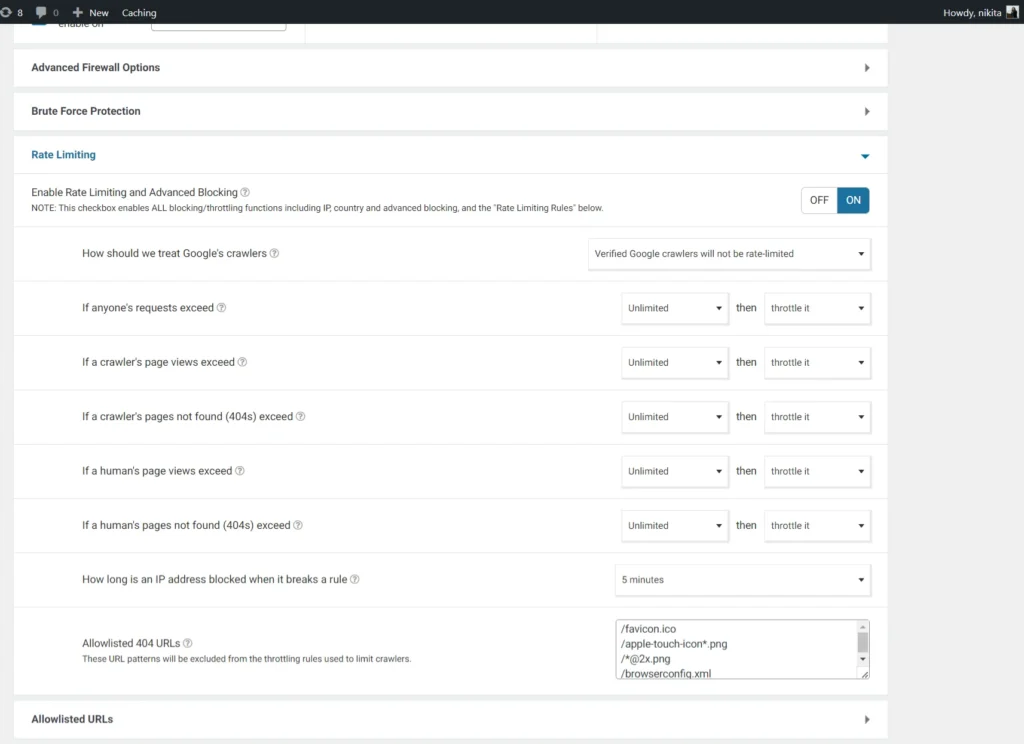
Screenshot 14: Rate Limiting Settings
- Blocking: This helps to configure what you want to block including blocking according to geolocations (country) (premium), IP address, or Custom Pattern in which you can block by IP address range, hostname, user agent etc.
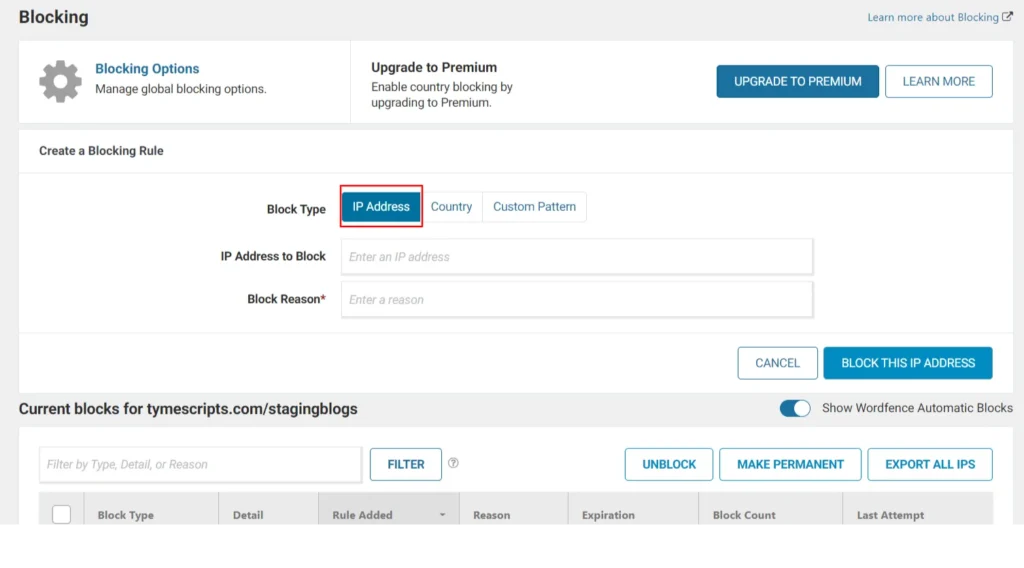
Screenshot 15: Blocking by IP Address
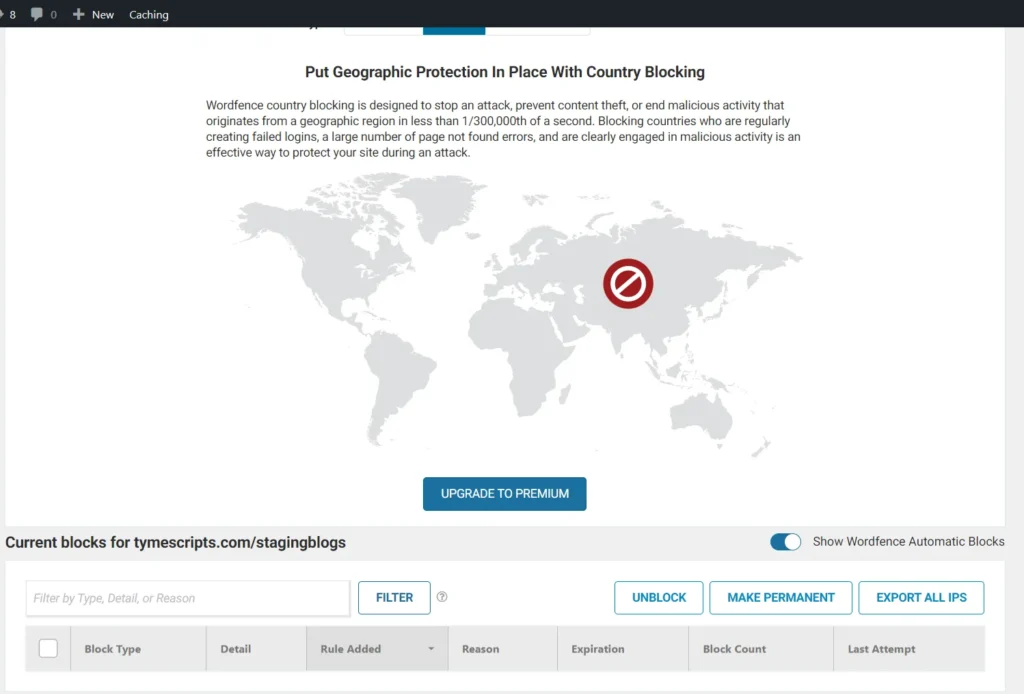
Screenshot 16: Blocking by Country
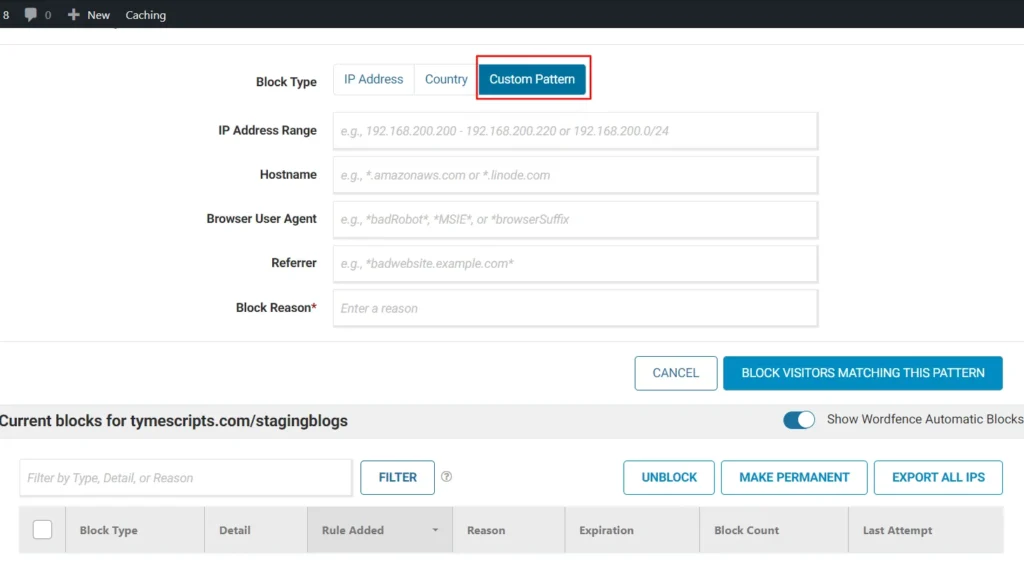
Screenshot 17: Blocking by Custom Pattern
- Help: You can get the documentation and help from here.

Screenshot 18: Firewall Help
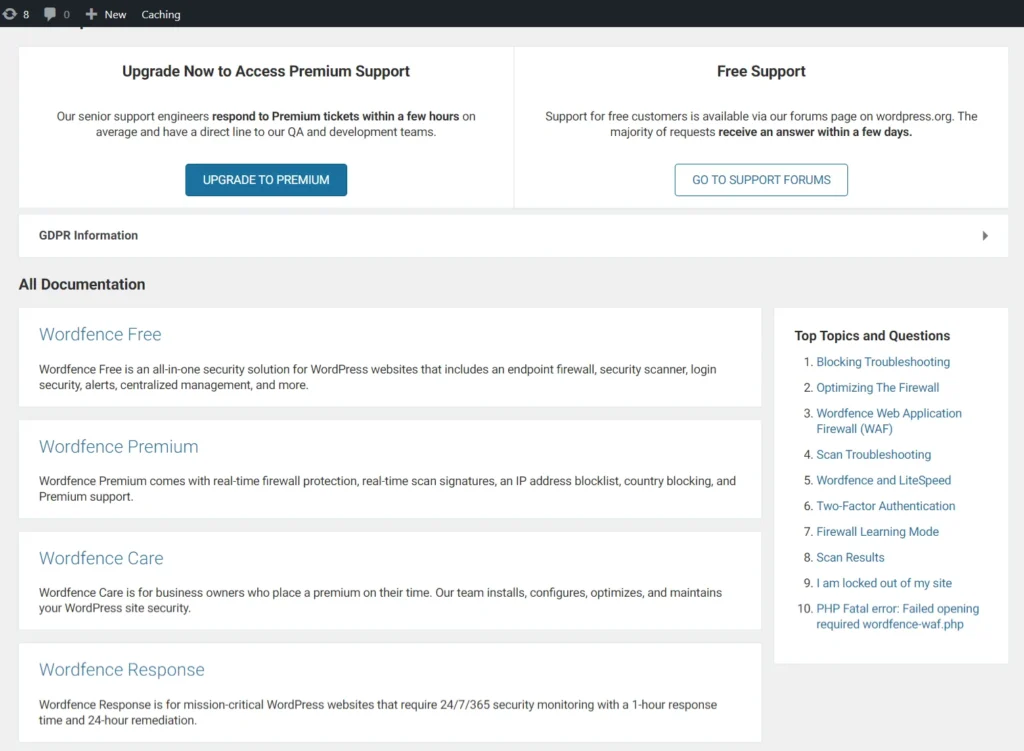
Screenshot 19: Help Section
- All Firewall Options: Go to All Firewall Options and select Advanced Firewall Options.
- In this section, you can enable advanced firewall securities such as:
Allowlisted IP addresses that bypass all rules: This feature lets you create an exception for a specific IP address, allowing it full access to your website regardless of Wordfence security rules. This is useful if you have a constant internet connection (like in an office) with a static IP address.
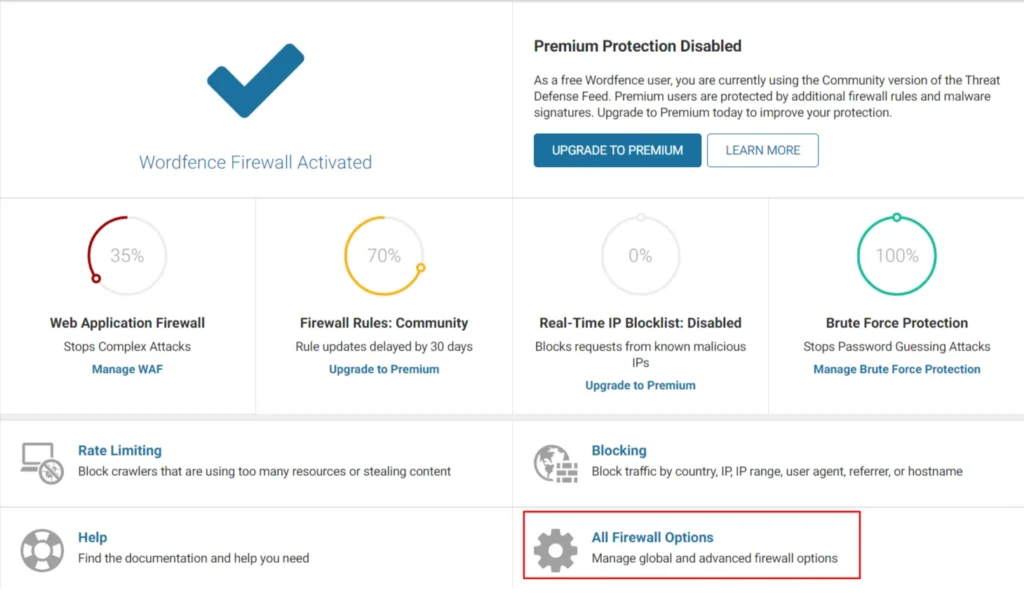
Screenshot 20: All Firewall Options
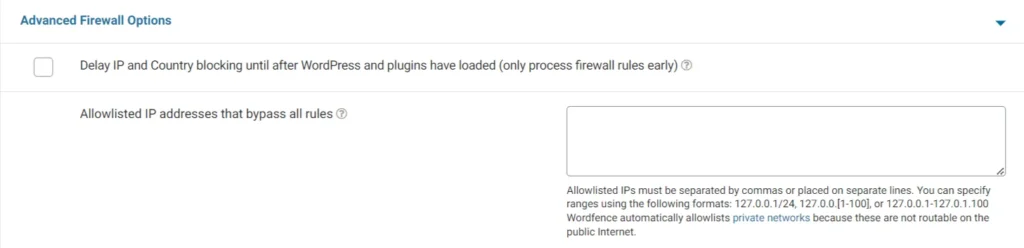
Screenshot 21: Advanced Firewall Options
- Allowlisted Services: Wordfence prevents accidental blockage of certain external services, like Facebook. This can happen with strict Rate Limiting rules, where Facebook's crawler might get blocked if it requests pages too fast (like when someone shares multiple links from your site). By default, some services are pre-approved (allowlisted). You can manually remove any service from this list using the "Allowlisted Services" option. Once unchecked, a service will be treated like any other visitor.

Screenshot 22: Allowlisted Services
- Immediately block IPs that access these URLs: This feature lets you create a honeypot to catch malicious visitors. You can define a fake URL, like "/example-one". Anyone attempting to access this non-existent address will be automatically blocked. Remember to use relative URLs starting with a forward slash, and be mindful that these URLs are case-sensitive.

Screenshot 23: Block IPs that Access mentioned URLs
- Ignored IP addresses for Wordfence Web Application Firewall alerting: Do you run regular scans, uptime checks, or other automated services on your site? If so, and you don't want alerts for those activities triggering an "increased attack rate" notification, you can add their IP addresses here. But remember, only include services you completely trust, as you won't be notified if that IP actually attacks your site.

Screenshot 24: Ignored IP Addresses
- Rules: Wordfence's firewall packs a double punch. First, it has a set of specific rules that recognize common attacks hackers love to use. These rules are super efficient at spotting matches because they're so precise. Second, the firewall has another layer of defense with broader rules that use patterns to sniff out suspicious activity. This helps block even never-before-seen attacks (known as "0-days") that fall into familiar categories.
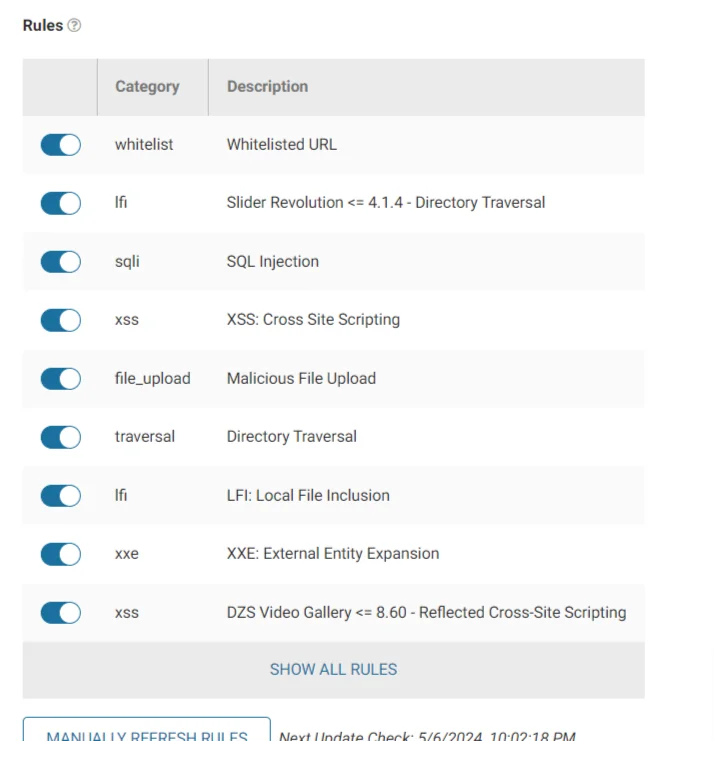
Screenshot 25: Rules
- Brute Force Protection: This acts as a master control for enabling or disabling all Brute Force Protection features.
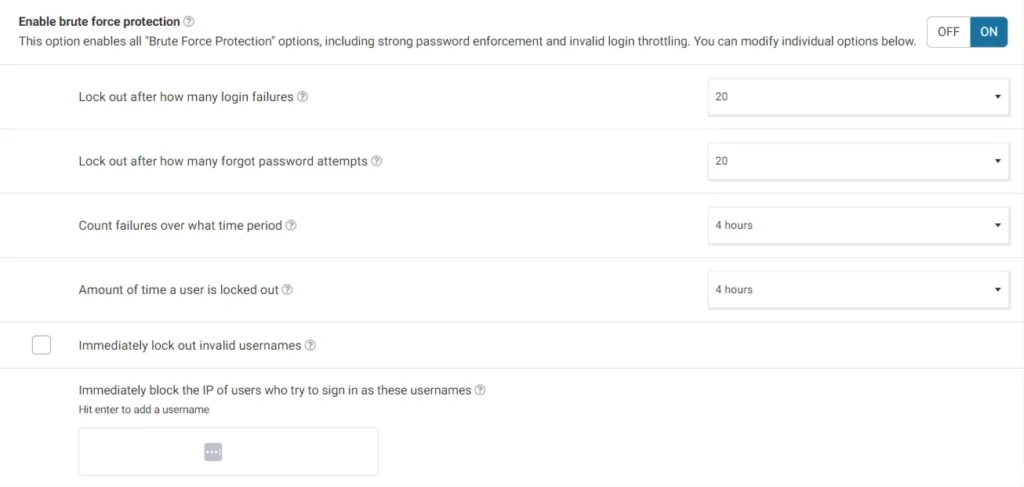
Screenshot 26: Brute Force Protection
- Lock out after how many login failures: Blocks repeated login attempts (protects against brute force attacks). Set to 20 to allow for forgotten passwords, but lockout kicks in after 20 attempts.
- Lock out after how many forgot password attempts: Limits on the "Forgot password?" form stop spam and brute-force attacks. Set it to 5 for most sites.
- Count failures over what time period: This setting defines a window to track failed logins. It thwarts brute-force attacks by locking out users after too many failed attempts within that period. You can adjust this window for your needs.
- Amount of time a user is locked out: This sets the lockout duration for failed login attempts (to prevent brute force attacks). Strong passwords make it very difficult to crack them, even after many tries.
- Immediately lock out invalid usernames: Enabling immediate lockouts for invalid usernames can be inconvenient for small sites (1-2 admins/editors) due to potential typos. It's best for sites with few users. If a legitimate user gets locked out, unblock their IP via Wordfence "Firewall" > "Blocking".
- Immediately block the IP of users who try to sign in as these usernames: This setting blocks login attempts with usernames you specify (e.g., "admin" or your domain name). Avoid usernames similar to real accounts to prevent accidental blocks. Existing accounts with these usernames won't be blocked.
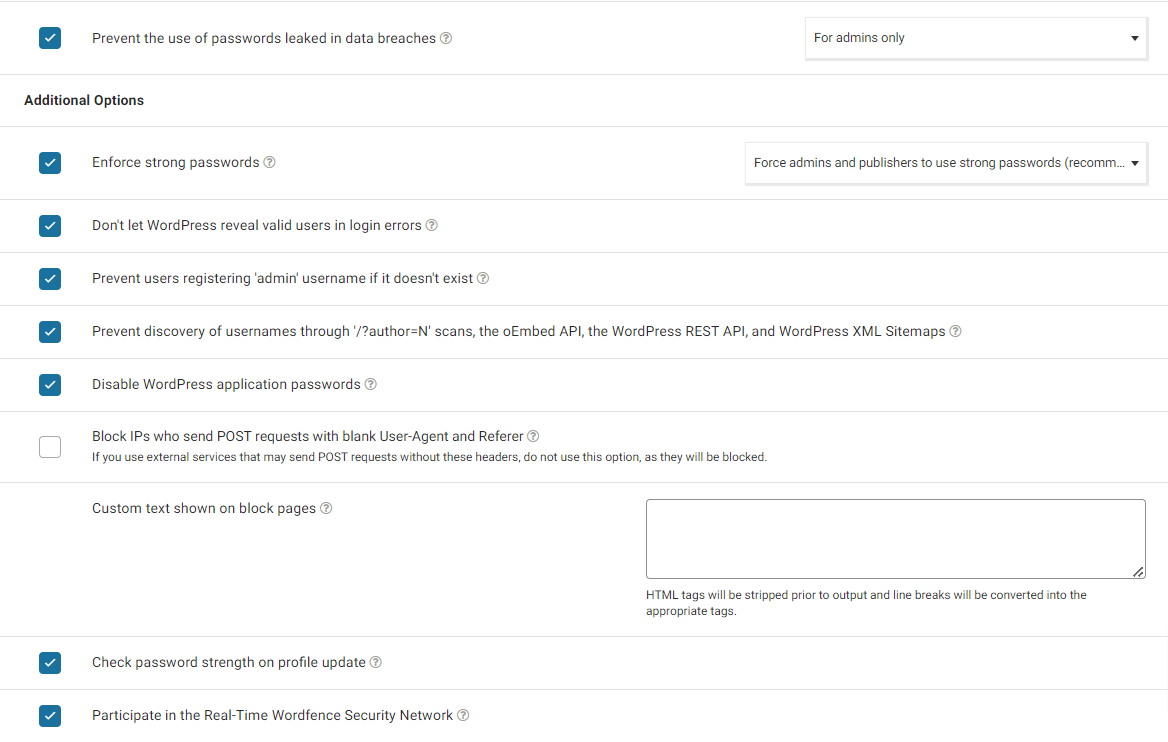
Screenshot 27: Brute Force Additional Options
- Prevent the use of passwords leaked in data breaches: Stops logins with leaked passwords (used in hacks) for admins by default. Optionally, apply it to all who can publish posts (including admins).
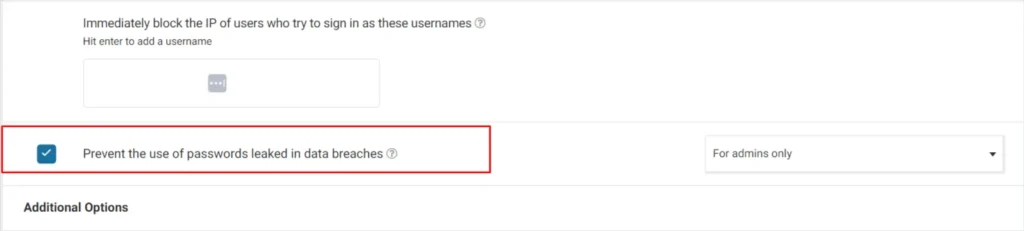
Screenshot 28: Check to Prevent Use of Passwords Leaked
- Additional Options:
- Enforce strong passwords
- Don't let WordPress reveal valid users in login errors
- Prevent users from registering 'admin' username if it doesn't exist
- Prevent discovery of usernames through '/?author=N' scans, the oEmbed API, the WordPress REST API, and WordPress XML Sitemaps
- Disable WordPress application passwords
- Block IPs who send POST requests with blank User-Agent and Referer
- Custom text shown on block pages: Wordfence lets you add a custom message for blocked users (e.g., how to contact the site owner). Keep it plain text, and line breaks work like the WordPress editor.
- Check password strength on profile update
- Participate in the Real-Time Wordfence Security Network
- The dashboard of Wordfence Firewall also displays IPs blocked, Top Countries by Number of Attacks, firewall summary, a graph about total blocked attacks, and login attempts (both failed and successful).
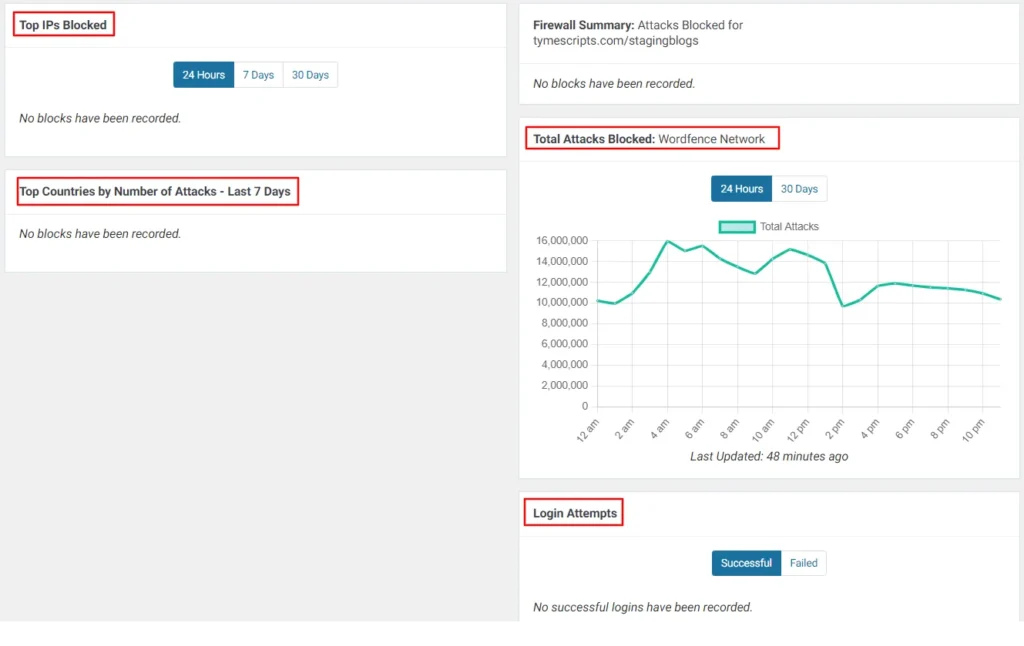
Screenshot 29: Firewall Dashboard
Conclusion
In this post (Part 1 of 2 of the series), we installed and configured the WordFence plugin. Then we understood the Wordfence dashboard, which shows the status of the installation, with Firewall and Scan indicating the site protection percentage.
Next, we configured the firewall WAF, which protects the WordPress site from web attacks. We also looked at the features of rate limiting, blocking, and advanced firewall options.
In the next part of this series, we will explore in more depth the various settings and features of WordFence.
WordPress
7 min read
How to Create a Multilingual Enterprise WordPress Website Using Weglot
Introduction
It is now essential for enterprise-level organizations to have a multilingual web presence in today's interconnected business ecosystem. This step goes beyond just accommodating; it shows that we are actively trying to reach more diverse audiences and grow your market.
Think about this situation: A website run by a multinational firm only supports one language. Because their language preferences differ from the site's preferred language, many potential customers are unintentionally left out of this setup.
There are several important reasons why multilingual websites are important:
- Broadened Audience Reach: Embracing linguistic variety allows organizations to engage with a broader spectrum of global consumers, broadening their audience reach. Companies may promote inclusion and accessibility by making their platforms multilingual.
- Fostering Trust and Relatability: Users feel more comfortable and at ease when they can consume the content in their local language, which in turn increases trust and relatability. This language resonance greatly enhances credibility and long-term relationships with customers.
- Strategic Competitive Advantage: In today's highly competitive industry, having a website that is available in multiple languages gives you a clear advantage. It enhances a company's brand appeal and relevance by portraying it as culturally sensitive and aware of global market trends.
- Elevated SEO Performance: Websites that are available in more than one language improve SEO performance by increasing their visibility in more geographic areas. Search engine rankings, the amount of organic traffic, and overall online presence can all be improved with locally optimized content.
Choosing the Right Translation Plugin
Selecting the perfect multilingual plugin for your enterprise website is crucial. Imagine it as the bridge that connects your website content to a global audience, and you want a sturdy, reliable bridge! Here's a breakdown of key factors to consider when choosing a plugin that can handle your business needs:
1. Scalability: Can it Scale?
Enterprise websites tend to deal with a lot of content and traffic. The last thing you want is a plugin that buckles under pressure. Look for a plugin that boasts scalability, meaning it can handle your website's growth as you add more languages and content.
2. Feature Feast: Does it Have the Right Tools?
Multilingual plugins come with a variety of features, and for an enterprise website, you'll likely need a well-equipped toolbox. Here are some must-have features to consider:
- Number of Languages Supported: Does the plugin offer enough languages to reach your target audience? Enterprise needs might be broader, so a plugin supporting a vast array of languages is ideal.
- Translation Method: Choose a plugin that offers flexibility in translation methods. Automatic translation can be a good starting point, but there must be an option for self-editing for a more polished final product.
- Content Management: Managing translated content across multiple languages can get tricky. Look for a plugin with a user-friendly interface that allows you to easily edit, review, and approve translations.
3. SEO Savvy: Can it Help You Get Found?
Search Engine Optimization (SEO) is crucial for any website, and a multilingual website is no exception. Ensure the plugin you choose is SEO-compatible. This means it should allow you to optimize your translated content for search engines in each language. The goal is to make sure your website shows up in search results, no matter what language someone uses.
4. Multisite vs. Subfolder Structure URLs
This might seem like a technical detail, but it can impact your website's structure and SEO. Here's a simplified breakdown:
- Multisite: In essence, you create separate websites for each language version of your website. This offers more control and flexibility but can be more complex to manage.
- Subfolder Structure: Here, you add a language code to your existing website URL (e.g., [invalid URL removed] for French). This is a simpler setup but offers less flexibility in managing each language version as a separate entity.
Ultimately, the best choice depends on your specific needs and priorities. Keeping the above points in mind, we have selected the Weglot Plugin for translation for this blog.
Step-by-Step Guide on How to Create Multilingual Enterprise Website Using Weglot
Step 1: Getting the API Key.
- Head over to Weglot: https://weglot.com/ and sign up for a free trial.
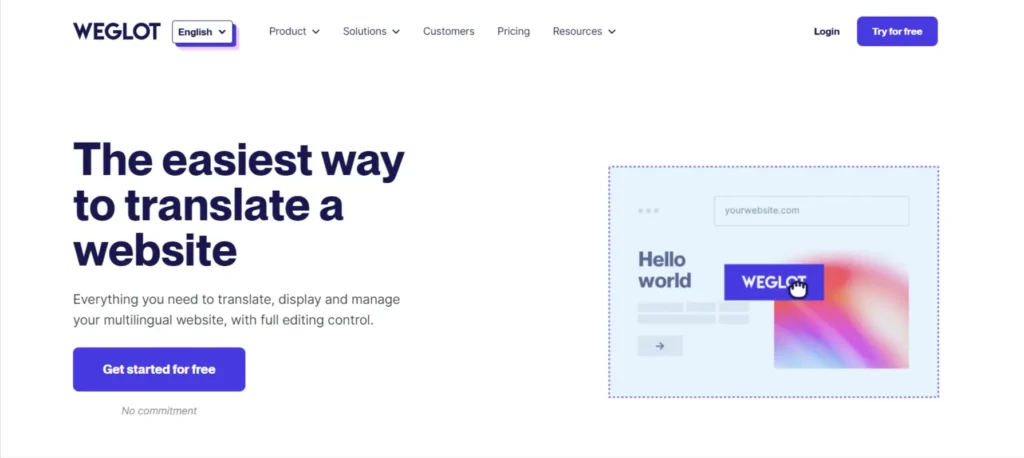
Screenshot 1: Register to get the “API Key”
- Once you register for the site, create a project by entering its name and selecting a technology.
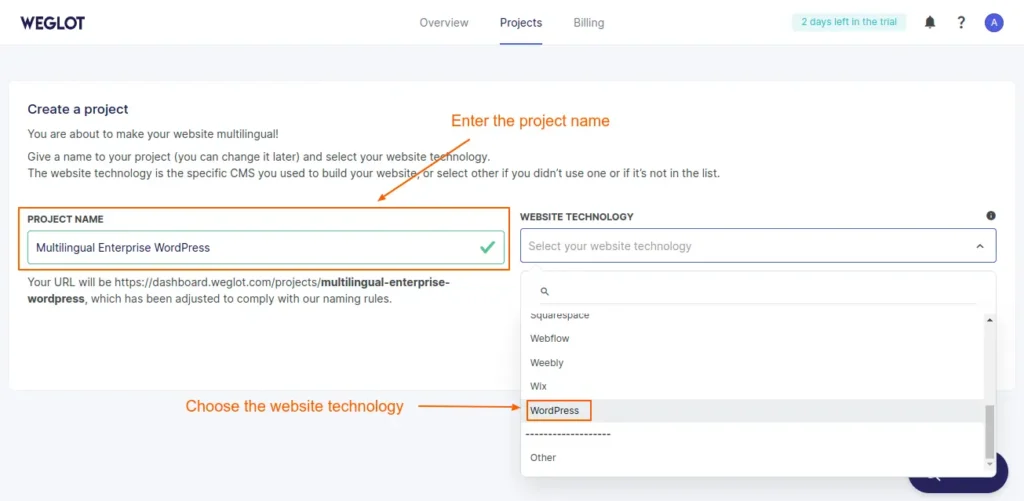
Screenshot 2: Create a Project and choose website technology as "WordPress.”
- Once that is done, copy the generated Weglot API key.
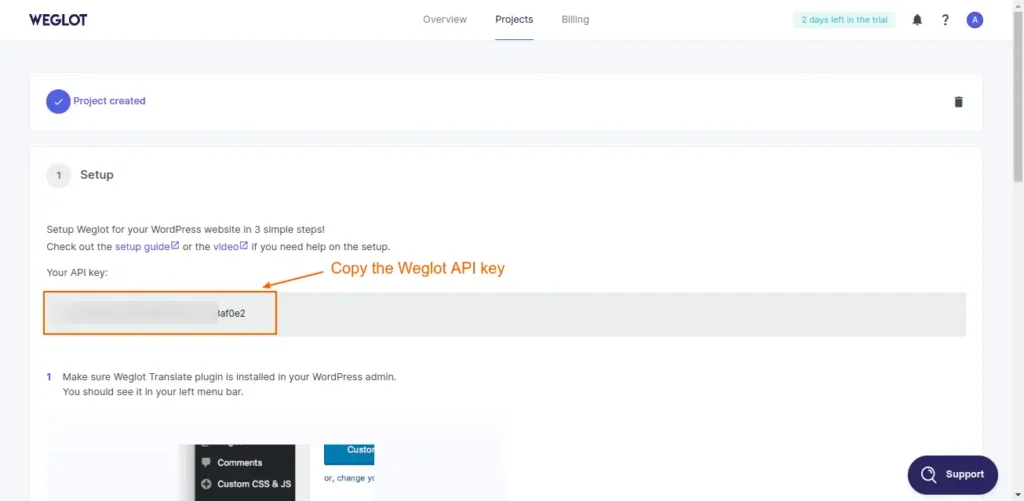
Screenshot 3: Copy the Weglot API key
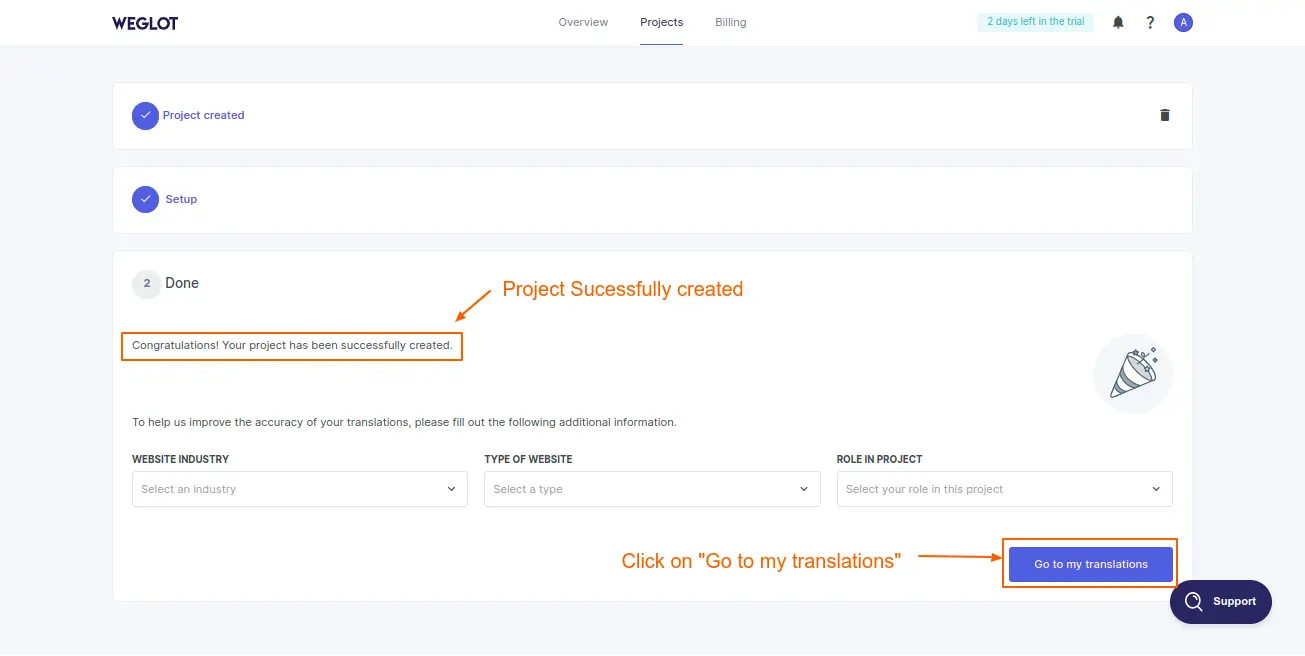
Screenshot 4: Project successfully created
Step 2: Install and Activate WeGlot Plugin
- Go to Plugins on your website’s dashboard.
- Go to Add New Plugin.
- Search for Weglot Plugin.
- Install and Activate the plugin.
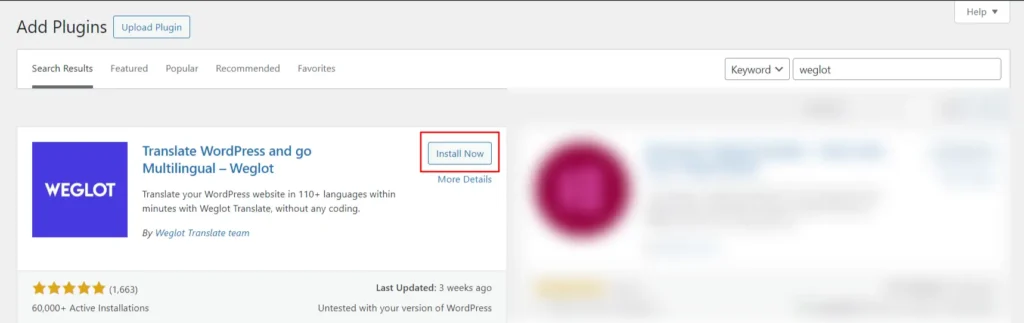
Screenshot 5: Install and Activate the plugin
Step 3: Weglot Plugin Settings
- After you activate the plugin, go to the Weglot plugin from your dashboard.
- Enter the API key that you received when you registered at the WeGlot website in Step 1.
- Configure the required settings, like choosing the original language and choosing the destination language. For this blog, we have added Hindi as the destination language.
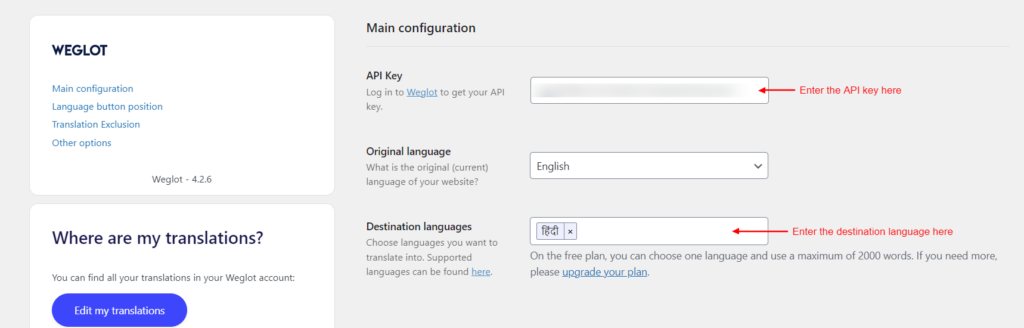
Screenshot 6: Main Configuration Settings
Step 4: Language button design
- The language button design settings allow you to customize how your language switch button will look on the website.
- The settings include whether to display the language button as a dropdown or side by side, whether to display a flag in the language button, how the flag would look (rectangle, circular, or square), or whether you want a full language name or only the language code.
- You can also customize the language button settings by overriding the CSS code.
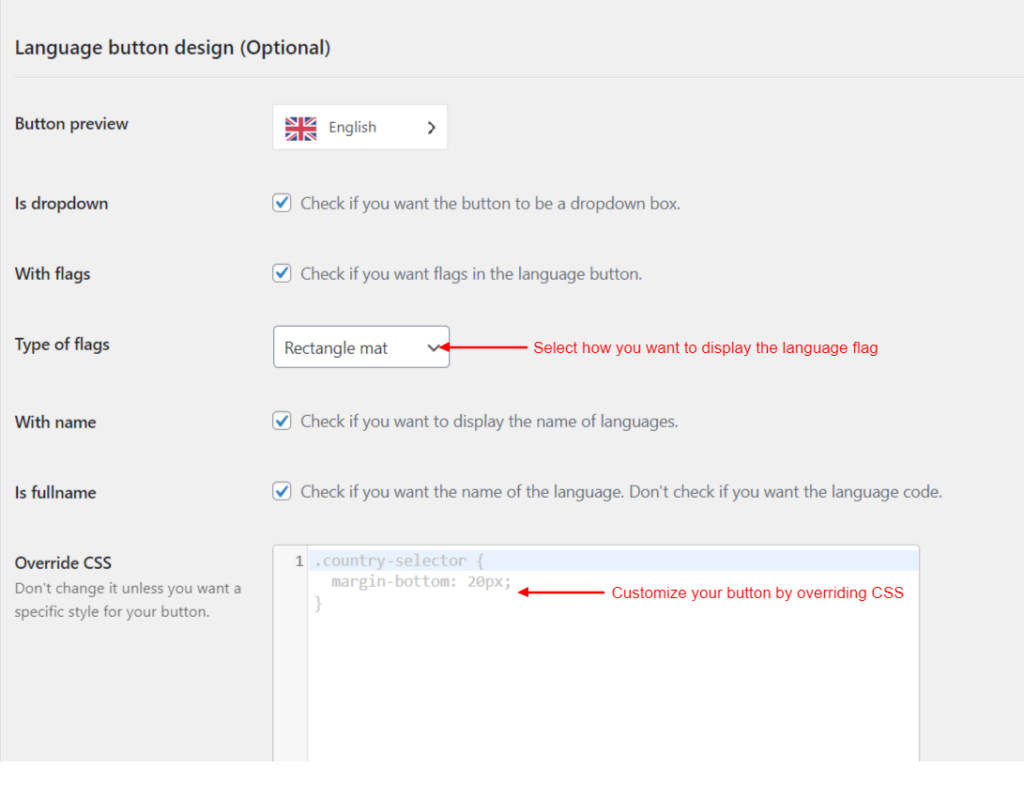
Screenshot 7: Language Button Settings
Step 5: Language Button Position
- These settings define where the language button will be positioned, which would help the user locate it easily.
- Choose from various options to place the language button in the menu, as a widget, with a shortcode, in the source code, or even in a custom position.
- To select these positions, go to Appearance > Menus or Appearance > Widgets.
- To select a custom position, you can go to the Switch editor.
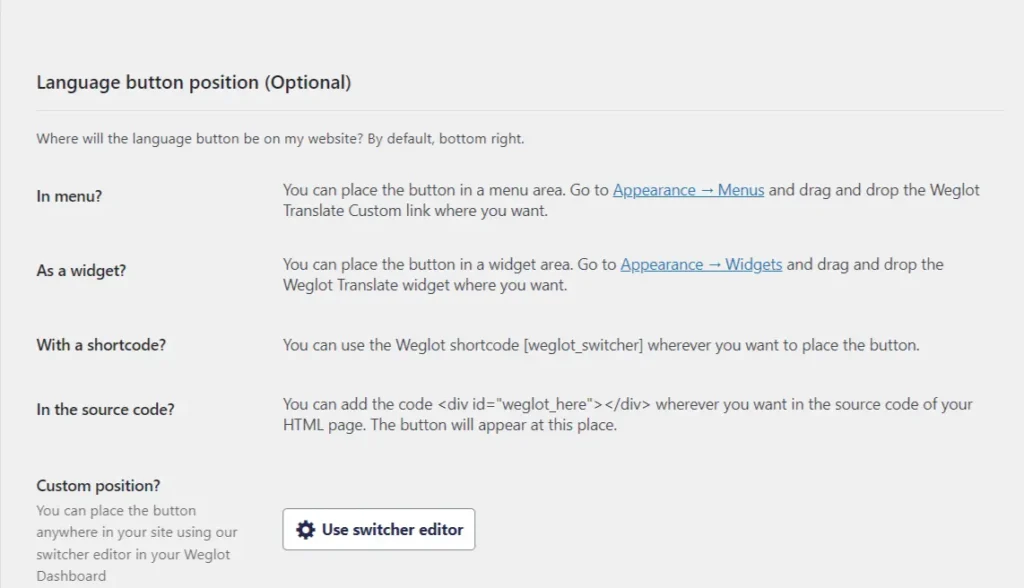
Screenshot 8: Language Button Position
Step 6: Translation Exclusion
- These settings allow you to specifically exclude any URL or blocks that you do not wish to translate on your website.
- Note that these settings are optional and not mandatory.
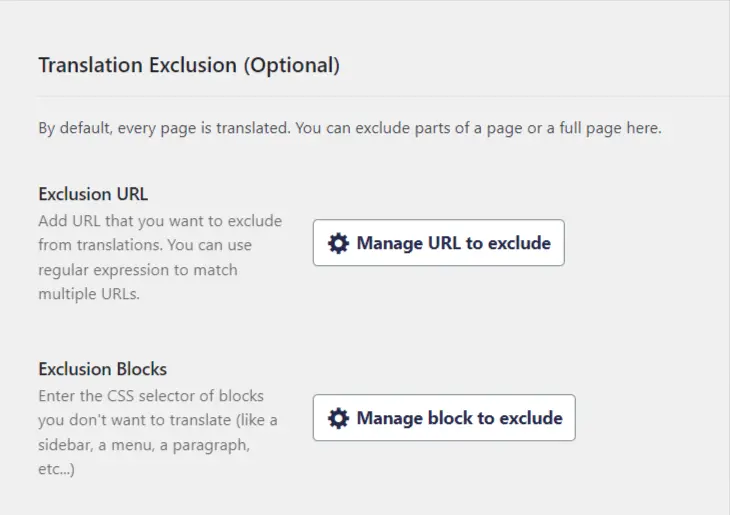
Screenshot 9: Translation Exclusion Settings
Step 7: Other Settings
- These settings include auto redirection for users, auto email translation, Translate AMP pages, and allowing users to search in their languages.
- Note that these settings are optional and not mandatory.
- Click on Save Changes.
- Your website is ready to be translated.
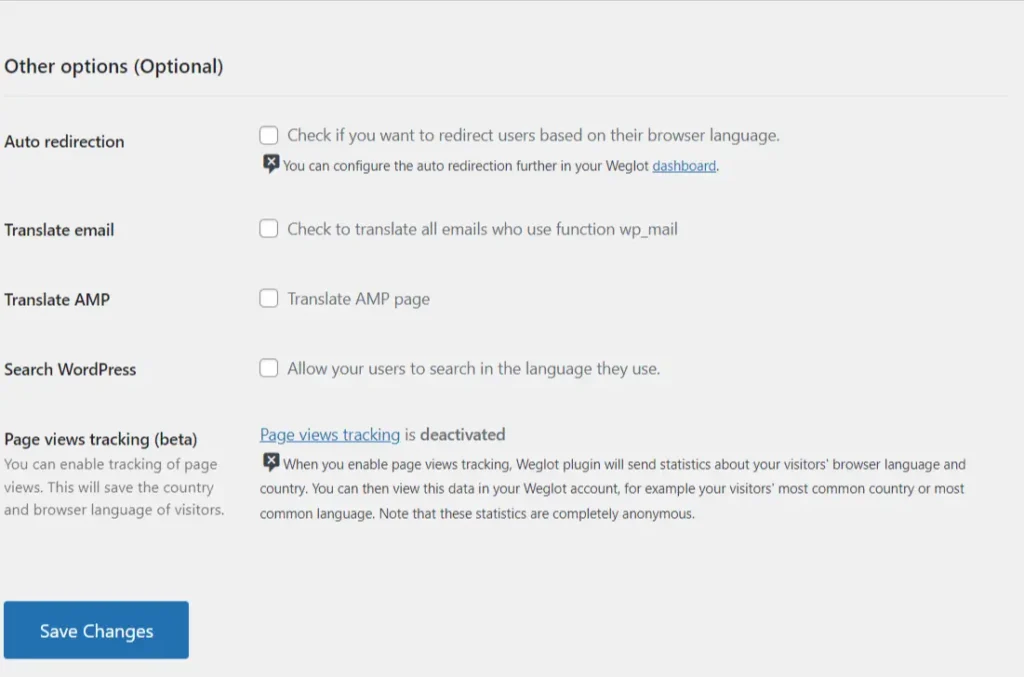
Screenshot 10: Other Options
- Once you have configured the settings, head over to the front end of the website to see the automated language translation in action.
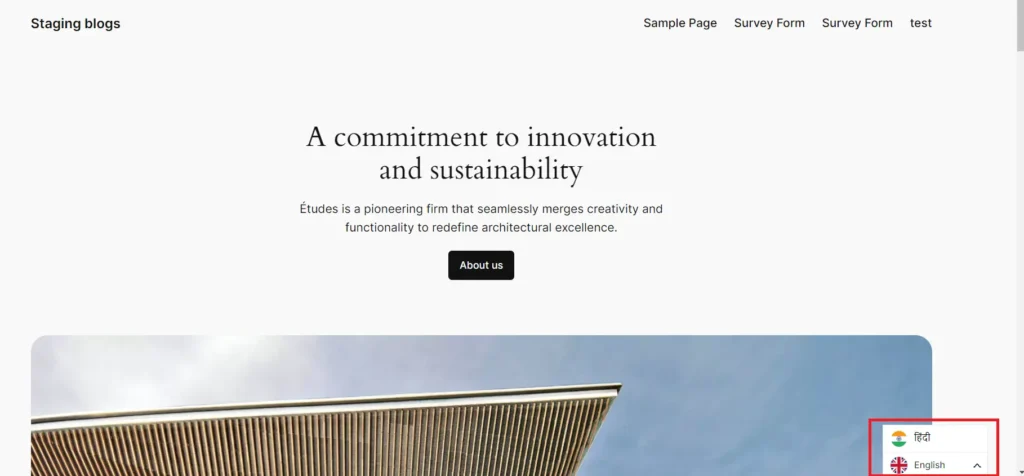
Screenshot 11: Output of Language Selection

Screenshot 12: Output of Translated Website in Hindi
Step 8: Editing Translations
- Once the plugin is configured, click the language switcher on the front end of the website. The Weglot plugin then automatically translates all the text on the website into the destination language selected.
- Sometimes it's required to edit those translations manually. To do that, click on “Edit my translations” button, it will take you to the Weglot dashboard, as shown in the below screenshot (number).
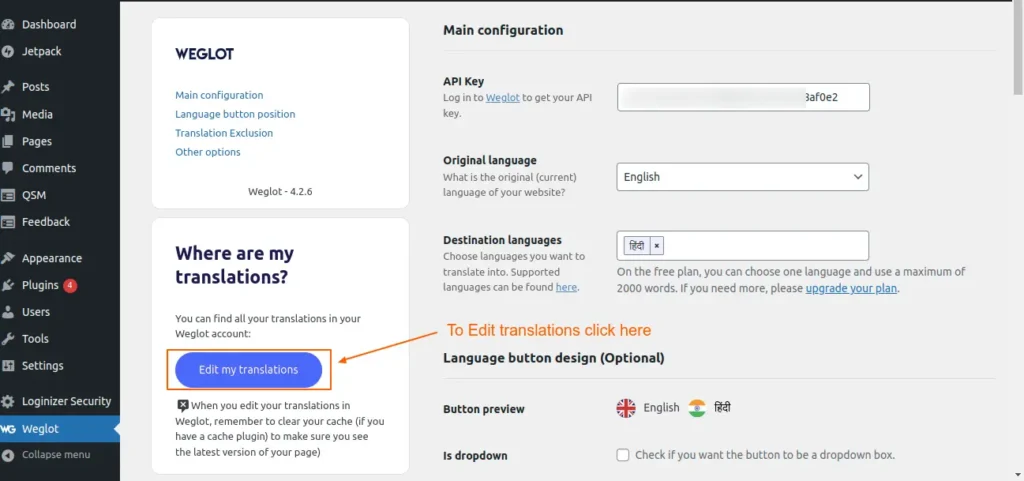
Screenshot 13: Edit translations
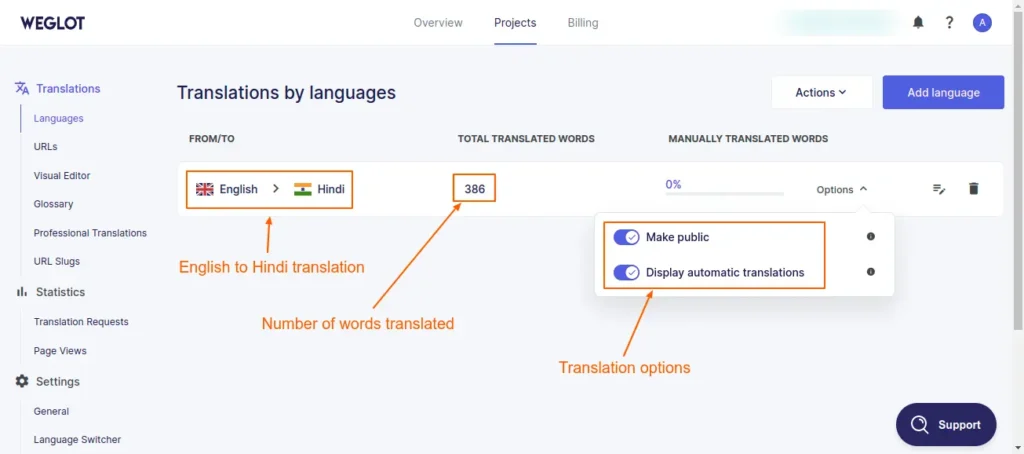
Screenshot 14: Translation by languages (English to Hindi)
- On the Weglot dashboard’s “Translations by languages” screen, we can see the “Total translated words” and “Manually translated words” columns.
- Also, there are two options available, as seen in the above screenshot number. First, we can make the translations public or private. This is helpful if you want the language translations to be private so that only you and your team can view them (by appending “?weglot-private=1” at the end of the URL). This means it won't be visible to search engines or visitors.
- The second option is “Display automatic translations.” If you prefer to show only manual translations on your website rather than automatic translations, switch on this option.
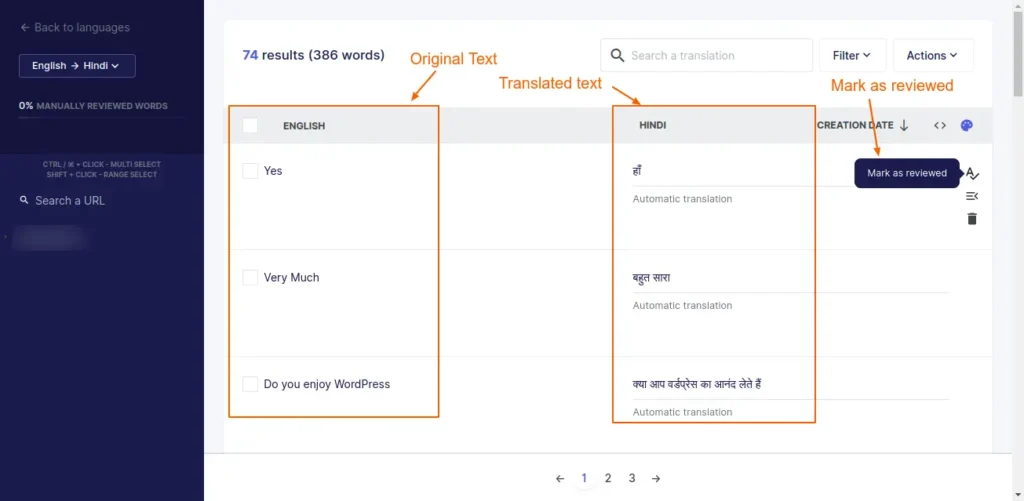
Screenshot 15: Manually edit the translation and mark it as reviewed
Note: All the translations (automated and manual) are stored on the Weglot platform. Only the Weglot plugin settings are stored in the WordPress database.
Conclusion
Making a website that supports multiple languages doesn't have to be complicated when you have Weglot by your side. With this intuitive plugin, you can expand your reach to new markets and engage with people all over the world—without ever having to touch a line of code.
If you want to build a multilingual enterprise WordPress website, connect with us.
WordPress
10 min read
How to choose the best Enterprise WordPress agency for your business
Choosing the best enterprise WordPress agency is crucial for companies looking to make a big online impact in the fast-paced digital world of today. Making decisions might be overwhelming because there are so many organizations fighting for your attention. On the other hand, making the time and effort to locate the ideal fit can pay off well in the end.
Finding a strategic partner who understands your business goals & brand identity and has the competence to execute your vision is key.
The decision to choose an enterprise WordPress firm is a strategic investment in your company's future. To boost your brand's online presence, start by digging deep into your requirements, communicating clearly and openly, and focusing on your research. This way, teaming up becomes a game-changer, making your digital stand out.
Understanding Enterprise WordPress Agency
So, you're diving into the world of enterprise WordPress agencies – it's like stepping into a whole new ball game, isn't it? Let's explore what defines these agencies, how they differ from standard WordPress agencies, and the critical factors to consider when embarking on enterprise-level projects.
What is an enterprise WordPress agency?
Enterprise WordPress agencies are specialized firms equipped to handle large-scale, complex projects for established businesses and organizations. They possess a deep understanding of enterprise-level requirements, including scalability, security, and customization, to accommodate the diverse needs of their clientele.
Characteristic features of enterprise WordPress agencies include:
- Expertise in WordPress development: These agencies boast seasoned developers proficient in leveraging WordPress's extensive capabilities to create highly customized solutions tailored to enterprise clients.
- Robust infrastructure: They employ advanced tools, frameworks, and methodologies to build scalable, high-performance websites capable of handling significant traffic loads without compromising on speed or reliability.
- Focus on security and compliance: Enterprise WordPress agencies prioritize security measures and adhere to industry best practices to safeguard sensitive data and ensure compliance with regulatory standards.
- Strategic consulting: Beyond technical execution, these agencies offer strategic guidance and consulting services to help enterprises maximize their online presence, enhance user engagement, and achieve their business objectives.
Distinction from Regular WordPress Agencies
While both regular and enterprise WordPress agencies share a foundation in WordPress development, they cater to distinct clientele and project scopes.
Regular WordPress agencies primarily serve small to medium-sized businesses and startups, focusing on building foundational websites, blogs, and e-commerce platforms. They may lack the resources, expertise, and infrastructure necessary to tackle enterprise-level projects effectively.
In contrast, enterprise WordPress agencies specialize in addressing the multifaceted requirements of larger organizations with diverse stakeholder needs, intricate workflows, and rigorous security protocols. They possess the scalability, technical prowess, and industry-specific insights required to execute projects of considerable scale and complexity.
Factors To Consider While Choosing An Enterprise WordPress Agency
1. Experience and Expertise
Proven Track Record
An enterprise WordPress agency's track record stands as a testament to its capability and reliability in delivering exceptional results. Businesses can gain valuable insights into an agency's capabilities by looking at past projects and client feedback. This helps them understand how well the agency can handle challenging tasks, meet deadlines, and go beyond what's expected.
A track record of successful implementations demonstrates the agency's proficiency in navigating challenges, adapting to evolving requirements, and delivering tangible value to clients. This history of accomplishment instills confidence and reassures enterprises that their projects are in capable hands.
Portfolio Assessment
A comprehensive portfolio serves as a window into the agency's capabilities, showcasing a diverse range of projects, industries served, and creative solutions implemented. When evaluating an Enterprise WordPress Agency, businesses should scrutinize its portfolio to assess compatibility with their objectives and vision.
A strong portfolio shows off what the enterprise WordPress development company can do – it's all about their range, their knack for coming up with fresh ideas, and how they customize their work to fit what every client needs.
It gives you a peek into their design style, how savvy they are with tech, and just how good they are at using WordPress to get the results they want.
Custom Development and Complex Functionalities
Enterprise-level projects often necessitate custom development and the integration of complex functionalities to address specific business requirements. An adept enterprise WordPress agency should possess the expertise and technical acumen to execute these tasks seamlessly.
Whether it involves integrating curated plugins, third-party systems, or implementing intricate workflows, the agency's proficiency in custom enterprise WordPress development is paramount. By leveraging WordPress's extensibility and flexibility, the agency can create tailored WordPress enterprise solutions that aligns precisely with the enterprise's objectives and operational workflows.
2. Technical Proficiency
Understanding of WordPress Core, Themes, and Plugins
A reputable enterprise WordPress agency must possess a comprehensive understanding of the WordPress ecosystem, including its core architecture, themes, and plugins. The agency excels at utilizing all the features that WordPress provides. They have the ability to develop personalized solutions that perfectly align with the requirements and preferences of enterprises.
From building themes to extending functionality through plugins, the agency's mastery of WordPress empowers them to create visually stunning, user-friendly websites that meet the highest standards of excellence. A thorough grasp of WordPress core ensures that the agency can navigate technical challenges adeptly, implement best practices, and optimize the platform to achieve desired outcomes.
Scalability and Performance Capabilities
Enterprises require websites that can scale seamlessly to accommodate growth, handle increasing traffic volumes, and deliver optimal performance under any circumstances. An enterprise WordPress agency must demonstrate the ability to architect scalable solutions that meet evolving business needs while maintaining exceptional performance standards.
This involves optimizing the codebase, leveraging caching mechanisms, and employing content delivery networks (CDNs) to minimize load times and enhance the user experience.
By keeping scalability and performance in mind from the initial stage, the agency can make sure the website is adapting to the new requirements and changes. This way, users always get a smooth, high-quality experience.
Security Best Practices
For anyone investing in WordPress development for enterprise, security's not just important—it's at the top of the list. Implementing security practices isn't optional, it's a must. An Enterprise WordPress Agency must employ robust security measures to safeguard against cyber threats, data breaches, unauthorized access, and much more.
This entails implementing industry-standard security protocols, regular software updates, encryption techniques, and proactive monitoring to mitigate risks effectively. Starting with security in mind right from the development process itself, the agency puts its clients at ease. It's all about safeguarding those precious assets and keeping enterprise clients’ online identities solid and secure.
3. Scalability
Ability to Handle Large Databases
Dealing with a large amount of data is a common challenge for enterprises. Therefore, they require robust systems and efficient information management solutions at scale. An Enterprise WordPress Agency must demonstrate proficiency in handling large databases efficiently, ensuring optimal performance, data integrity, and scalability.
The performance and speed optimization of the database is our primary concern in this context. To accomplish this, intelligent strategies need to be implemented, including database optimization, efficient query execution, and the utilization of caching mechanisms.
We maintain optimal database configuration and management practices, enabling us to process increasing volumes of data for our clients without impeding operations. Thus, everything operates efficiently and promptly.
Experience with High-Traffic Websites
Websites that get a ton of visitors have their own set of challenges. We're talking performance, reliability, and making sure they can grow without a hitch. An experienced Enterprise WordPress Agency should have a proven track record of managing websites that attract substantial traffic volumes without compromising speed, uptime, or user experience.
By using a mix of caching, CDN (content delivery network), and load balancing, the traffic on the website can be handled more efficiently. The enterprise agency should be an expert at creating systems that can handle loads of traffic without breaking a sweat. So, even when the site gets super busy, users can still navigate smoothly and enjoy their experience.
Handling Complex Integrations
Enterprises rely on various systems, applications, and third-party services to streamline their operations, enhance productivity, and deliver value to customers. An adept Enterprise WordPress Agency should possess the expertise to integrate WordPress seamlessly with these complex ecosystems, ensuring interoperability, data synchronization, and workflow automation.
When it comes to connecting different systems like CRM platforms, online stores, payment gateways, or tools for automated marketing, the agency must be good at handling these complex integrations.
By leveraging APIs, web services, and custom integration solutions, enterprises can facilitate seamless data exchange and streamline business processes for enhanced efficiency and productivity.
4. Support and Maintenance
Post Launch Support Services
After the grand unveiling of your enterprise website, the journey doesn't end there; it's just getting started. A top-notch agency understands this and extends a reassuring hand of post-launch enterprise support for WordPress services.
Whether it's minor tweaks to enhance performance or guidance on utilizing new features effectively, having an expert team ready to assist ensures your digital presence remains dynamic and robust.
Ongoing Updates and Security Patches
Technology evolves, and so do the tactics of those with malicious intent. This is why ongoing updates and the application of security patches are a must.
A reputable agency makes it a top priority to keep your website up-to-date and secure from potential risks. This proactive strategy not only strengthens your website's defenses but also guarantees that it takes advantage of the newest advancements and enhancements, helping you stay ahead in the competitive online landscape.
Prompt Issue Resolution
In today's world, things move quickly, and everyone's time is crucial. The perfect WordPress Enterprise agency understands this well—they don't just talk about it; they live it.
With a committed team ready to assist you, problems get spotted and fixed promptly. This helps keep your online activities running smoothly, with minimal interruptions. Such quick responses not only make your website more dependable but also reassure you that your online presence is being taken care of by WordPress experts.
5. Communication and Project Management
Transparent communication
Imagine working with a team that makes you feel like you're part of the process every step of the way. That's the hallmark of transparent communication. It's about open dialogues, where your ideas, concerns, and feedback are not just welcomed but are considered pivotal.
A standout Enterprise WordPress development agency practices clarity from the get-go, setting the tone for a collaborative partnership. Being transparent builds trust, thus ensuring that you're never left guessing about your project's status.
Regular Progress Updates
Staying informed is critical in the project development process. You must constantly monitor the status of your project. Regular updates provide a snapshot of your website's evolution, keeping you current on its state.
The right agency doesn't keep you waiting or wondering; instead, they proactively share updates, celebrate milestones, and discuss the next steps. These updates aren't just to keep you in the loop; they're also an invitation for your thoughts and feedback.
Agile Project Management Processes
When you're selecting a WordPress Enterprise Agency, make sure their team maintains effective communication and follows an agile project management process.
Here's a breakdown of the project management process,
- Initiation: This is where the project kicks off. You discuss your goals, requirements, and expectations with the agency. They gather information to fully understand the scope of the project.
- Adaptive Planning: Agile projects embrace change; hence, agile teams prioritize delivering the highest value features first and adjust their plans based on feedback and changing priorities. The project is broken down into small, manageable tasks organized into sprints or iterations, timelines are set, roles and responsibilities are defined and resources are allocated.
- Execution: This is the hands-on phase. The agency starts developing your WordPress site, implementing designs, writing code, and integrating functionalities. Regular communication is key here to ensure everything stays on track.
- Monitoring and Controlling: Throughout the project, the agency keeps a close eye on the progress made. They track milestones, conduct regular reviews, and address any issues that arise promptly. Agile methodologies emphasize continuous improvement and flexibility, allowing for adjustments as needed.
- Project Deployment: Once the WordPress site is developed and tested, it is ready to go live. The agency ensures all deliverables meet your requirements, conducts final testing, and prepares for deployment.
- Post-Project Review: After the site is launched, there's still work to be done. The agency gathers feedback, evaluates the project's success, and identifies areas for improvement, if any. This assists in shaping future projects and maintaining continuous client satisfaction.
Conclusion
As you embark on the pivotal decision of choosing the right WordPress EnterPrise Agency, remember that the best partnerships are built on transparency, collaboration, and a shared commitment to excellence.
Choosing an agency that resonates with your organization's values and goals is integral to not just meeting but exceeding the expectations of your digital initiatives. The right WordPress Enterprise agency becomes an extension of your team, a collaborator who is as invested in your success as you are.
If you are looking for enterprise WordPress development services then look no further Connect with our experts.
Tutorials
8 min read
How to Create a Survey in WordPress Using Quiz and Survey Master Plugin
Capturing the attention of your target demographic while simultaneously collecting useful data is a must in the modern digital era. Any content producer or business owner's toolbox should include surveys since they provide a direct route to understanding your audience's preferences, wants, and opinions.
You can engage your audience on a deeper level and empower them to make well-informed decisions by adding surveys to your WordPress site. Using the powerful capabilities of the Quiz and Survey Master plugin, this tutorial will show you how to implement surveys in WordPress.
Note: The Quiz and Survey Master plugin as the name suggests, can be configured for conducting quizzes and surveys. This article discusses the configuration of surveys only.
Step 1: Install and Activate the Plugin
- Log in to your WordPress dashboard.
- Navigate to Plugins > Add New.
- In the search bar, type “Quiz and Survey Master”.
- Once you find the plugin, click on Install Now.
- After installation, click Activate to enable the plugin on your WordPress site.
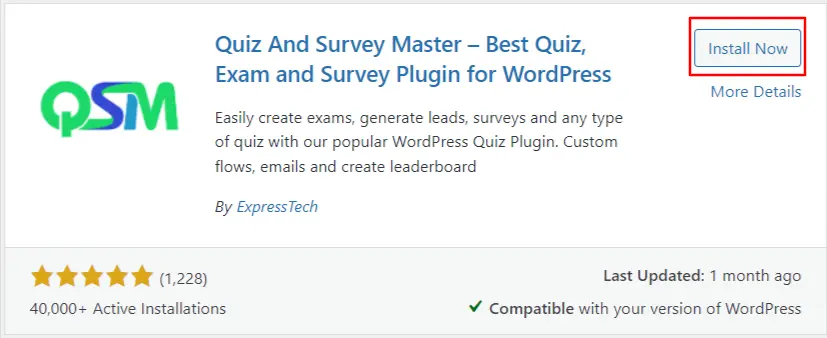
Screenshot 1: Install the Quiz and Survey Master Plugin
Step 2: Create a New Survey
- Go to QSM > Quizzes/Surveys in your WordPress dashboard.
- Click on the Create New Quiz/Survey button.
- Enter a name for your survey in the Quiz Name/Survey Name field.
- Optionally, you can add a description of your survey.
- Click Create Quiz/Survey to proceed.
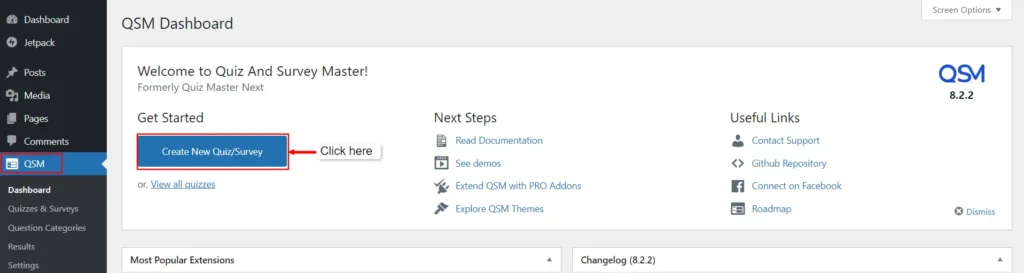
Screenshot 2: Click on ‘Create New Quiz/ Survey’
- Select the theme for which you want to create your quiz/ survey. There are also paid themes available to choose from.
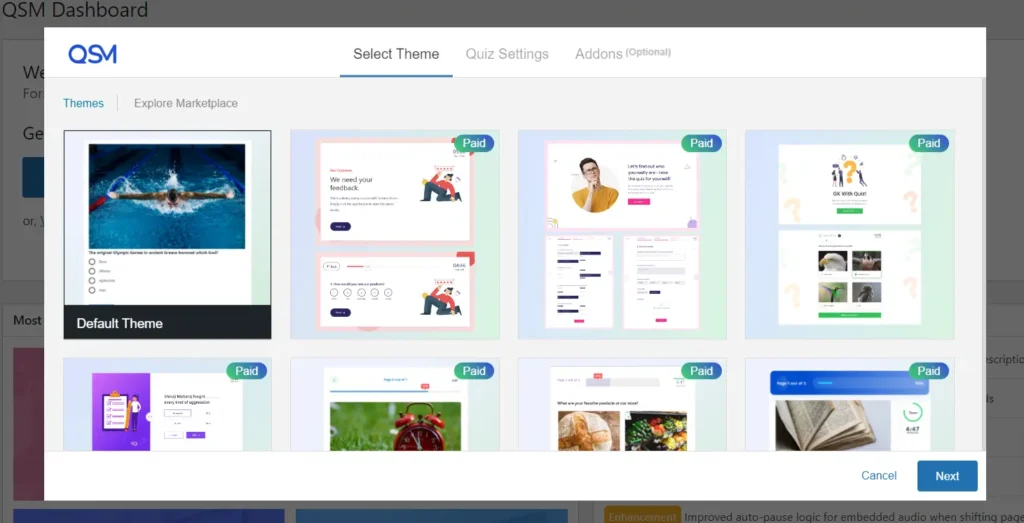
Screenshot 3: Select Theme
- After selecting your theme, you must enter Quiz Settings' details.
- Select the form type Survey to create a survey. This is an important step for creating and configuring surveys
- Further options, such as enabling a contact form, setting a Time Limit, requiring user login, enabling a comment box, and others, are set to “No” by default. You can choose “Yes” or options that fit your requirements.
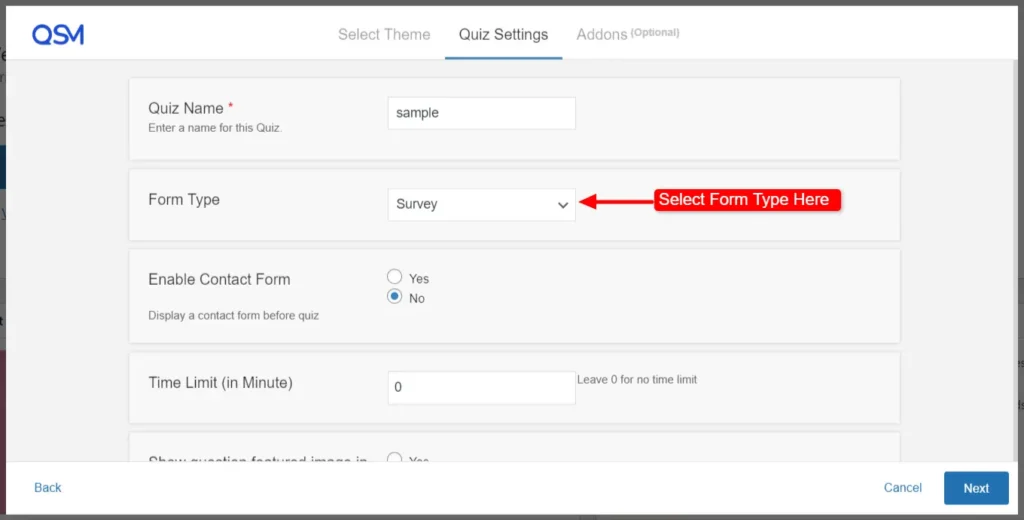
Screenshot 4: Enter the Quiz Settings Details
- You can choose other add-ons such as Quiz Navigator, Quiz Protector, Advanced Question Types, and many more. These add-ons come with an additional price, which can be viewed by clicking on View Details.
- Click on Create Quiz to proceed further.
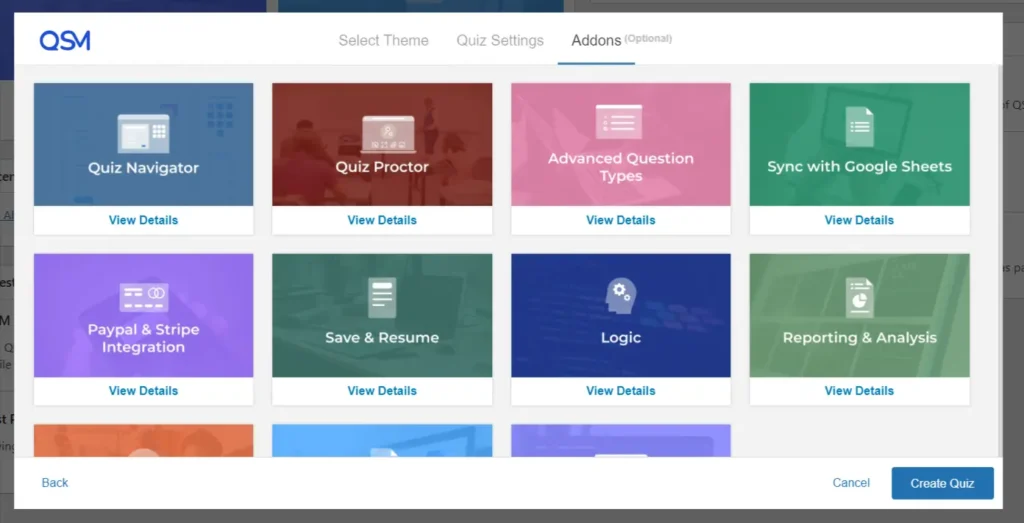
Screenshot 5: Choose add-ons (optional)
Step 3: Add Questions to Your Survey
- After creating your survey, you'll be redirected to the Questions tab.
- Click on ‘Type Your Question Here’.
- Code tags in question descriptions can display HTML, CSS, and JS code snippets. Using code snippets prevents the system from executing the code and interfering with the website's code.
- The WordPress Visual editor lets you add photos, audio, video, documents, spreadsheets, and more from your Media Library and customize the Question using formatting options. Click the Text tab on the editor to add your question in HTML.
- Choose the question type from the dropdown menu on the right side (e.g., Multiple Choice, True/False, Open Answer).
- Enter the question in the Question text area.
- Feed the answers to your questions. Answers depend entirely on the Question Type.
- Set additional parameters for the question, such as required answers or hints.
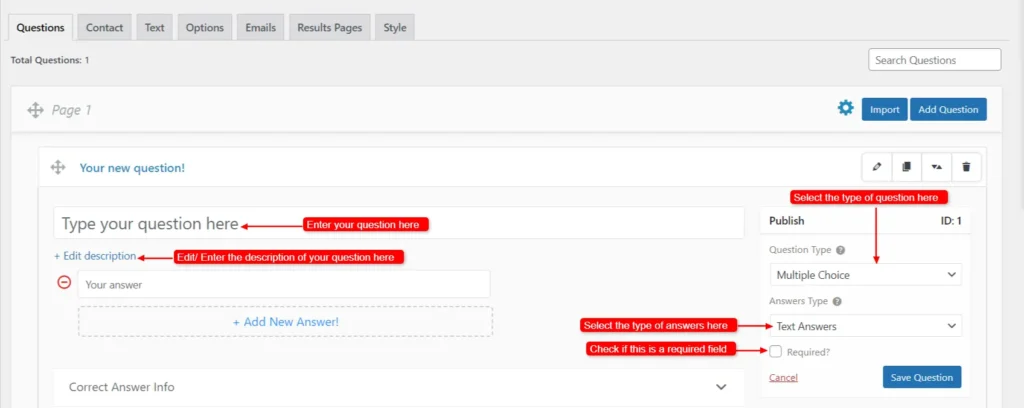
Screenshot 6: Questions Tab: Enter your Questions
- You can also feed information for correct answer info, the type of comment box you want, and add a Hint if you want. At the end of the quiz, the user can receive a thorough explanation of the correct answer through the correct answer info block. The results page shows the right answer.
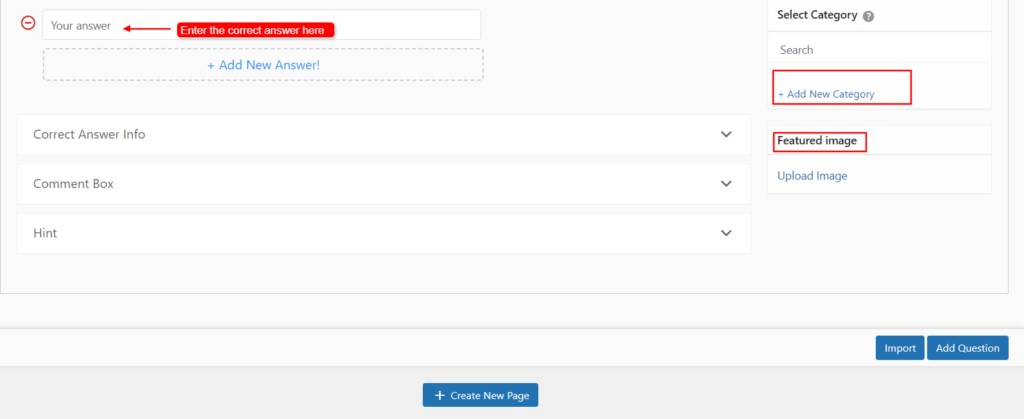
Screenshot 7: Select various fields
- Set the featured image if you require it.
- You can Add a new category for your questions too.
- Click Save Question to add it to your survey.
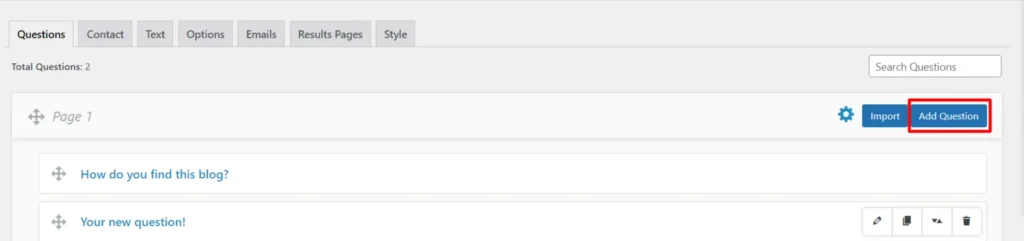
Screenshot 8: Click on Add New Question
- Click on Add Questions and repeat these steps to add more questions to your survey.
- Clicking the “Create New Page” option at the bottom of the question tab generates a new page for questions and responses. A quiz/survey with numerous question pages will show Next & Previous buttons to switch between pages.
Step 4: Gathering User Information
- After setting up the questions and answers, create a contact form to collect user contact information or other details before or after taking the quiz/survey.
- Go to the Contact tab.
- Enable the field and enter the Label Name.
- Choose the Form Options according to when you want to display the form.
- Click on Save Form.
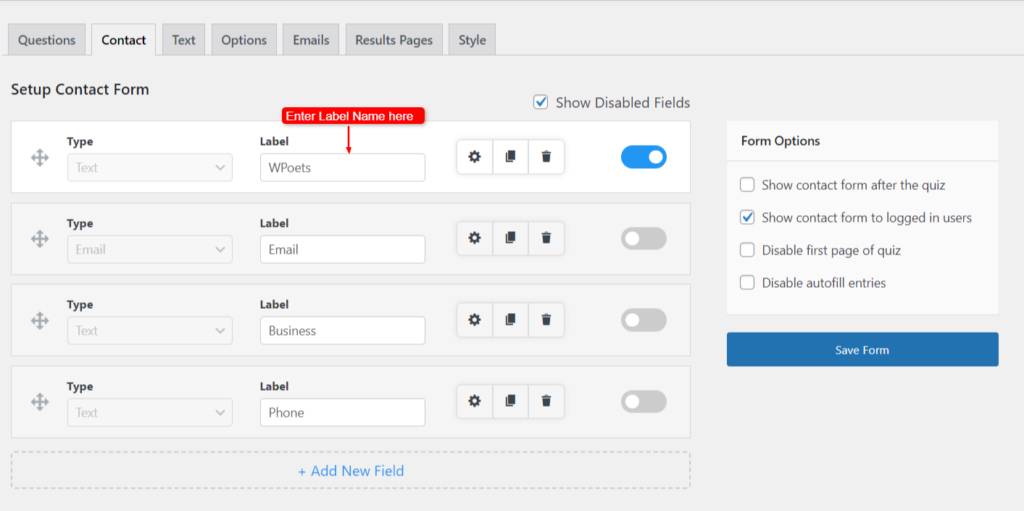
Screenshot 9: Gather User Information Through Contact Form
Step 5: Editing Text Sections
- Once we have some quiz questions, we can alter some of the text users will see and interact with.
- Go to Text tab.
- The text tab is divided into 3 subtabs:
- General: You can choose from several different messages in this drop-down menu.
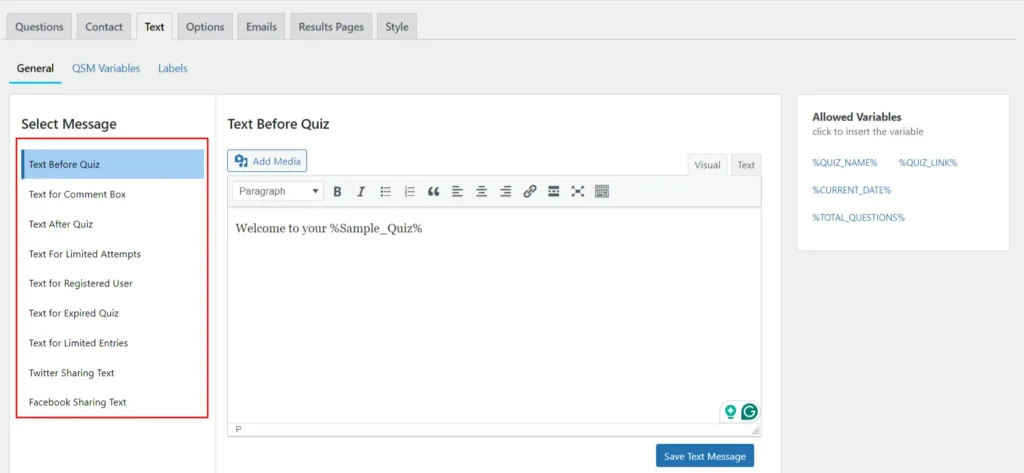
Screenshot 10: Text > General Tab
- QSM Variables: This includes factors that have already been set for the Results Page and Email Pages.
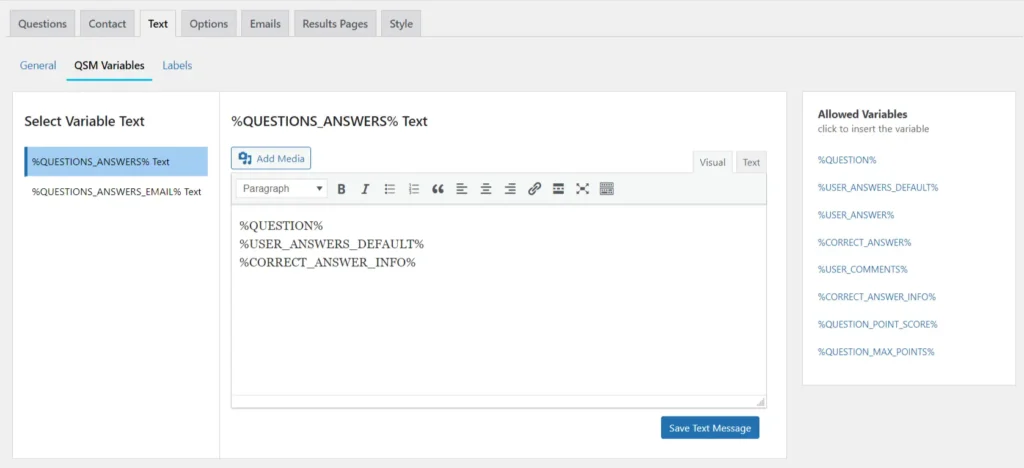
Screenshot 11: Text > QSM Variables Tab
- Labels: Some Label options let you change things like the “Validation Messages” and the “Default Text” shown on the Quiz Navigation Buttons.
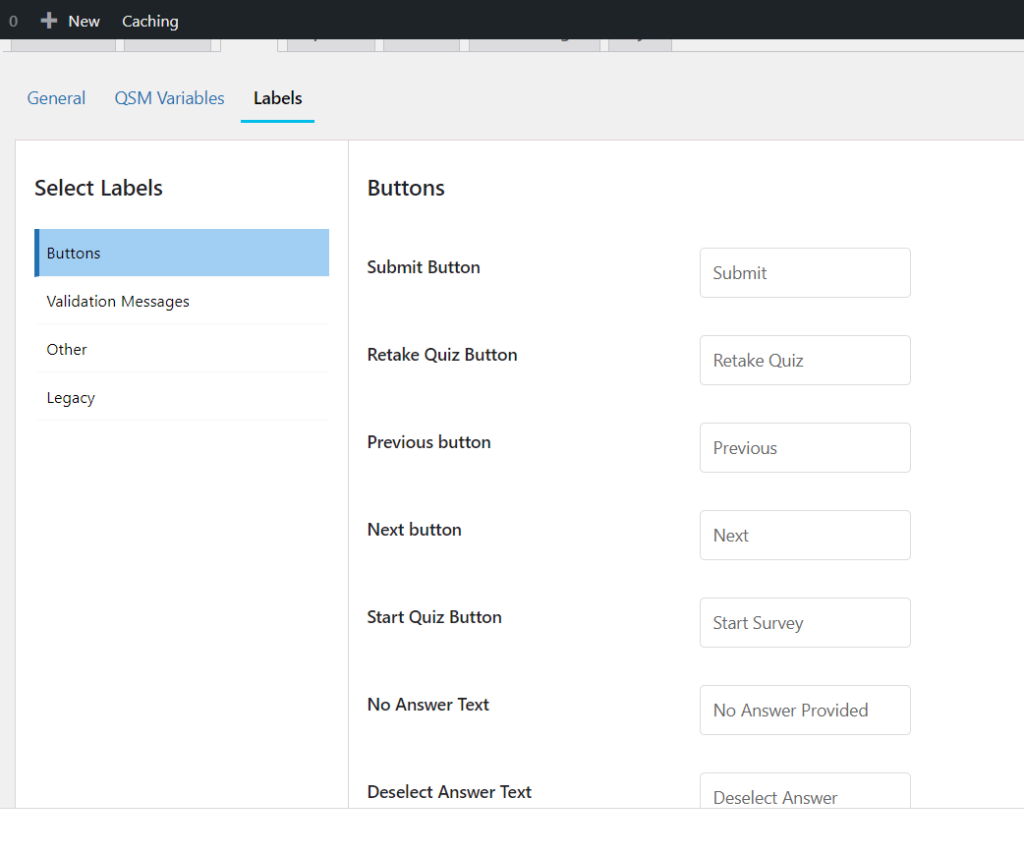
Screenshot 12: Text > Labels Tab
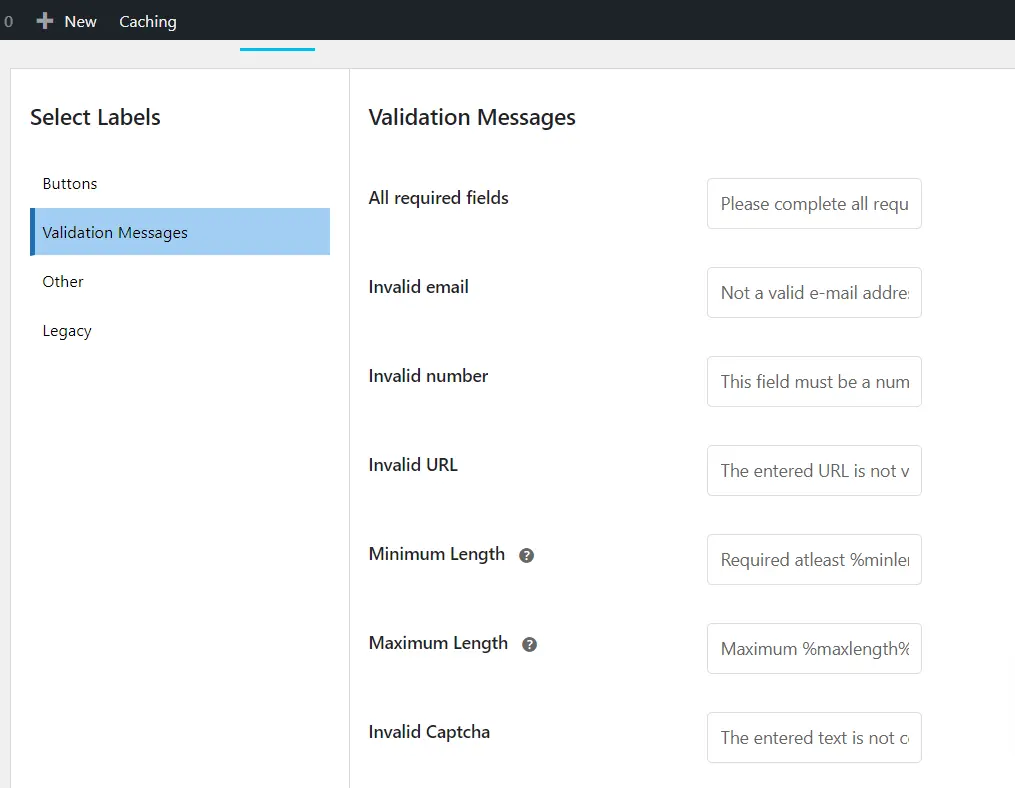
Screenshot 13: Text > Validation messages Tab
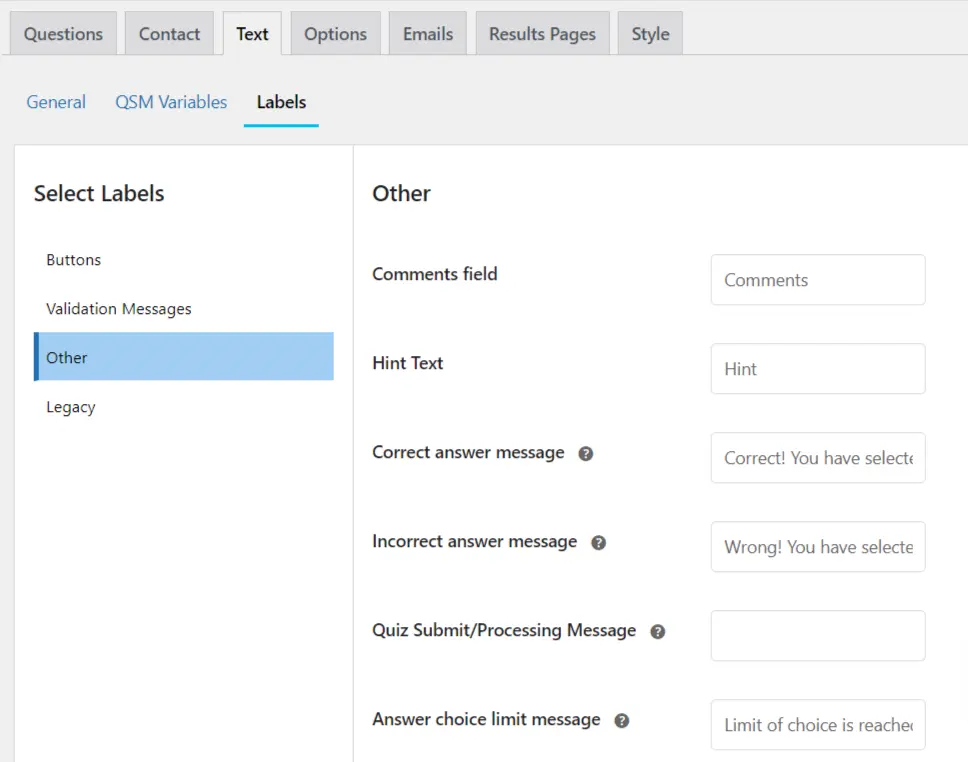
Screenshot 14: Text > Other Tab
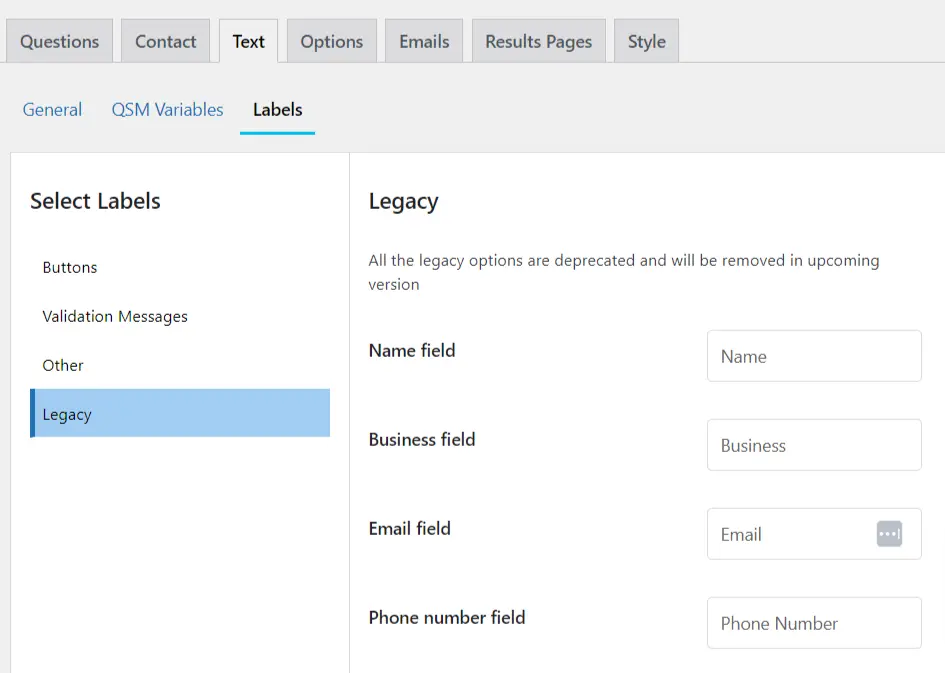
Screenshot 15: Text > Legacy Fields Tab
Step 6: Basic Settings in the Options Tab
- It's time to change the choices now that we've added our questions and written some text.
- Go to the Options Tab.
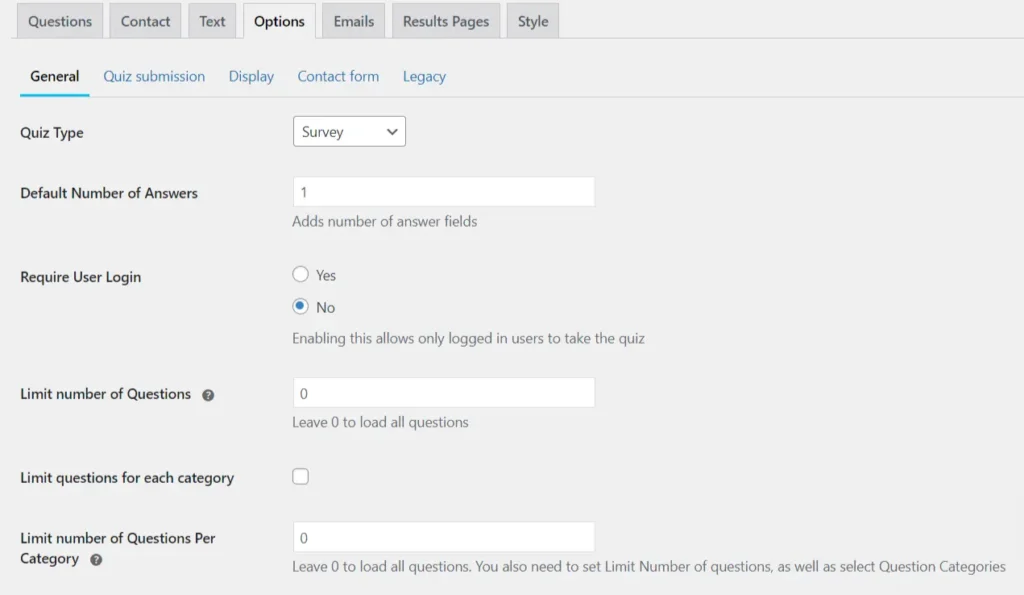
Screenshot 16: Options > General Settings Tab
- This tab involves various settings that fall under the categories as follows: General, Quiz Submission, Display, Contact Form, and Legacy.
- These are basic settings that allow you to select quiz type, set how to display results, set the position of the contact form, set what information to gather from users, etc.
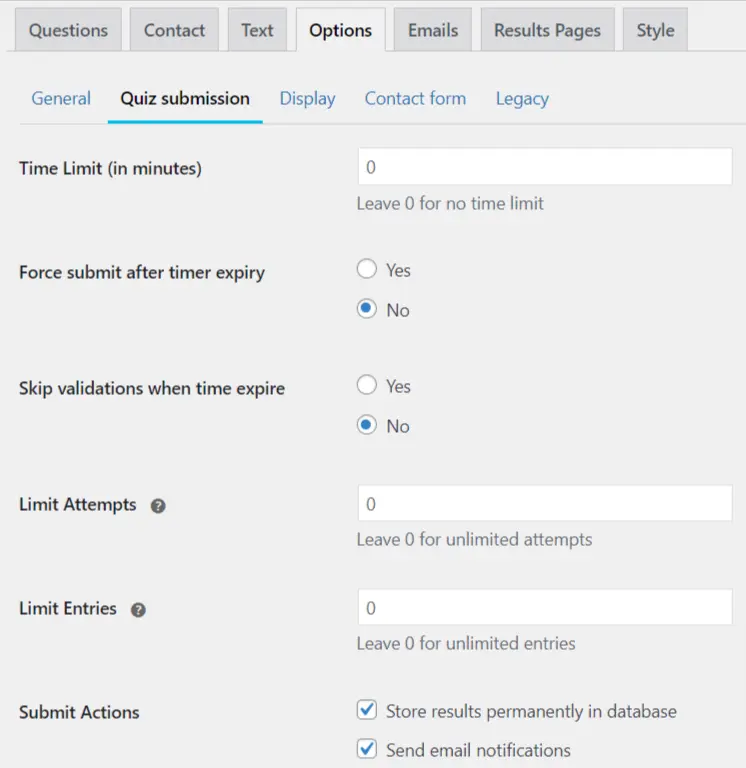
Screenshot 17: Options > Quiz Submission Settings
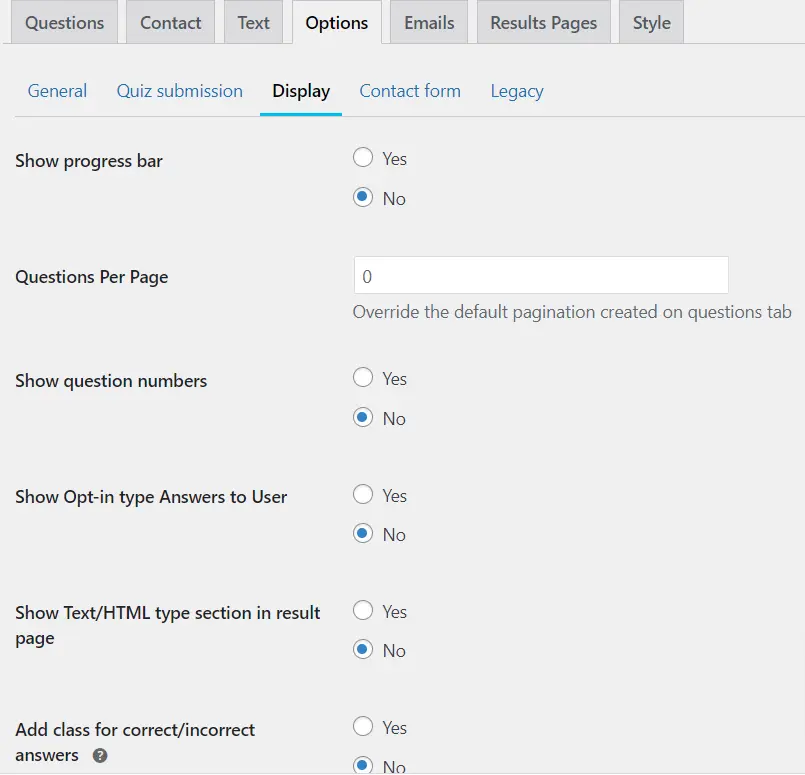
Screenshot 18: Options>Display Settings
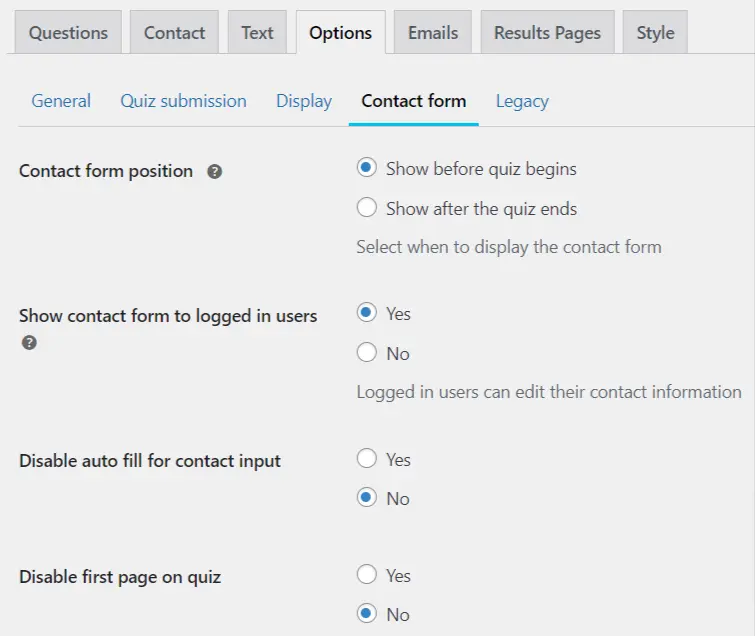
Screenshot 19: Options> Contact Form
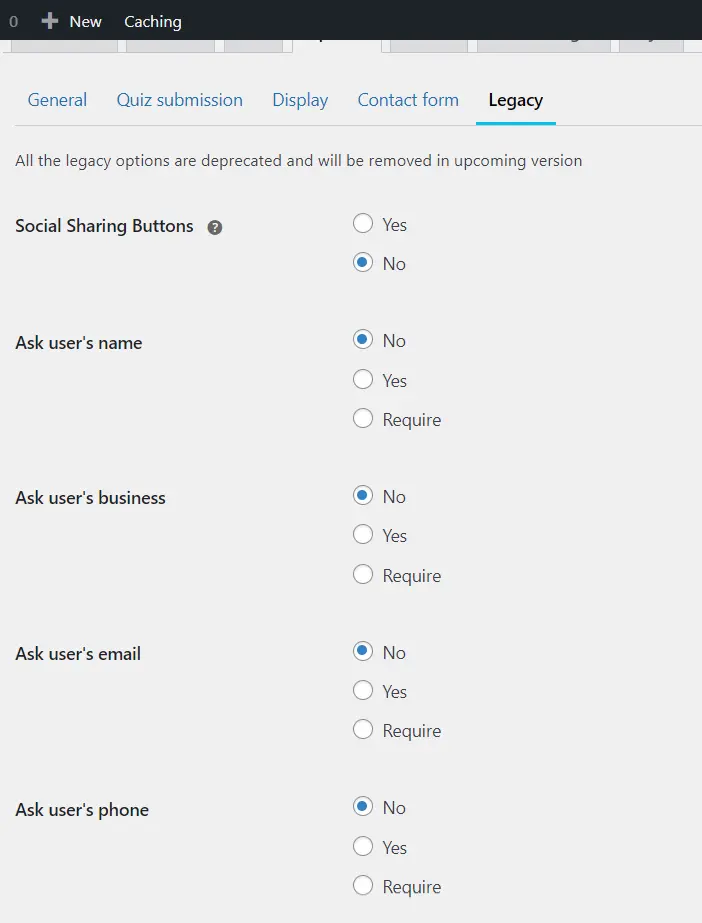
Screenshot 20: Options> Legacy Settings
Step 7: Setting up Emails
- After users submit the surveys, you may need to send them emails with their answers.
- Go to the Emails Tab.
- We can run a function with Template Variables.
- Click on Insert Template Variables at the bottom-right.
- Clicking the button opens a window with all the Template Variables you can use to send emails. These variables start a task when used.
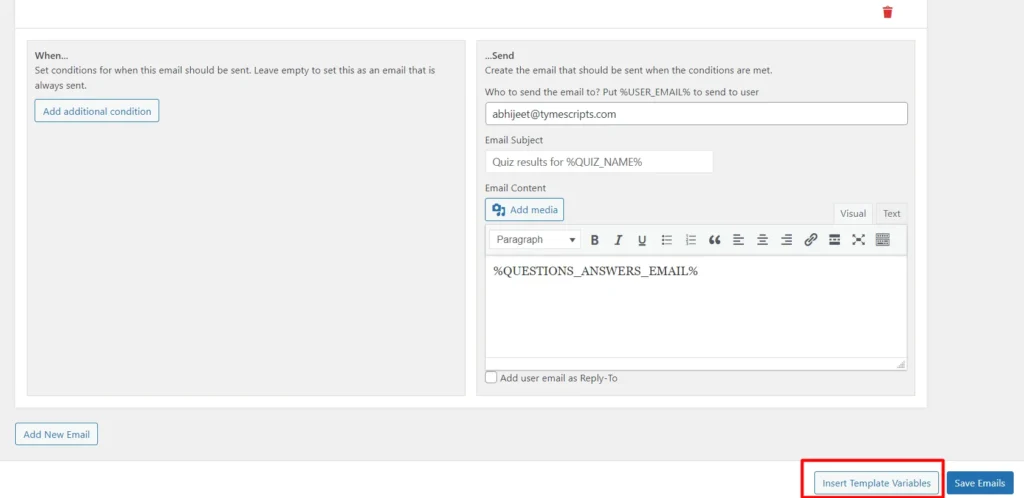
Screenshot 21: Click on Insert Template Variables
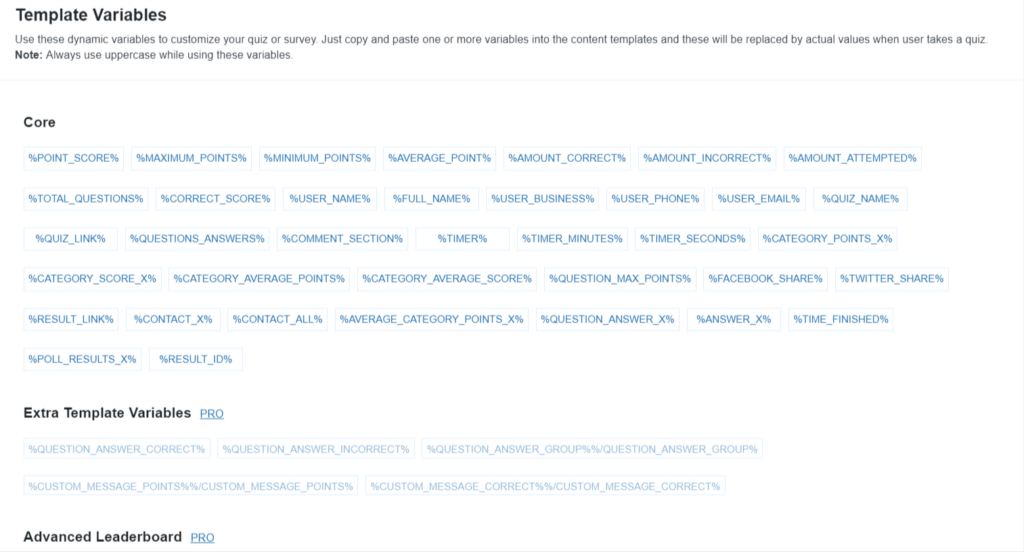
Screenshot 22: Email Template Variables
- Click on the Variable you need. It gets copied automatically, and you can paste it into the email text section. Customise and add variables to improve the email experience. %QUESTIONS_ANSWERS_EMAIL% is set by default.
- To add extra content, use template variables in the Email Body to include Amount Correct, User Name, Points Scored, Average Category Points, Correct Score, Category Points, Category Average Points, Quiz Name, and more.
- Click on Add Additional Condition to add more conditions to your email.
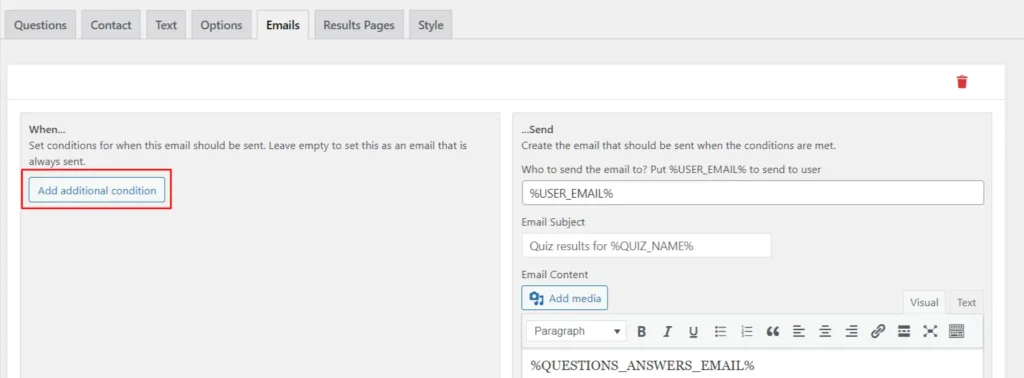
Screenshot 23: Additional Condition for Email
Step 8: Result Page Settings
- This page is shown after the user submits the survey.
- This is quite similar to the Emails page we’ve seen earlier.
- Go to the Results tab.
- We can run a function with Template Variables.
- Opening the Results Tab, the Insert Template Variables button appears in the bottom-right corner.
- Once you click the button, a new window appears with all the Template Variables you may use to configure quiz results. These variables start a task when used.
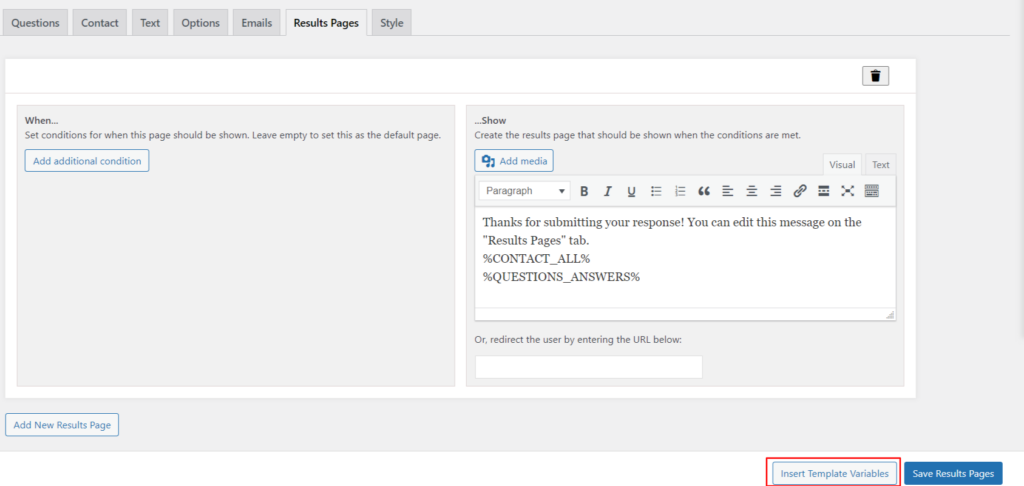
Screenshot 24: Insert Template Variables for Results Page
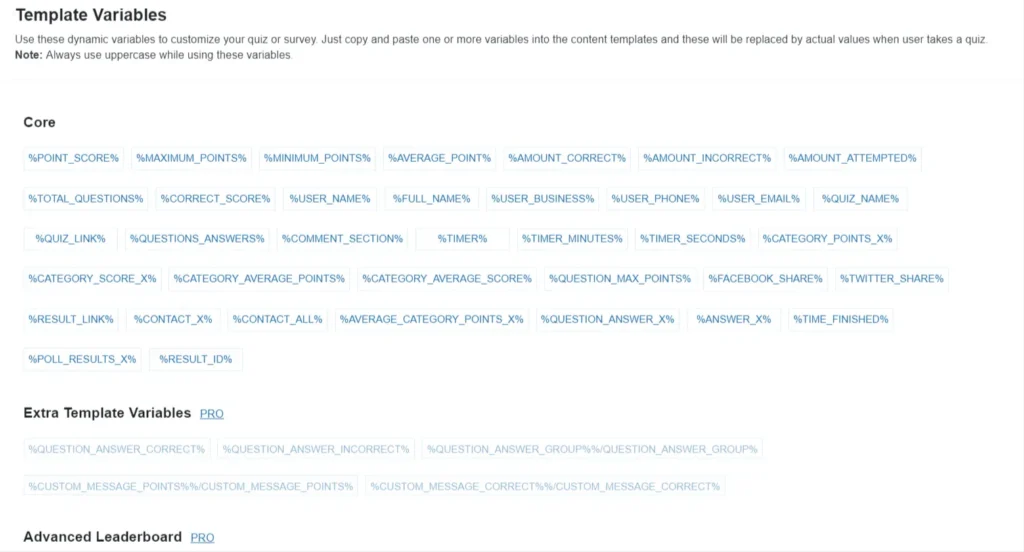
Screenshot 25: Template Variables in Results Page
- Navigate to the Conditions section on the QSM Results Page.
- Click on the "Category Name" drop-down menu.
- Select the desired category from the options listed.
- Choose between "Total points earned" or "Correct score percentage" from the available options.
- Select a condition to apply to the output display.
- This allows you to showcase various outputs tailored to users whose results meet the specified category criteria.
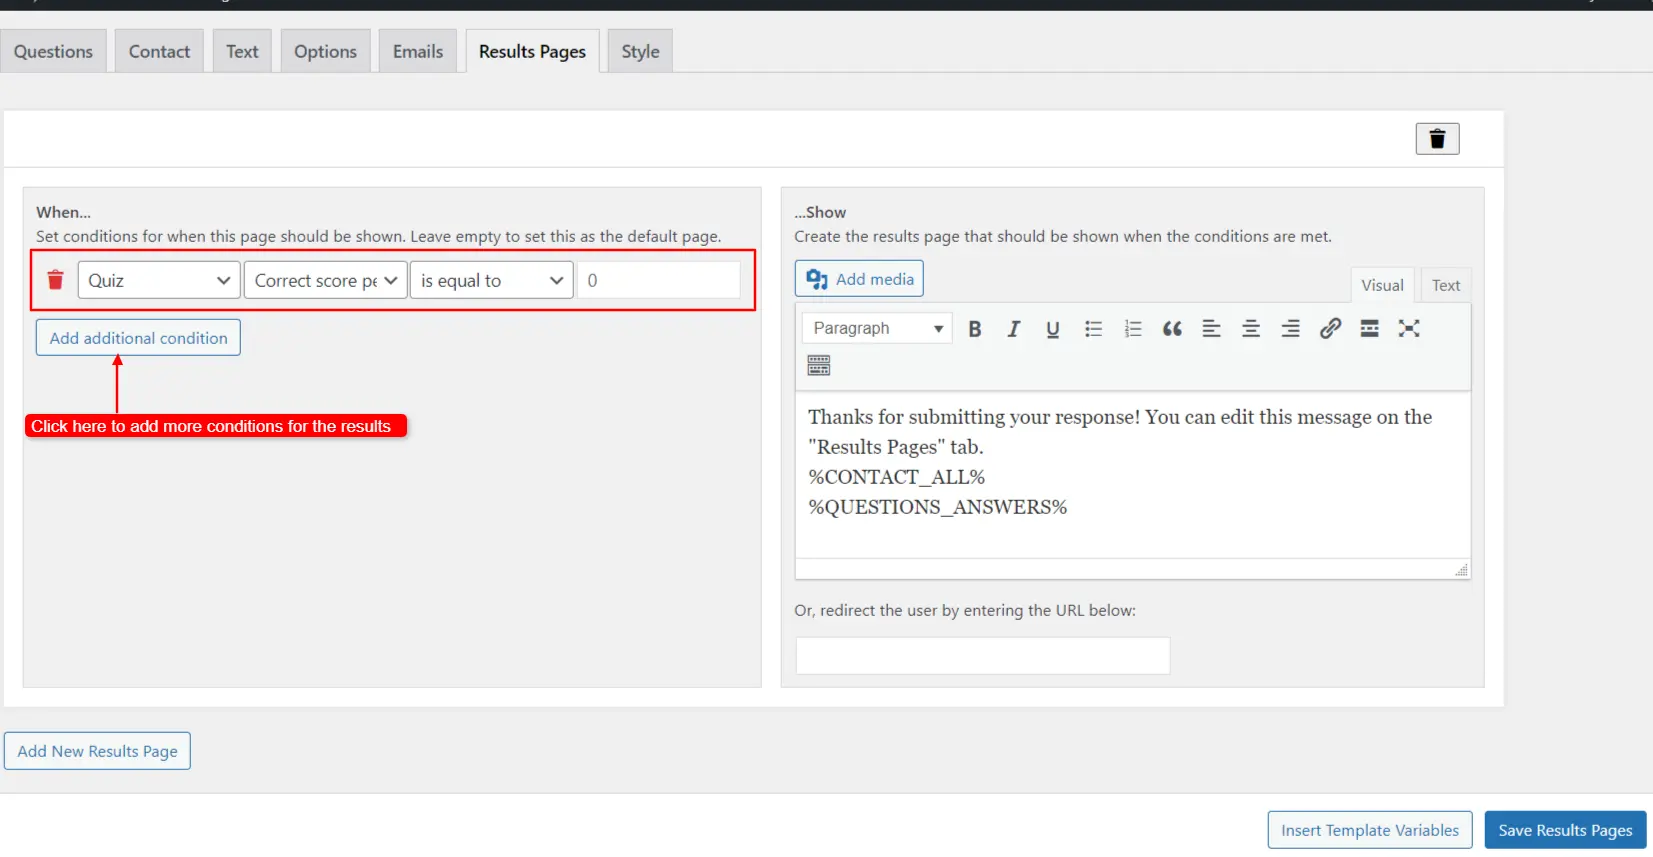
Screenshot 26: Adding Additional Condition in the Results Page
Step 9: Styling Your Survey
- The Style tab is designed to help users customize the appearance of their quizzes and surveys.
- Select the Theme you want for your survey from the Themes section.
- You can add Custom CSS to customize your survey.
- The Legacy section will soon be removed from the plugin as specified in the screenshot below.
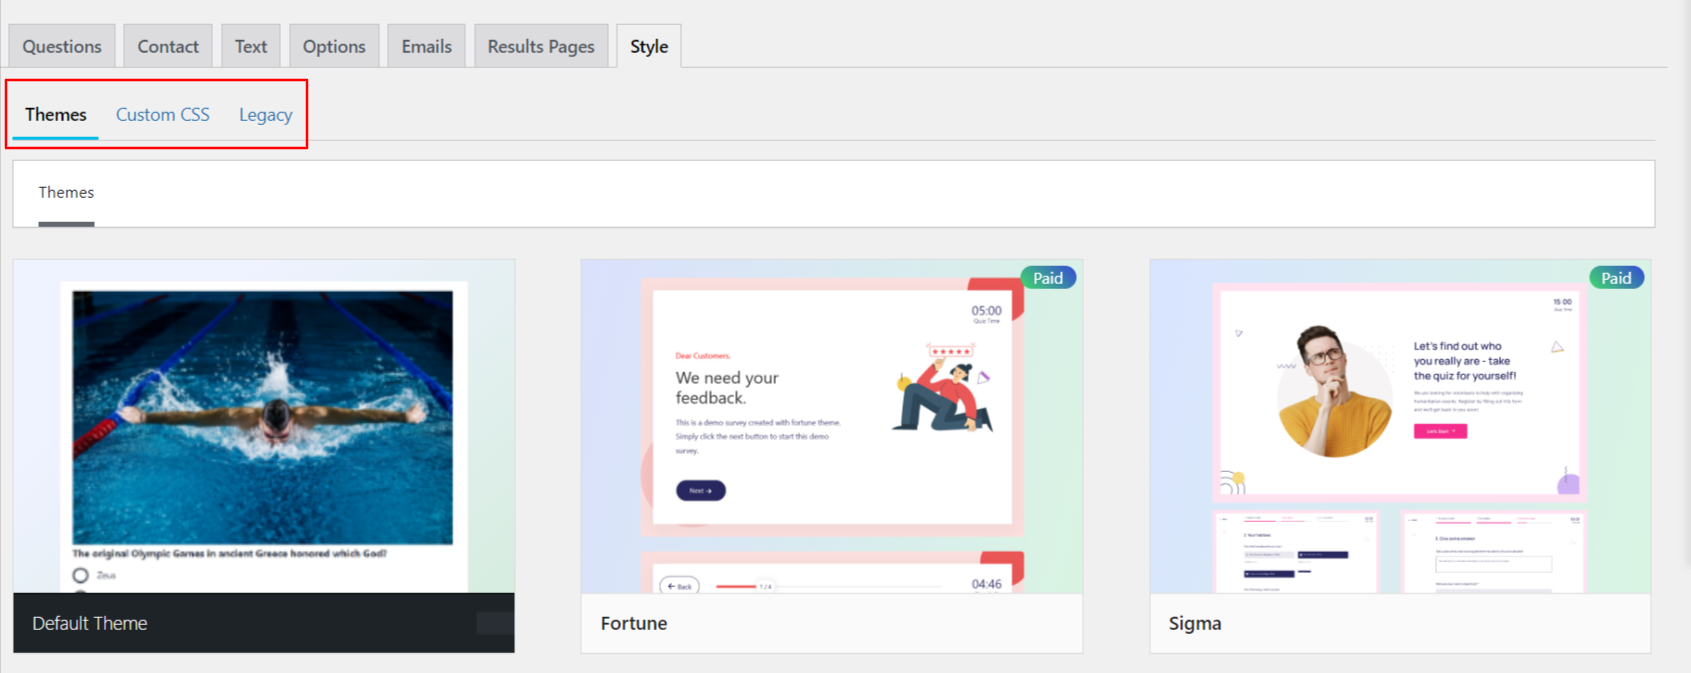
Screenshot 27: Styling Your Survey>Selecting Theme
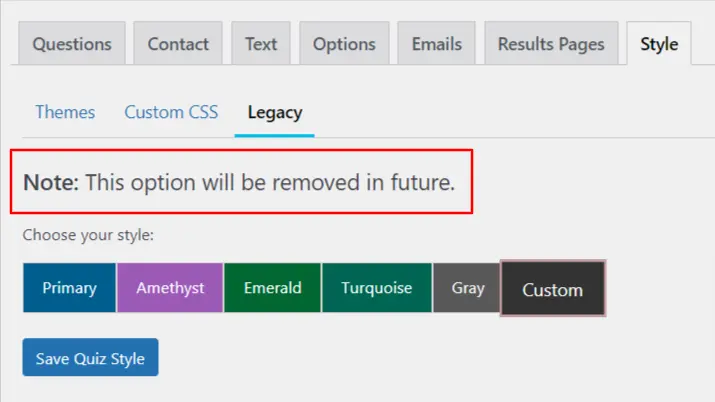
Screenshot 28: Legacy Section to be Removed
Step 10: Adding Survey to your Website
There are three ways to add a survey to your website:
- By Pasting Shortcode on Page/Post
- Copy the shortcode from QSM > Quizzes/Surveys > Shortcode. Paste it into your page or post. The shortcode displays the survey or provides a link to it.
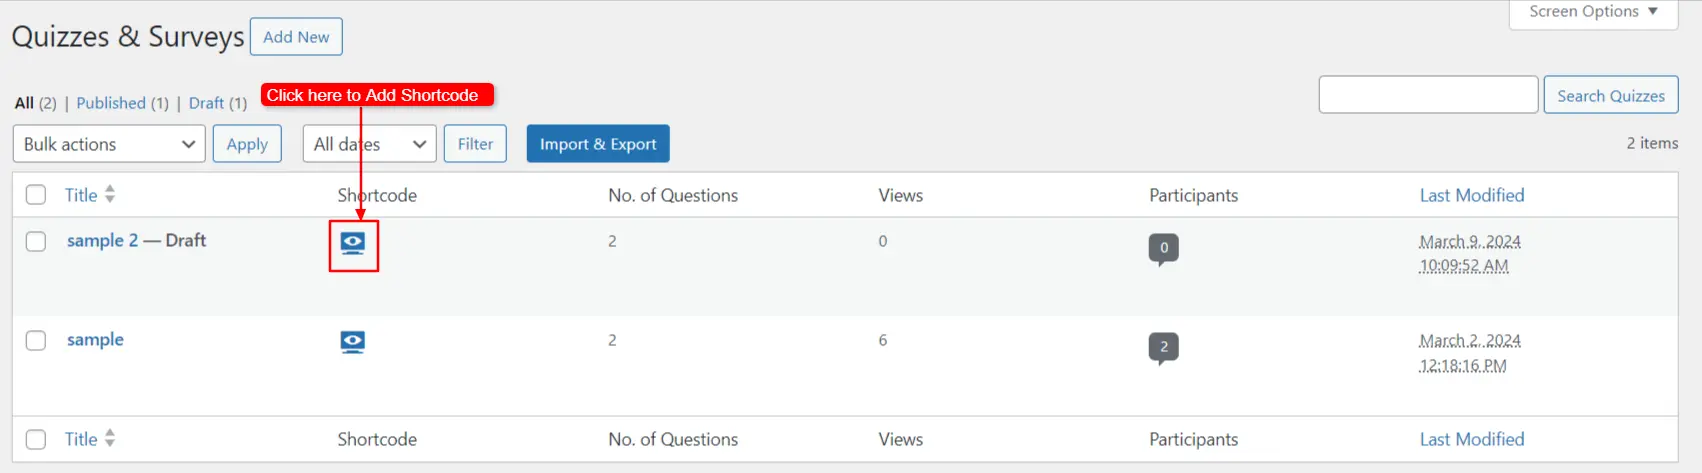
Screenshot 29: Click to Add Shortcode
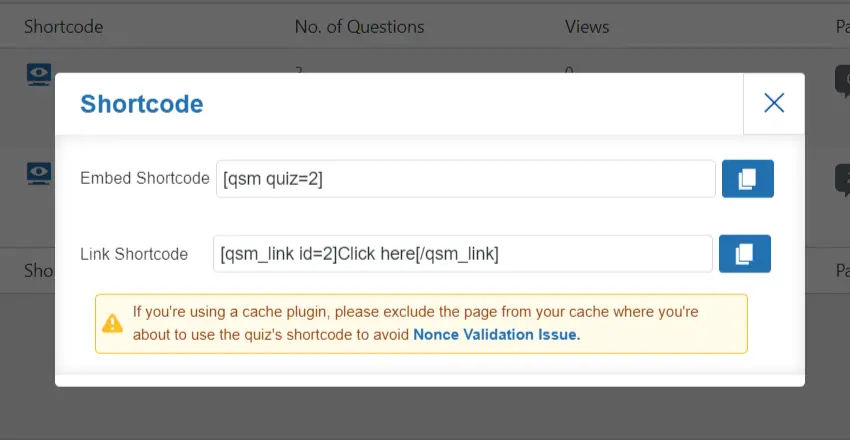
Screenshot 30: Embed the Shortcode
- By Using Gutenberg Block
- Insert the quiz or survey on a page or post with the Gutenberg editor by searching for the “QSM Block”. Select your Quiz/Survey ID from the dropdown in block settings and update.
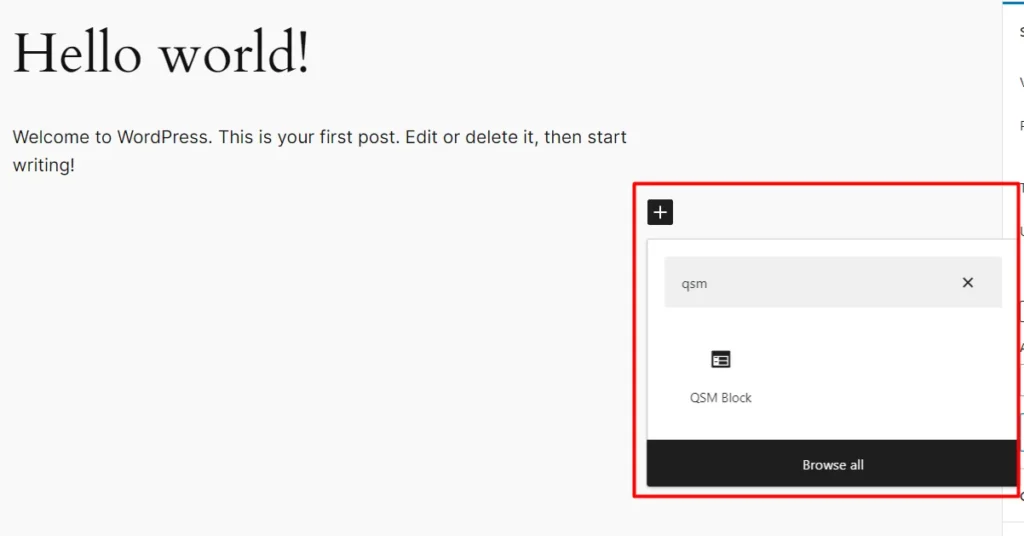
Screenshot 31: Add Survey Through Gutenberg Block
- Now, you can select the survey to be added from block settings.
- Click on Update to add the survey to your website.
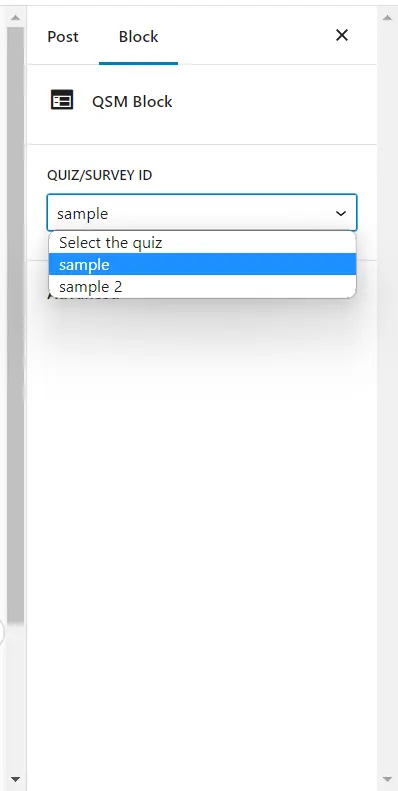
Screenshot 32: Selecting Survey from Block settings
- Click on View Post to view the survey embedded in your post.
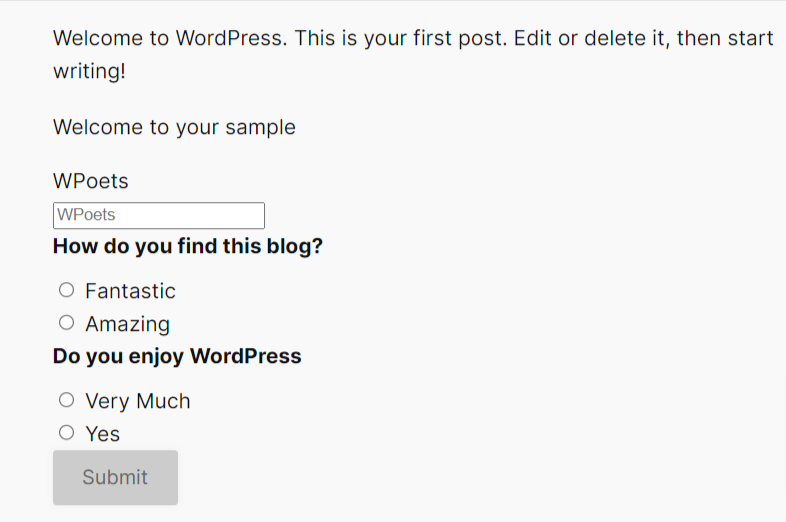
Screenshot 33: Survey Embedded in Website
Conclusion
Crafting surveys in WordPress using the Quiz and Survey Master plugin is a streamlined process that empowers you to engage deeply with your audience and gather vital insights. This guide explored the steps necessary to design, customize, and deploy your surveys effectively. By leveraging this powerful tool, you can enhance your connection with your audience, make data-driven decisions, and ultimately drive your WordPress site's success forward.