Introduction
Moving your site from Ghost to WordPress can seem complex, but the process is actually much simpler than it appears. If you’re planning to make the switch, you’re in the right place.
In this step-by-step blog, you’ll learn exactly how to migrate your Ghost site to WordPress safely and quickly.
We’ll cover everything from exporting data, converting Ghost’s JSON to WordPress-compatible CSV, importing content, preserving SEO settings, and launching your new site without losing traffic. And if you’d prefer expert help, our Ghost to WordPress migration service takes care of everything delivering a smooth, safe move with no downtime or data loss.
Why Migrate from Ghost to WordPress?
Ghost is popular for being simple, fast, and clean, perfect for writers and small blogs. But, as your site grows and you need more advanced features, Ghost’s minimalist approach can start to feel restrictive.
That’s where WordPress stands out, a flexible, open-source CMS offering unmatched control over design, functionality, and long-term scalability. You can build anything from a simple blog to a full-scale business or enterprise website with ease.
With tools like Yoast SEO and Rank Math, you can optimize your content to rank in search results. And because it supports advanced content types, custom workflows, and tons of integrations, it’s a platform that’s truly built for the future.
You also gain the advantage of a massive global community, helpful documentation, and experts who can step in whenever you need support.
So if Ghost’s minimalist setup is starting to hold you back and you want more creative freedom, powerful features, and full ownership of your site, migrating to WordPress is a smart move for your growth.
Prerequisites and Preparation
Before you begin migrating your site from Ghost to WordPress, make sure you have everything ready to ensure a smooth transition:
1. Choose the Right WordPress Hosting
Choose a reliable WordPress hosting provider that offers fast performance, strong security, and daily backups. Managed WordPress hosts like Kinsta or SiteGround handle speed, backups, and security automatically.
If you prefer more control, you can also choose VPS hosting.
2. Install WordPress
Install WordPress, and after it’s done, here are the next steps:
- Log in to Your WordPress Dashboard: Access your site admin by visiting mynewwebsite.com/wp-admin and entering your credentials.
- Choose a Simple Default Theme for Testing: To get started, activate a default WordPress theme such as Twenty Twenty-Four (the latest official default theme).
3. Optional: Create a Staging Environment
If you want to preview your migrated content before launch, set up a staging site. Many hosting providers include this feature, or you can use plugins like WP Staging. This allows you to:
- Test the import process safely
- Adjust design and functionality
- Fix any issues before live
Export Content from Ghost
The first step in migrating from Ghost to WordPress is to export all your existing Ghost content, including posts, tags, and authors.
- Log in to your Ghost Admin Dashboard.
- Go to Settings → Import/Export.
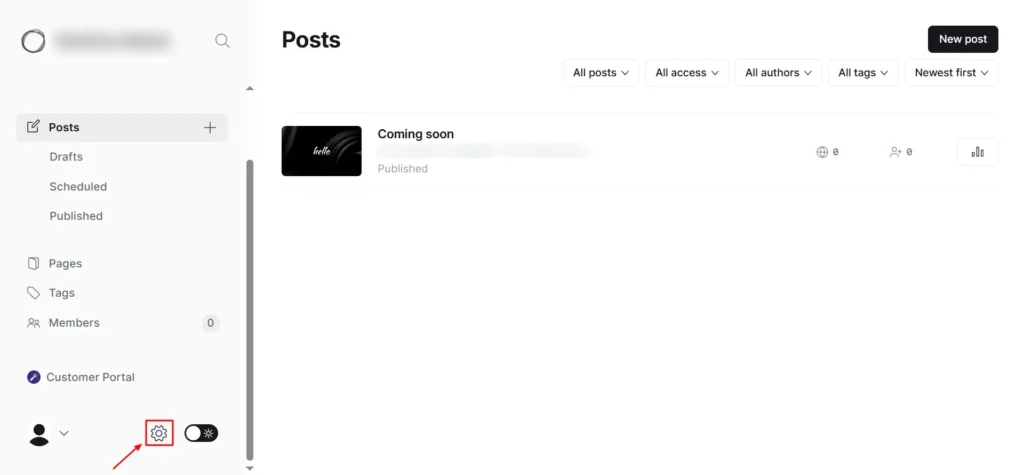
Screenshot 1: Settings → Import/Export
- Click Export your content.
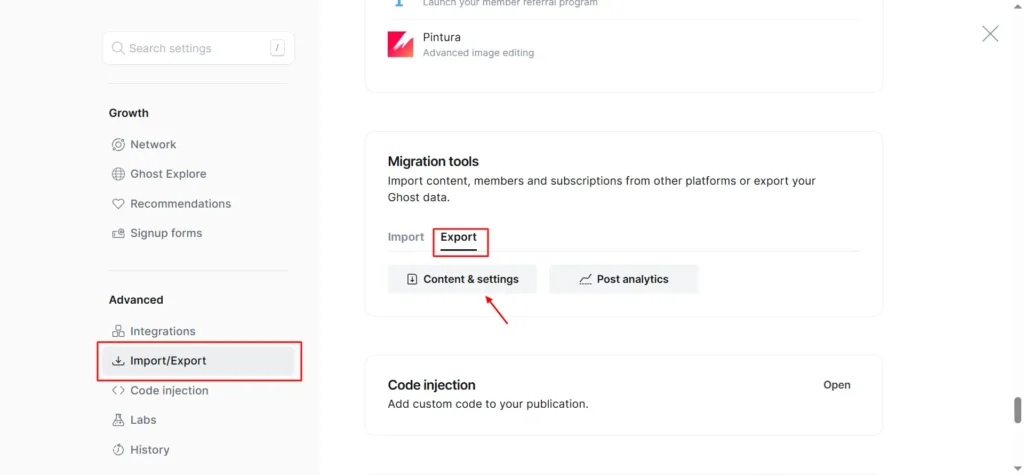
Screenshot 2: Export Content
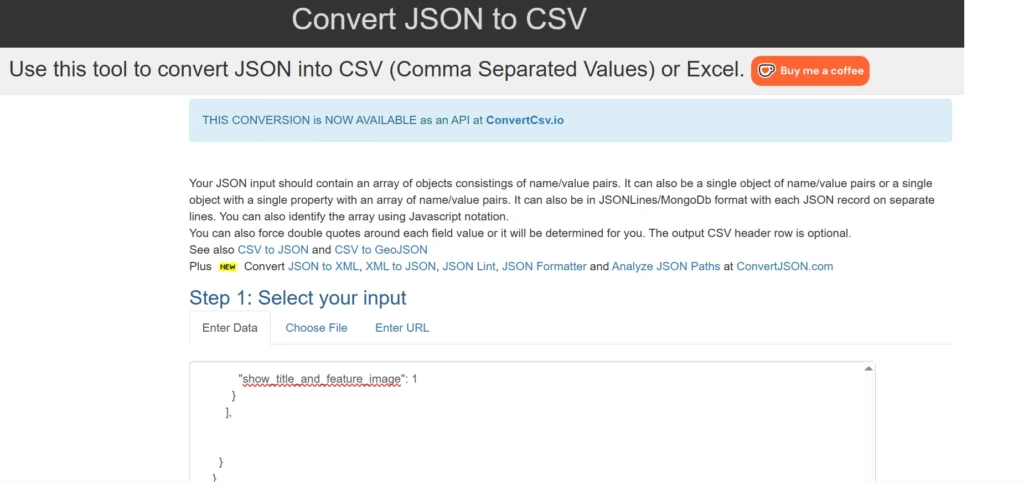
- Ghost will generate a JSON file that contains all your posts, pages, and metadata.
- Download and save this file safely; you’ll need it in the next step.
Convert Ghost Export for WordPress
WordPress does not directly import Ghost’s JSON format, so you’ll need to convert it into a CSV file.
Clean the Ghost JSON File
Ghost exports the entire database, not just your posts. This means it also includes a lot of Ghost-specific system data, such as:
- Theme configuration and design settings
- Memberships, newsletters, and subscription products
- Roles, permissions, and internal integrations
- Site settings, API keys, and system metadata
These are not supported by WordPress and can cause unwanted clutter or errors during CSV conversion and import.
Before converting the file to CSV, open the .json file in a JSON formatter (eg. https://jsonformatter.org/) and remove the following sections:
- meta
- custom_theme_settings
- newsletters
- products, offers, and billing data
- roles, roles_users
- settings
- Authentication keys and internal system records
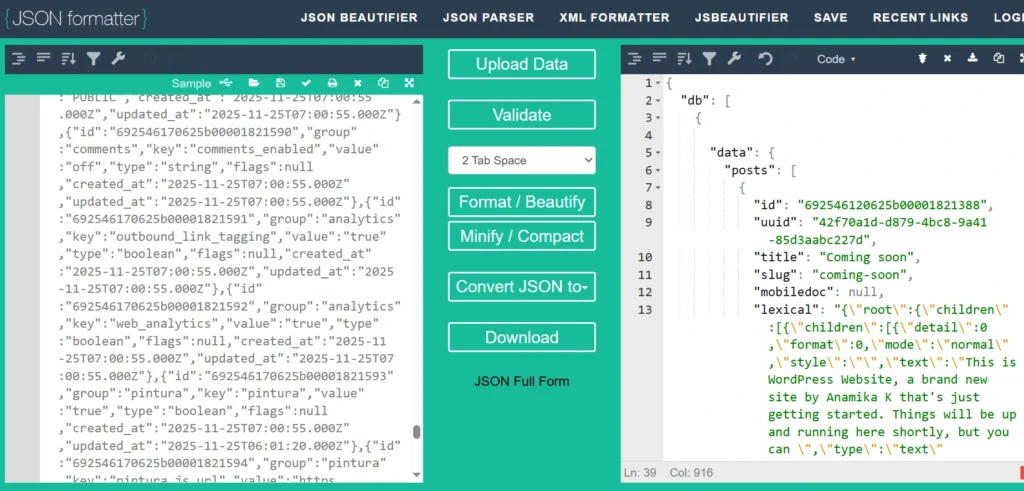
Screenshot 3: JSON Formatter
| Note: This cleanup does not affect your posts or pages; it only removes Ghost-specific system data that WordPress cannot use. |
Convert JSON to CSV
Once the JSON file has been cleaned:
- Upload the simplified .json file to an online conversion tool
https://convertcsv.com/json-to-csv.htm
Screenshot 4: JSON to CSV Converter
- Before you convert, review and adjust the settings before converting to ensure the CSV is WordPress-friendly.
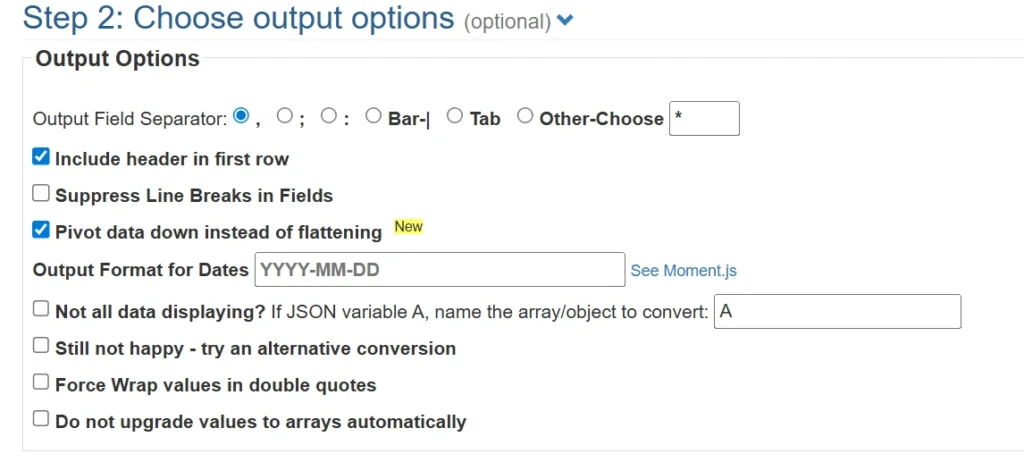
Screenshot 5: Choose output options
Enable – Include header in first row and Pivot data down instead of flattening.
| Note: These settings prevent formatting issues and generate a CSV that imports cleanly into WordPress. |
- Convert the file directly to CSV
- Download the generated CSV file
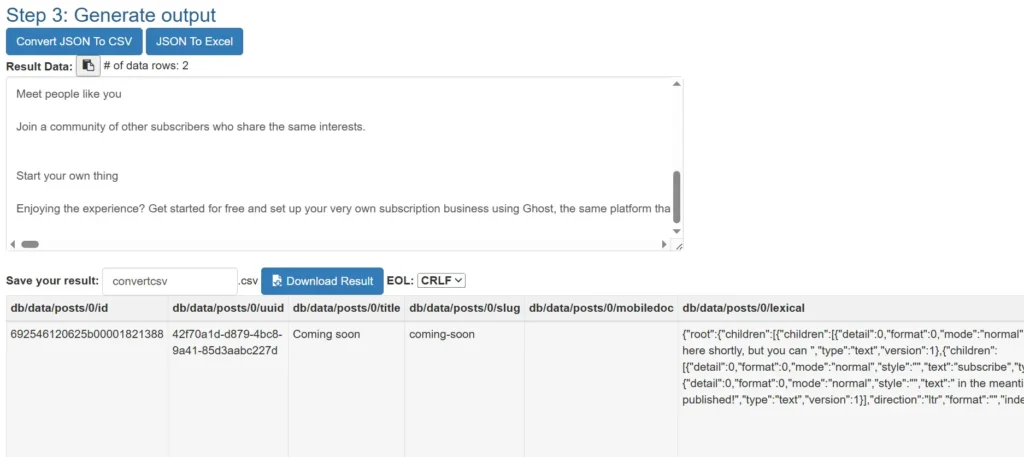
Screenshot 6: Download CSV file
Ghost saves content in nested JSON objects. When converting, these nested structures are flattened into long, path-based column names, like: db/data/posts/0/title
Since WordPress import tools do not recognize Ghost’s internal data structure, these column headers must be renamed to WordPress-compatible fields.
Ghost to WordPress Column Mapping
| Ghost CSV Column | WordPress Field |
| db/data/posts/0/title | post_title |
| db/data/posts/0/slug | slug |
| db/data/posts/0/html | post_content |
| db/data/posts/0/feature_image | featured_image |
| db/data/posts/0/type | post_type |
| db/data/posts/0/status | post_status |
| db/data/posts/0/published_at | post_date |
After downloading the CSV file:
- Upload the CSV file to Google Sheets
- Open the file and review the first row (column headers)
- Rename Ghost-specific, path-based column names to WordPress-compatible fields.
- Save the changes and download the file again as a CSV
This step makes it easier to review, edit, and validate column names before import.
Changing column names won’t affect your content; it just helps map the data correctly for a smooth, error-free WordPress import.
Prepare Author Column in CSV
Before importing posts, ensure the CSV file includes an author-related column (for example, post_author) containing the intended author username.
If authors do not yet exist in WordPress, posts can still be imported and will be assigned to a default user. Once authors are created, posts can be reassigned or re-imported with correct author mapping.
Import Content into WordPress
There are multiple ways to move content from Ghost to WordPress. You can use the built-in WordPress importer for XML/WXR files, rely on WP-CLI or command-line tools if you’re a developer, or use import plugins for CSV files.
We’ll use the WP Import Export Lite plugin because it offers an easy, non-technical way to import Ghost CSV files while properly managing HTML content, images, authors, and duplicate posts.
1. Install the WordPress Importer Exporter Lite plugin and activate it.
2. Go to WP Imp Exp → New Import
Open the WP Import Export Lite plugin from the WordPress admin menu and click New Import.
3. Upload Your Converted Ghost CSV
Upload your CSV file containing Ghost data (converted from JSON → CSV).
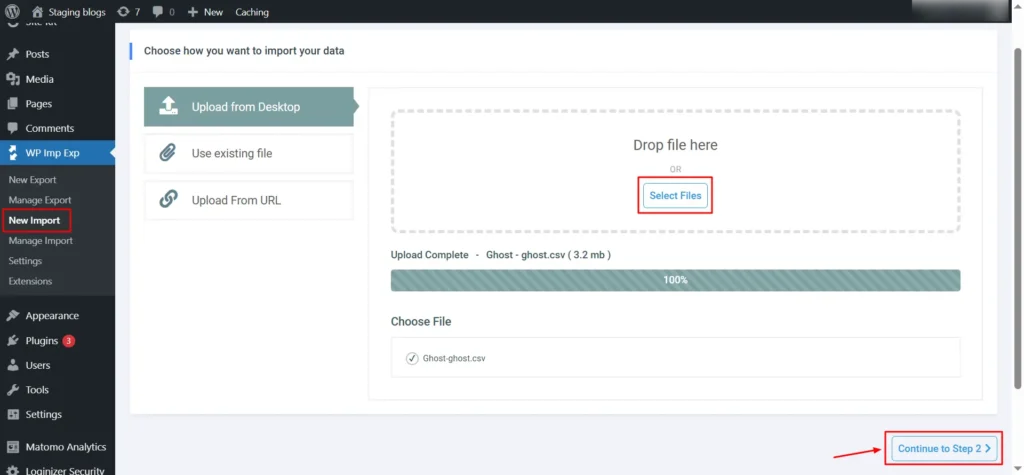
Screenshot 7: New Import
Click Continue to Step 2.
4. Select “Post” as the Import Type
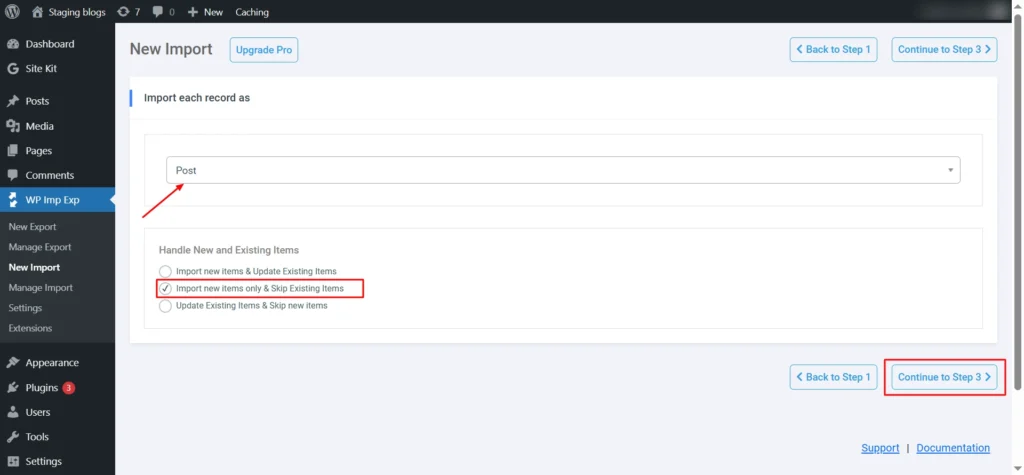
Screenshot 8: Select Post
In the dropdown, choose: Post
Select the option: Import new items only and Skip existing items.”
(This ensures no duplicates if you re-run the import.)
Click Continue to Step 3.
5. Map Your Ghost Fields to WordPress Fields
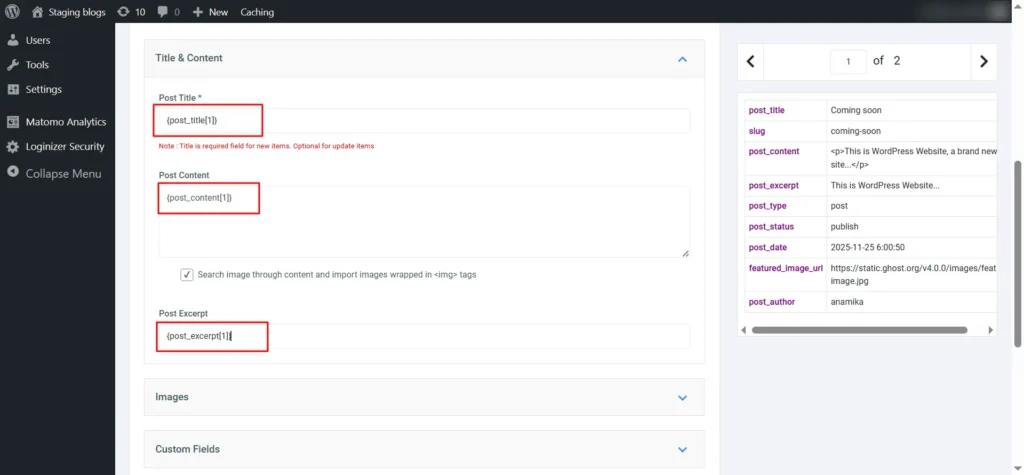
Post Title, Content, and Excerpt
- Map post_title to {post_title[1]}
- Map Post Content to {post_content[1]}
- Map Post Excerpt to {post_excerpt[1]}
Enable: Search image through content and import images wrapped in <img> tags.
Screenshot 9: Map Title and Content
| Note: Ghost’s Mobiledoc is an internal editor format and is not always included in exports. WordPress cannot read Mobiledoc data. For this reason, always use the HTML content field, which is fully rendered and universally supported for WordPress imports. |
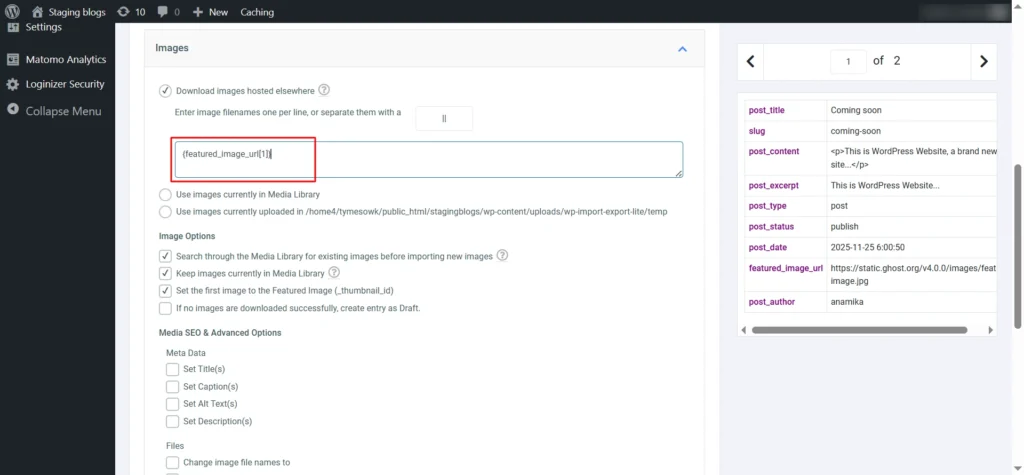
Import Images
Your converted CSV includes a featured image column, so you can map it directly during import. In WP Import Export Lite, map the featured image field (e.g., _feature_image) to WordPress’s _thumbnail_id.
Enable: Download images hosted elsewhere
This enables image downloading so that WordPress imports the image into the Media Library.
Image Options
- Enable: Search through content and import images wrapped in <img> tags
- Enable: Set the first image as the Featured Image (_thumbnail_id)
Screenshot 10: Map Featured Image
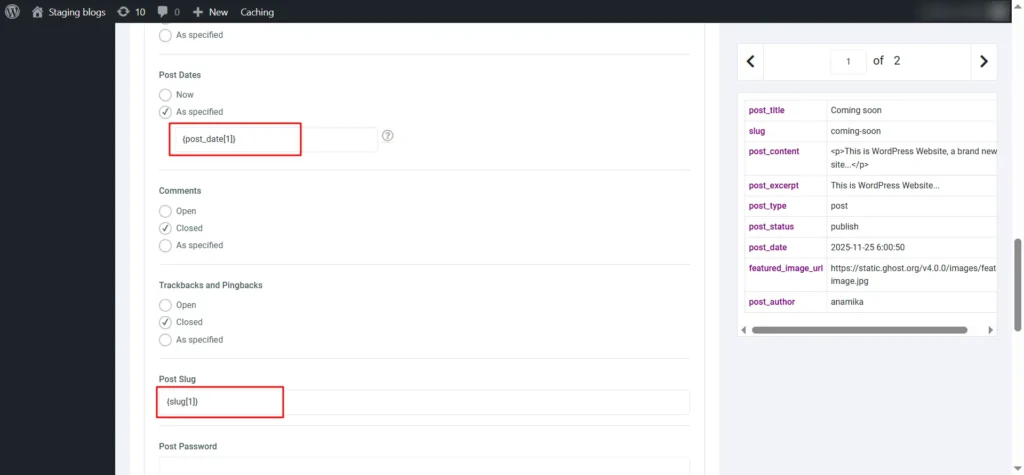
Map the Publish Date and the Slug
- In Other Post Options→Post Dates → As specified, enter: {post_date[1]}
- This uses Ghost’s original publish date.
- The date field must use a format supported by WordPress. Example: 2024-11-10 13:00:00 (YYYY-MM-DD HH:MM: SS)
- Scroll down to Post Slug and map: {slug[1]}
Screenshot 11: Map Publish Date and Slug
Map Ghost Roles to WordPress Roles
| Ghost Role | Wordpress Role | Notes |
| Administrator | administrator | Full access to content and settings |
| Editor | editor | Can publish/manage posts, including others’ content |
| Author | author | Can publish/manage own post only |
| Contributor | contributor | Can write/manage own posts, but cannot publish |
| Owner | administrator (closest match) | Closest match for full permissions |
| Super Editor | editor | Limited to editorial capabilities |
| Note: Ghost exports may include entries such as Blog Owner, Admin Integration, Ghost Explore Integration, Self-Serve Migration Integration, DB Backup Integration, and Scheduler Integration. These are system accounts and internal integrations, not real users. WordPress handles them through plugins, APIs, and WP-Cron, so they aren’t transferred as users. |
When importing posts from Ghost, WordPress does not automatically create users. To ensure posts are assigned correctly and authors have proper permissions, manually add each author.
Add Authors Manually
- In WordPress, go to: Users → Add New
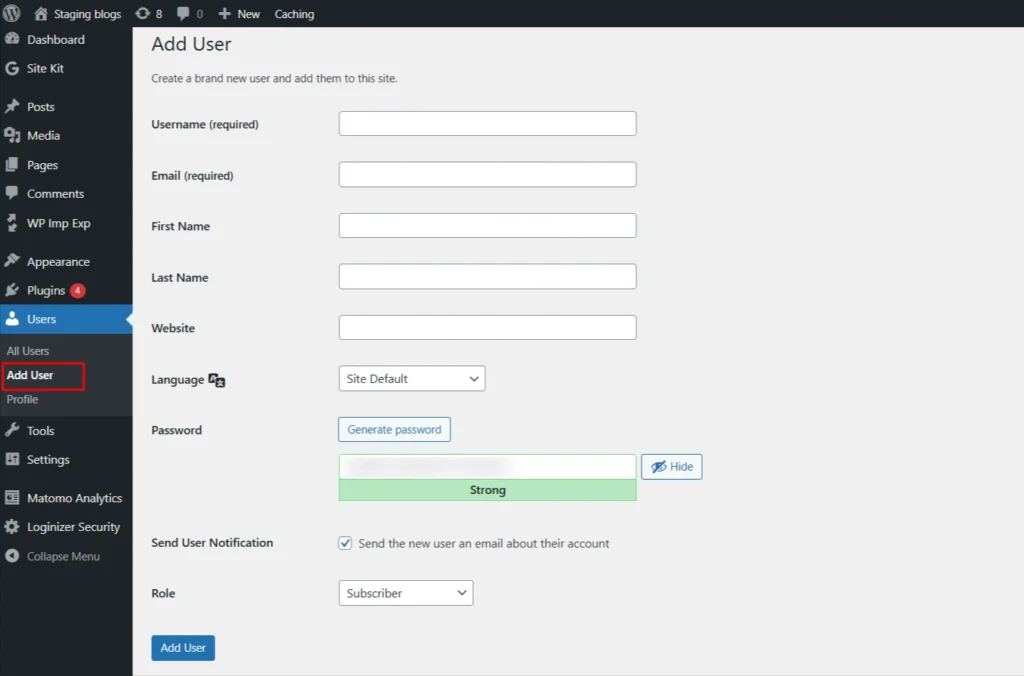
Screenshot 12: Add New User
- Fill in the author details:
- Username → unique login name
- Email → author’s email
- First and Last Name → optional
- Display Name → author’s public name
- Password → set manually or let WordPress generate
- Role → assign according to the mapping table above
- Bio → optional, adds extra author info
- Click Add New User. Repeat for each author.
- Map Author in Post Import: When importing posts, map the author field to {post_author[1]} so each post is assigned to the correct user.
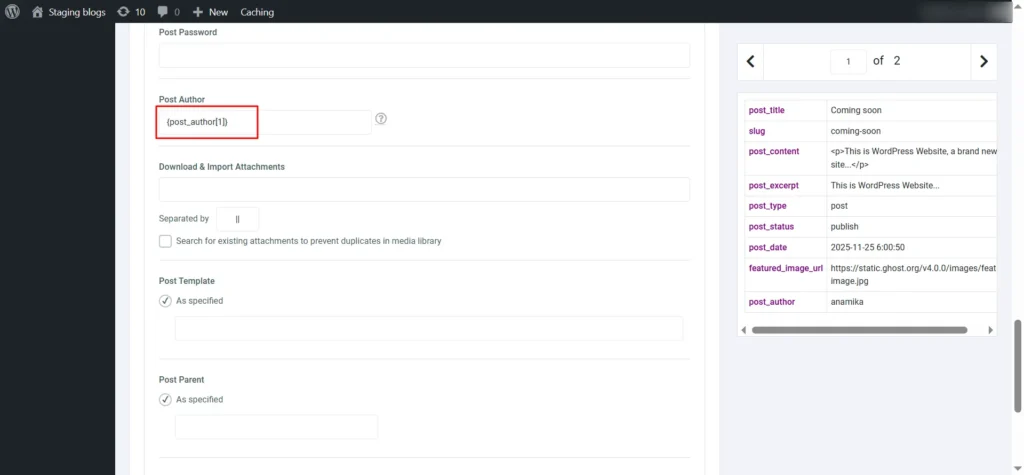
Screenshot 13: Map Post Author
6. Choose How to Handle Existing Items
- In Search Existing Item, select the field you want to use for detecting duplicates.
- Choose Slug because each slug is unique.
- In the input box, map the slug column from your CSV: Eg: {slug[1]}
- This ensures posts with the same slug will be updated, not duplicated.
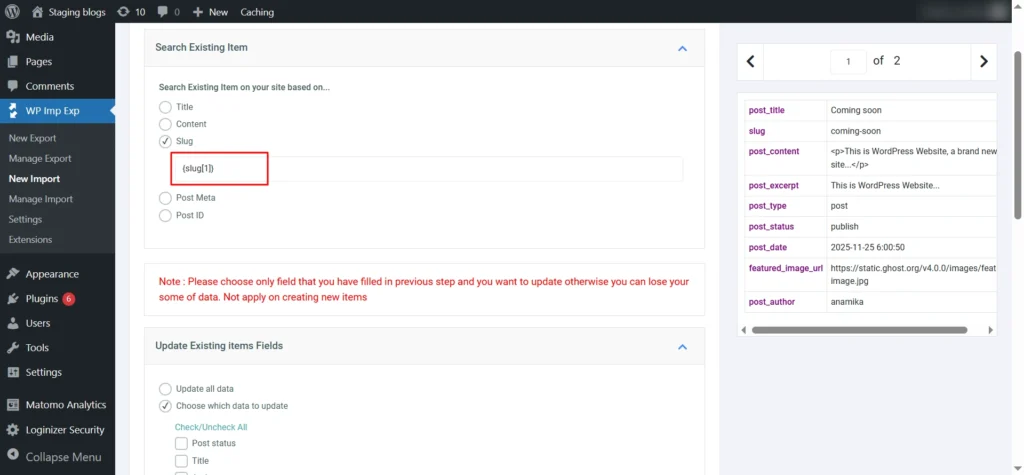
Screenshot 14: Search Existing Item
7. Update Existing Items Fields
- Choose which parts of your content to update, or choose ‘update all’ if you want.
- Post status
- Title
- Author
- Slug
- Content / Description
- Excerpt / Short Description
- Dates
- Menu order
- Parent post
- Post type
- Comment status
- Ping Status
- Post Password
- Attachments
- Images
- Custom Fields
- Taxonomies (incl. Categories and Tags)
- For your first import, you’ll need to select at least one field, as the plugin requires it.
- Check Title, Content, and Images as these are essential fields and safe to include.
- Keep other fields unchecked to avoid overwriting titles, slugs, images, etc.
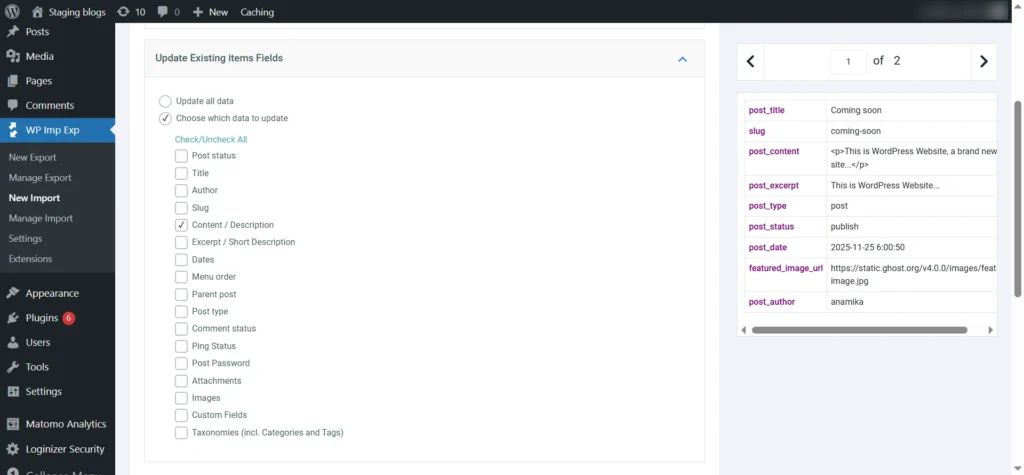
Screenshot 15: Update Existing Items Fields
8. Configure Advanced Options
- Enable Iterative, Piece-by-Piece Processing.
- Set the number of records to process in each iteration.
- For example: 5 records per iteration (as shown in the screenshot).
- This helps avoid server timeout issues during heavy imports.
- Click Continue to move to the next step.

Screenshot 16: Configure Advanced Options
9. Run the Import
- Click Continue and start the import.
- The plugin will process the records in batches (e.g., 5 at a time).
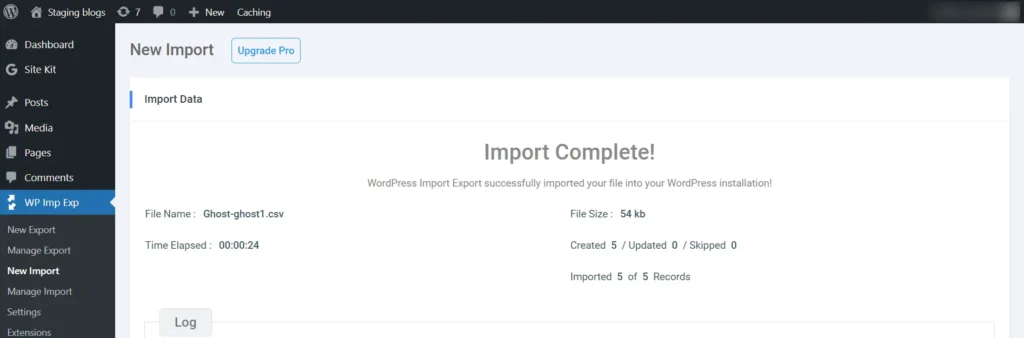
Screenshot 17: Run the Import
10. Verify Results
- Go to Posts → All Posts.
- Check if:
- Existing posts were updated correctly.
- New posts were created as expected.
- No duplicates were generated.
- Open individual posts to confirm the content has been updated (only the fields you selected).
Update URLs and Permalinks
To maintain SEO rankings and prevent broken links, it’s crucial to match your old Ghost URLs with your new WordPress permalinks.
- Go to Settings → Permalinks in your WordPress dashboard.
- Choose a structure similar to your Ghost URLs, such as:
/blog/postname/ - Save changes.
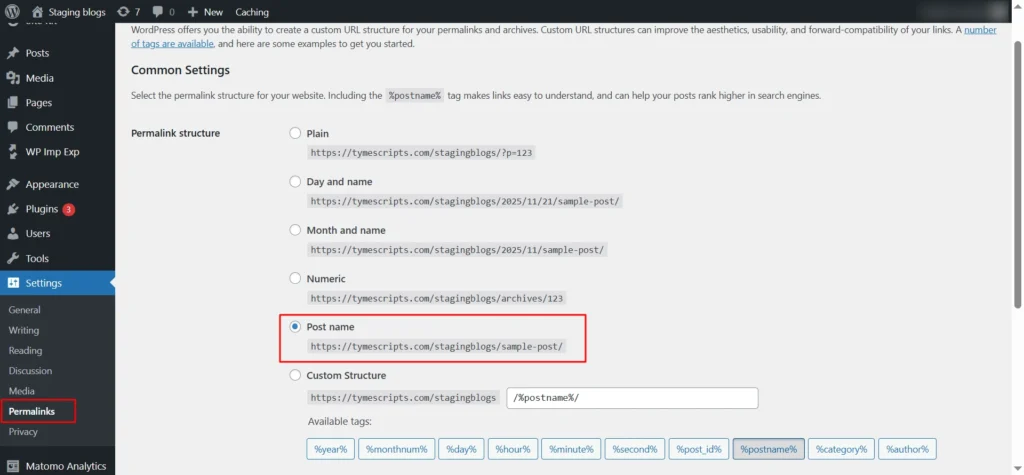
Screenshot 18: Set Permalinks
Point Your Domain to WordPress
Once everything is imported and tested, it’s time to make your WordPress site live.
If You Used a Ghost Subdomain
If your old site was hosted on a Ghost-provided subdomain, you can’t directly redirect that domain to your new WordPress site.
Instead, update your Ghost site’s homepage with a banner notifying visitors that your website has moved to a new address.
If You Used a Custom Domain
If your Ghost site uses a custom domain like mynewwebsite.com, you can easily point it to your new WordPress hosting provider by updating the DNS settings.
Steps to Point Your Domain:
- Log in to your domain registrar (GoDaddy, Namecheap, Google Domains, etc.).
- Remove existing Ghost DNS/Nameserver records.
- Add your new WordPress host’s nameservers or A record.
- Wait for DNS to propagate (up to 24 hours).
- Confirm your domain loads your WordPress site.
SEO, Plugins, and Final Checks
It’s time to fine-tune your new WordPress site for performance, visibility, and consistency.
1. Install Essential SEO Plugins
Ghost handles basic SEO, but WordPress gives you far more control.
Install a plugin like Yoast SEO or Rank Math to manage:
- Meta titles and descriptions
- XML sitemaps
- Canonical URLs
- Schema markup and social tags
If you’ve imported metadata from Ghost using WP All Import, verify that it appears correctly in your SEO plugin.
2. Check Internal Links and Redirects
Ensure all internal links point to the correct WordPress URLs.
Use a plugin like Better Search Replace to update any old Ghost URLs within posts.
Then, set up 301 redirects (using the Redirection plugin or your .htaccess file) to preserve SEO value from old Ghost links.
3. Reinstall Analytics and Tracking
Reconnect Google Analytics, Search Console, and any marketing or tracking scripts that were active on your Ghost site.
4. Optimize Speed and Performance
- Install caching and optimization plugins like WP Rocket, LiteSpeed Cache, or W3 Total Cache.
- Compress and serve images via Smush, EWWW Image Optimizer, or a CDN such as Cloudflare.
5. Test Responsiveness and Design
Check every page on mobile, tablet, and desktop to ensure layout, typography, and navigation look perfect.
Potential Challenges and How to Solve Them
- Content Structure Differences: Ghost uses a minimalist content model focused mostly on simple posts and tags, while WordPress supports complex content types, categories, and custom taxonomies. Mapping Ghost content properly during migration and using converter tools that maintain relationships helps avoid lost or miscategorized content.
- Broken URLs: Ghost’s permalink structure might differ from WordPress’s. Without proper 301 redirects, users risk broken links. Setting WordPress permalinks to reflect the original URLs and using redirection plugins like Redirection ensures SEO value is preserved.
- Theme and Design Differences: Ghost themes cannot be used in WordPress, and replicating your Ghost site’s look may require customization. Choose a modern WordPress block theme or page builder (like Gutenberg or Elementor) to recreate the layout.
See how we helped CARS24 Australia overcome migration challenges and preserve SEO in our Ghost CMS to WordPress migration case study.
Conclusion
Migrating from Ghost to WordPress isn’t just shifting your content; it’s leveling up to a platform built to grow with you.
With a smooth import process, your posts, media, and SEO value come over cleanly, and WordPress gives you far more freedom to customize and expand your site. Whether you’re introducing new functionality or enhancing your digital presence,
WordPress provides the freedom and control to shape your website exactly the way you want. You’re now set up on a platform that’s ready for the future.
Published on Jan 19, 2026 | Updated on Jan 19, 2026
Author

Anamika Kumari
Author
|
Reviewer

Abhijeet Bendre
Author
|