In WordPress, post types define the different kinds of content you can create and manage. By default, WordPress provides several post types:
- Posts – for blog articles and news updates.
- Pages – for static content like About or Contact.
- Attachments – for media uploads such as images, videos, or documents.
- Revisions – for version control of posts and pages.
- Menus (nav_menu_item) – for navigation items.
- Custom CSS-Add your own styling to change the site’s look.
- Changesets-Save and preview customizer changes before publishing.
What Are Custom Post Types?
Custom post types extend WordPress beyond blogs and pages. They enable you to create content that is easier to manage and tailored to your project’s unique needs. They also help separate different types of content instead of mixing everything into regular posts or pages.
Some examples of Custom Post Types (CPTs):
- Portfolio – to showcase creative work.
- Products – for an eCommerce store.
- Testimonials – to display client reviews.
- Events – for managing schedules or bookings.
- Movies – to list and showcase film details or reviews.
- Products – for displaying items you sell or promote.
- Services – to present the offerings or solutions your business provides.
- Case Studies – to highlight successful projects and real-world results.
Why Use Custom Post Types?
- Better Content Organization – keeps your blog posts, products, or projects separate.
- Improved User Experience – visitors can easily navigate and find specific content.
- Scalability – as your website grows, content remains structured and manageable.
- Flexibility – you can design layouts and templates tailored to each post type.
How to add a Custom Post Type in WordPress using the Custom Post Type UI plugin
Go to the WordPress Dashboard of your website. From the left-hand navigation menu, go to the Plugin menu and click on it.
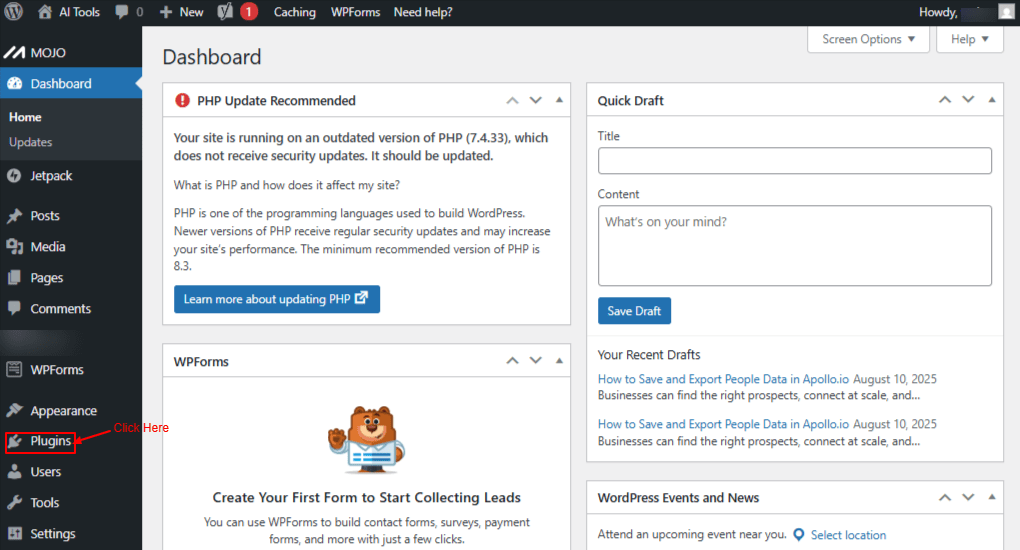
Screenshot 1: Plugin Option
Then click on Add plugin.
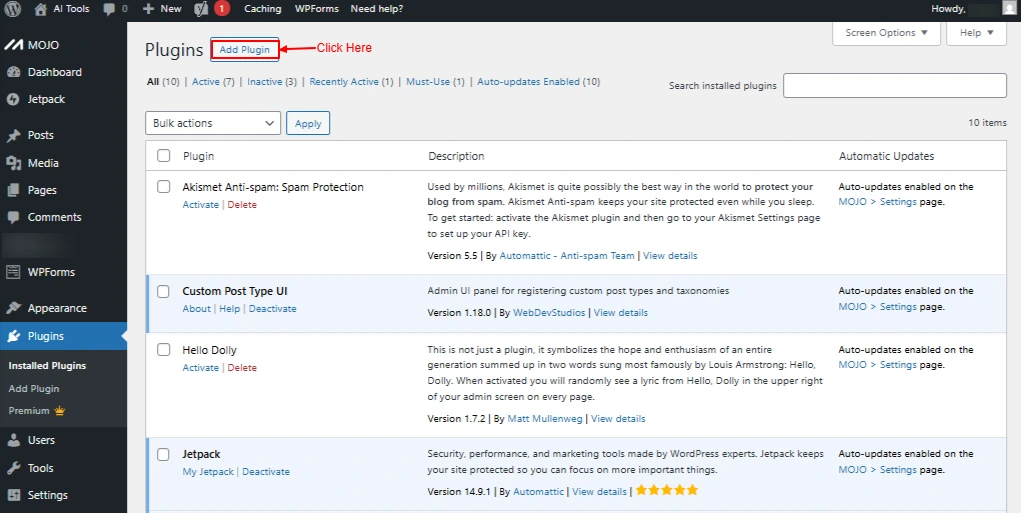
Screenshot 2: Add Plugin
In search Plugin Search Custom Post type
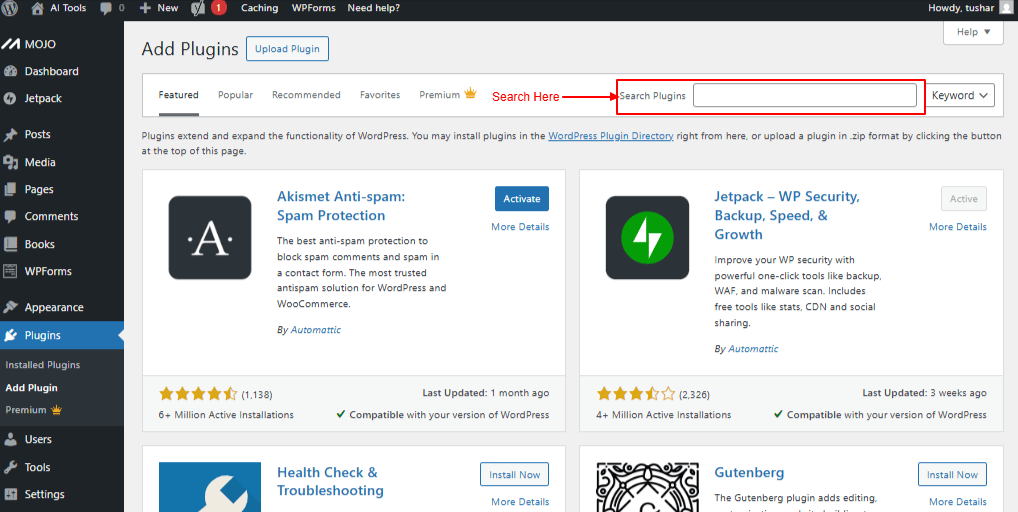
Screenshot 3: Search Plugins
Click on Install Now In Custom Post Type UI
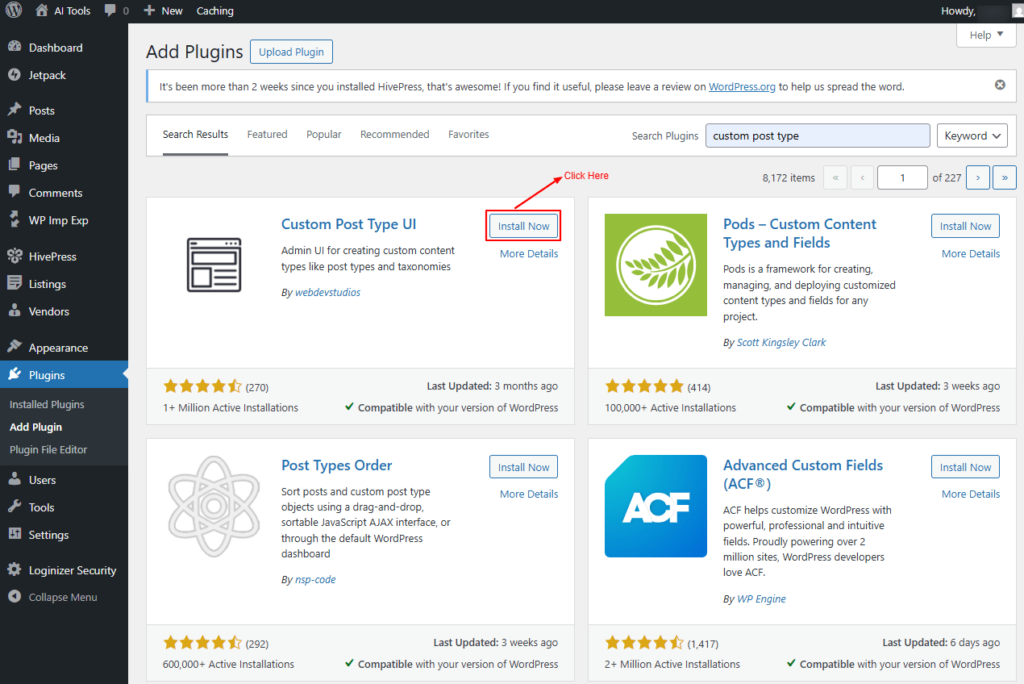
Screenshot 4: Install Now Plugin
After installing the Custom Post Type Plugin, you will see the option of CPT UI in the left-hand navigation Menu.
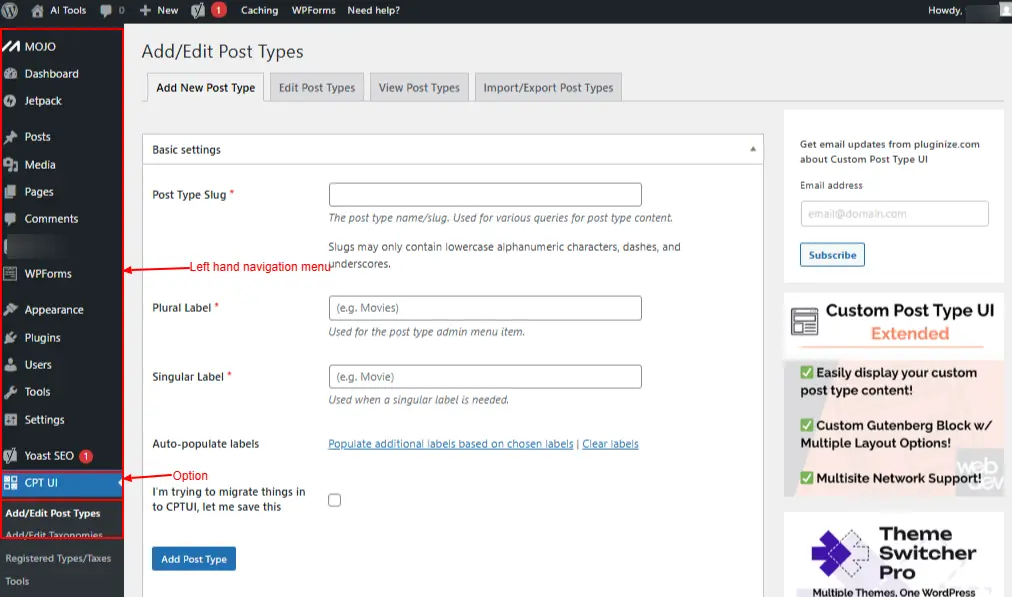
Screenshot 5: CPT UI
Click On CPT UI.
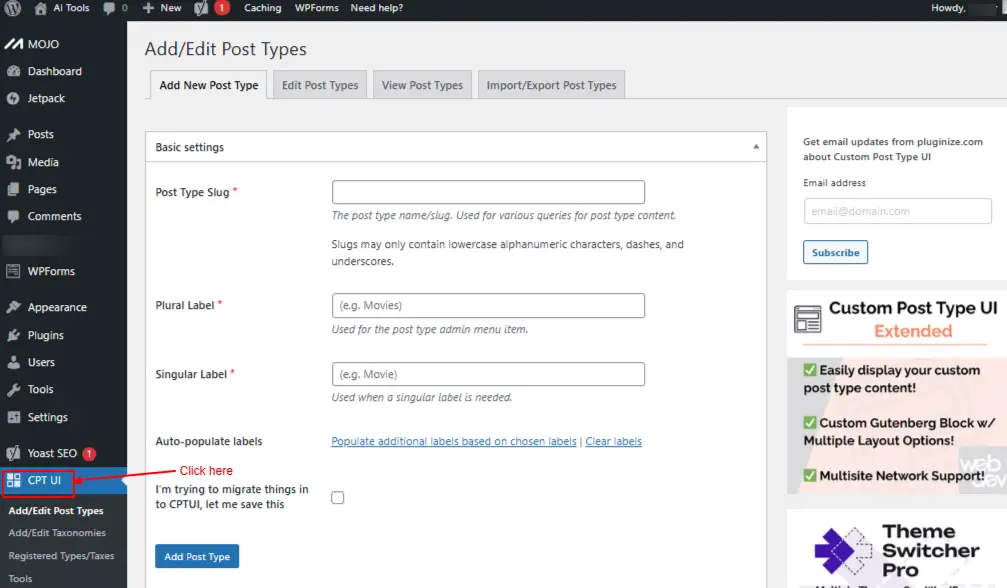
Screenshot 6: Click On CPT UI
CPT UI → Add/Edit Post Types
Using this sub-menu, you can add a Custom Post type.
1. Add New Post Type
Basic Settings
- Post Type Slug: Enter the Setting post type name/slug. For e.g, book. The post type name or slug, used in various queries to retrieve post type content.
- Slugs can only include lowercase letters, numbers, dashes, and underscores.
- Plural Label: Enter the plural label for e.g, Books.Displayed as the label for the post type in the admin menu.
- Singular label: Enter the Singular Label for e.g. Book.Used for the singular form of the label.
- Auto-populate labels: This helps to auto-populate additional labels based on chosen labels. Clear labels link will clear all labels.
- I’m trying to migrate things into CPTUI.. Let me save this: This option is used when the post type has already been registered through another method—such as a different plugin or the register_post_type() function—and allows you to override the default restriction that prevents re-registering an existing post type.
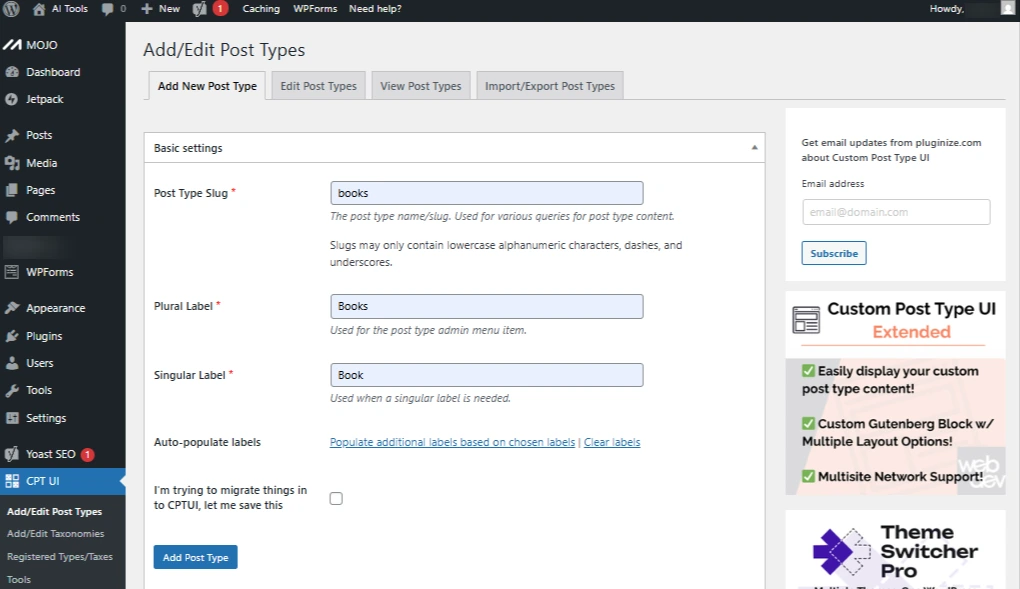
Screenshot 7: Basic Settings
Additional labels
- Post Type Description: Enter the description of what your custom post type is used for.
- Menu Name: Enter the Label for Menu Name. For e.g., My Books. Specify a custom name to display for your post type in the admin menu.
- All Items: Enter the Label for all items. For e.g., All books.Displayed in the admin submenu for viewing all items of the post type.
- Add New: Enter the Label for adding new. For. e.g., Add New. Displayed in the post type admin submenu for adding new items.
- Add New Item: Enter the Label for adding new items. e.g., Add New Book. Displayed at the top of the editor screen when creating a new post of this post type.
- Edit Item: Enter the Label for the edit item. For e.g., Edit Book. Displayed at the top of the editor screen when editing an existing post of this post type.
- New Item: Enter the Label for New Item. For e.g., New Book. A post type label is shown in the admin menu to represent the post type.
- View Item: Enter the Label for View Item. For e.g., View Book. Displayed in the admin bar when viewing the editor screen of a published post for this post type.
- View Items: Enter the Label for View Items. For e.g., View Books. Displayed in the admin bar when viewing the editor screen of published posts for this post type.
- Search Item: Enter the Label for the Search item. For e.g., Search Books. Displayed as the label for the search button on the post type list screen.
- Not Found: Enter the Label for Not Found. For e.g., No Books Found. Displayed on the post type list screen when no posts are found to display.
- Not Found in Trash: Enter the Label for Not Found in Trash. For e.g., No Books Found in thrash. Displayed on the post type trash screen when no posts are found in the trash.
- Parent: Enter the Label for parent. For e.g. Parent Book. Used for hierarchical post types where a colon is required.
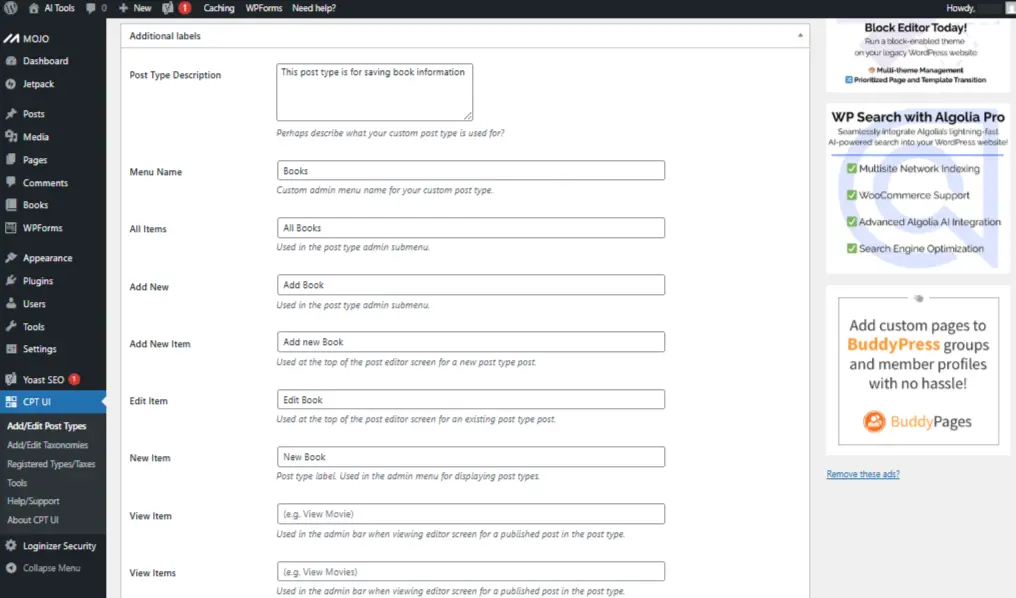
Screenshot 8: Additional Labels
Settings
- Public: (Default: true) Determines whether posts of this custom post type are visible in the WordPress admin interface and can be accessed publicly.
- Publicly Queryable: (Default: true) Specifies whether queries for this post type can be executed on the front end during the parse_request() process.
- Show UI: (Default: true) Determines whether a default user interface should be created for managing this post type.
- Show in Nav Menus: (Default: true) Specifies whether this post type can be selected for inclusion in navigation menus.
- Delete with user: (Default: false) Specifies whether posts of this type should be deleted when a user is removed.
- Show in REST API: (Default: true) Determines whether this post type’s data is included and accessible through the WordPress REST API.
- Has Archive: (Default: false) Determines whether this post type should include an archive URL.If left empty, the archive slug will automatically use the post type’s slug.
- Capability Type: Enter the setting Capability Type. For e.g.post. Specifies the post type used to determine read, edit, and delete capabilities. You can include a comma-separated second value to define the plural form.
- Hierarchical: (Default: false) Determines whether the post type can have parent-child relationships. At least one published item must exist to assign a parent.
- Menu Icon: Enter the Menu Icon. For Eg.dashicons-book-alt. Specifies the image URL or Dashicon class to use as the icon. Custom images should be 20×20 pixels.
- Support: This setting adds the support for various available post editor features. Checked value means the post type feature is supported.
- Title
- Editor
- Featured Image
- Excerpt
- Trackbacks
- Custom Fields
- Comments
- Revisions
- Author
- Page Attributes
- Post Formats
- None

Screenshot 9: Post Types Settings
2. Edit Post Types
All the Basic settings, Additional Labels, and settings added in the “Add New Post type” tab can be edited here.
- Basic Settings
- Post Type Slug
- Plural Label
- Singular Label
- Auto-populate labels
Screenshot 10: Edit Post type Basic Settings
- Additional Labels
- Post Type Description
- Menu Name
- All Items
- Add New
- Add New Item
- Edit Item
- New Item
- View Item
- View Items
- Search Item
- Not Found
- Not Found in Trash
- Parent Item
- Featured Image
- Set Featured Image
- Remove Featured Image
- Use Featured Image

Screenshot 11: Edit Post Type Additional Labels
- Settings
- Public (True)
- Publicly Queryable(True)
- Show UI(True)
- Show in Nav Menus(True)
- Delete with user(False)
- Show in REST API(True)
- Menu Icon
- Supports
- Title
- Editor
- Author
- Featured image
- Excerpt
- Trackbacks
- Custom Fields
- Comments
- Revisions
- Author
- Page Attributes
- Post Formats
- None

Screenshot 12: Edit Post Type Settings
3. View Post Types
All the Custom post types registered with CPT UI plugin can be viewed here. You can view the following data: Settings, Supports, Taxonomies, Labels, Template Hierarchy
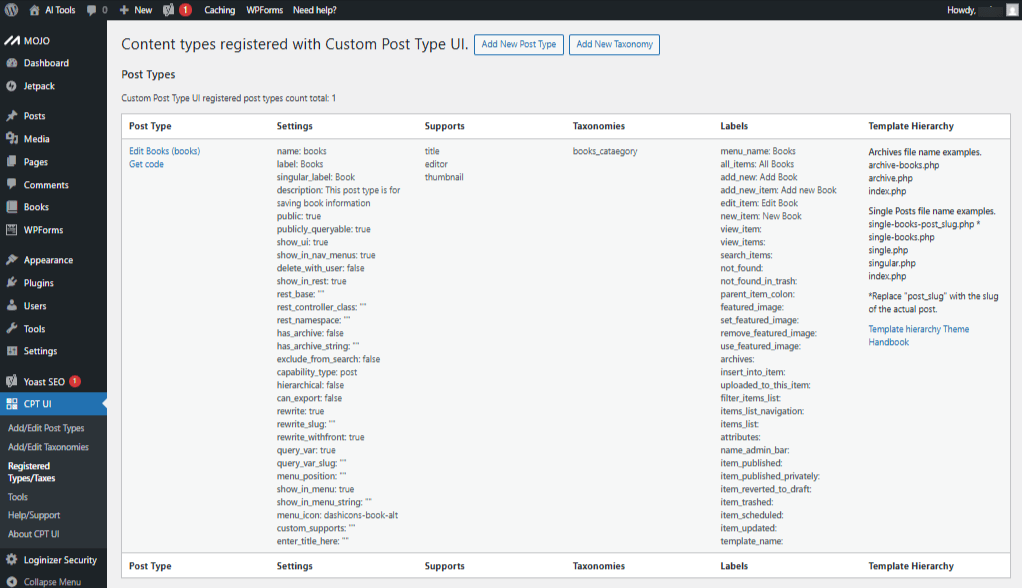
Screenshot 13: View Post Type
Template Hierarchy Column lists all the hierarchies for the Archives and Single posts
- Archives file name examples
- archive-books.php
- archive.php
- index.php
- Single Posts file name examples
- single-books-post_slug.php *
- Single-books.php
- Single.php
- Singular.php
- index.php
4.Import/Export Post Types
This tab takes you to CPT UI → Tools Menu. From this tab you can Import Post Types and Export Post Types settings
- Import Post Types: To import post types from another WordPress site, paste the exported data from that site and click “Import.”
- Export Post Types settings: Use the “Copy” option to export your current post types for use on another WordPress site or to create a backup of your existing post type settings.
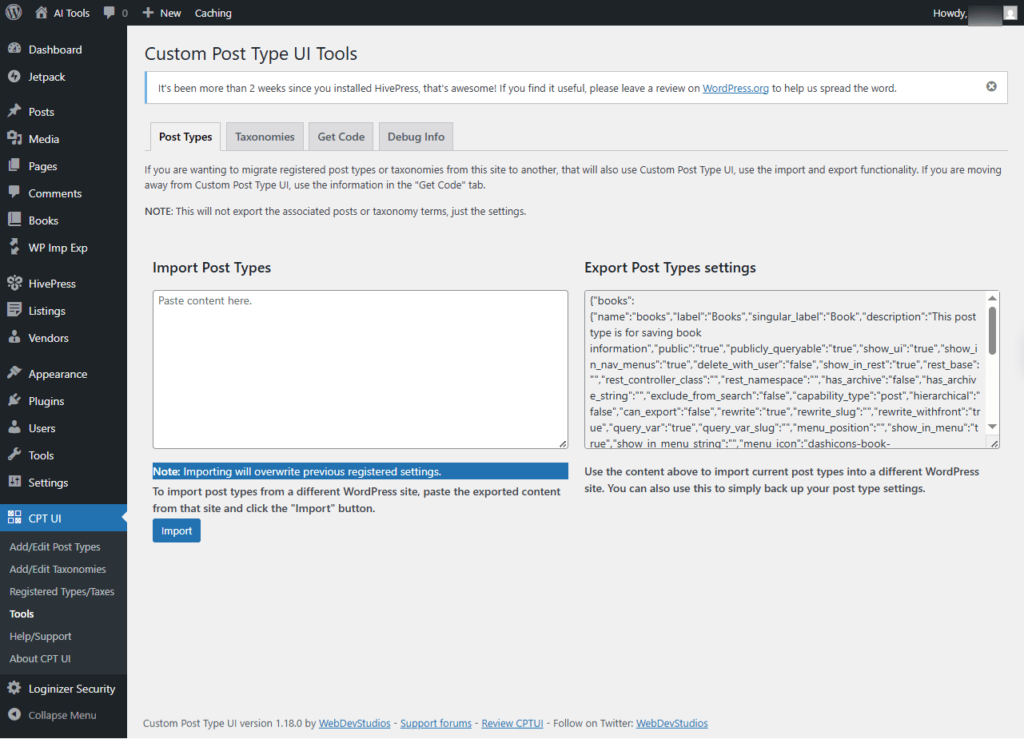
Screenshot 14: Import/Export Post Types
CPT UI → Add/Edit Taxonomies
When you go to WordPress Dashboard → CPT UI → Add/Edit Taxonomies, you get two main sections:
5. Add New Taxonomy
Here you can create a new taxonomy. The submenu/fields you’ll see include:
Basic Settings
- Taxonomy Slug: The name or slug of the taxonomy, used for querying taxonomy-related content. Slugs can only include lowercase letters, numbers, dashes, and underscores.
- Plural Label: Enter the plural label for the setting.For e.g., Book Categories.Used as the label for the taxonomy in the admin menu.
- Singular Label: Enter the setting Singular label.For e.g. Book Category.Used for the singular form of the label.
- Auto-populate label: Fill in additional labels based on the selected labels | Clear labels link will clear all labels.
- Attach to Post Types: These settings enable support for available registered post types. Selecting at least one is required, and by default, only public post types are shown.
- Posts (WP Core)
- Pages (WP Core)
- Media (WP Core)
- Books (Custom Post Type)
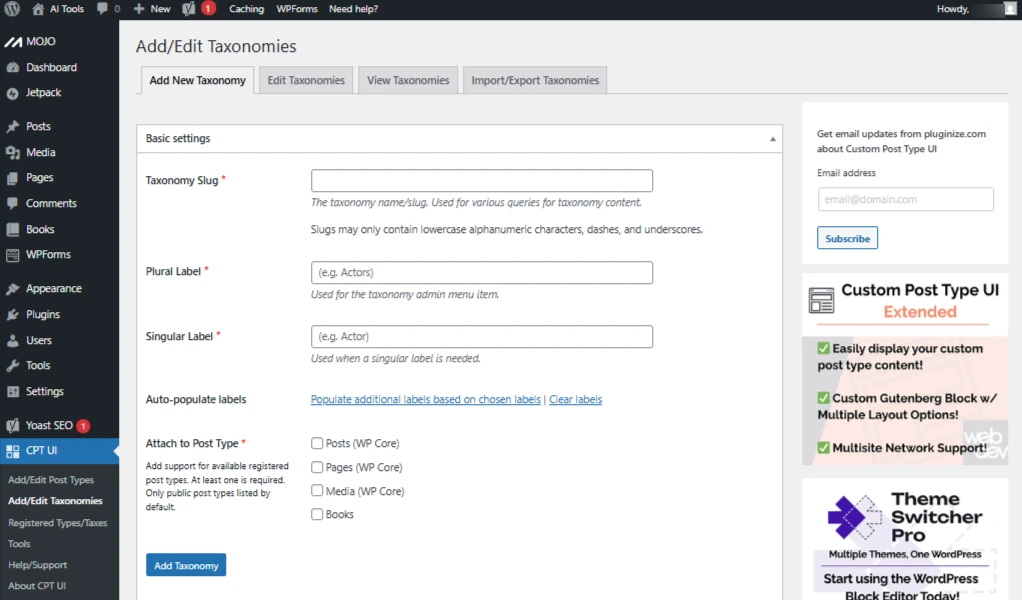
Screenshot 15: Basic Taxonomy Settings
Additional Labels
- Description: This label describes the purpose of your taxonomy.
- Menu Name: Enter the Label for Menu Name. For e.g., My Book Categories.Custom name to display for your taxonomy in the admin menu.
- All Items: Enter the Label for All Items. For e.g., All Books Categories. Displayed as the tab text when viewing all terms of a hierarchical taxonomy while editing a post.
- Edit Item: Enter the Label for Edit item. For e.g., Edit Book Category. Displayed at the top of the term editor screen when editing an existing taxonomy term.
- View Item: Enter the Label for View Item. For e.g., View Book Category. Displayed in the admin bar while editing an existing taxonomy term.
- Update Item Name: Enter the Label for Update Item. For e.g., Update Book Category. Custom taxonomy label displayed in the admin menu for managing taxonomies.
- Add New Item: Enter the Label for Add New Item. For e.g., Add a New Book Category. Displayed at the top of the term editor screen and used as the button text when creating a new taxonomy term.
- New Item Name: Enter the Label for New Item Name. For e.g., New Book Category. Custom taxonomy label shown in the admin menu to display taxonomies.
- Parent Item: Enter the Label for Parent Item. For e.g., Parent Book Category. Custom taxonomy label displayed in the admin menu to represent taxonomies.
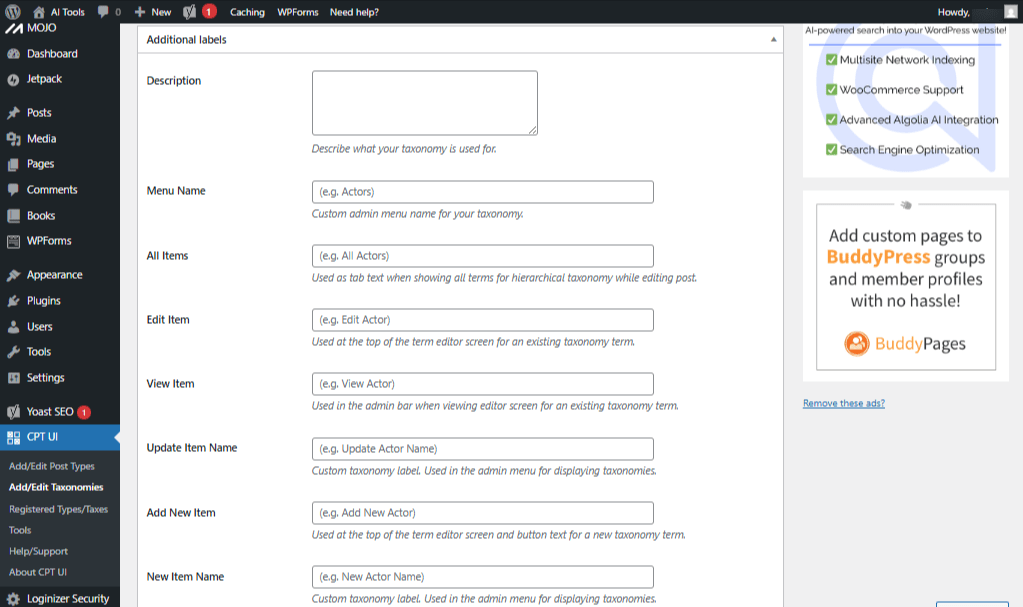
Screenshot 16: Taxonomies Additional labels
Settings
- Public: (Default: true) Specifies whether the taxonomy is intended for public use, either through the admin interface or on the front end.
- Publicly Queryable: (Default: same as the “public” setting) Determines whether the taxonomy can be queried publicly.
- Hierarchical: (Default: false) Determines whether the taxonomy supports parent-child relationships. When set to “True,” checkboxes are displayed; when set to “False,” a text input field is used.
- Show UI: (Default: true) Specifies whether a default user interface should be created for managing this custom taxonomy.
- Show in Menu: (Default: same as show_ui) Determines whether the taxonomy should be displayed in the admin menu.
- Show in Nav Menus: (Default: same as public) Specifies whether the taxonomy can be included in navigation menus.
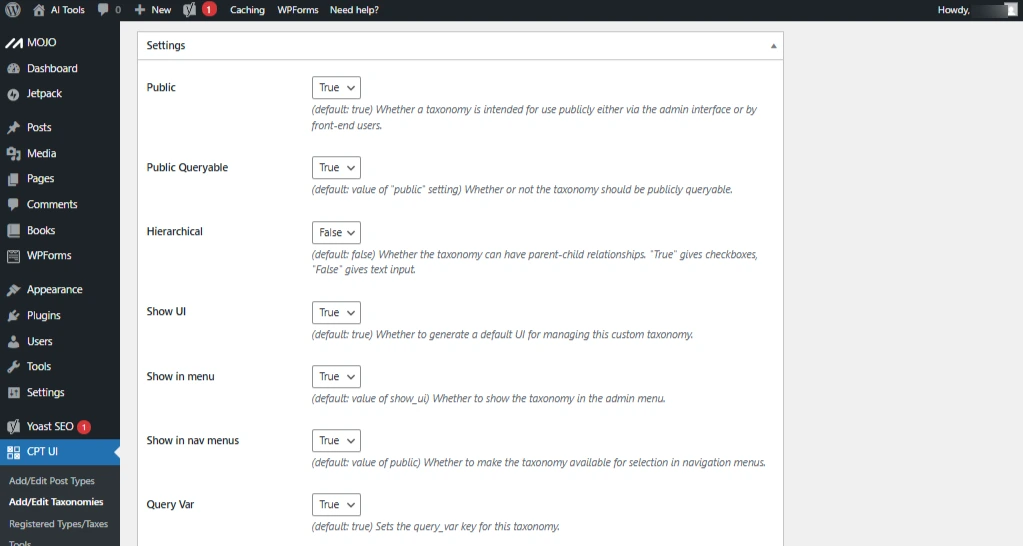
Screenshot 17: Add New Taxonomies Settings
6. Edit Taxonomies
All the Basic settings, Additional Labels, and settings added in the “Add New Taxonomy” tab can be edited here.
Basic Settings
- Taxonomy Slug – Unique ID (cannot contain spaces, e.g., books_category).
- Plural Label – Plural form of taxonomy name (e.g., Book Categories).
- Singular Label – Singular form (e.g., Book Category).
- Attach to Post Types – Choose which post types the taxonomy should be assigned to (Posts, Pages, Products, or Custom Post Types).
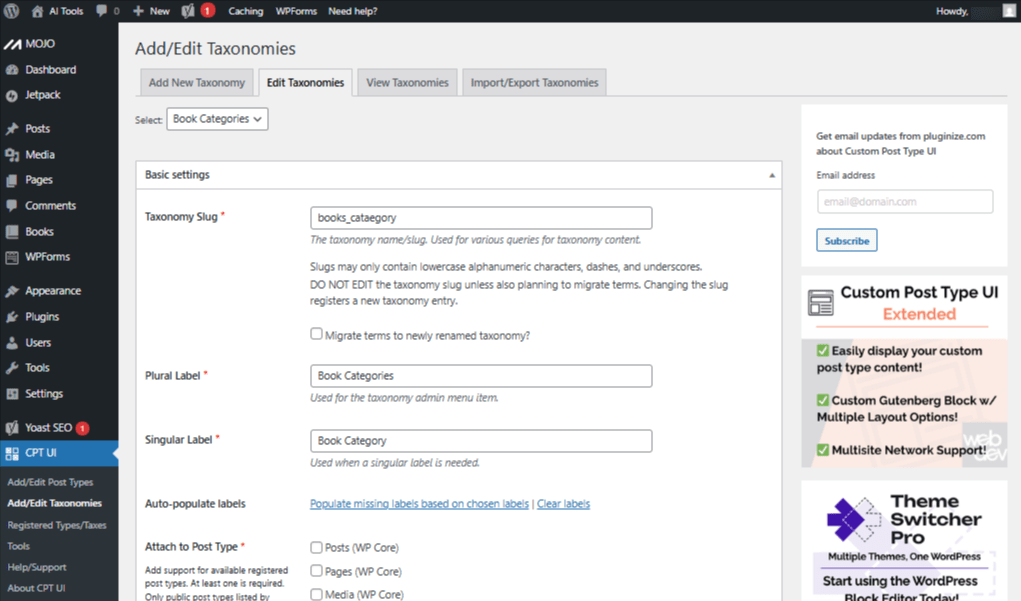
Screenshot 18: Taxonomies Settings
Additional Labels
- Description: Describe the purpose of your taxonomy.
- Menu Name: Specify a custom name for your taxonomy in the admin menu.
- All Items: Displayed as the tab label when viewing all terms of a hierarchical taxonomy while editing a post.
- Edit Item: Shown at the top of the editor screen when editing an existing taxonomy term.
- View Item: Displayed in the admin bar while editing an existing taxonomy term.
- Update Item Name: Custom label for the taxonomy displayed in the admin menu.
- Add New Item: Displayed at the top of the term editor and used as the button text when creating a new taxonomy term.
- New Item Name: Custom label shown in the admin menu for the taxonomy.
- Parent Item: Used to identify the parent item in the admin menu.
- Parent Item Colon: Used to indicate the parent item in the admin menu.
- Search Items: Used as the search prompt in the admin menu.
- Popular Items: Used to indicate popular items in the admin menu.
- Separate Items with Commas: Used when separating items with commas in the admin menu.
- Add or Remove Items: Used for actions like adding or removing items in the admin menu.
- Choose from Most Used: Text displayed in the taxonomy meta box when clicking ‘Choose from the most used items’ and no items are available.
- Not Found: Text displayed to indicate that no terms exist in the taxonomy within the meta box or list table.
- Back to Items: Text shown as a link back to the main index after a taxonomy term has been updated.

Screenshot 19: Taxonomies Additional labels
Settings
- Public: (Default: true) Specifies whether the taxonomy is intended for public use, accessible through the admin interface, or the front end.
- Publicly Queryable: (Default: same as the “public” setting) Determines whether the taxonomy can be queried publicly.
- Hierarchical: (Default: false) Specifies whether the taxonomy supports parent-child relationships. Setting it to “True” displays checkboxes, while “False” uses a text input field.
- Show UI: (Default: true) Determines whether a default user interface should be created for managing this custom taxonomy.
- Show in Menu: (Default: same as show_ui) Specifies whether the taxonomy should appear in the admin menu.
- Show in Nav Menus:(Default: same as public) Determines whether the taxonomy can be included in navigation menus.
- Query Var: (Default: true) Determines the query_var key used for this taxonomy.
- Rewrite: (Default: true) Specifies whether WordPress should generate rewrite rules for this taxonomy.
- Show Tag Cloud: (Default: inherited from show_ui) Specifies whether the taxonomy should appear in the Tag Cloud Widget controls.
- Show in Quick/Bulk Edit Panel: (Default: false) Determines whether the taxonomy is displayed in the quick or bulk edit panels.
- Show in REST API: (Default: true) Specifies whether this taxonomy’s data should be accessible via the WP REST API.
- REST API Base Slug: The slug used in REST API URLs.
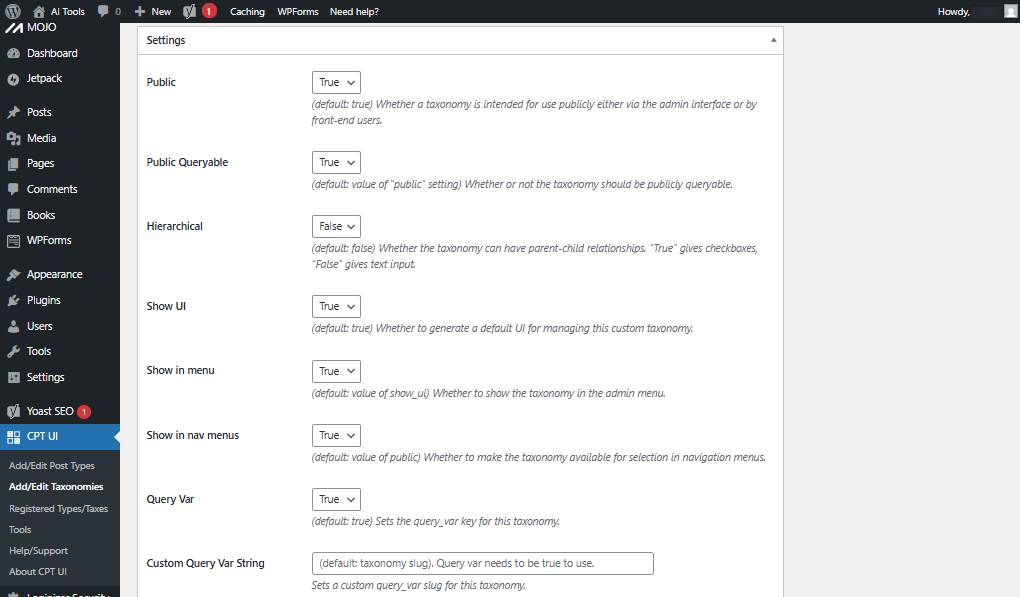
Screenshot 20: Taxonomies Settings
After editing, click Save Taxonomy. The taxonomy will be updated immediately.
7. View Taxonomies
All the Custom post types registered with CPT UI plugin can be viewed here. You can view the following data: Taxonomy Settings, Post Types, Labels, Template Hierarchy.
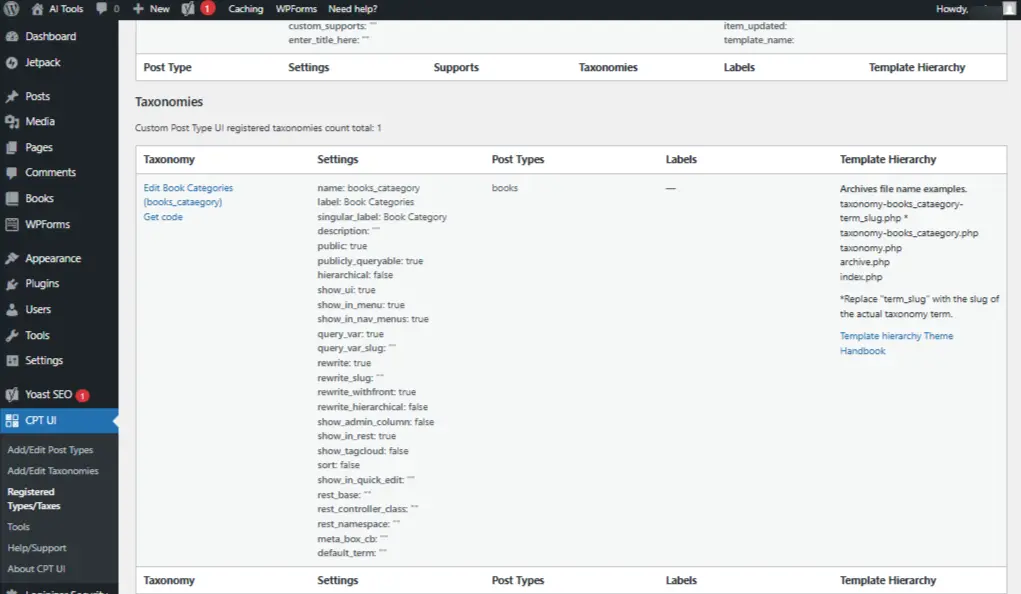
Screenshot 21: Custom Post Type UI registered taxonomies
8. Import/Export Taxonomies
To migrate registered post types or taxonomies to another site using Custom Post Type UI, use the import/export feature. If moving to a site not using Custom Post Type UI, refer to the ‘Get Code’ tab.
Note: This only transfers the settings, not the associated posts or taxonomy terms.
- Import Taxonomies: Importing will overwrite any previously registered settings. To import taxonomies from another WordPress site, paste the exported content from that site and click the ‘Import’ button.
- Export Taxonomies settings:
- Copy the content shown to import your current taxonomies into another WordPress site, or to back up your taxonomy settings.
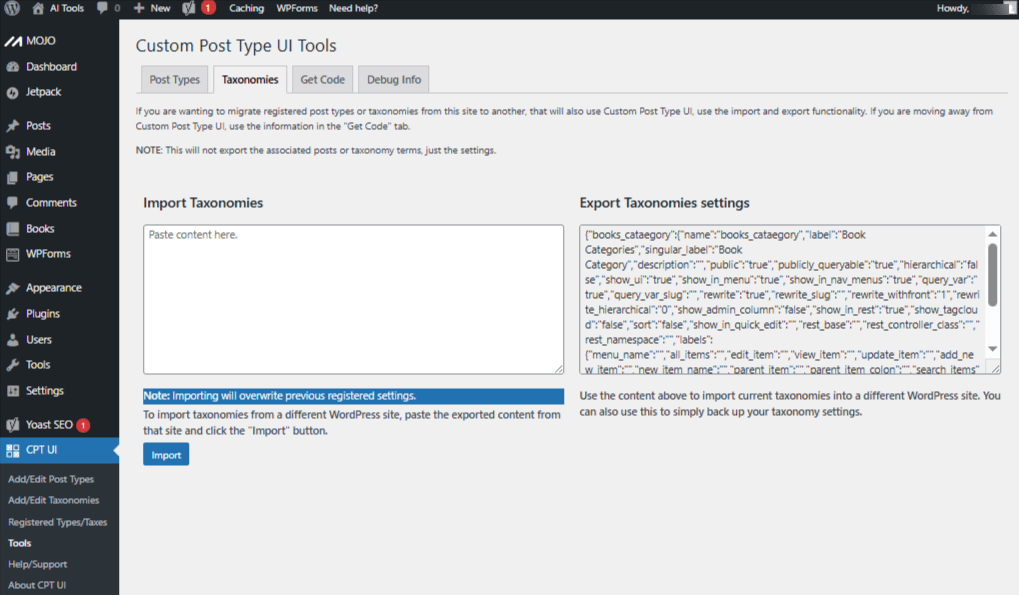
Screenshot 22: Import / Export Taxonomies
9. Get code
Get the PHP code for Custom Post Type and Taxonomy registered through CPT UI. This code snippets are useful for if for some reason you not might wan to use CPT UI further but want to retain your existing registered post types or taxonomies.
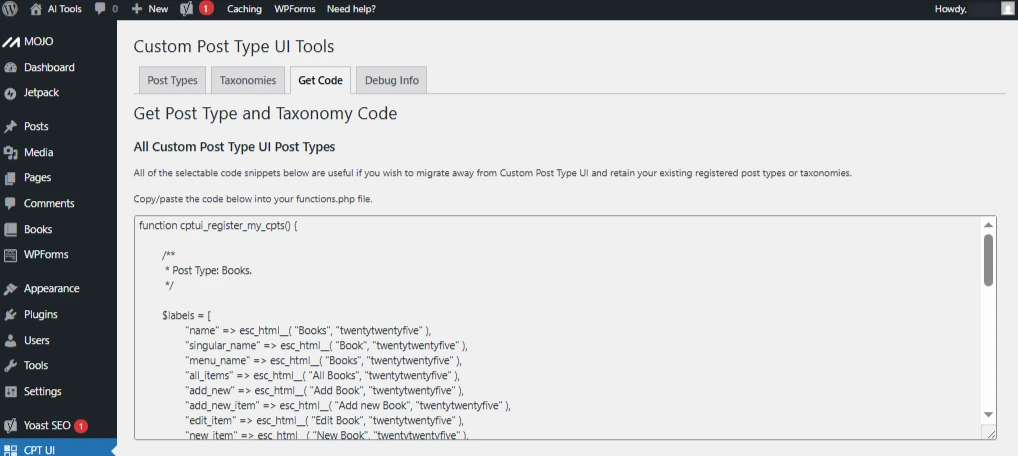
Screenshot 23: All CPT UI Post Types
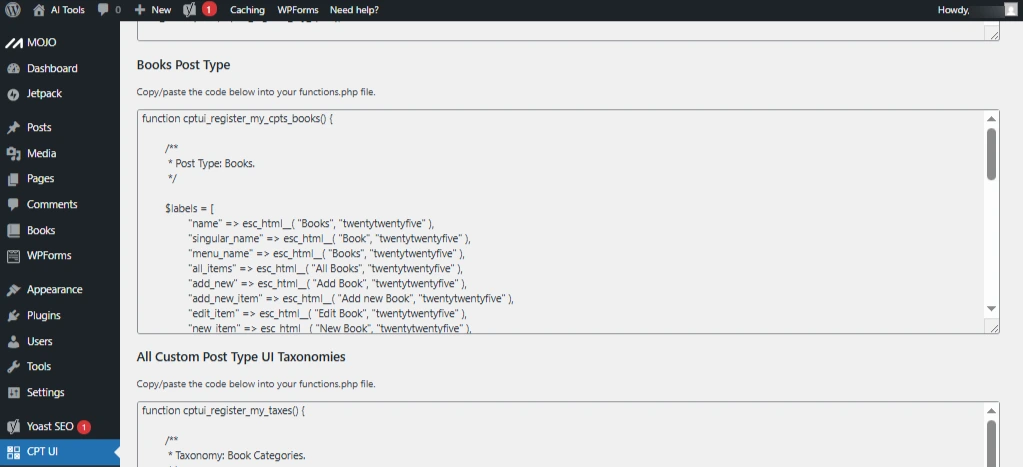
Screenshot 24: Books Post Type
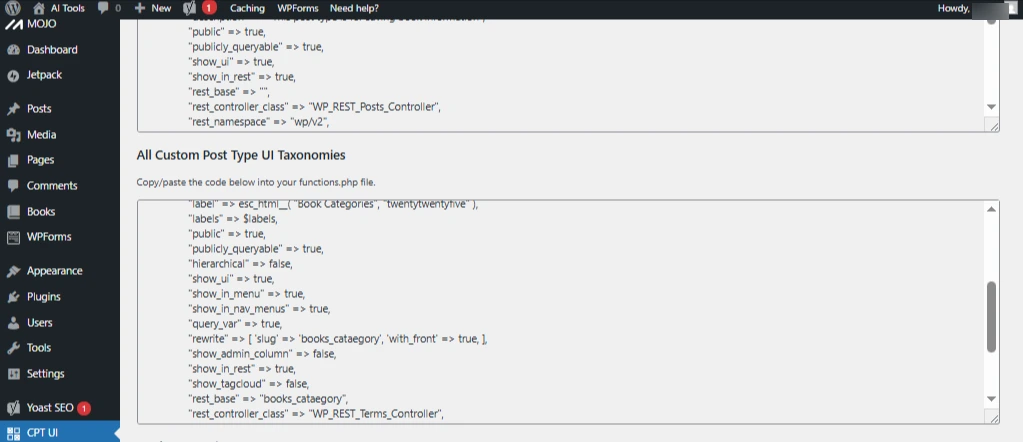
Screenshot 25: All CPT UI Taxonomies
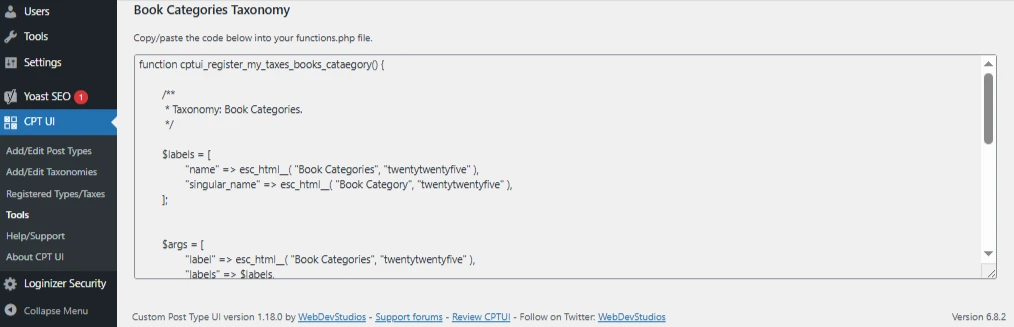
Screenshot 26: Book Categories Taxonomy
10. Debug info
If you’ve requested support for Custom Post Type UI on the forums, you may be asked to send the information below to the plugin developer.
Enter the email they provided in the field at the bottom and click ‘Send debug info.’
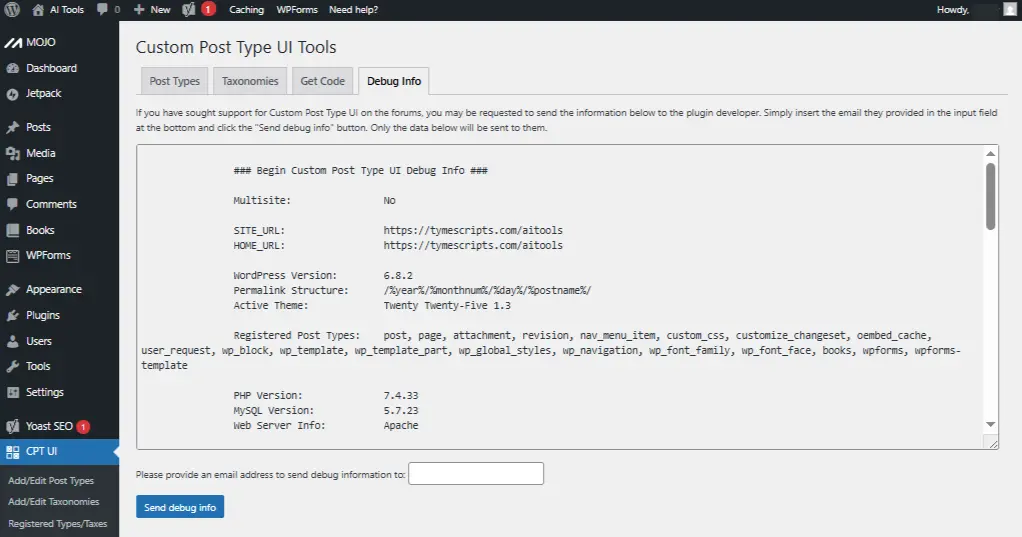
Screenshot 27: Debug info
Conclusion
In WordPress, post types play a vital role in managing and displaying different kinds of content. The default post types—such as posts, pages, attachments, and revisions—cover the basics, but they are not always enough for websites that need more structured or specialized content. This is where Custom Post Types (CPTs) are useful.
They give site owners the flexibility to create unique content like portfolios, testimonials, events, or products, making websites more dynamic and organized.
Instead of writing custom code, you can use the plugin’s simple interface to register and manage new post types and taxonomies. This ensures that even non-technical users can customize their website’s content structure to match their business needs.
Published on Nov 3, 2025 | Updated on Nov 3, 2025