Introduction
Google Analytics 4 (GA4) gives marketers and developers the flexibility to go beyond standard tracking by creating custom events tailored to business goals.
In GA4, everything is an event, but there are four distinct types of events.
Automatically Collected Events
Automatically collected events are the interactions GA4 tracks right out of the box. The moment you set up GA4 on your site or app, it begins recording these events without any additional work from your side.
Here are some examples of automatically collected events:
- first_visit: when a user visits your site or app for the first time
- session_start: when a new session begins
- user_engagement: when users focus on your site or app for a measurable time
These built-in events help you understand basic user activity without adding code.
Enhanced Measurement Events
Enhanced measurement events are also collected automatically, but only if the enhanced measurement feature is enabled in your GA4 property settings.
With enhanced measurement turned on, GA4 can track additional interactions like
- Scroll tracking
- Outbound link clicks
- Video engagement (play, pause, progress)
- File downloads
- Site searches
These events provide deeper insights without needing custom implementation.
Recommended Events
Recommended events are actions that you manually implement on your website or app. Google provides predefined names and parameters for these events, which align with common needs such as:
- For All Businesses – login, sign_up, search, share, etc
- For Online Sales – add_to_cart, begin_checkout, add_payment_info, purchase, etc
- For Lead Generation – generate_lead, qualify_lead, working_lead, etc
- For Games – level_start, level_end, level_up, earn_virtual_currency, etc
Custom Events
Custom events are entirely defined by you. These are useful when the automatically collected, enhanced measurement, or recommended events do not fit your specific use case.
Since custom events are not part of GA4’s standard reports, you will need to create custom reports or use the Explorations feature to analyze them. It’s best to use custom events only when no other option meets your tracking requirements.
This blog discusses the process for setting up custom event tracking in Google Analytics 4 without Google Tag Manager (GTM)
Step-by-Step Guide to Configuring Custom Events in GA4
Configuring events in GA4 is easier than it seems. Below, we’ve outlined clear steps to help you set up, edit, and manage events, allowing you to track the interactions that matter most.
Method 1: Create Custom Events Without Code (using the GA4 interface only)
Best For:
- Page-based tracking scenarios where events are triggered by URL changes or existing GA4 events
- Quick setup requirements with minimal technical resources
- Small teams or organizations with limited development capacity
- Simple conversion tracking, like thank you page visits or specific URL patterns
- Marketing teams that need independence from development cycles
What You Can Track Without Code
Page-Based Events:
- Thank you for page visits
- Specific URL patterns (pricing pages, product pages)
- Form completion confirmation pages
- Download completion pages
Modifying Existing Events:
- Adding parameters to automatically collected events
- Creating variations of enhanced measurement events
- Combining multiple existing events into new custom events
What cannot be tracked:
- Custom user interactions like specific button clicks, hover events, or form field interactions
- Dynamic content interactions, such as AJAX form submissions or single-page application events
- Complex conditional logic where events should fire based on multiple criteria
- Real-time user behavior, like scroll depth percentage, time spent on specific sections
- Cross-domain tracking with custom parameters
- Events that occur before page load or during page transitions
Steps for custom events tracking without code
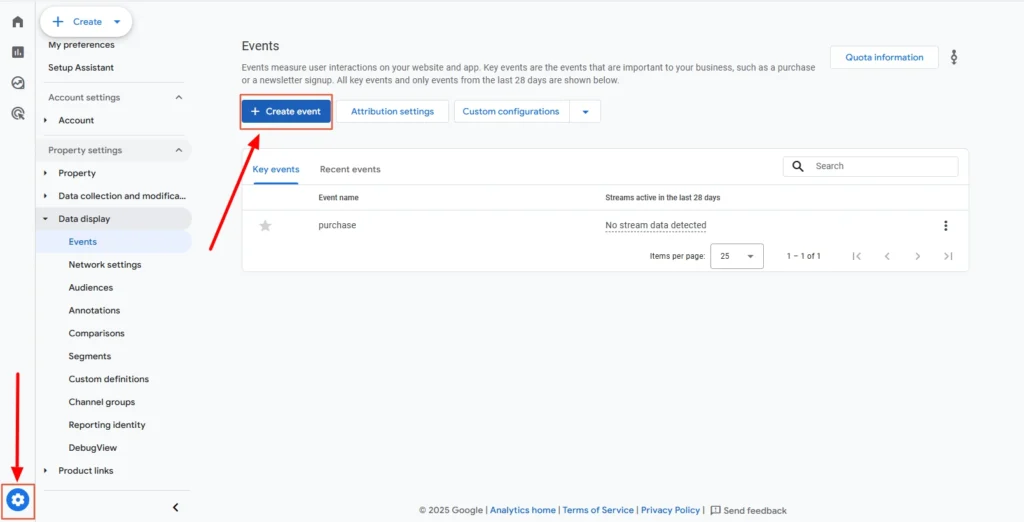
- Click the Admin gear icon in the bottom left.
- Under the Data column (or Data Display), choose Events.
- Click Create Event (top right)

Screenshot 1: GA4 Events Create
- The Create an Event pop-up will appear. Click on the View More Options button under the Create without Code Section, as shown in the screenshot below.
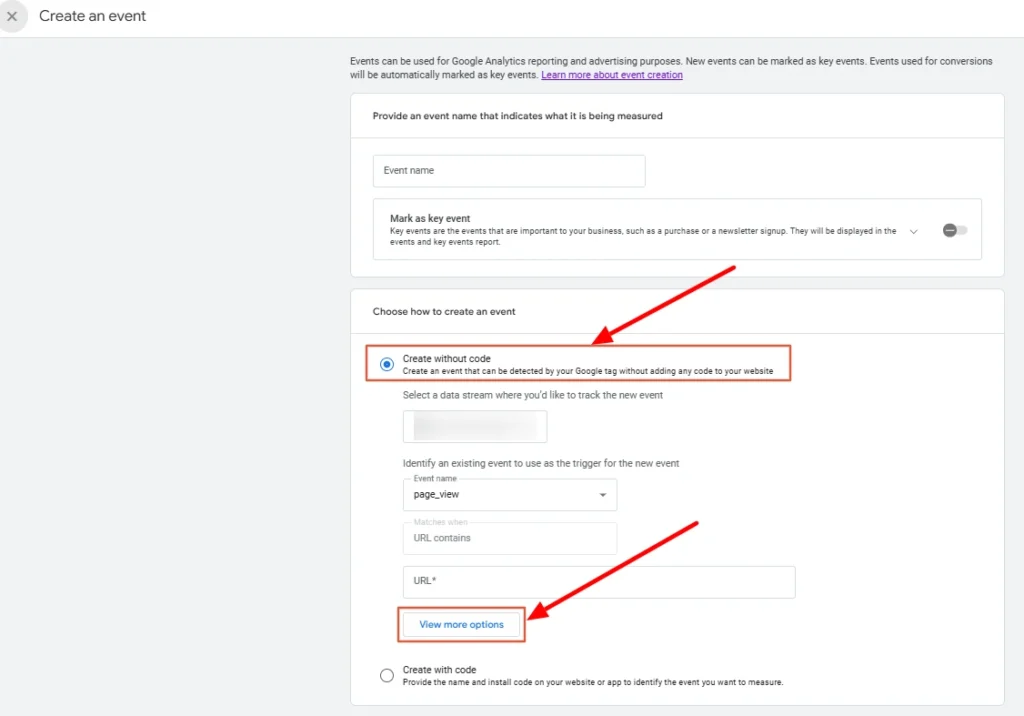
Screenshot 2: Create without Code Section
- Another Create Events panel will appear.
- Name your custom event by using lowercase letters, with underscores to separate words, for example, ‘contact_us_button_click’.
- Note: We will debug this custom event later using debug tools
- GA4 limits names to 40 characters; avoid spaces or uppercase letters.
- Then, we need to move on to the Matching Conditions section, which specifies when the event should fire using conditions based on an existing event and its parameters. Typical setup includes:
- event_name equals page_view
- link_text equals Contact Us
- The following parameters are available for creating custom events :
| event_name | affiliation |
| content_id | content_type |
| coupon | creative_slot |
| currency | discount |
| group_id | index |
| item_brand | item_category |
| item_id | item_list_id |
| item_list_name | item_name |
| item_variant | items |
| language | location_id |
| method | page_location |
| page_referrer | page_title |
| payment_type | price |
| promotion_id | promotion_name |
| score | search_term |
| shipping | shipping_tier |
| success | tax |
| transaction_id | value |
| virtual_currency_name |
- When creating or editing an event in GA4, tick the checkbox of Copy parameters from the source event to pull in all details like URL, button text, and page info from the original event. This ensures your custom event is complete for reporting purposes.
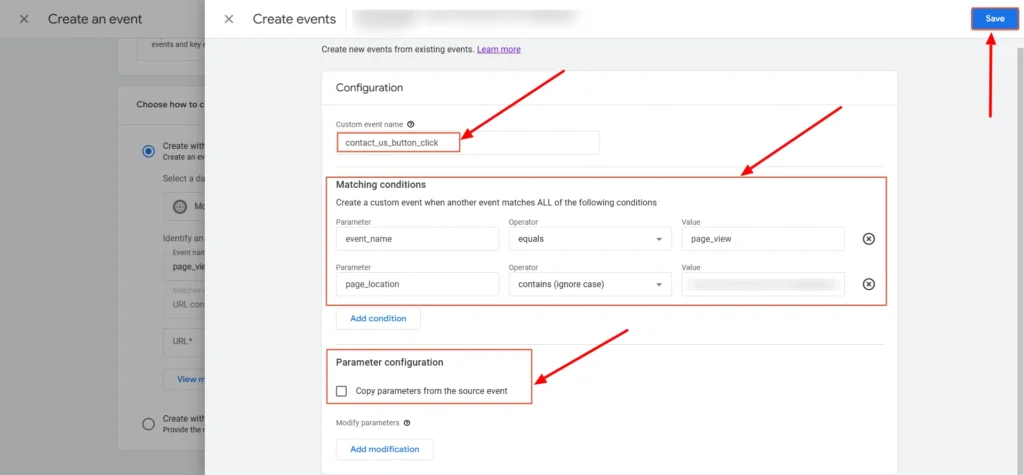
Screenshot 3: Custom Event Config
- Once you hit Save>Create, GA4 starts tracking the custom event in the background.
- Your event will now start triggering when the matching conditions are met (no code needed).
- It may take a few hours for the data to appear in reports and up to 24–48 hours to show in standard reporting.
Method 2: Create Custom Events With Code (Manual Implementation)
Creating custom events with code is most suitable for the following situations:
- Complex user interaction tracking requiring precise control over when events fire
- E-commerce implementations with detailed product tracking and custom parameters
- Single-page applications or dynamic websites where standard page view tracking isn’t sufficient
- Advanced debugging requirements where you need detailed control over event timing and parameters
- High-accuracy tracking scenarios where you cannot afford to miss events
Steps for custom events tracking using code
Let’s track a button click (such as a “Contact Us” submit button) in GA4 using a custom event.
Create the Event in the GA4 Interface
- Click the Admin gear icon in the bottom left.
- Under the Data column (or Data Display), choose Events.
- Click Create Event (top right)
Screenshot 4: Create Event
- The Create an Event panel will appear.
- In the Event name field, enter the name, e.g., contact_us_form_submit_using_code.
- Note: According to the official documentation, marking an event as a key event is optional when creating custom events. However, when creating an event using the code, some reason “Create event” button click is not working unless the “Mark as key event” toggle is turned on. This appears to be a bug at the time of writing this blog.
- In contrast, when creating a custom event without code, you can create the event even when the “Mark as key event” toggle is off.
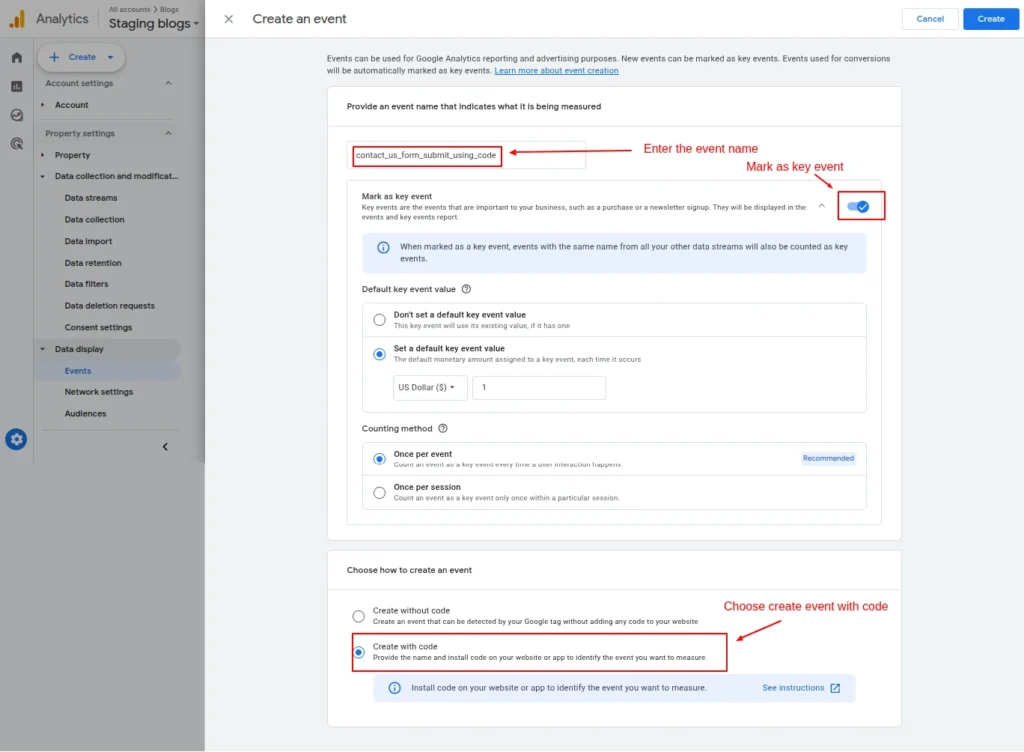
Screenshot 5: Create an event with custom code
- Then, select Create with code. This means the event would be fired from your website and doesn’t need extra conditions here.
- Finally, click on Create.
Add the Code to Your Website
- You’ll be adding the custom events code to the functions.php file of your WordPress child theme. Using a child theme is recommended so your changes aren’t lost when updating the parent theme.
- Paste the following code into the functions.php file of your active child theme:
| <?php function my_custom_ga4_contactus_submit_event_script() { ?> <script> document.addEventListener(‘DOMContentLoaded’, function() { var form = document.querySelector(‘#contact-us form’); // Adjust selector to your form container if (form) { form.addEventListener(‘submit’, function(event) { if (typeof gtag === ‘function’) { gtag(‘event’, ‘contact_us_form_submit_using_code’, { event_category: ‘form’, event_label: ‘Contact Us Form’, value: 1 }); } }); } }); </script> <?php } add_action(‘wp_footer’, ‘my_custom_ga4_contactus_submit_event_script’); |
- The above code adds custom JavaScript to your WordPress child theme that listens for a form submission event and then fires a GA4 custom event (e.g., contact_us_form_submit_using_code). This approach ensures the event is recorded only after the form is successfully submitted.
- Note: The code provided is a sample and may need adjustments to match your specific form’s HTML structure or WordPress form implementation.
That’s it; your new custom event is now ready to be tracked. Now, let’s see methods to debug custom events.
Testing and Debugging Custom Events
The first step is to enable debug_mode so that events appear in GA4’s DebugView for testing.
To do that, there are two options
- Google Analytics Debugger (Chrome Extension)
- Manually setting debug_mode to true in the code
Google Analytics Debugger (Chrome Extension)
- Go to the Google Analytics Debugger extension page on the Chrome Web Store.
- Click “Add to Chrome.”
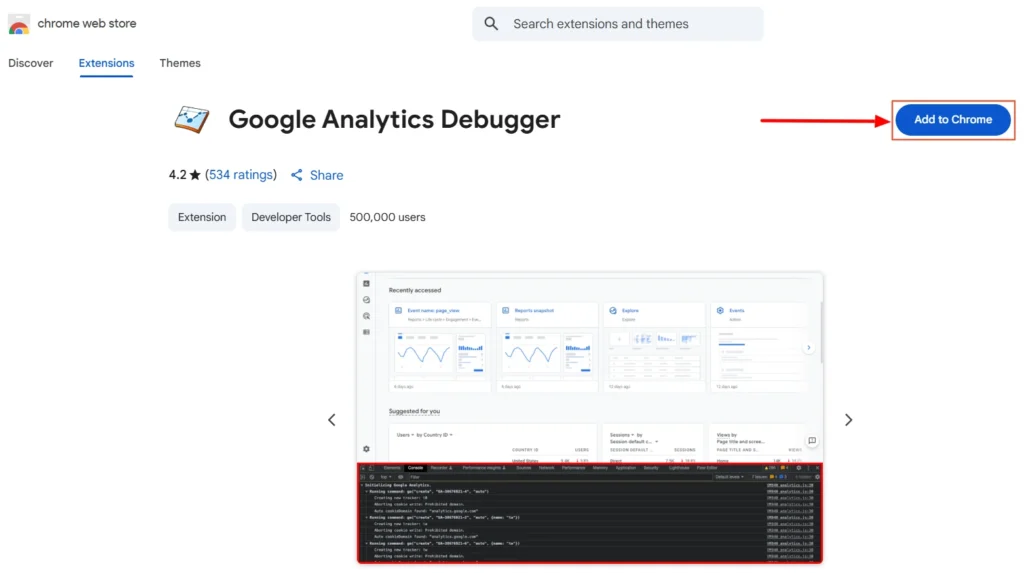
Screenshot 6: GA Debugger Extension
- Click “Add Extension” in the pop-up to confirm.
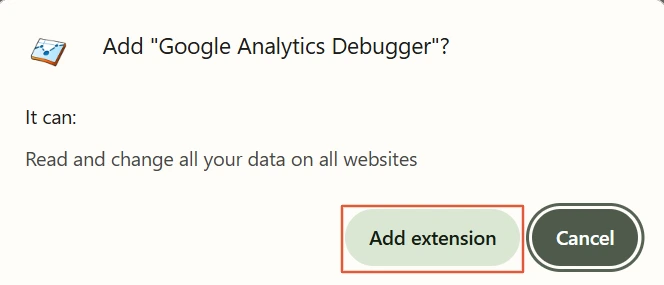
Screenshot 7: Add Extension
- After installing, click the extension icon (puzzle piece) in the Chrome toolbar.
- Find “Google Analytics Debugger” and click the pin icon to keep it visible.
- Click the extension to enable it; you should see an “ON” icon when the extension is on.

- Now refresh your website page where the event code is triggered (e.g., where your contact_us_button_click_code runs) and click.
- Right-click anywhere on the webpage and select Inspect, or press Ctrl + Shift + I (Windows) or Cmd + Option + I (Mac).
- Go to the Console tab.
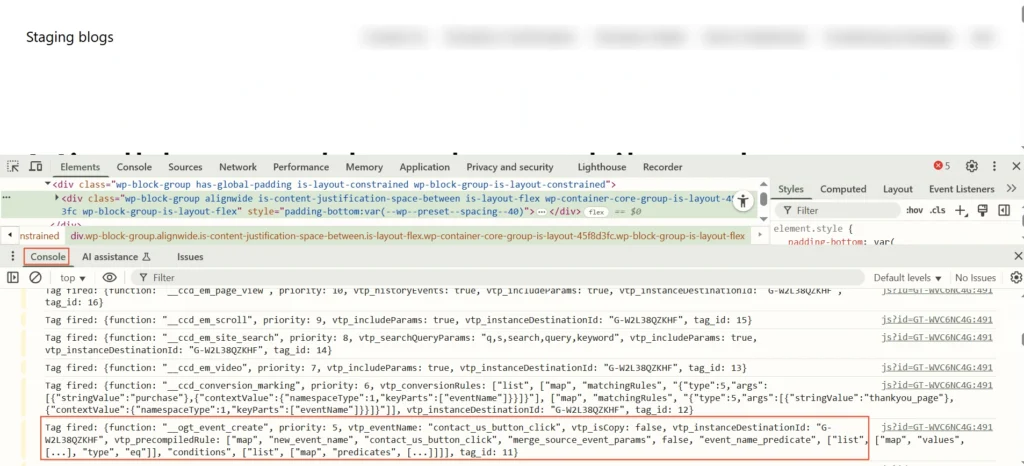
Screenshot 8: GTM Tag Fired Console
- You’ll now see detailed logs from GA4, including:
- Page view events
- Custom events like contact_us_button_click_wc
- Configuration info
- Any event parameters being passed
Manually setting debug_mode to true
The following code will make the custom events appear in DebugView immediately, allowing you to test and verify your tracking in real time.
| <script> gtag(‘event’, ‘contact_us_form_submit_using_code’, { // Add other parameters that need to be passed debug_mode: true // activate the debug mode }); </script> |
DebugView in GA4
- Once the debug mode is enabled using the Chrome extension or the manual code, go to Google Analytics GA4 > Admin > DebugView (under the Property column).
- Act on your site (e.g., click the Contact Us button).
- In DebugView, you should see the custom events appear on the timeline.
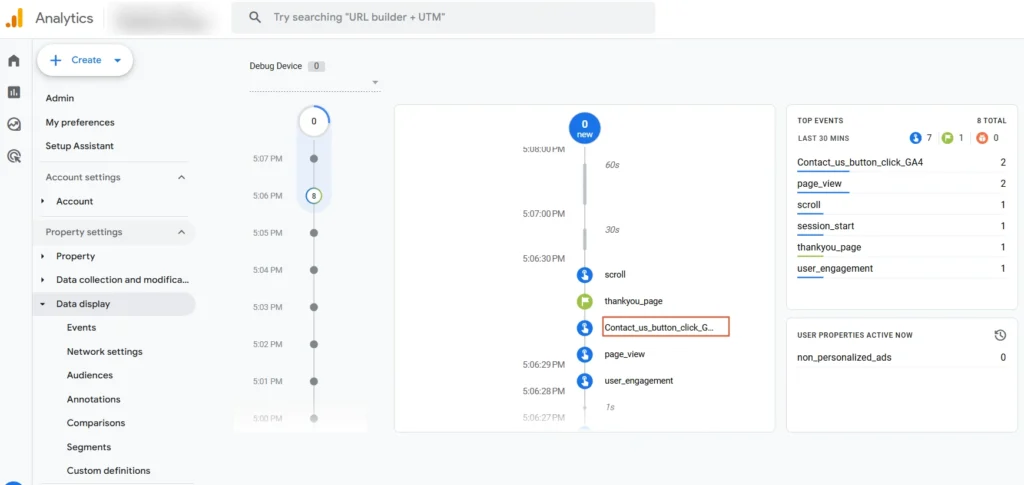
Screenshot 9: GA4 DebugView Event
Conclusion
With GA4’s custom events, you can keep track of the interactions that are most important to your business, whether it’s lead form submissions, key button clicks, or advanced e-commerce actions.
The option to create custom events in GA4 without using code is quick and easy to use for simple needs. But for dynamic websites, single-page applications, or scenarios where accuracy is critical, implementing custom events via code gives you the precision and control you need.
That’s it for this blog; now you know how to create custom events in GA4, when to use the without code option, and when to rely on code for more accurate tracking.
Published on Oct 20, 2025 | Updated on Jan 16, 2026
Author

Sakina Attarwala
Author
|
Reviewer

Abhijeet Bendre
Author
|