
Introduction
In today’s digital world, website speed is no longer optional; it’s essential for user experience, SEO, and conversion rates. A slow WordPress site can frustrate visitors, increase bounce rates, and affect search rankings.
For WordPress site owners, optimizing performance can feel overwhelming with so many plugins & settings to consider. That’s where FlyingPress stands out by offering an easy-to-use, all-in-one WordPress optimization solution, combining smart caching, image & font optimization, and advanced CSS/JS handling for fast page loads.
In this guide, we’ll show you exactly how to configure FlyingPress to maximize your WordPress site’s speed, from caching and CDN integration to image optimization & database cleanup.
Why FlyingPress Is the Go-To WordPress Speed Plugin?
FlyingPress is widely recognized as a leading WordPress performance plugin for several key reasons:
- All-in-One Optimization: Covers caching, lazy loading, CSS/JS optimization, and database cleanup in a single plugin.
- User-Friendly Interface: Makes complex performance enhancements accessible for non-technical users.
- Seamless CDN & Cloudflare Integration: Ensures faster global delivery of your content.
- Advanced Features for Dynamic Sites: Supports role-based caching, query string control, and cookie bypass rules, ideal for enterprise websites, membership sites, or content-heavy blogs.
- Proven Speed Boosts: Many users see improvements in Core Web Vitals and overall page load speeds, thanks to features such as self-hosted fonts, lazy rendering, and deferred JavaScript.
FlyingPress effectively balances simplicity & advanced functionality, making it the go-to WordPress speed optimization plugin.
Optimizing Your WordPress Site with FlyingPress
Activating FlyingPress
- Go to Plugins → Add New → Upload Plugin and choose the FlyingPress ZIP.
- Click Install Now, then Activate.
- Open the FlyingPress Dashboard and paste your license key → Activate License.
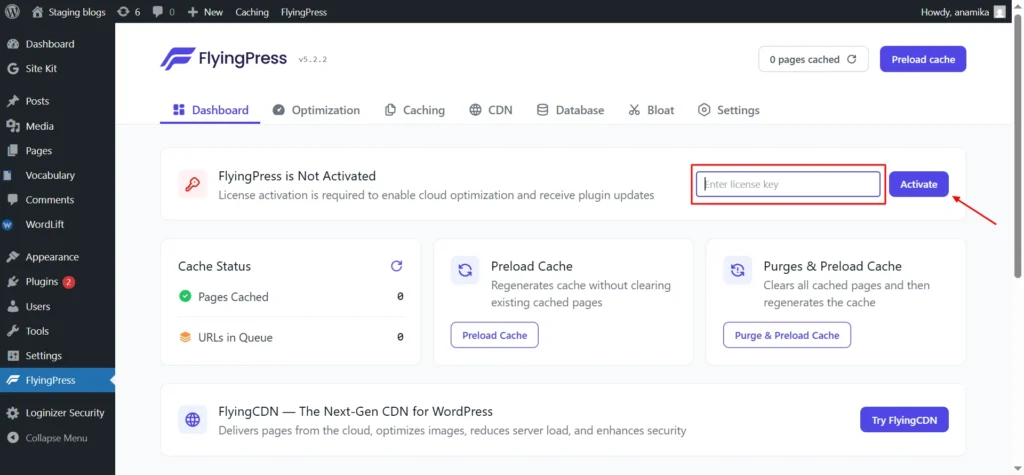
Screenshot 1: Activating FlyingPress
The FlyingPress dashboard provides essential cache management controls. From here, you can see:
- Total Pages Cached – Displays how many pages have been successfully cached.
- URLs in Queue – Shows pages currently waiting to be cached.
- Preload Cache Option – lets you start preloading cached pages manually.
- Purge Cache Button – Allows you to clear the entire cache and rebuild it instantly.
The dashboard also provides quick access to documentation, the Facebook community, and support tickets.
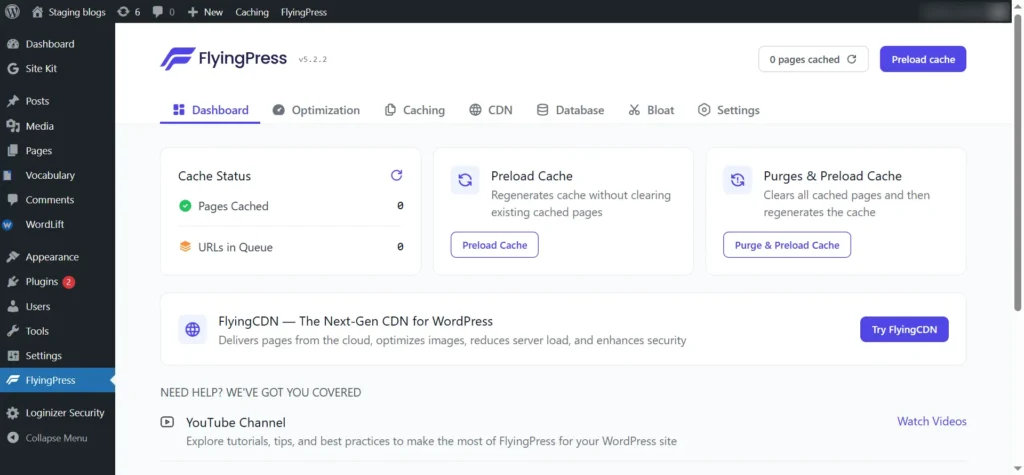
Screenshot 2: FlyingPress Dashboard
Without any further delay, let’s dive into the core FlyingPress settings and see how to configure them properly for optimal performance.
Optimization

Screenshot 3: Optimizing CSS & JavaScript
Step 1: Optimizing CSS & JavaScript
Optimizing your CSS and JavaScript files is a crucial step to boost your WordPress site’s speed, and FlyingPress makes this process seamless with its smart features.
- Minify CSS and JavaScript:- Minification is a simple yet powerful speed optimization. FlyingPress removes unnecessary spaces, line breaks, and comments from CSS and JS files, reducing their size for faster page loads.
- Remove Unused CSS:- FlyingPress’s cloud system automatically removes unused CSS. Since this can affect complex themes or page builders like Elementor, test your site carefully after enabling it and exclude any problematic files if necessary.
- Delay All JavaScript:- This feature lets you control when JavaScript files load to improve your site’s performance. FlyingPress offers three options:
- Defer Loading: Loads JavaScript after the page’s main HTML is parsed. This speeds up the initial render while keeping functionality intact.
- Load When Idle: Loads JavaScript only after the page fully loads and the browser is idle. Ideal for pages with heavy scripts or where interactivity isn’t needed right away.
- Load After Interaction: Loads JavaScript only after the user interacts with the page (e.g., clicks, scrolls, or moves the mouse). Perfect for maximizing speed on static or content-led pages.
- Load Third-Party Scripts on Interaction:- This optimization setting delays the loading of third-party scripts, such as ads, analytics, and widgets, until a user interacts with the page, ensuring that your main content loads instantly for a faster and smoother browsing experience.
- Delay Specific Scripts on Interaction: – For greater control, you can manually select which scripts to delay. This helps you fine-tune your optimization setup and minimize any potential conflicts.
- Self-Host External CSS and JavaScript:- Enabling this lets FlyingPress download & serve important third-party CSS and JS files locally. This reduces external HTTP requests, improves Time To First Byte (TTFB), & boosts site responsiveness.
Step 2: Optimizing Images, Videos & iframes
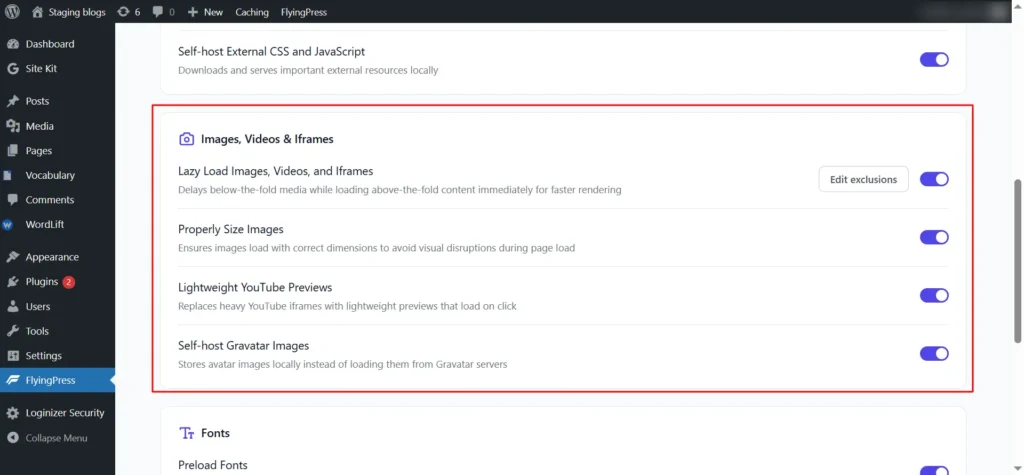
Screenshot 4: Optimizing Images, Videos & iframes
When it comes to optimizing images, videos, and iframes on your WordPress site, FlyingPress makes it easy to improve load times & overall user experience.
- Lazy Loading for Images and Videos:- Enabling this feature delays off-screen media from loading until scrolled into view, reducing initial page load time and boosting performance and SEO.
- Properly Size Images:- When images lack width and height attributes, layout shifts can occur as the page loads. FlyingPress automatically adds these attributes, stabilizing the layout and preventing disruptive visual shifts.
- YouTube Preview Images:- Instead of loading the full YouTube embed immediately, it replaces the embed with a lightweight preview thumbnail that only loads the full video player when clicked, greatly reducing page weight and speeding up initial loads.
- Self-host Gravatar Images:- Just like hosting fonts locally, you can also serve Gravatar images from your own server. Doing that, you reduce extra third-party requests, helping to improve your site’s loading speed.
Step 3: Optimizing Fonts
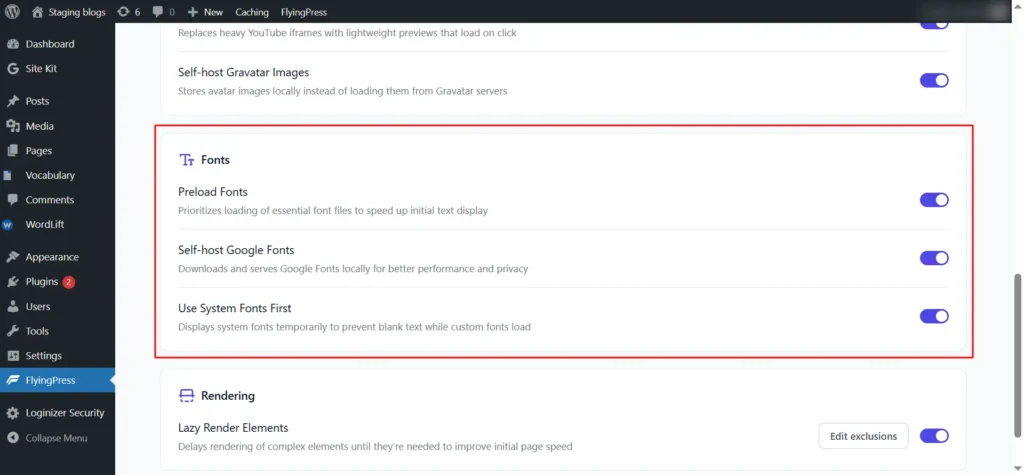
Screenshot 5: Optimizing Fonts
Fonts shape your website’s visual identity, but unoptimized fonts can slow your site and hurt performance. Tools like FlyingPress make it easy to optimize fonts for faster load times and better user experience.
- Preload Critical Fonts:- Preloading the key fonts used above the fold, usually one or two essential ones, ensures that browsers load them first. This speeds up the rendering of visible text, improving the page load time.
- Self-Host Google Fonts: – By enabling this, you can download these fonts directly to your server instead of loading them from Google’s servers. This reduces the number of external requests, resulting in faster loading times and better performance.
- Use System Fonts First: Enable this to show text immediately with system fonts while custom fonts load in the background, preventing invisible text delays and improving site speed and readability.
Step 4: Lazy Render Elements
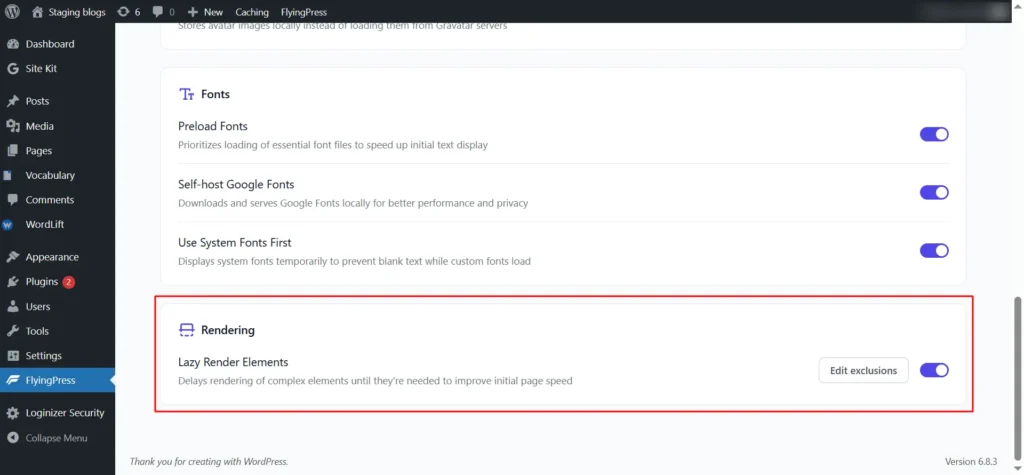
Screenshot 6: Lazy Render Elements
To boost your website’s initial load speed, you can lazy render HTML elements. Lazy rendering delays the loading of certain sections until they become visible on the screen, making it one of the most effective techniques for improving performance.

Screenshot 7: Lazy Render Exclusion
You can also exclude above-the-fold elements that should load instantly for a better user experience. To add or exclude elements, click the respective button in the settings and list the CSS selectors, such as:
- .main-navigation → Main navigation
- .hero-banner → Hero section
Once you’ve added these exclusions, save your changes.
If you’re unsure about the class name, use the Inspect Element tool in your browser. Open a page, right-click the section you want to check, and select Inspect. You’ll find the class name there. Copy it and add it to the plugin’s settings as shown above in screenshot 7, and then save your changes.
Caching
Next is Caching, which is one of the easiest ways to make your site load faster:
Step 5: Set Basic Caching Options
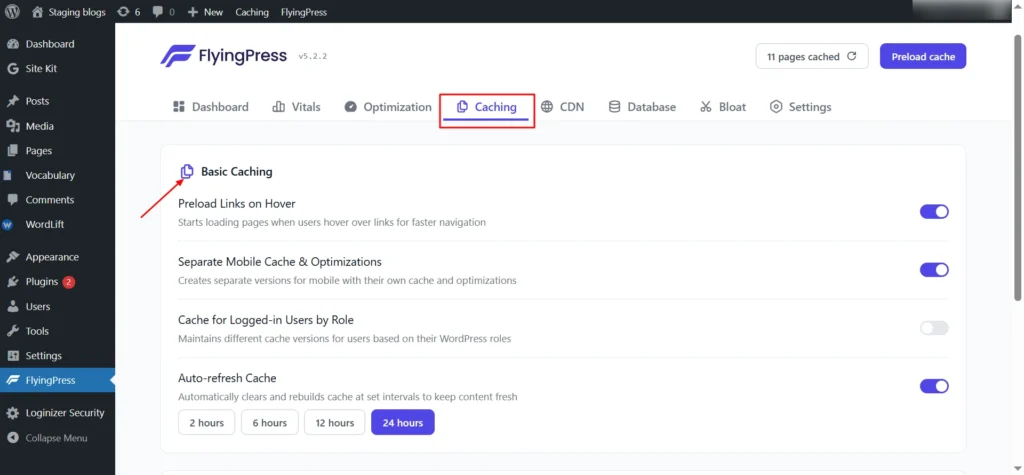
Screenshot 8: Basic Caching
- Preload Links on Hover:- Begins preloading pages when users hover over links, creating a smooth and fast navigation experience.
- Separate Mobile Cache & Optimizations:- By enabling a separate mobile cache, you ensure that your site serves optimized content for mobile devices.
- Cache for Logged-in Users by Role:- For most blogs and informational sites, this setting can stay disabled. Enable it only for membership or content sites where logged-in users need personalized caching.
- Auto-Refresh Cache:- Set your cache refresh to 2, 6, 12, or 24 hours based on content update frequency. Use 24 hours for regular blogs, and 2 to 4 hours for news sites or frequently updated content to ensure visitors always see the latest information.
Step 6: Advanced Caching options (optional)
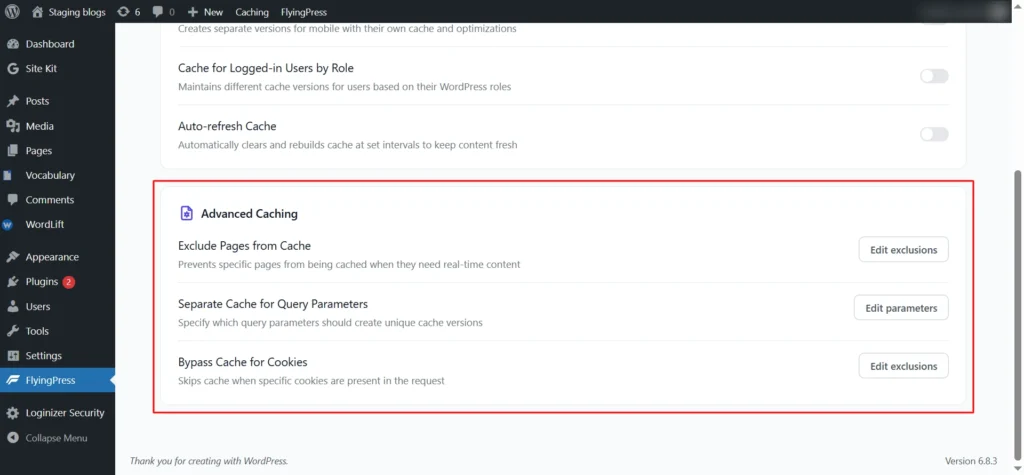
Screenshot 9: Advanced Caching
Enhance your site’s speed by customizing caching for dynamic content. This is useful for WooCommerce or membership sites, allowing you to exclude specific pages, user queries, or cookies from being cached, ensuring accurate, real-time content delivery.
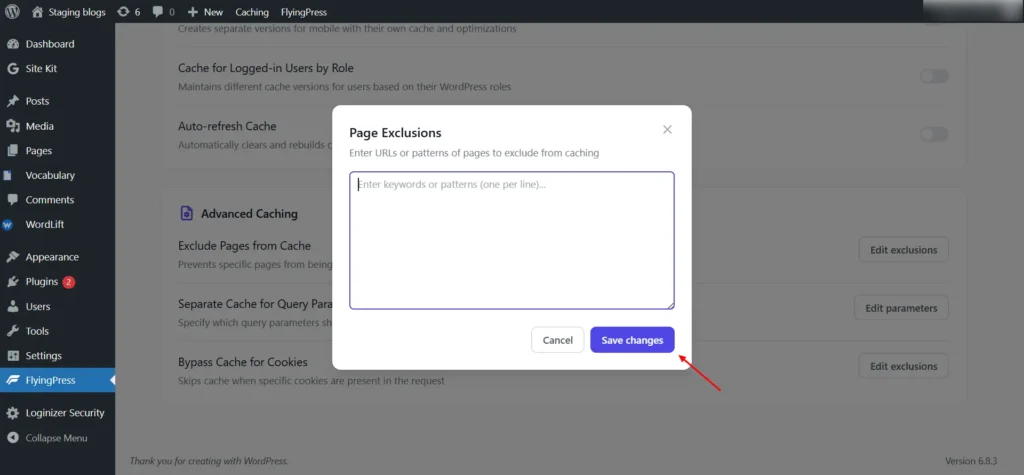
Screenshot 10: Page Enclusion from Caching
- Exclude Pages from Cache:- Some pages shouldn’t be cached, for example, a user account page.
- If the permalink is https://yourwebsite.com/my-account
- Simply add the page’s permalink (like my-account) to the exclude list, and FlyingPress will skip caching it.

Screenshot 11: Query Strings to Cache
- Separate Cache for Query Parameters:- Exclude pages with specific query parameters (e.g., category) from caching by entering the parameter; these pages will always load fresh.
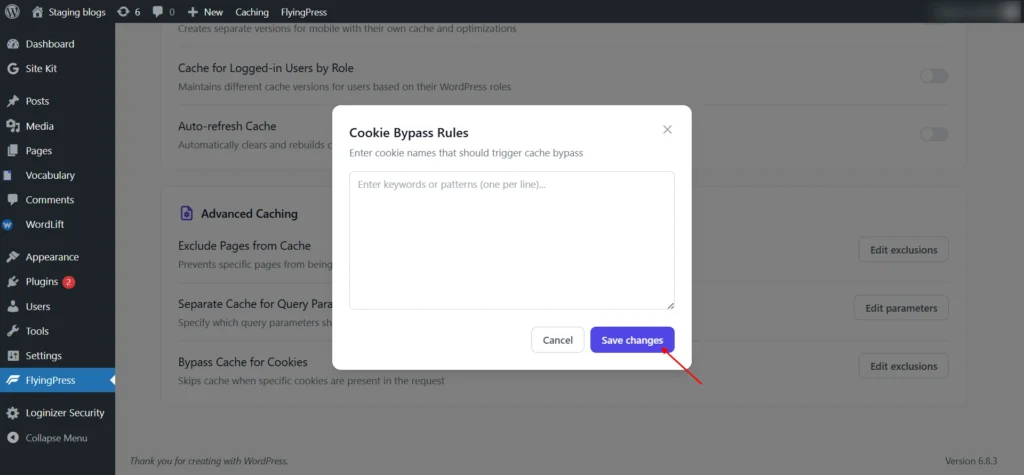
Screenshot 12: Cookie Bypass Rules
- Bypass Cache for Cookies: Similarly, you can bypass caching for specific cookies. Enter the cookie names in the bypass list, like (user_session for logged-in members), and FlyingPress will serve uncached pages for users with those cookies, perfect for logged-in users or personalized experiences.
CDN
Step 7: Set up a CDN

Screenshot 13: Enable CDN
A Content Delivery Network (CDN) can improve your website’s speed by serving static assets like images, CSS, and JavaScript from servers located around the world. FlyingPress makes it easy to integrate a CDN, offering multiple options according to your needs:
Custom CDN Providers
If you prefer another CDN provider, FlyingPress supports custom configurations:
- Enter your CDN domain (e.g., cdn.yoursite.com)
- Select which file types to serve via CDN (CSS, JS, images, fonts) or all files
FlyingCDN
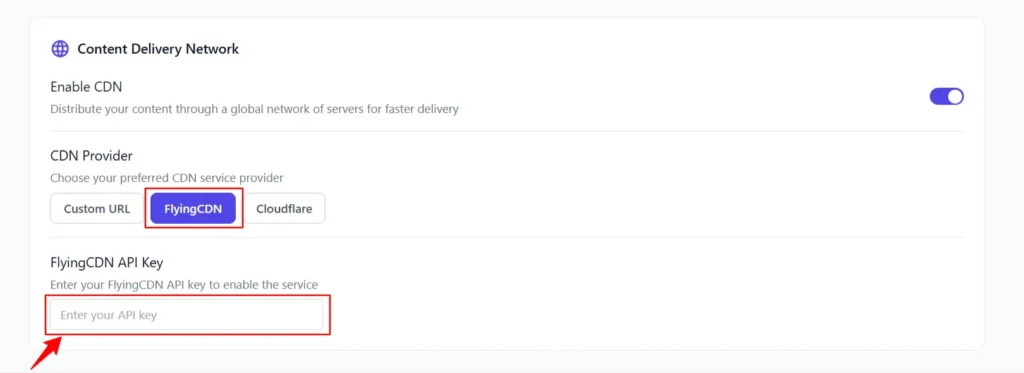
Screenshot 14: FlyingCDN
FlyingCDN is the premium option, offering advanced features and seamless integration with FlyingPress. Simply enter your API key, and FlyingPress handles the configuration automatically.
Cloudflare
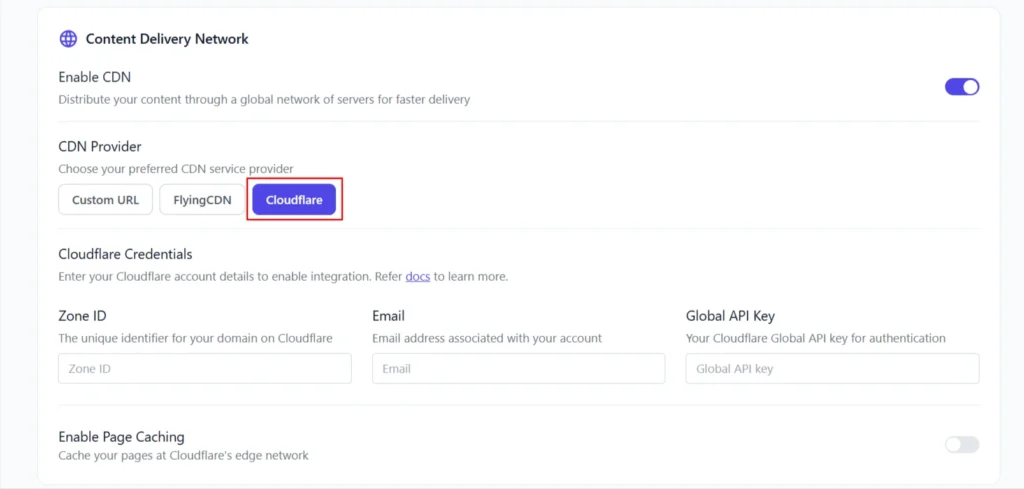
Screenshot 15: Cloudflare
FlyingPress also integrates directly with Cloudflare, allowing you to take advantage of its edge network without additional costs:
- Enter your Zone ID from the Cloudflare dashboard
- Add your Global API Key
- Enable Page Caching to cache your full HTML content directly on Cloudflare’s edge network.
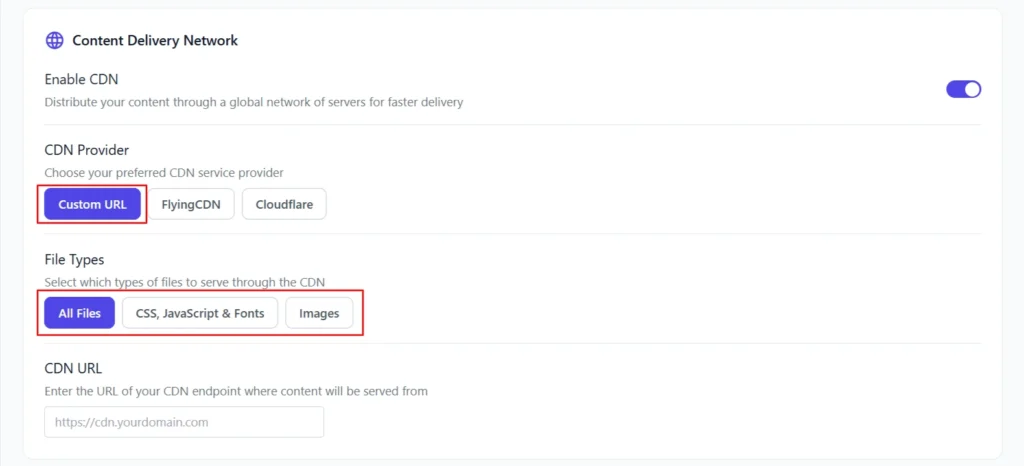
Screenshot 16: Custom URL
After setting up the CDN settings, you can proceed to the next step, database optimization.
Database
A clean, optimized database keeps your WordPress site fast. FlyingPress automates maintenance, letting you focus on content while your site runs smoothly. Database optimization in FlyingPress comes with four main sub-options. Let’s take a closer look at each option.
Step 8: Automatic Cleaning (optional)
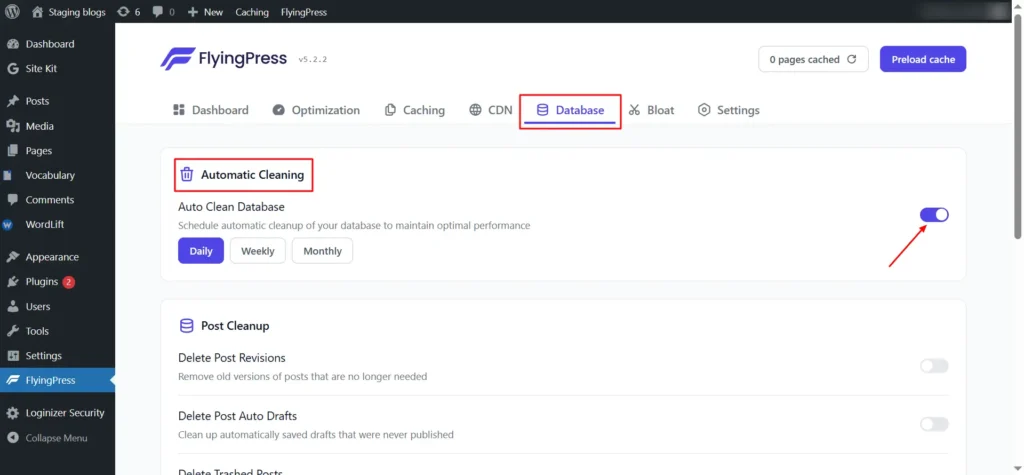
Screenshot 17: Database Automatic Cleaning
You can configure the automatic cleanup process based on your site’s activity:
- Daily – Recommended for high-traffic websites
- Weekly – Ideal for most sites
- Monthly – Suitable for low-activity websites
Automatic cleanup boosts database performance by removing junk data and optimizing during low-traffic times.
Step 9: Post Cleanup (optional)
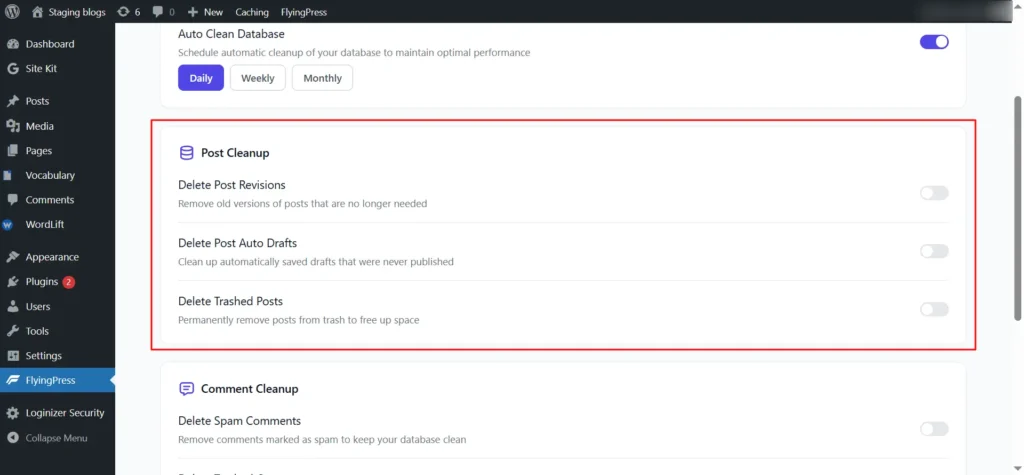
Screenshot 18: Post Cleanup
FlyingPress lets you remove unnecessary post data to keep your database lean:
- Delete Post Revisions:- If you frequently update content, enable this to save multiple post revisions for easy tracking. For single-page sites, you can disable it.
- Delete Post Auto Drafts:- Auto drafts are temporary and usually don’t accumulate much data. You can leave this disabled.
- Delete Trashed Posts:- Automatically removes posts in the trash, keeping your database clean and freeing up space.
Step 10: Comment Cleanup
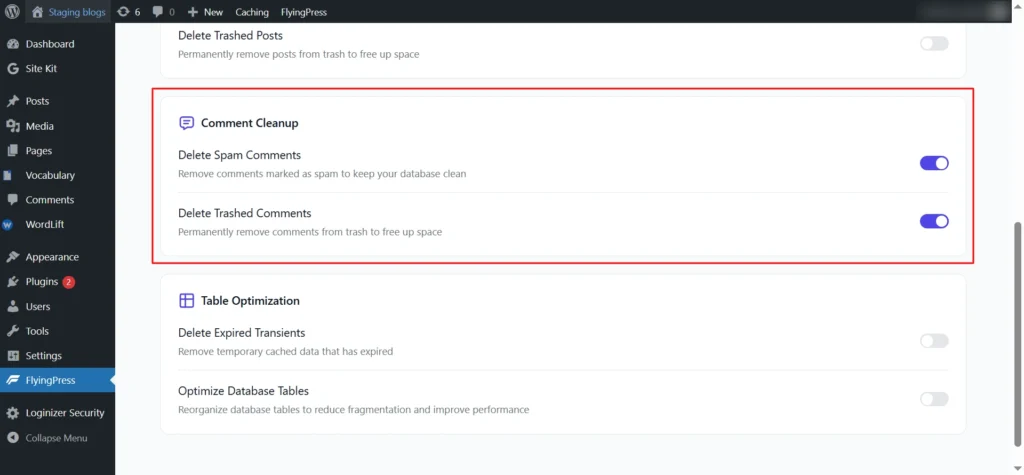
Screenshot 19: Comment Cleanup
FlyingPress helps keep your comment database clean and optimized:
- Delete Spam Comments:- If comments are marked as spam, FlyingPress will automatically remove them, keeping your database lean.
- Delete Trashed Comments:- Once enabled, FlyingPress will automatically remove every trashed comment from your website.
Step 11: Table Optimization

Screenshot 20: Table Optimization
Maintaining your database tables ensures long-term efficiency and faster queries:
- Delete Expired Transients:- There’s no need to keep expired transients in your database. Enabling this option automatically removes them, keeping your database clean.
- Optimize Database Tables:- Regularly optimizing your MySQL database is essential for website speed and performance. Enable this option to defragment and rebuild tables for better efficiency.
Bloat
Step 12: Remove WordPress Bloat
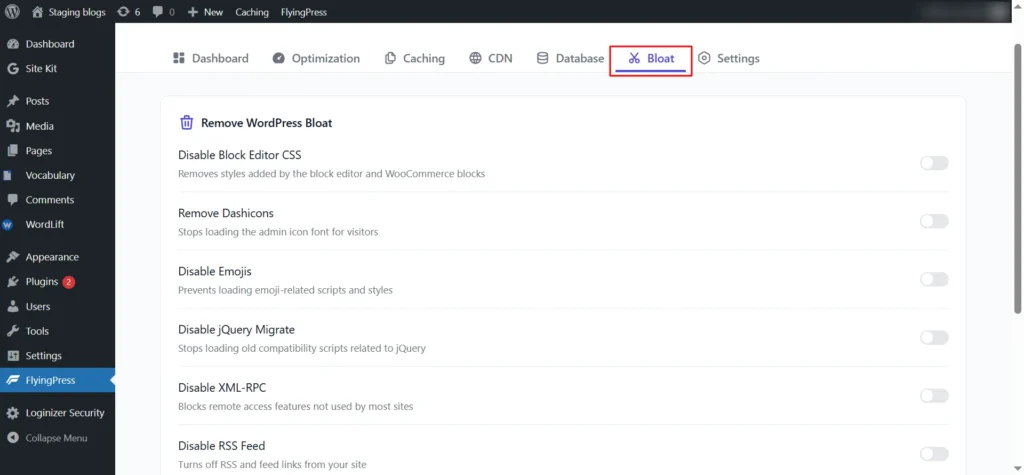
Screenshot 21: Bloat
Next, let’s address WordPress bloat. Bloat occurs when unnecessary scripts, styles, or features load on your website, slowing it down. FlyingPress (or Perfmatters settings) lets you disable or optimize these features to streamline your site. Here’s how:
- Disable Block Editor CSS: If you are using the Gutenberg editor, keep this option disabled to ensure proper functionality.
- Remove Dashicons: Eliminates CSS files loaded by admin icons on the front end, reducing unnecessary CSS.
- Disable Emojis: Removes extra JavaScript related to emojis, improving page load speed.
- Disable jQuery Migrate: Page builder plugins like Divi or Elementor rely on jQuery. Keep this enabled if you use such plugins.
- Disable XML-RPC: XML-RPC enables remote interactions with your site, such as publishing posts from mobile apps, pingbacks, or third-party services, but it’s not optimized for speed or security. Most sites can safely disable it.
- Disable RSS Feed: If your website includes a blog, keep the RSS feed active. Otherwise, you can disable it to reduce unnecessary load.
- Disable oEmbeds: WordPress automatically generates previews for embedded content like YouTube videos, Spotify playlists, or tweets. Disable this if you don’t need auto-embeds.
- Disable WP Cron: WP Cron is essential for running scheduled tasks. Only disable it if you have configured a manual cron job via your hosting or a third-party service.
- Limit Post Revisions: Saves only the latest three post revisions in your database, helping reduce database bloat.
- Throttle Heartbeat API: Limits background activity to once every 60 seconds, minimizing unnecessary server requests.
Settings
The Settings page focuses on managing key plugin configurations that help keep your site running smoothly.
Step 13: License Key Management
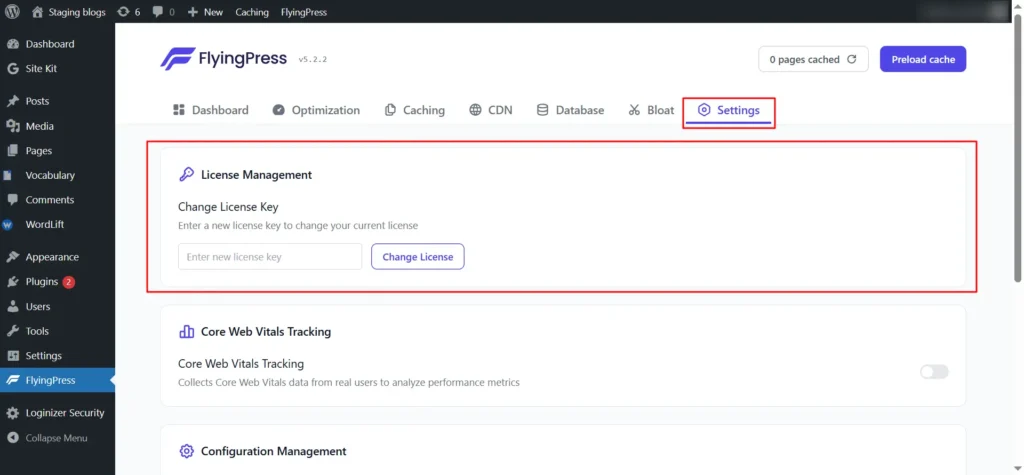
Screenshot 22: License Management
FlyingPress is a premium plugin that requires a valid license key for updates and support. Enter your key here to keep the plugin up-to-date.
Step 14: Configuration Management (optional)
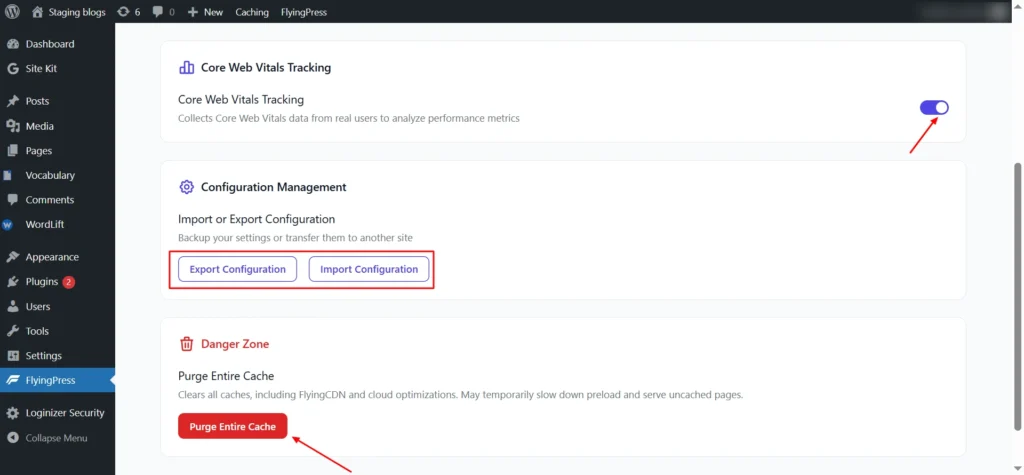
Screenshot 23: Configuration Management
FlyingPress lets you import or export plugin settings, making it easy to transfer your configuration to another WordPress site or apply a third-party setup. This ensures consistency across multiple sites and simplifies migration.
Step 15: Purge Entire Cache
When needed, you can purge the entire cache from this page. This is helpful if you’ve made major changes to your site or want to ensure that visitors see the latest content immediately.
Step 16: Cache settings
In this step, you’ll configure your cache settings to control how WordPress stores and delivers cached content.
Access Cache Settings
From the WordPress admin menu, go to Caching → Cache Settings. This opens the Endurance Cache configuration panel.
Set Cache Level
Under Endurance Cache, select the desired cache level based on your website’s update frequency and performance needs:
- Off (Level 0): Disables caching completely. Use this only for development or troubleshooting.
- Assets Only (Level 1): Caches static assets such as images, CSS, and JavaScript files. Ideal for frequently updated websites.
- Normal (Level 2): Caches both static assets and pages, ideal for most blogs and business websites.
- Advanced (Level 3): Full caching with aggressive optimization, best for static or rarely updated sites.
Save Changes
After setting the cache level, click Save Changes to apply the configuration.
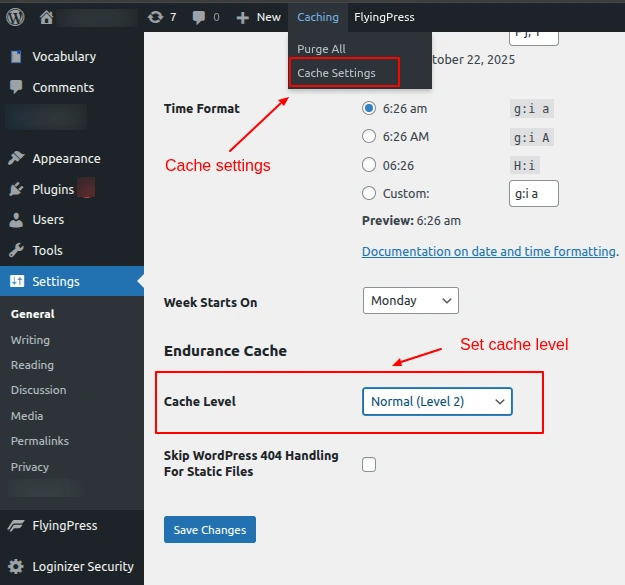
Screenshot 24: Cache Setting
By properly configuring your cache level, your website will serve pages more quickly, reduce server load, & improve user experience.
Conclusion
Optimizing a WordPress site for speed doesn’t have to be complicated. With FlyingPress, you get a comprehensive, easy-to-use solution that covers every important aspect of performance, from caching, CDN integration, and image optimization to database cleanup & bloat reduction.
By following this step-by-step guide, you can improve your site’s load times, enhance user experience, & boost SEO rankings. For WordPress owners seeking the fastest and most reliable speed optimization tool, FlyingPress truly stands out as the best choice and beyond.
Published on Oct 24, 2025 | Updated on Jan 16, 2026
Author

Anamika Kumari
Author
|
Reviewer

Savita Soni
Reviewer
|