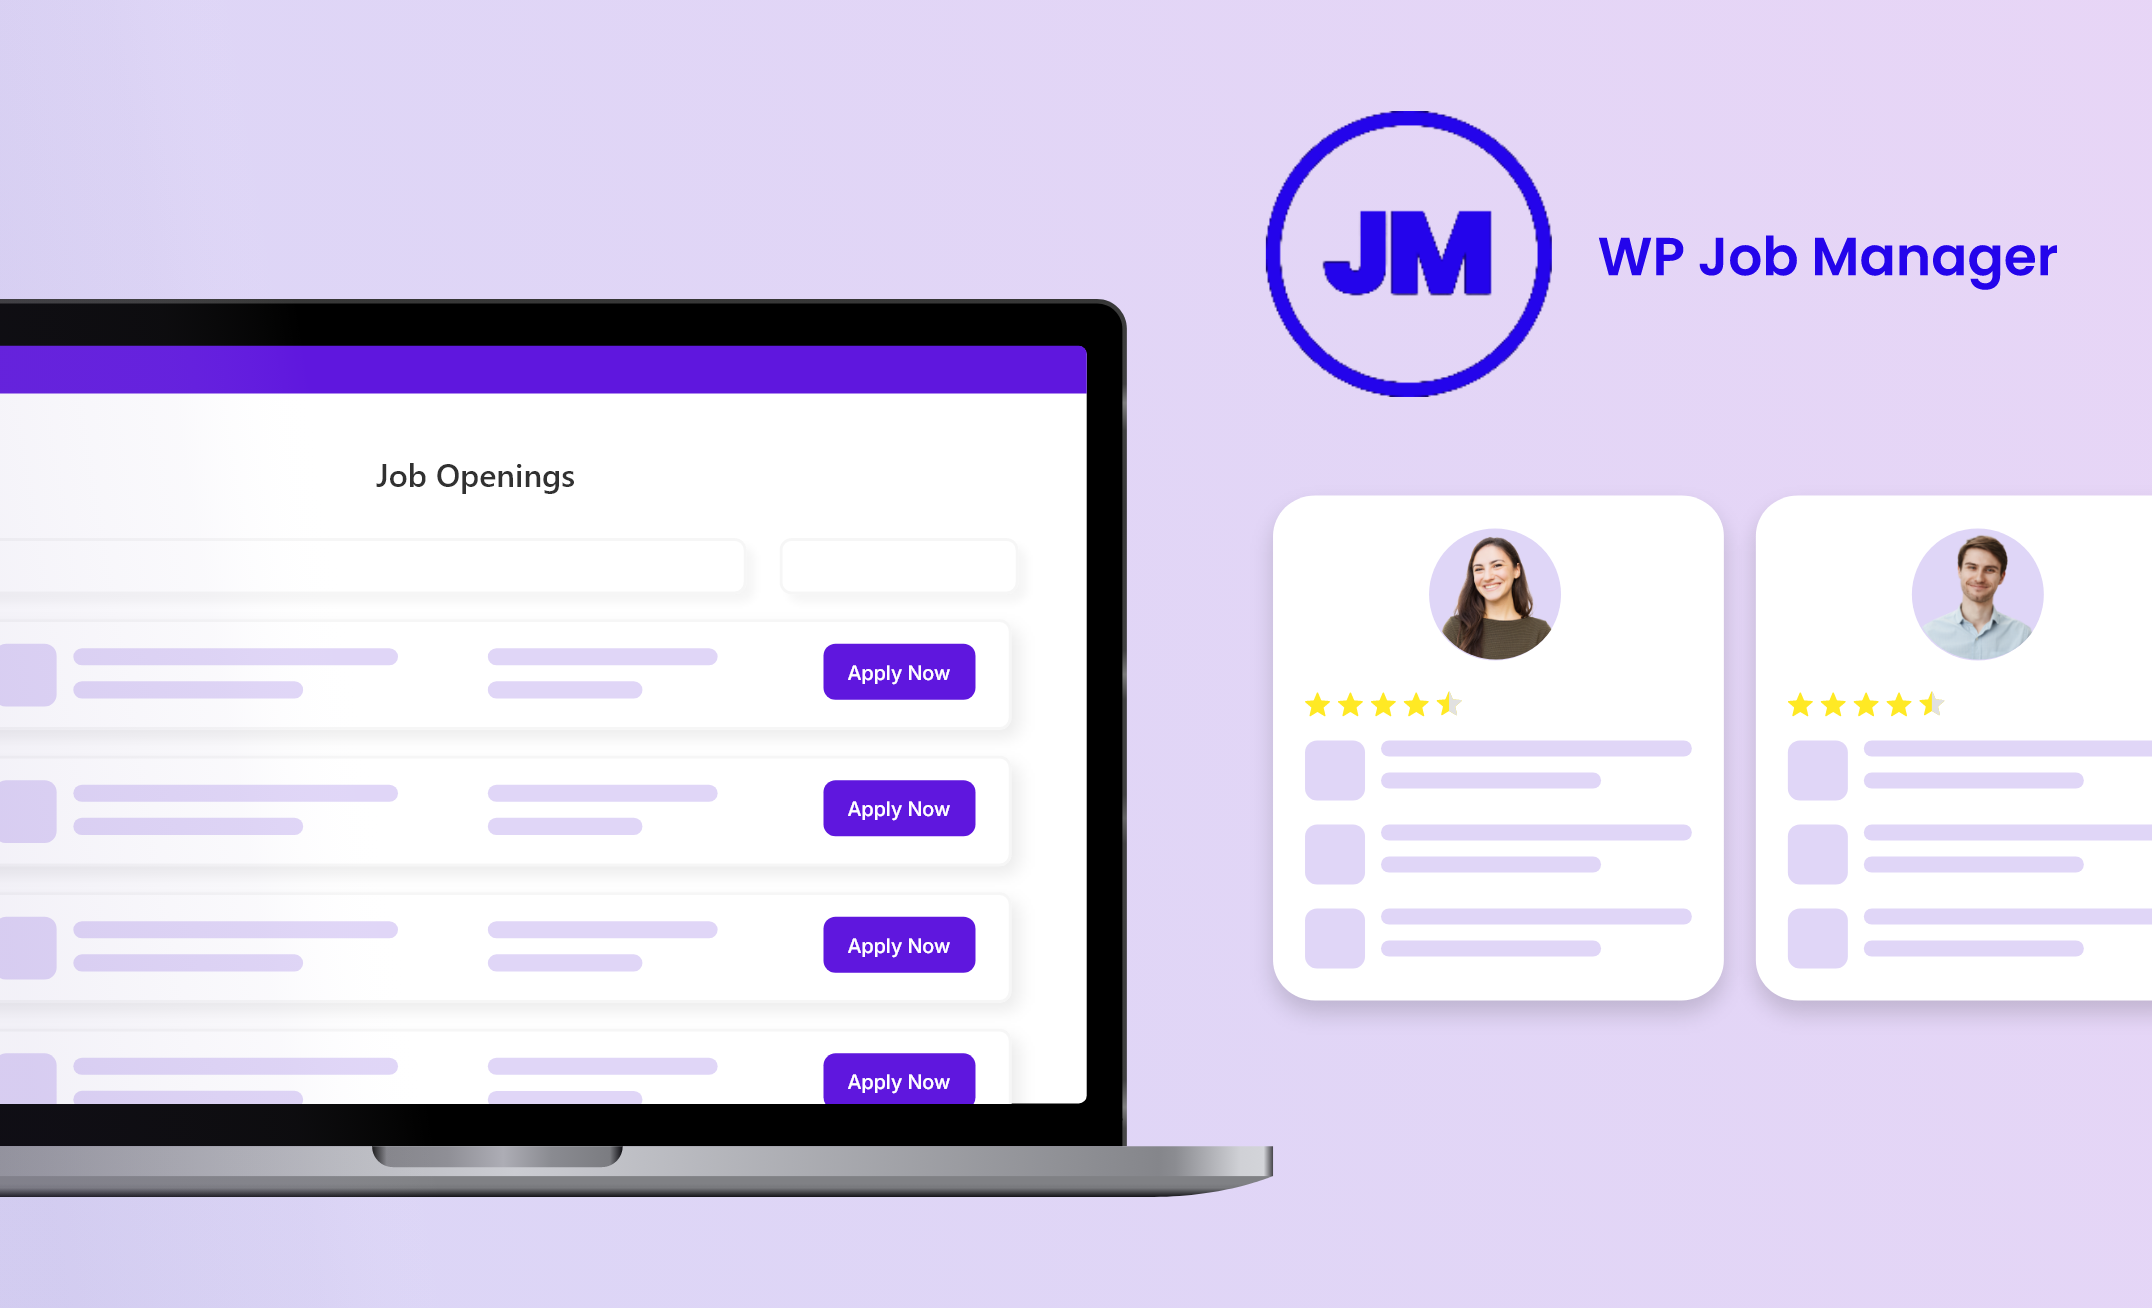
Every company today needs a strong careers page. It’s not just about listing open roles, it’s about showing job seekers that your business is growing and worth joining.
But here’s the catch: if your listings aren’t easy to find or don’t show up in search results, you might be missing out on great candidates without even realizing it.
That’s where WP Job Manager can make a real difference.
It’s a simple, lightweight WordPress plugin that lets you add a fully functional job board directly to your website without the need for coding or technical setup. Moreover, job listings get easily noticed by search engines like Google, meaning your openings have a better chance of showing up where candidates are searching.
Ready to get started?
Why WP Job Manager Is Worth Adding to Your Website
If you’re running a company website and want to attract real traffic to your job listings, it’s not enough to simply post open roles and hope for the best. WP Job Manager helps you turn your careers page into a functional, easy-to-manage job board that people can find and use. Here are some clear reasons why it works so well:
- Search-Friendly Listings: Each job post is structured using Google Job Schema, which makes it easier for Google to index and show in search results, including Google Jobs. That means more visibility without needing to pay for external listings.
- Custom Job Pages That Get Clicks: Every job has its page, making it easier to share and easier for candidates to apply. These pages also help your site rank better over time.
- No-Code Job Posting for HR: Easily manage job applications with a page on your site, no admin access needed. Your team can post and update jobs directly from the front end, without any technical skills required.
- Flexible Fields for Any Role: Whether you’re hiring for tech, design, operations, or remote positions, you can customize each listing to include the exact details you want.
- Built-In Filtering and Search Tools: Candidates can sort by location, category, or type of job, helping them find what fits—and apply faster.
- Easy to Manage and Expand: You get a basic job board out of the box, and can add more features later, like resume uploads, job alerts, or applicant tracking, as your hiring needs grow.
Step 1: Install and Activate the WP Job Manager Plugin
- Go to the WordPress Dashboard.
- Go to Plugins > Add New > WP Job Board Plugin
- Install and Activate
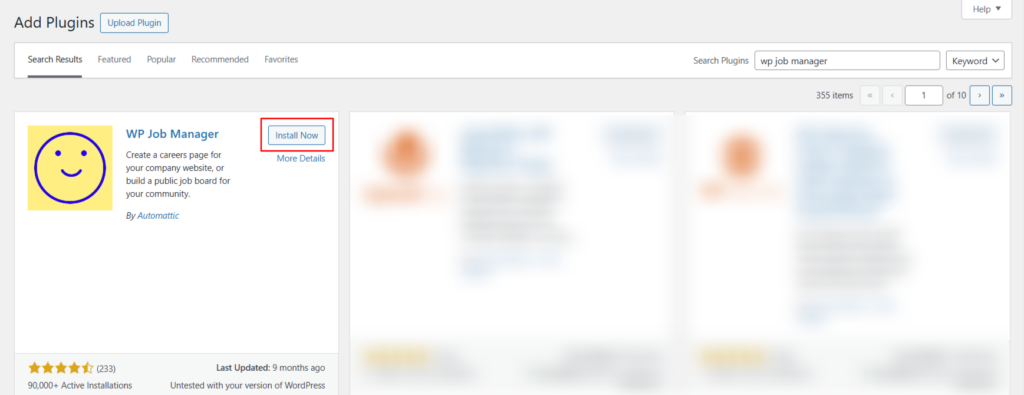
Screenshot: WP Job Manager
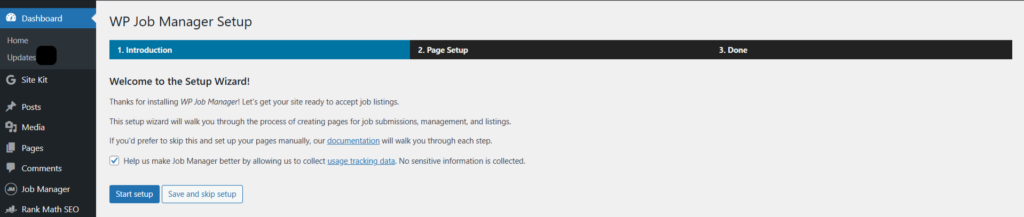
Step 2: Run the Setup Wizard
Go to WP Jobs Manager and click on Run Setup Wizard

Screenshot: Click on Run Setup Wizard
You’ll see a checkbox asking if you’d like to help improve the plugin by allowing it to collect anonymous usage data. Optional, but it’s a nice way to support the developers behind the scenes.
At this stage, you can either:
- Click “Start Setup” to let the plugin do all the work for you (highly recommended if you’re new), or
- Click “Save and Skip Setup” if you prefer to configure everything manually using shortcodes (great for advanced users or custom designs)
Screenshot: Run Setup Wizard
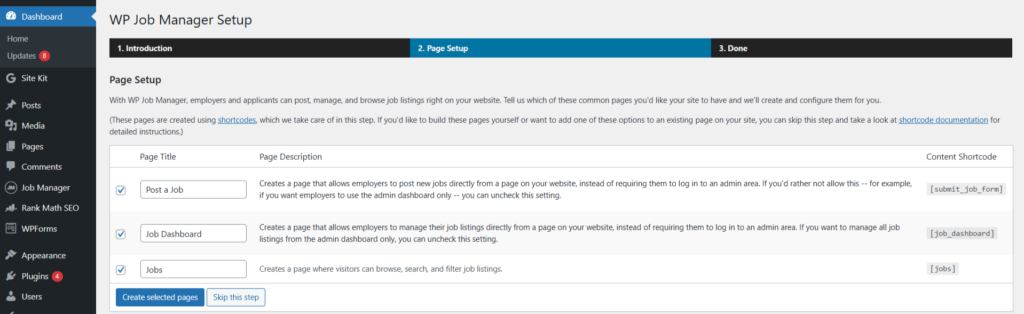
Once you hit “Start Setup” in the wizard, the next screen brings you to the Page Setup section.
Screenshot: Page Setup
You don’t have to make pages and add shortcodes by yourself (unless you want to later). WP Job Manager can automatically create three important job board pages for you.
Post a Job
This page uses the [submit_job_form] shortcode to allow employers to submit job listings directly from the front end of your website. This eliminates the need to give them access to the WordPress admin dashboard.
This is Perfect for multi-employer sites or directories.
Job Dashboard
Adds a [job_dashboard] page where employers can view, edit, and manage their listings again, all from the front end.
This creates a smoother, more polished experience for job posters.
Jobs
This one’s for your site visitors. It shows job listings using the [jobs] shortcode. People can look through jobs, search, and filter them easily.
By default, all three pages are selected. For most people, that’s the best choice. Just click “Create selected pages,” and WP Job Manager will set them up for you right away.
If you want to do it your way (like using a custom layout), you can skip this step and add the shortcodes yourself later.
We are going with all three selected pages.
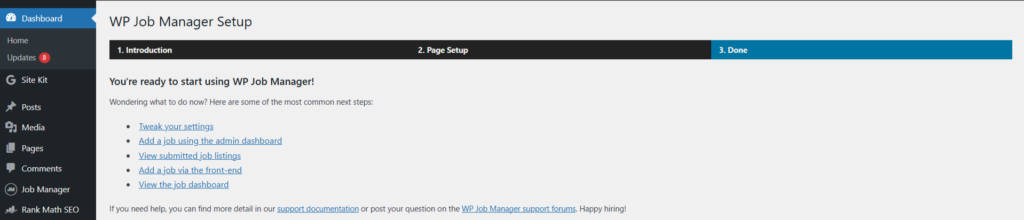
The next final screen is all about giving you quick access to the next steps so you can hit the ground running.
Screenshot: Final Step of Setup
What can you do now?
Tweak your settings: Customize listing behavior, duration, and fields.
Add a job using the admin dashboard: Manually add job listings via the WordPress backend.
View submitted job listings: Check active/pending jobs.
Add a job via the front-end: Test the user job submission form.
View the job dashboard: Preview the front-end employer dashboard.
Step 3: Add a Job
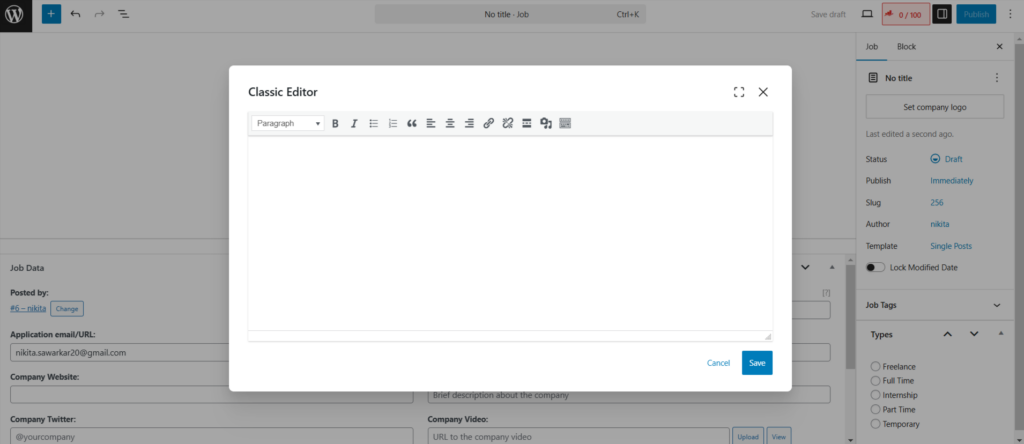
Once you have finished the setup, go to Job Manager> Job Listings> Add New Job.

Screenshot: Select Add Job
You’ll be directed to the new window, the classic editor of WordPress. Here, you have to add a job description.
Screenshot: Add Job Description Here
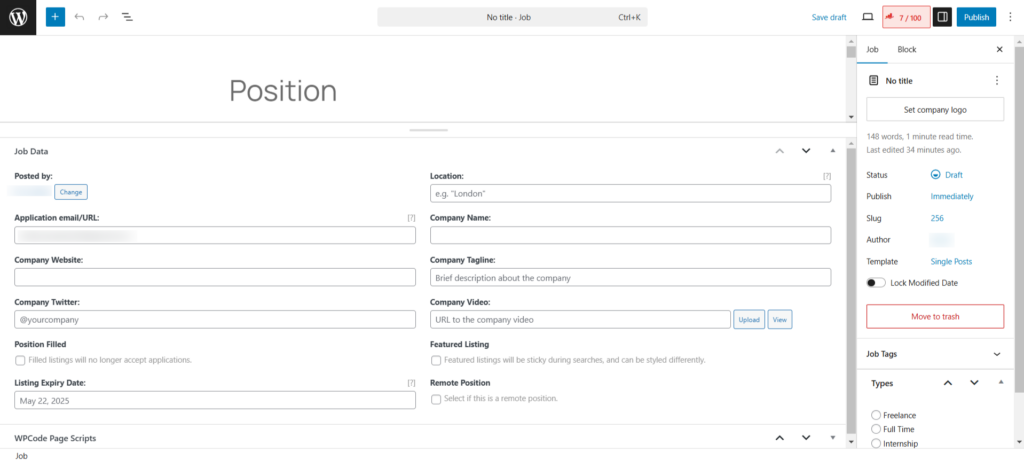
Next, fill in the job title, location, company details, job description, and other such details. Select the job type and upload a logo if needed. You can also add job tags and job types: Freelance, Full Time, Internship, Part Time, and Temporary.
Once done, click “Publish” to make the job listing live.
Screenshot: Add other Required Details
After publishing, click on the View tab to view your published job listing.
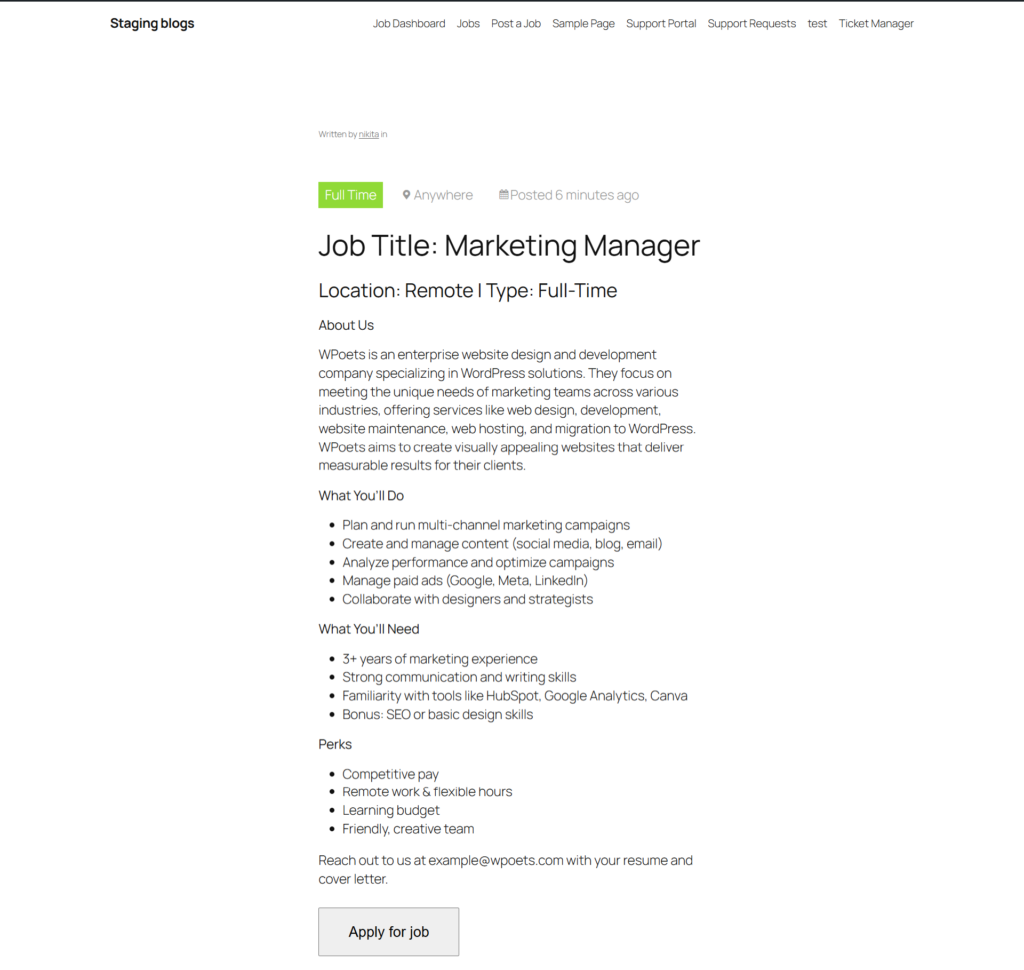
Screenshot: Published Job Listing
You can also see your job listing on the dashboard.
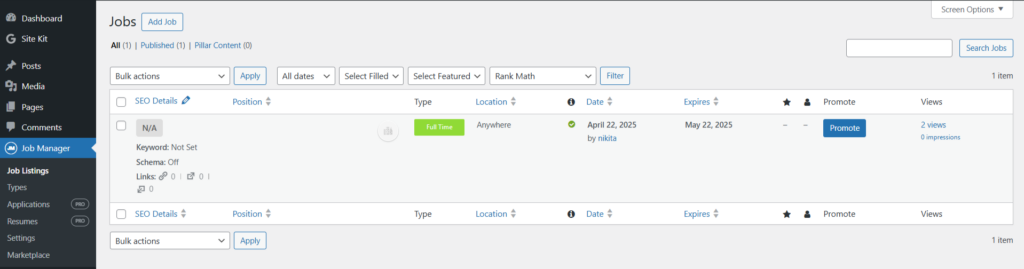
Screenshot: Job Listing Board
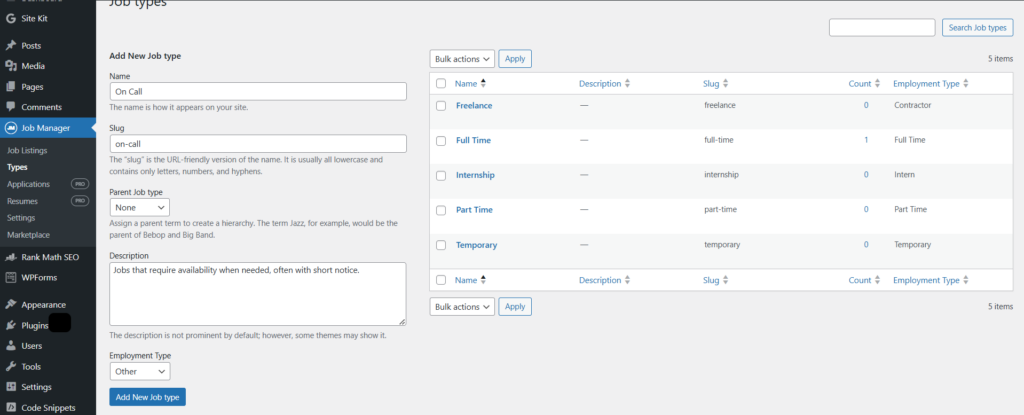
Step 4: Add a Job Type
To add a new job type,
- Enter the job type name (e.g., “Contract”).
- Add a slug (URL-friendly version, like contract).
- Optionally, add a description or select a parent type.
- Choose the Employment Type from the dropdown.
- Click “Add New Job Type“.
These types help organize job listings and let users filter them easily.
Screenshot: Add Job Type
Step 5: Add Applications (Pro Feature)
The Applications Pro feature ($79/year) allows employers to manage job applications directly on their dashboard.
It enables candidates to apply using a built-in form, and lets employers view, save, rate, and comment on applications privately.
This streamlines the hiring process and keeps everything organized within the site.
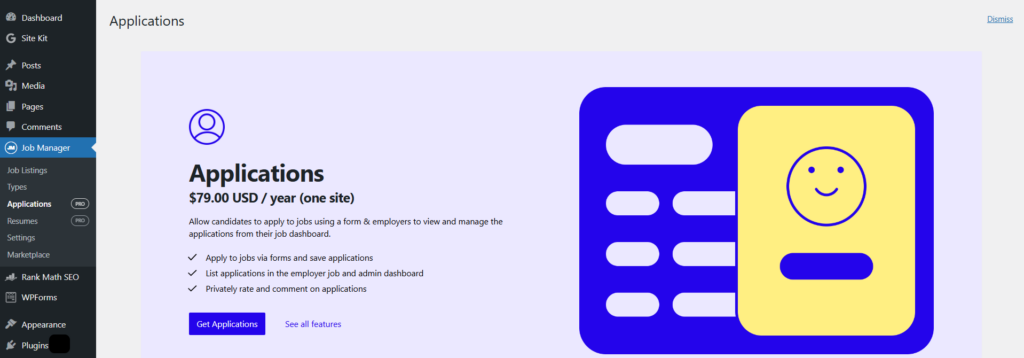
Screenshot: Add Applications
Step 6: Add Resumes
The Resume Manager feature ($49/year) adds a resume submission form to your site, letting candidates post resumes and apply to jobs using them.
Employers can manage resume listings from the WordPress dashboard, restrict access by user roles, and control who can view candidate contact details.
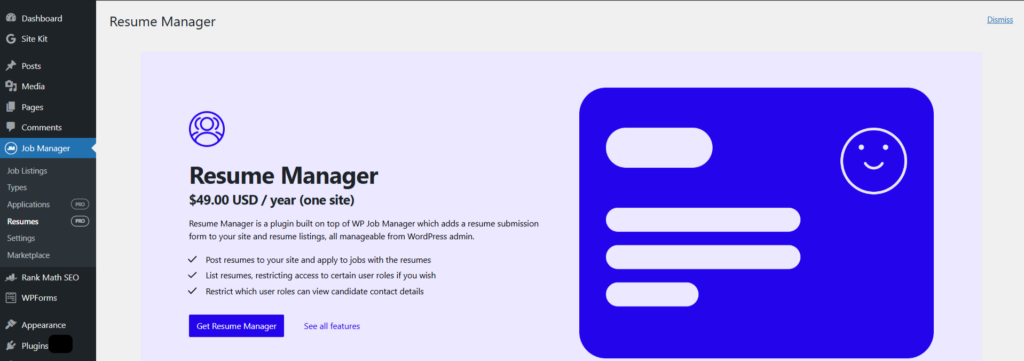
Screenshot: Resume Manager
Step 7: General Settings
Under settings, go to general settings.
The General Settings tab allows you to configure key plugin options.
You can change the date format (regular or relative), turn on job stats to track visitors, and add a Google Maps API key to show locations.
You can also choose to:
- Delete all data when you uninstall the plugin
- Skip the trash and delete job listings right away
- Turn on usage tracking to help make the plugin better
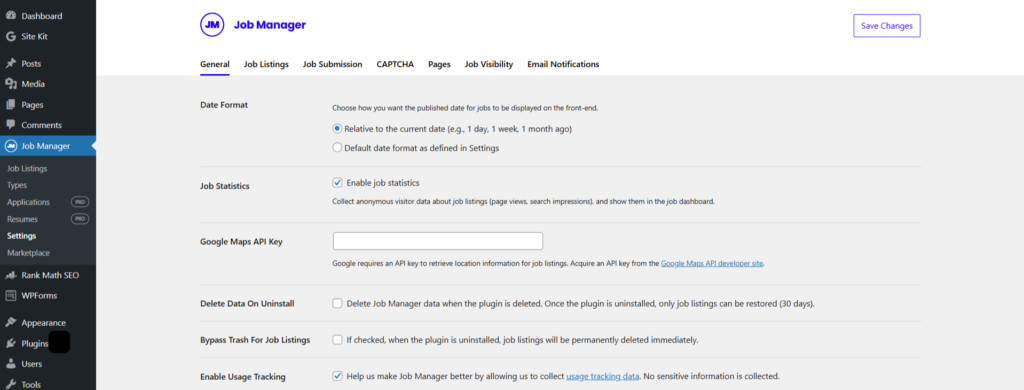
Screenshot: General Settings
Step 8: Settings > Job Listings
The Job Listings Settings control the appearance and functionality of job listings, including:
- Setting the number of jobs per page, choosing pagination style (load more/page numbers)
- Showing or hiding filled & expired jobs
- Enabling job categories/types (with multi-selection)
- Displaying remote job and salary information
- Showing or hiding location addresses
- and removing shortcodes from descriptions.
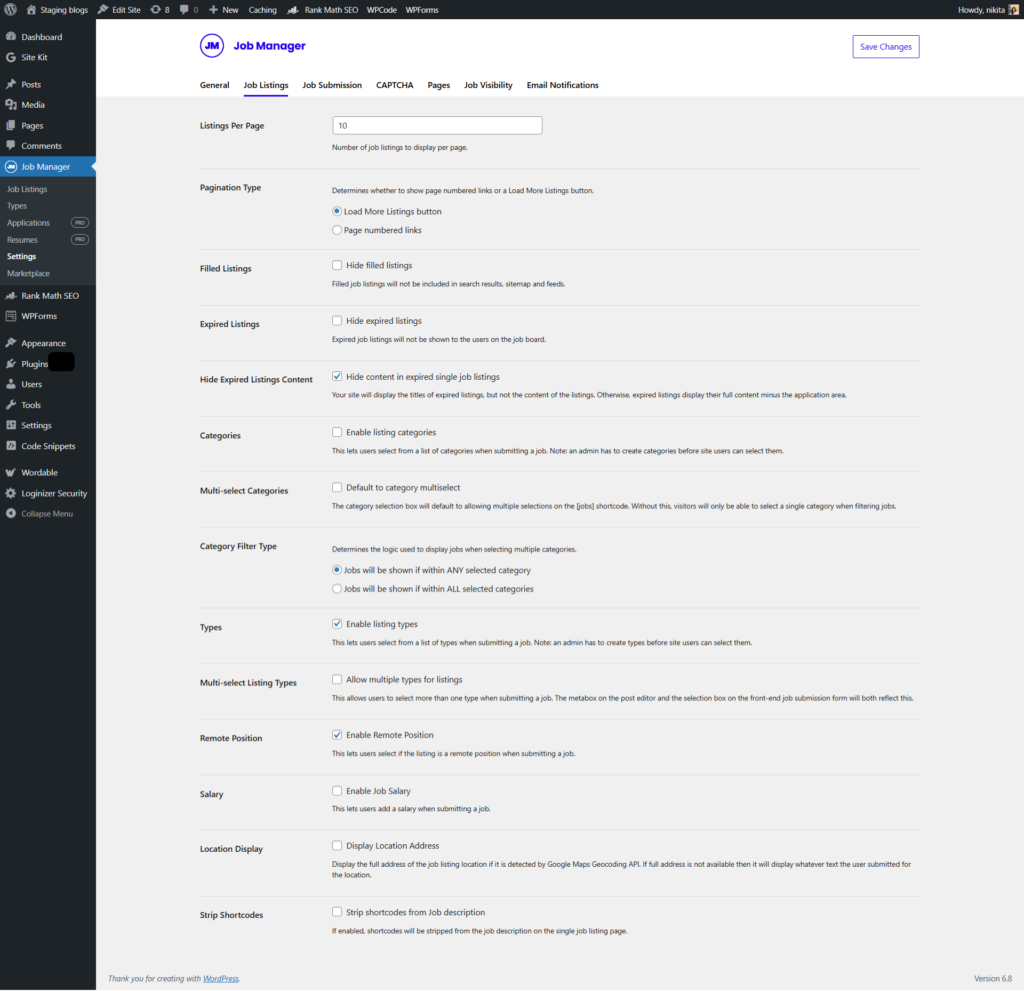
Screenshot: Job Listings
Step 9: Settings > Job Submission
The Job Submission Settings control how users submit/manage job listings. Users can be required to log in, create accounts during submission, and schedule listings.
Admins can review/approve submissions and edits, and control user editing permissions.
Other settings include listing duration, renewal options, posting limits, application methods (email/link), and terms & conditions agreements.
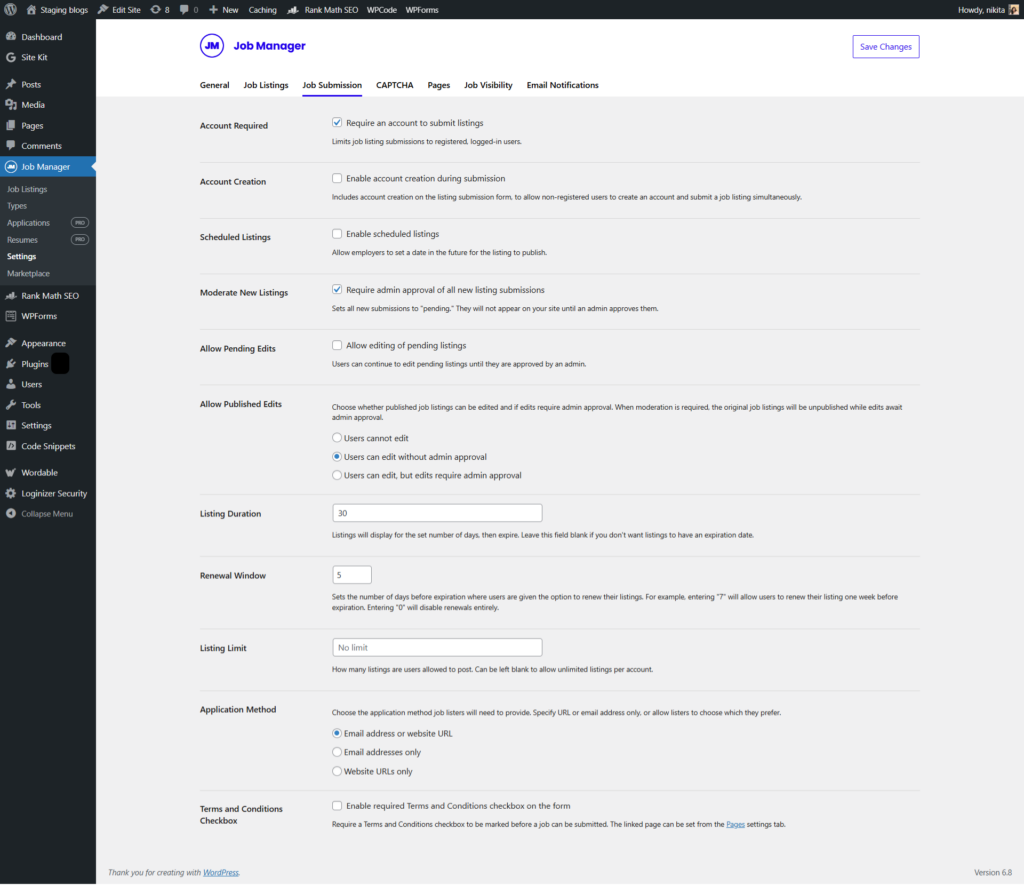
Screenshot: Job Submission
Step 10: Settings > Captcha
The CAPTCHA settings configure spam protection for job submissions.
You can customize the field label, choose reCAPTCHA v2 or v3 (requiring separate API keys), input the Site and Secret Keys, and enable CAPTCHA on the job submission form.
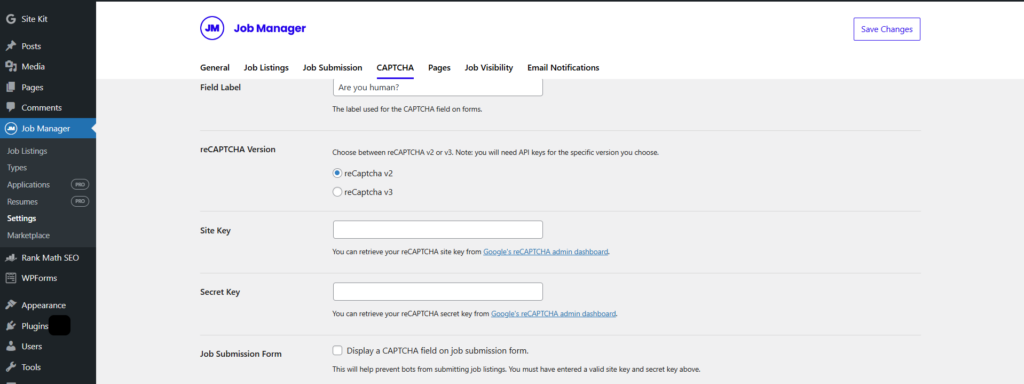
Screenshot: Captcha
Step 11: Settings > Pages Tab
The Pages tab links WP Job Manager’s functions (job submission, dashboard, listings) to specific WordPress pages using shortcodes. Ensure the correct shortcodes are on their corresponding selected pages for proper functionality.
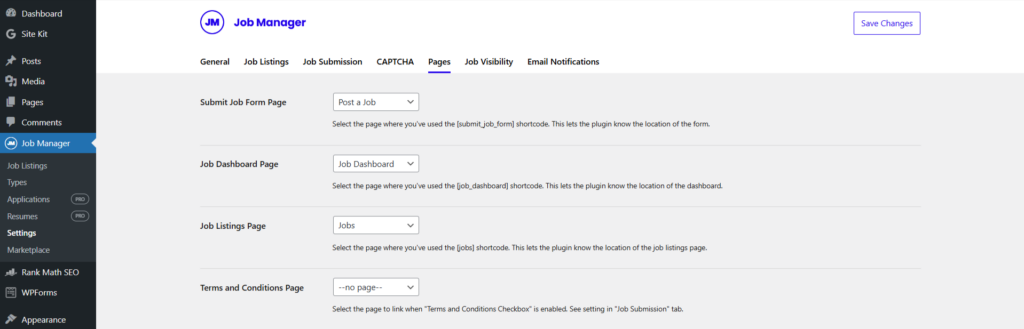
Screenshot: Pages Settings
Step 12: Settings > Job Visibility
The Job Visibility tab in WP Job Manager controls who can browse the general job list and view the details of individual job postings.
You can set these capabilities to “Everyone (Public)” or restrict access to specific user roles.
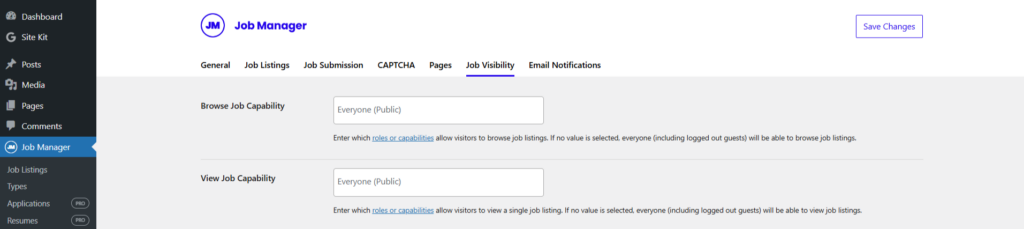
Screenshot: Job Visibility
Step 13: Settings > Email Notifications
The “Email Notifications” tab in WP Job Manager lets you configure automated email alerts. Specifically, it allows you to enable notifications to the administrator for new or updated job listings, and also set up notifications regarding expiring job listings.
You can choose the email format (plain text or rich text) for these notifications.
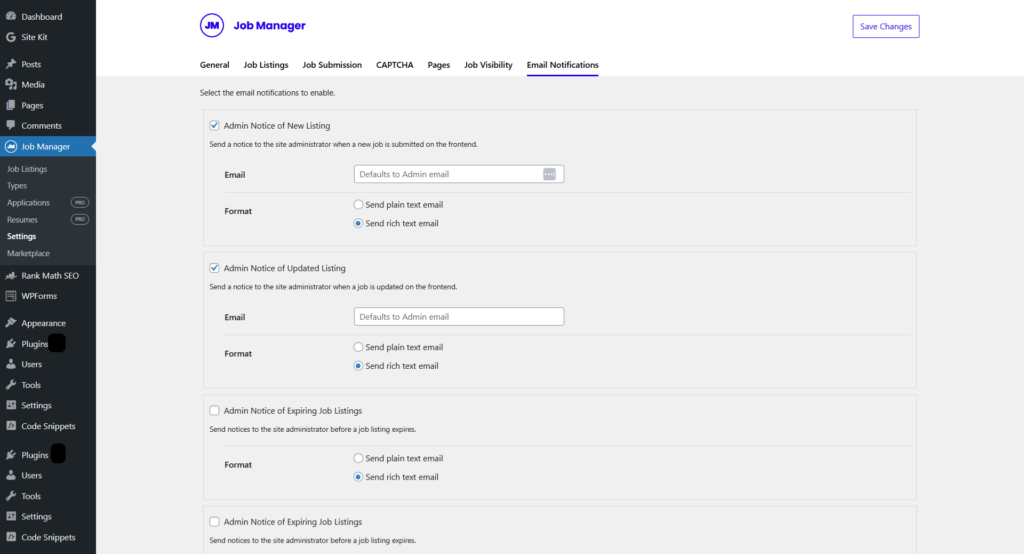
Screenshot: Email Notifications Settings
Step 14: Settings > Marketplace
The Marketplace allows users to manage installed plugins by activating, deactivating, updating, and deleting them. Users can also search for and install new plugins to extend WordPress functionality.
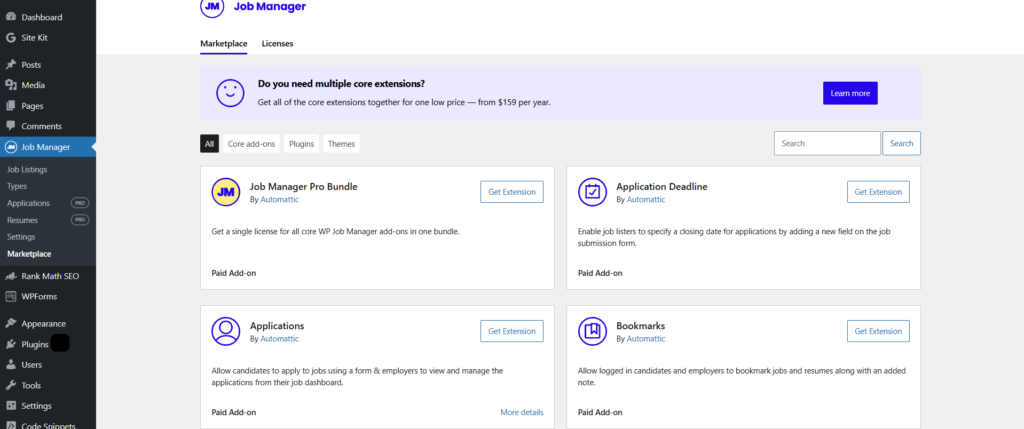
Screenshot: Marketplace
Conclusion
By adding WP Job Manager to your website, you’re not just creating a job board—you’re transforming your site into a powerful recruitment tool. With an intuitive interface that’s easy for both employers and job seekers to use, it streamlines the hiring process and helps you connect with a wider pool of qualified candidates.
Don’t let great talent slip away. Enhance your careers page with WP Job Manager and make your company stand out as a top destination for professionals on the hunt for new opportunities.
Now it’s your turn to install the plugin, configure your settings, and watch your job portal come to life!
Published on May 9, 2025 | Updated on Mar 2, 2026
Author

Abhijeet Bendre
Author
|
Reviewer

Savita Soni
Reviewer
|