In today’s digital-first world, businesses need websites that are flexible, scalable, and tailored to their marketing goals. One of the most effective ways to achieve this in WordPress is by using custom fields.
Custom fields enable you to store additional data for your posts, pages, or custom post types, creating more personalized, engaging, and conversion-focused content.
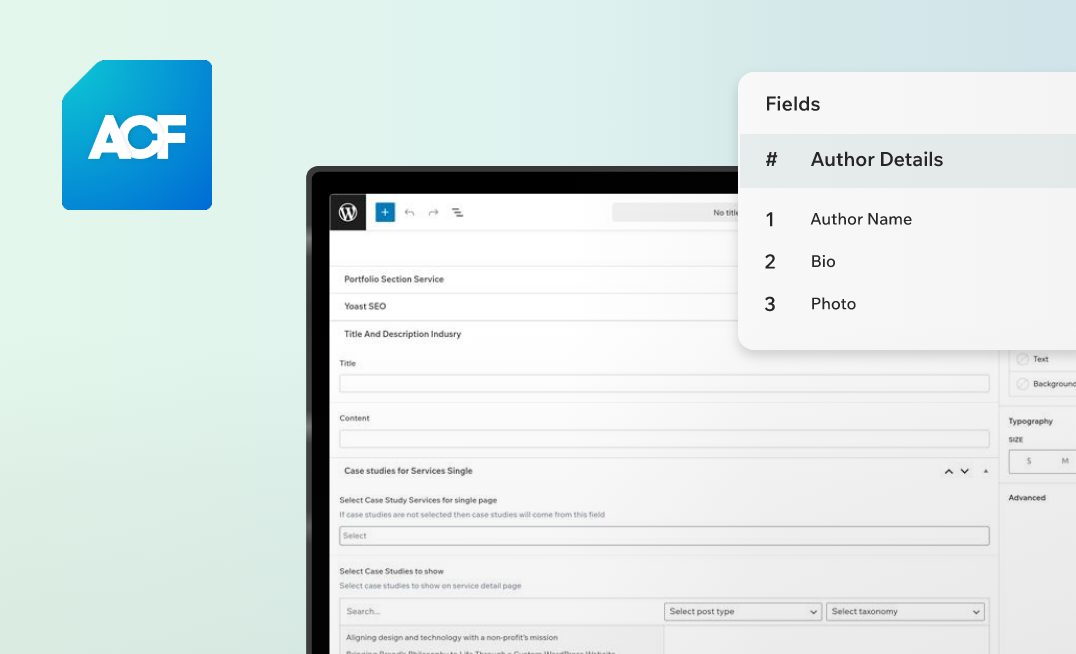
While WordPress comes with built-in custom fields, managing them can be cumbersome without the right tools. That’s where the Advanced Custom Fields (ACF) plugin comes in. ACF simplifies the process of adding, organizing, and displaying custom fields, even for marketers without coding experience.
How to add Custom Fields in WordPress
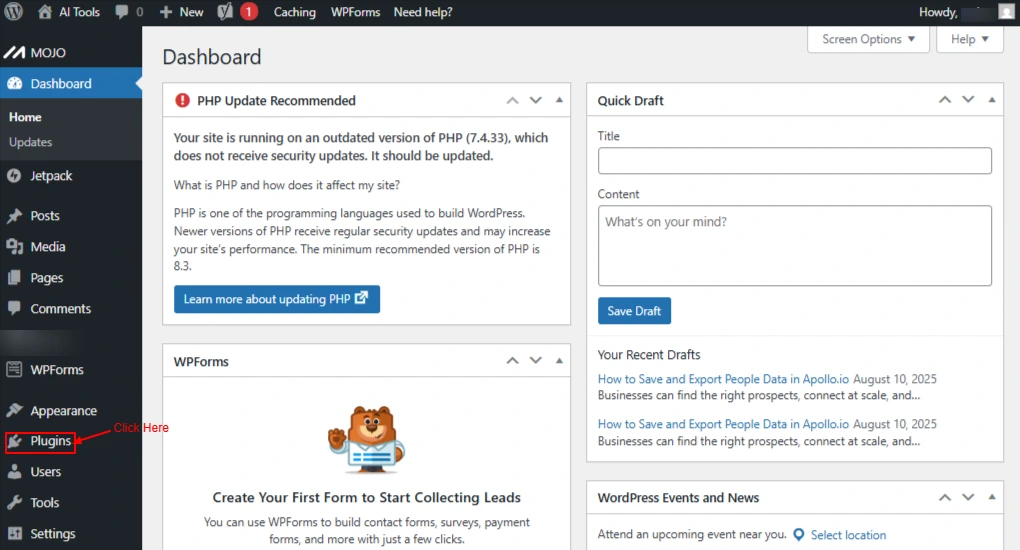
First, install the ACF Plugin. To do that, navigate to your WordPress dashboard.
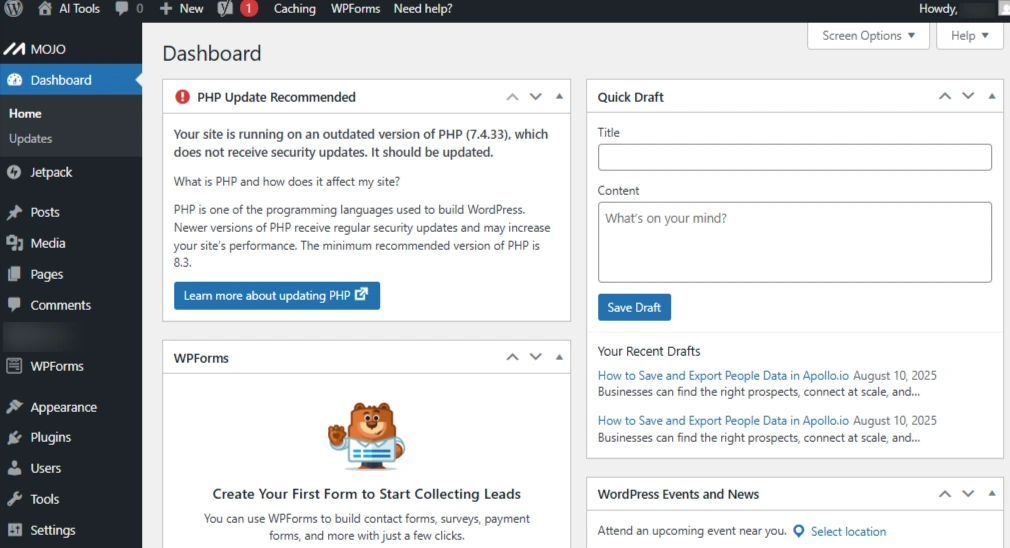
Screenshot 1: Dashboard of WordPress
Go to Plugins. From the left-hand navigation menu, click on it.
Screenshot 2: Plugin Option
Search for “Advanced Custom Fields.”
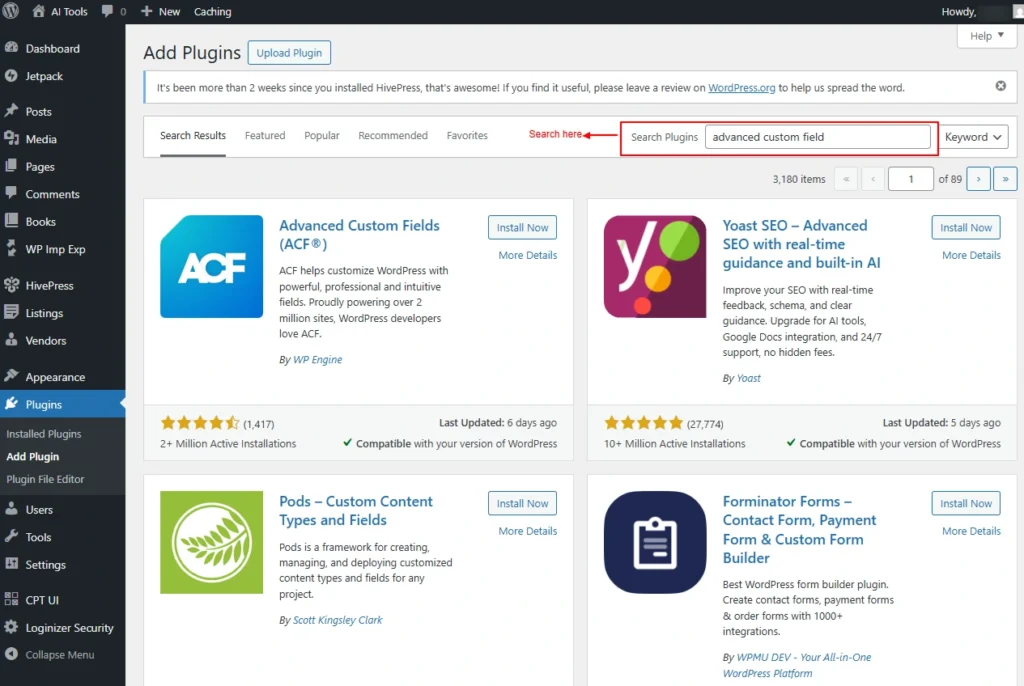
Screenshot 3: Search Advanced Custom Field
Click Install Now.
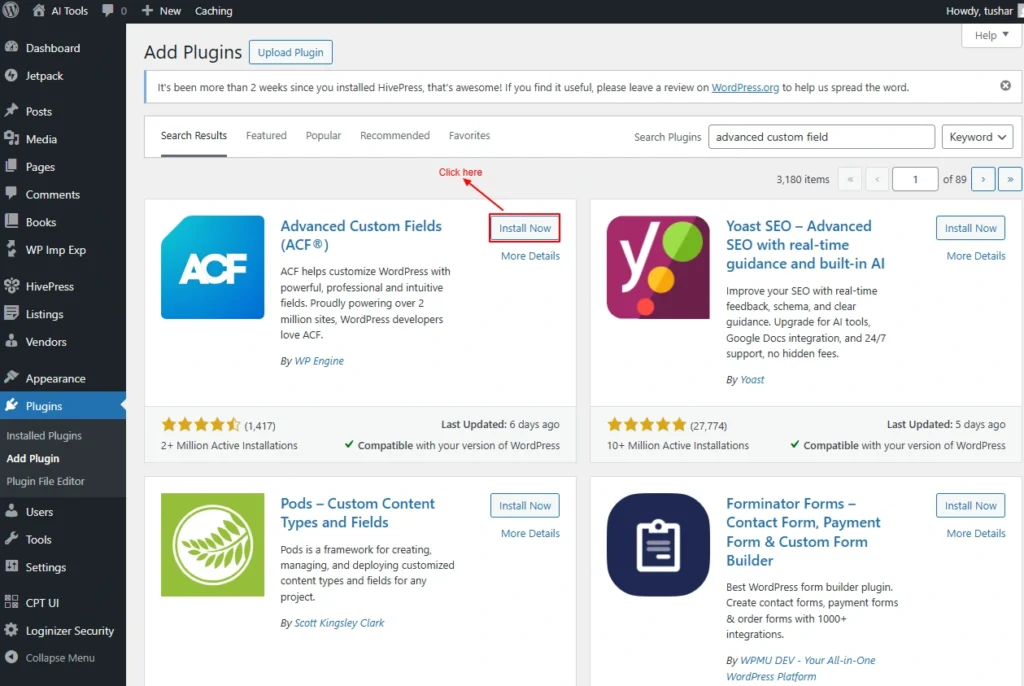
Screenshot 4: Install Now
Click on Activate.
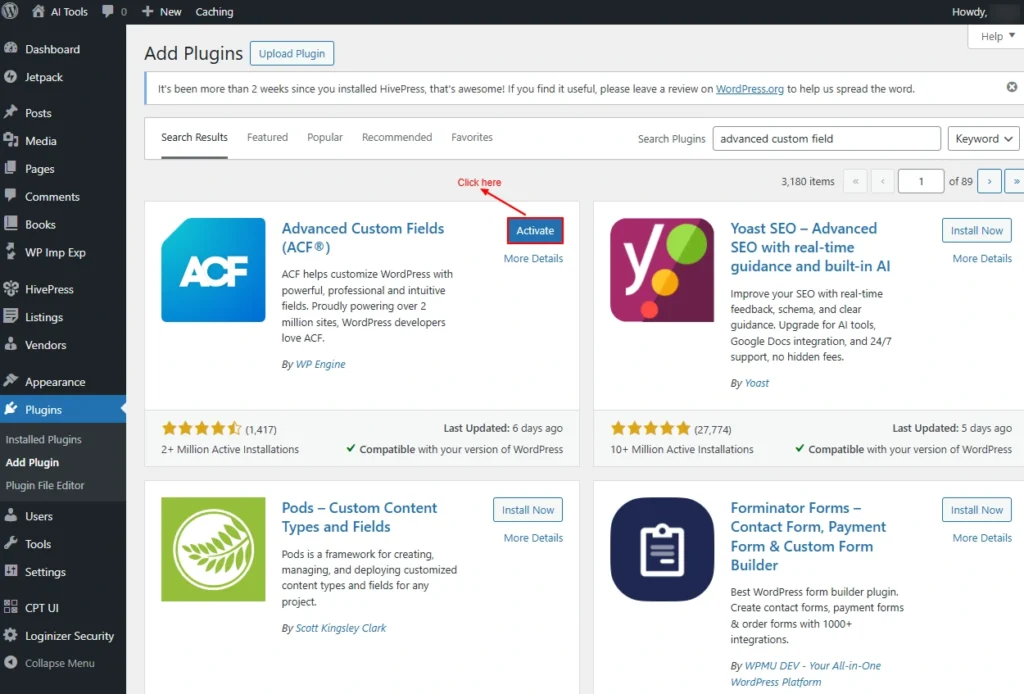
Screenshot 5: Activate
From the Left Hand Navigation Menu, Click on ACF Menu.
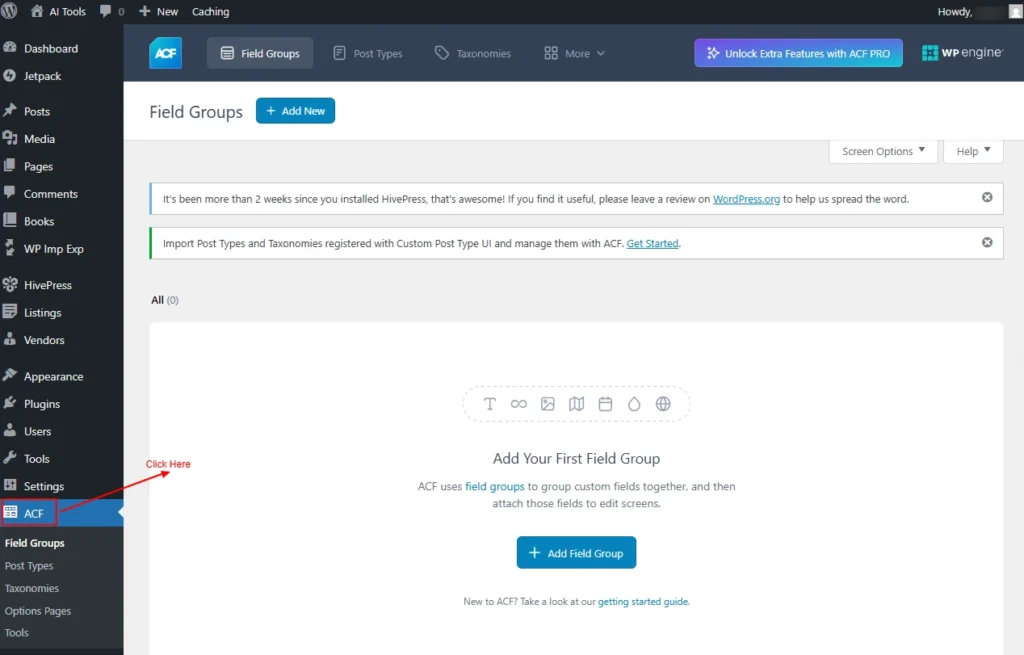
Screenshot 6: ACF Plugin
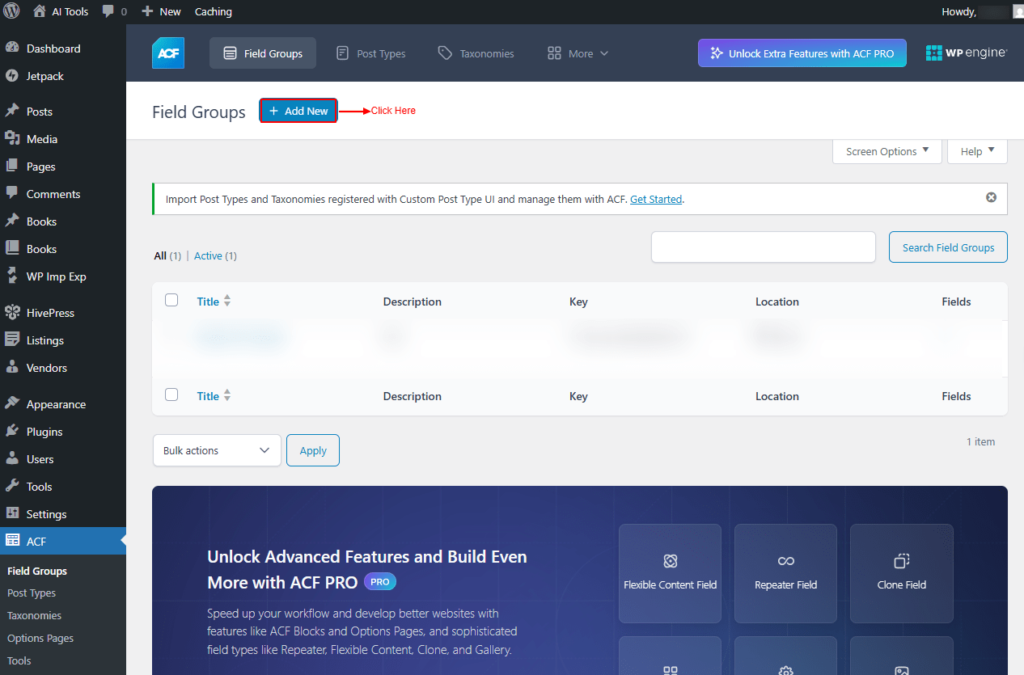
1. Field Groups
Field Groups are collections of custom fields that you create and assign to specific parts of your WordPress site, such as posts, pages, custom post types, users, taxonomies, options pages, and much more.
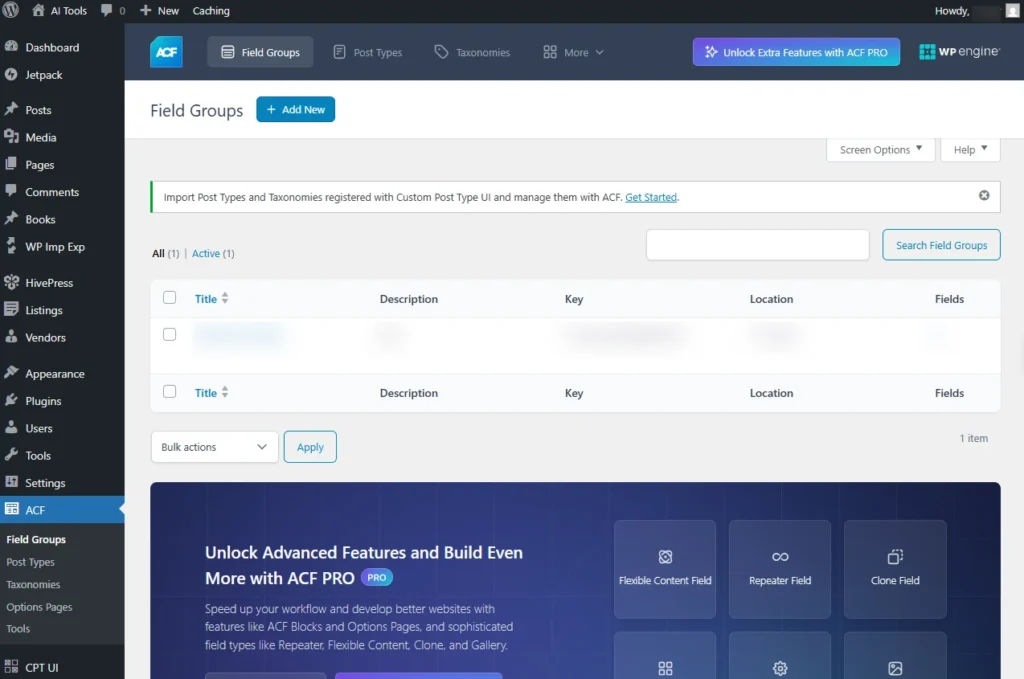
Screenshot 7: Dashboard Of Field Groups
Click on the “Add New” Button.
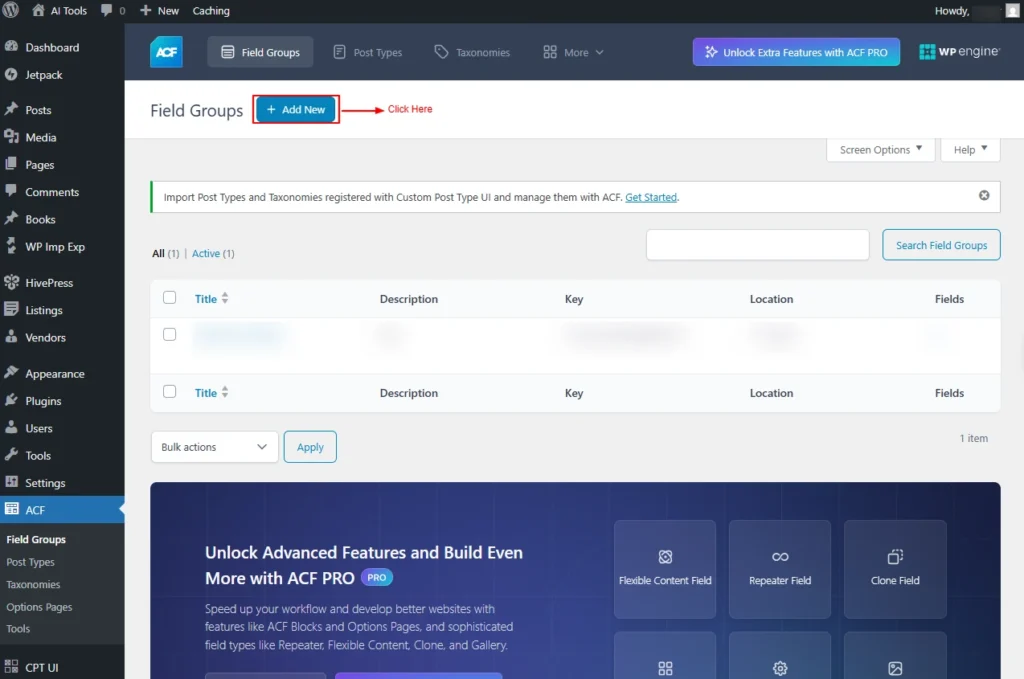
Screenshot 8: Add new Field Group
Add New Field Group
First, add the title for the Field Group.
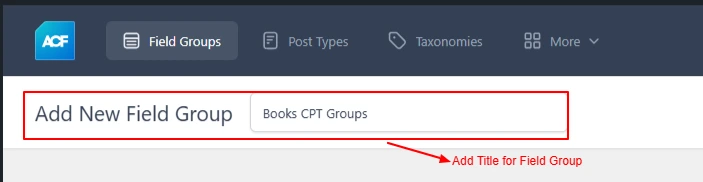
Screenshot 9: Add Title For Field Group
For example, you are creating a field group for Books CPT, let’s call it Books CPT Groups.
Fields Tab
In this tab, you can add the fields in the group Let’s. Consider you want to add four custom fields to the Book Custom Post Type,
- Number of Pages
- ISDN
- BooK author
- Book volume
You can add them from this screen.
There are four Subtabs to create custom fields.
- General
- Field Type: Enter the Field Type, e.g., Number
- Field Label: Enter the Field Label, e.g., Number of Pages
- Field Name: Enter the Field Name, e.g., page_number
- Default Value: Enter The Default Value, e.g., 100
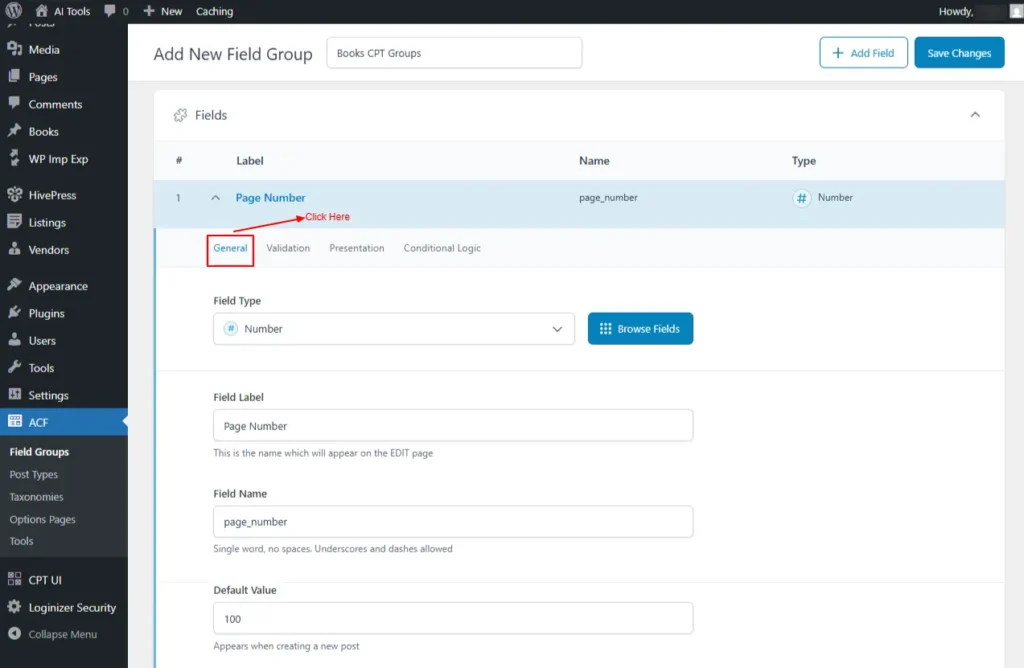
Screenshot 10: General tab for creating custom fields
- Validation
Validation options vary by field types.
For the Number field, they are
- Required: Switching this will mark the field as required
- Minimum Value: Enter the Minimum Value
- Maximum Value: Enter the maximum Value

Screenshot 11: Validation options for Fields
- Presentation
These settings control how a field appears in the editor
- Instructions: Add helper text to show Instructions for content editors. This would be shown when submitting the CPT data.
- Allow Access to Value in Editor UI: off
- Enable content editors to view and display the field value in the editor interface using Block Bindings or the ACF shortcode.
- Placeholder Text: Shows sample input
- Step Size: Defines numeric increments
- Prepend: Add text before the input
- Append: Add text after the input
- Wrapper Attributes: Adjust field layout and styling in the editor.
- Width (%)
- class
- id
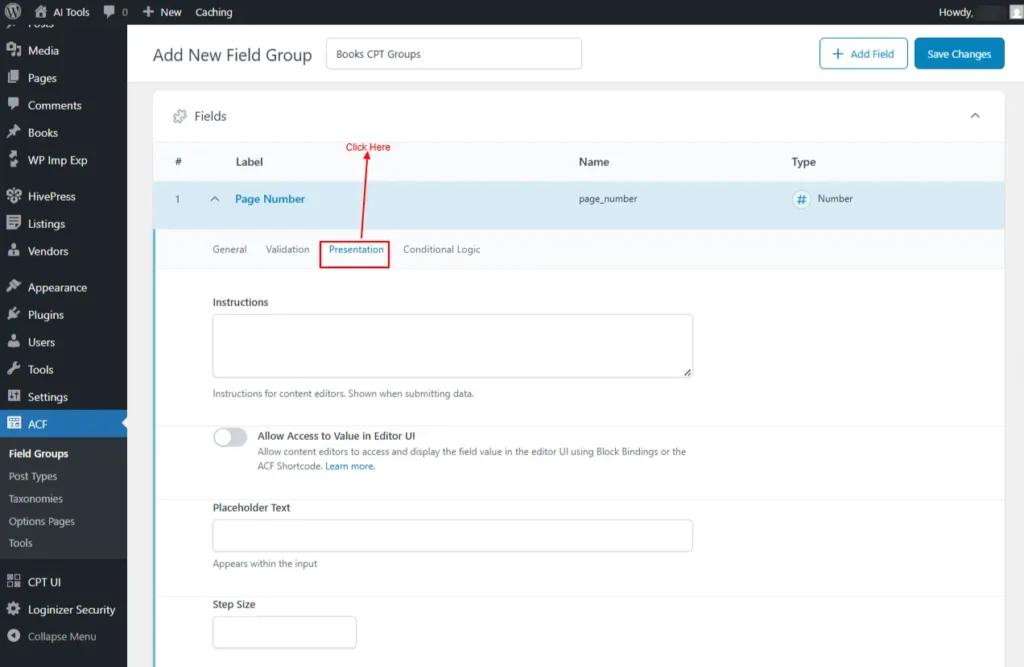
Screenshot 12: Presentation For Fields
- Conditional Logic
This setting allows fields to show or hide custom fields dynamically based on the conditions set.
The following rules are available
- Has any value
- Has no value
- Value is equal to
- Value is not equal to
- Value matches pattern
- Value contains
For example, show this field if: Book author is “Abhijeet”
You can add multiple rule groups.
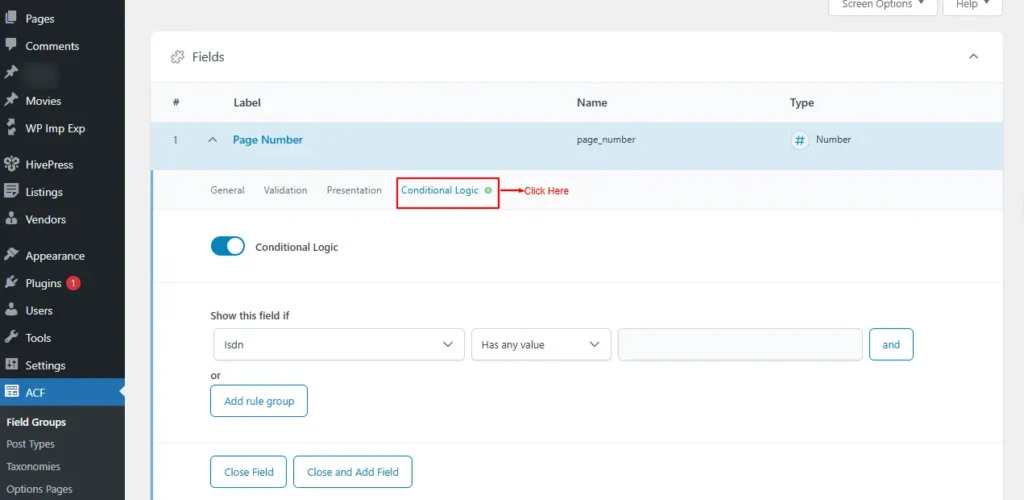
Screenshot 13: Conditional Logic for custom fields
Settings Tab
After adding the custom fields, you can configure a few settings for the entire field group.
- Location Rules
This setting determines where the custom field group appears; for example, setting “Post Type is equal to Book” ensures the custom fields show only on Book CPT.

Screenshot 14: Location Rules
- Presentation
You control how and where the field group appears in the WordPress editor.
- Style
- Standard (WP metabox)
- Seamless (no metabox)
- Position: placement on the edit screen
- High (after title)
- Normal (after content)
- Side
- Label Placement
- Top aligned
- Left aligned
- Instruction Placement
- Below labels
- Below fields
- Order No: display priority
- Hide on screen: to hide elements for a cleaner editing interface.
- Toggle All toggles all the Checkboxes
- Permalink
- Content Editor
- Excerpt
- Discussion
- Comments
- Revisions
- Slug
- Author
- Format
- Page Attributes
- Featured Image
- Categories
- Tags
- Send Trackbacks
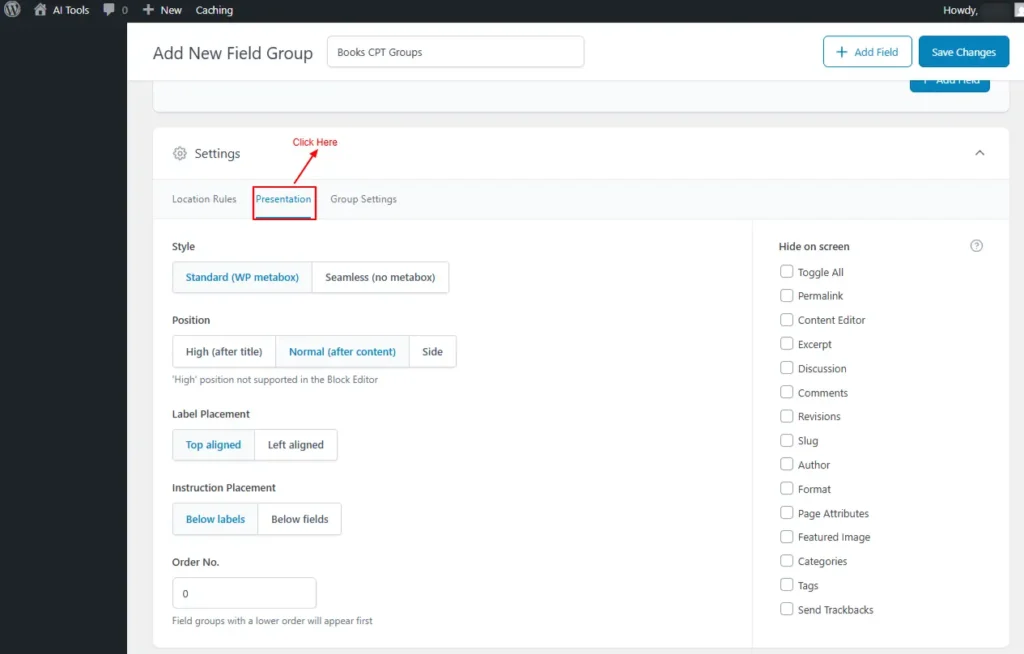
Screenshot 15: Presentation
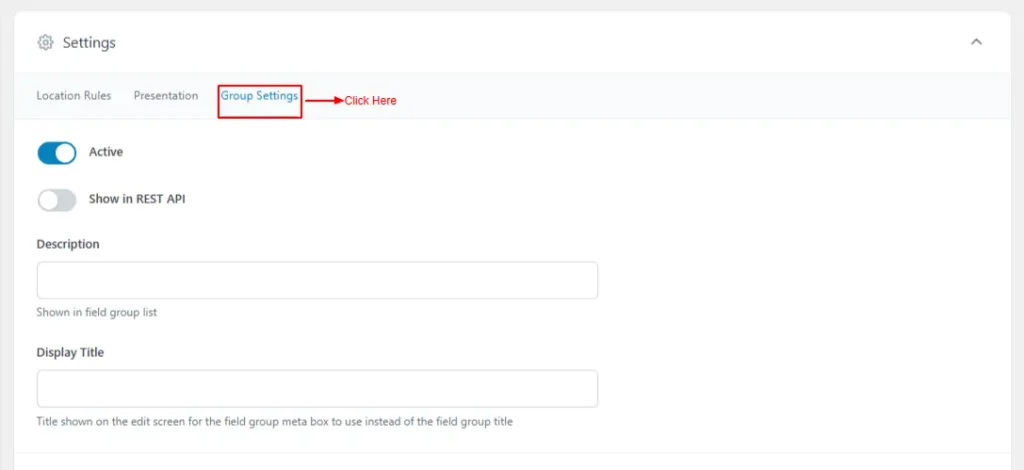
- Group Setting
- Active: On enables or disables the field group
- Show in REST API: allows its fields to be accessible via the WordPress REST API.
- Description: provides internal notes about the group’s purpose,
- Shown in the field group listing page
- Display Title: sets the visible title shown in the editor interface.
- Title shown on the edit screen for the field group meta box to use instead of the field group title
Screenshot 16: Group Settings
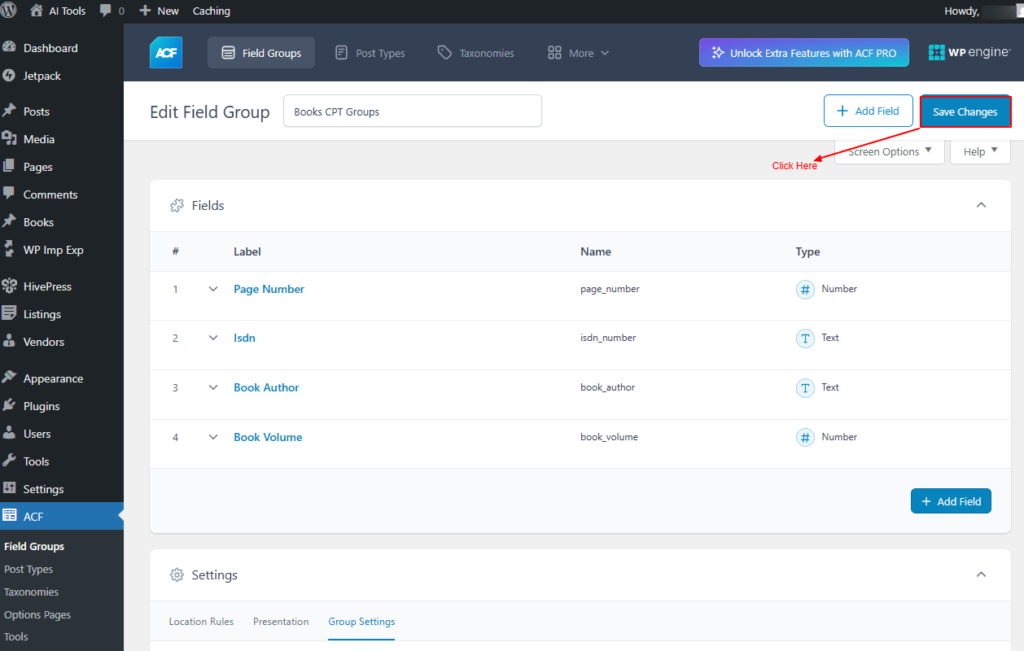
Create three custom Fields for the Field Group, using the above process
- ISDN Number: Type Text
- Book Author: Type Text
- Book Volume: Type Number
- Number of Pages: Type number
Once all fields are created, Click On Save Changes in the top right-hand corner.
Screenshot 17: Save Changes
The new Field Groups with me, “Books CPT Groups”, will be created and displayed in the Books CPT.
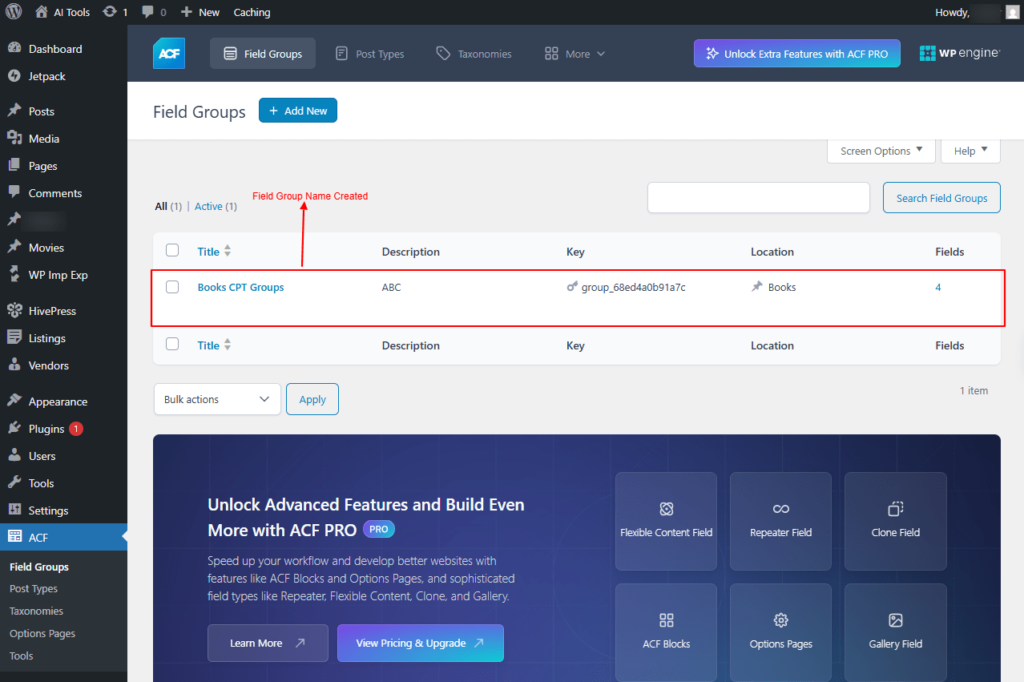
Screenshot 18: Books CPT Groups
2. Post Type
The following tab is for creating a Custom Post Type
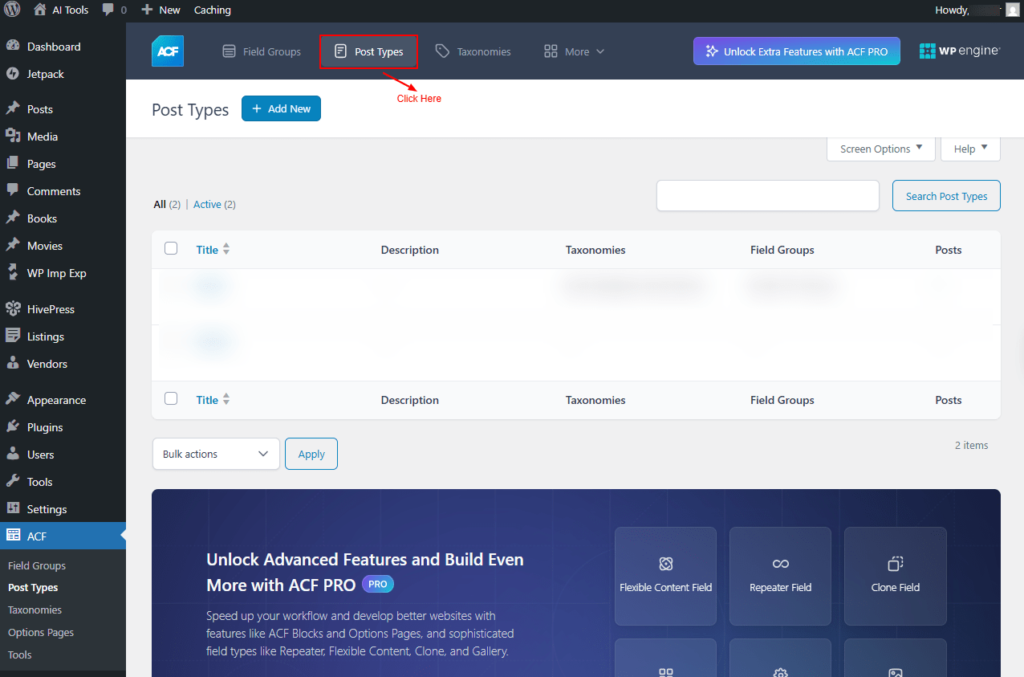
Screenshot 19: Dashboard of Post Types
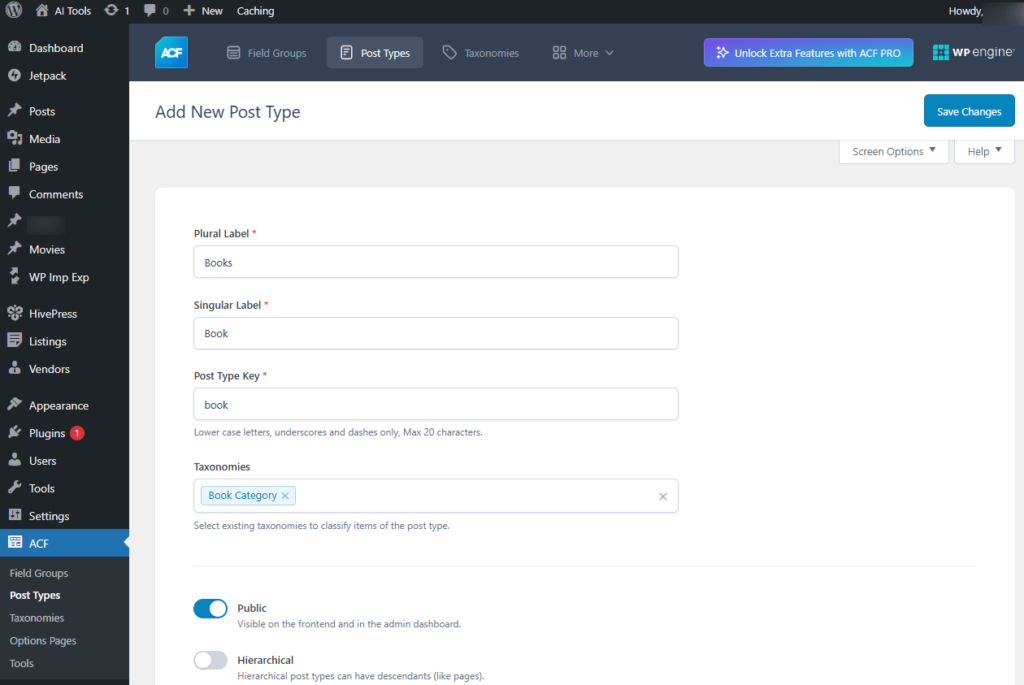
Click on the “Add New” Button.
Screenshot 20: Add New Post Type
Add New Post Type
- Plural Label: Enter the Plural label. For e.g., Books
- Singular Label: Enter the Singular label.For e.g., Book
- Post Type Key: Enter the label Post Type Key.For e.g., Books
- Taxonomies: Select existing taxonomies to be added to the post type screen.
- Public: Turning them on will make it available on the frontend and the admin dashboard
- Hierarchical: Set the CPTs hierarchy.
Screenshot 21: Add new Post type in ACF
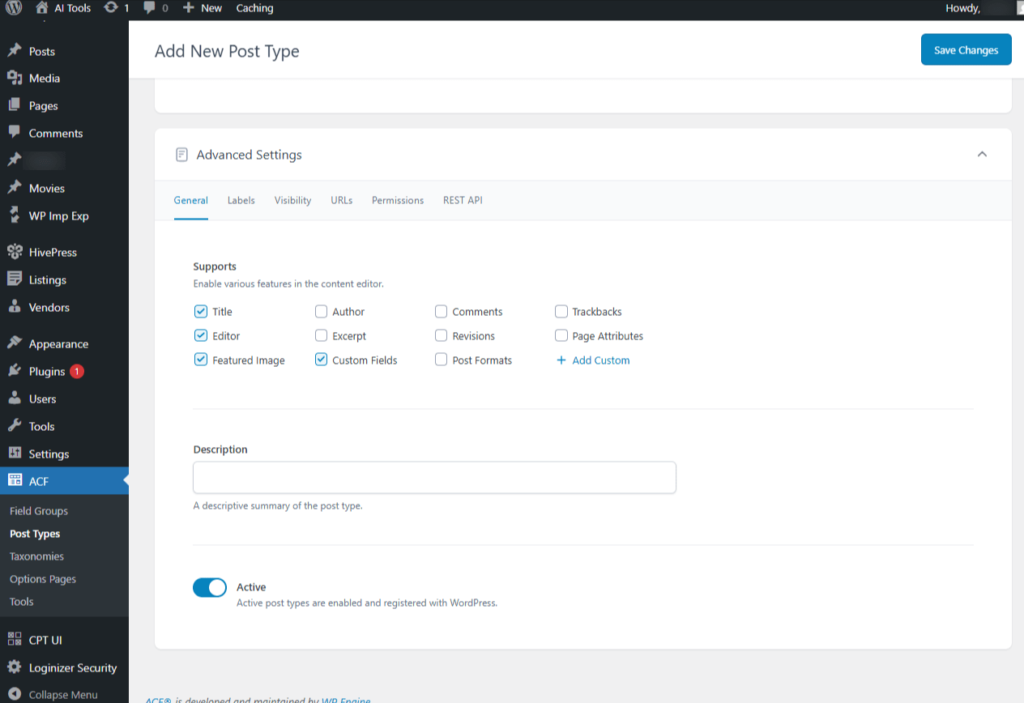
Advanced Settings
This section lets you set advanced settings for the Custom Post Type.
Advanced Settings → General
- Supports: This option lets you enable or disable the various features of the WordPress editor
- Title:
- Author:
- Comments
- Trackbacks
- Editor: Check
- Excerpt
- Revisions
- Page Attributes
- Featured Image: Check
- Custom Fields: Check
- Post Formats
- Add Custom
- Description: Enter the description of the post type.
- Active: On toggles whether the post type is currently enabled.
Screenshot 22: Advanced Settings → General Tab
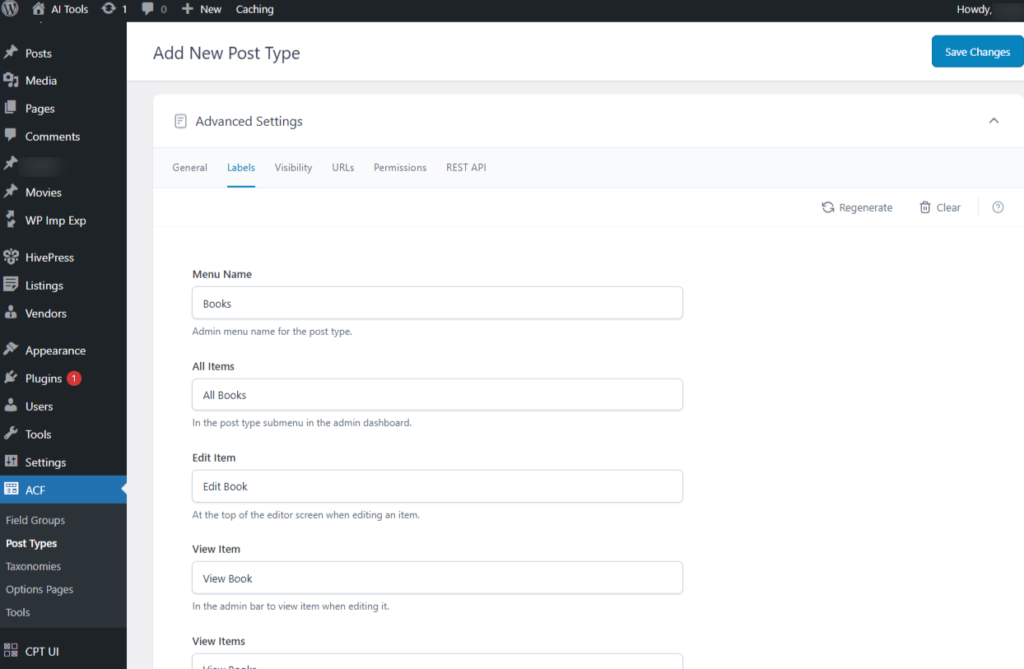
Advanced Settings → Labels Tab
This tab lets you define all the Custom labels for the CPT
- Menu Name: The name displayed in the admin menu for this post type.
- All Items: Shown in the post type submenu within the admin dashboard.
- Edit Item: Displayed at the top of the editor screen when editing an item.
- View Item: Appears in the admin bar when viewing an item during editing.
- View Items: Shown in the admin bar on the “All Posts” screen if the post type supports archives and the homepage isn’t an archive of that post type.
- Add New Item: Displayed at the top of the editor screen when adding a new item.
- Add New: Appears in the post type submenu within the admin dashboard.
- New Item: Appears in the post type submenu within the admin dashboard.
- Parent Item Prefix: Displayed for hierarchical post types in the list screen.
- Search Items: Shown at the top of the items screen when searching for an item.
- No Items Found: Displayed at the top of the post type list screen when no posts are available.
- No Items Found in Trash: Displayed at the top of the post type list screen when the trash is empty.
- Archives Nav Menu: Adds “Post Type Archive” items with this label to the list of posts available when adding items to an existing menu for a CPT with archives enabled. This option is only visible in “Live Preview” mode when a custom archive slug is set.
- Attributes Meta Box: Used as the title in the post attributes meta box within the editor.
- Featured Image Meta Box: Used as the title in the featured image meta box within the editor.
- Set Featured Image: Used as the button label for setting the featured image.
- Remove Featured Image: Used as the button label for removing the featured image.
- Use Featured Image: Used as the button label for choosing an image to set as the featured image.
- Insert Into Media Button: Used as the button label for adding media to the content.
- Uploaded To This Item: Displayed in the media modal to show all media files uploaded to this item.
- Filter Items List: Used by screen readers as the heading for filter links on the post type list screen.
- Filter Items By Date: Used by screen readers as the heading for the “Filter by Date” section on the post type list screen.
- Items List Navigation: Used by screen readers as the label for pagination controls on the post type list screen.
- Items List: Used by screen readers as the label for the items list on the post type list screen.
- Item Published: Displayed in the editor notice after an item is published.
- Item Published Privately: Displayed in the editor notice after a private item is published.
- Item Reverted To Draft: Displayed in the editor notice after an item is reverted to a draft.
- Item Scheduled: Displayed in the editor notice after an item is scheduled.
- Item Updated: Displayed in the editor notice after an item is updated.
- Item Link: Title of a navigation link block variation.
- Item Link Description: Description of a navigation link block variation.
- Title Placeholder: Used in the editor as the placeholder for the title.
Screenshot 23: Add new Post type → Advanced Settings → Labels tab
Advanced Settings → Visibility
This tba lets you define settings for Custom Post Type visibility.
- Show In UI: Items can be managed and edited from the admin dashboard.
- Show In Admin Menu: Admin editor navigation is located in the sidebar menu.
- Admin Menu Parent: By default, the post type appears as a new top-level item in the admin menu. If you specify an existing top-level item, the post type will instead be added as a submenu under it.
- Menu Position: The position of the item in the admin dashboard’s sidebar menu.
- Menu Icon
- Dashicons: Select an icon from the library of Dashicons.
- Media Library: select an icon from the Media Library
- URL: Select an icon from URL or an SVG provided as a Data URI.
- Custom Meta Box Callback: The name of a PHP function to be called when setting up meta boxes on the edit screen. For security reasons, this callback runs in a restricted context without access to superglobals such as $_POST or $_GET.
- Show In Admin Bar: Displays as an item in the “New” menu within the admin bar.
- Appearance Menus Support: Allows items to be added to menus from the Appearance → Menus screen. This option must be enabled in Screen Options.
- Exclude From Search: Determines whether posts are excluded from search results and taxonomy archive pages.
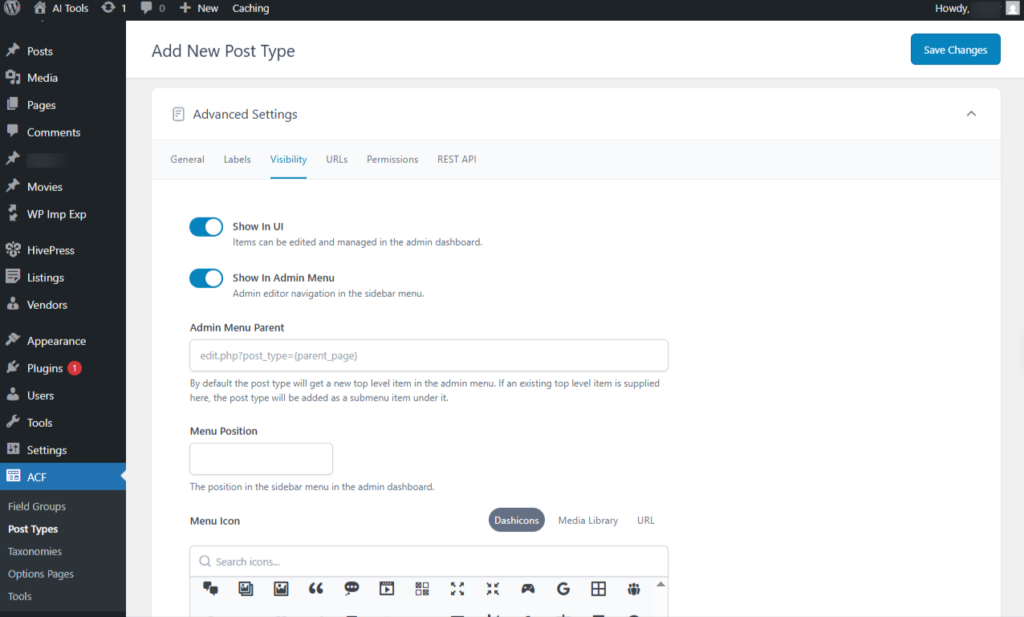
Screenshot 24: Add new Post type → Advanced Settings → Visibility
Advanced Settings → URLs
This screen helps manage the URLs for Custom Post Types.
- Permalink Rewrite: Post Type Key(Default) Rewrites the URL using the post type key as the slug. The resulting permalink structure will be {slug}.
- Front URL Prefix: Modifies the permalink structure to include the WP_Rewrite::$front prefix in URLs.
- Feed URL: The RSS feed URL for items of this post type.
- Pagination: Enables pagination for item URLs, such as archive pages.
- Archive: Includes an item archive that can be customized using an archive template file in your theme.
- Publicly Queryable: Allows item URLs to be accessed using a query string.
- Query Variable Support: Post Type Key(Default) Items can be accessed using a non-pretty permalink format, such as {post_type}={post_slug}.
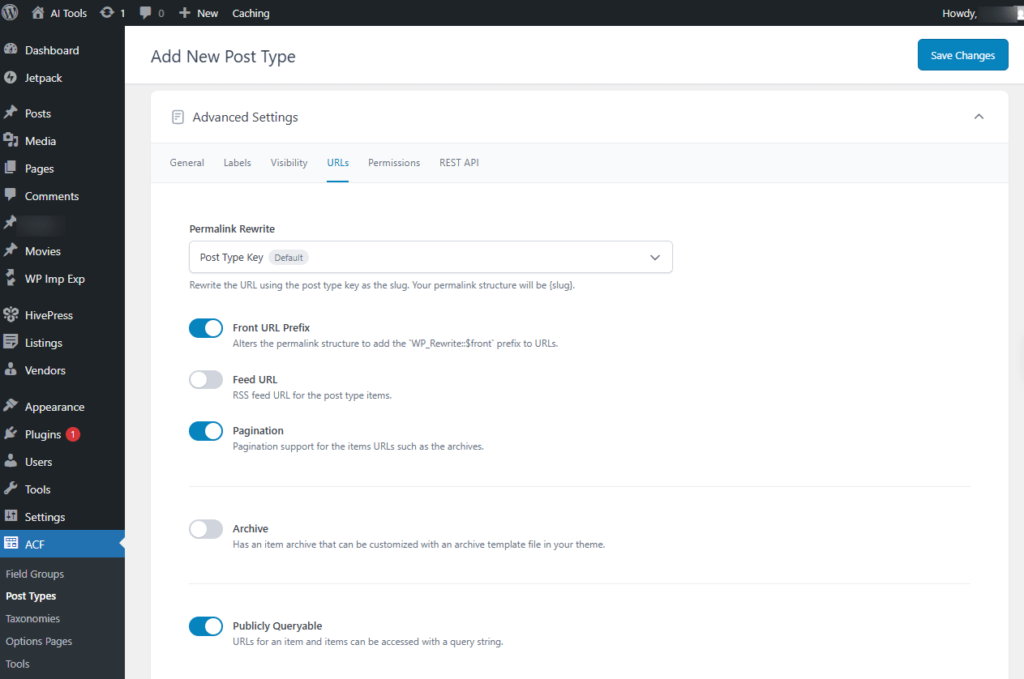
Screenshot 25: Add new Post type → Advanced Settings → URLs
Advanced Settings → Permissions
- Rename Capabilities: By default, the post type inherits the capability names from the standard “Post” type, such as edit_post and delete_posts. Enable this option to use post type–specific capabilities, like edit_{singular} and delete_{plural}.
- Can Export: Enables the post type to be exported via Tools → Export.
- Delete With User: Deletes a user’s items when the user account is removed.
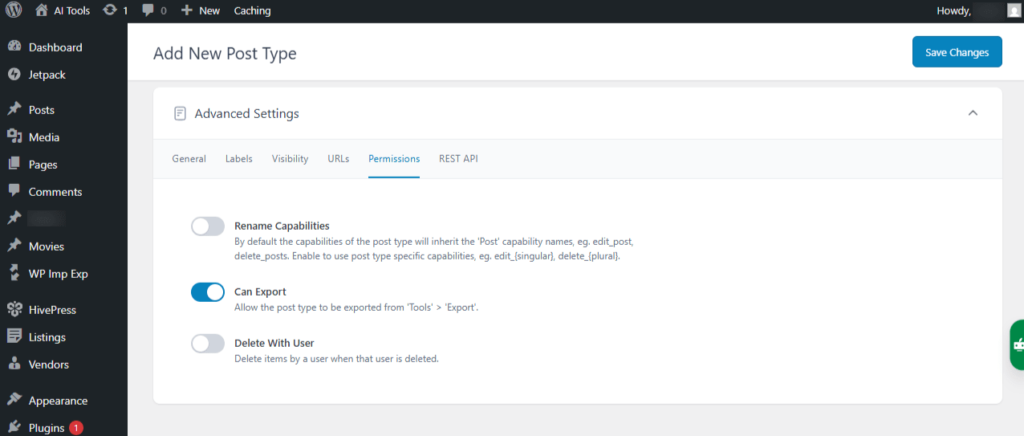
Screenshot 26: Add new Post type → Advanced Settings → Permissions
Advanced Settings → REST API
- Show In REST API: On Makes this post type available in the REST API. This is required for using the block editor.
- Base URL: The base route used for the post type’s REST API endpoints.
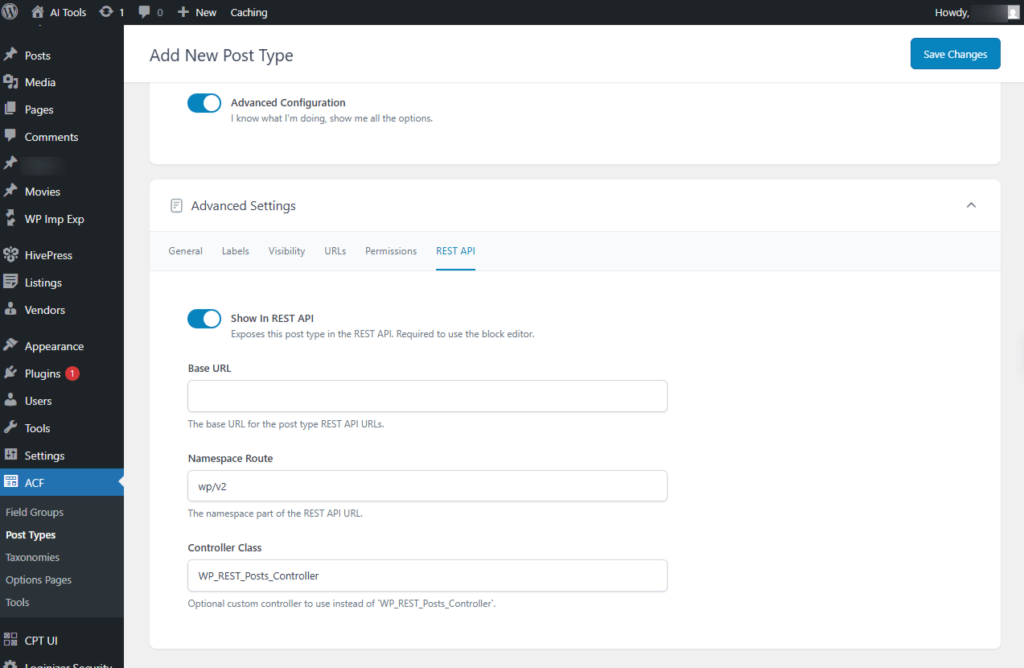
Screenshot 27: Add new Post type → Advanced Settings → REST API
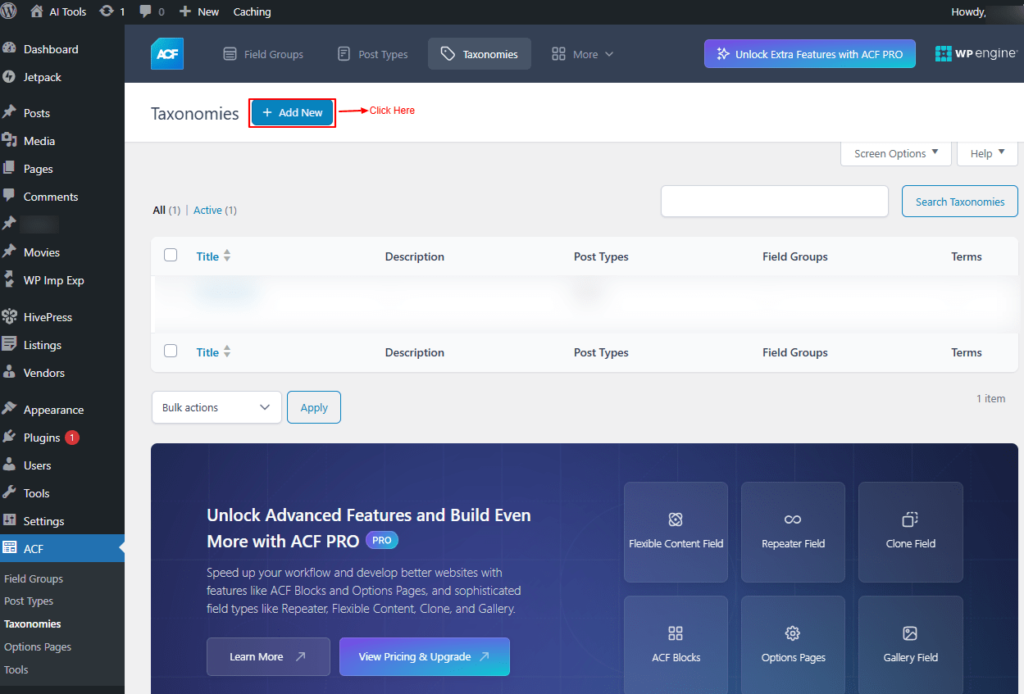
3. Taxonomies
This section allows you to create taxonomies. To do that, go to the Taxonomies menu in the ACF main menu.
Click on Add new.
Screenshot 28: Add New Taxonomy
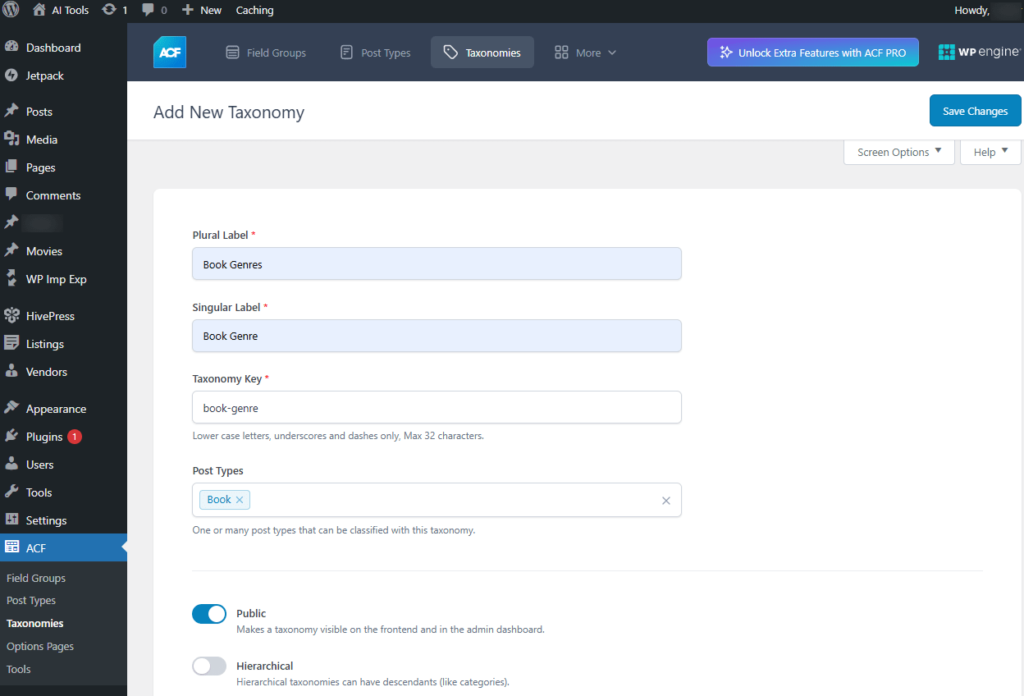
Add New Taxonomy
- Plural Label: Enter the label Plural. For e.g., Book Genres
- Singular Label: Enter the label. For e.g.. Book Genre
- Taxonomy Key: Enter the taxonomy Key. For e.g.. book-genre
- Use only lowercase letters, underscores, and dashes. Maximum length: 32 characters.
- Post Types: One or more post types that can be associated with this taxonomy.
- Public: Makes the taxonomy visible on both the frontend and the admin dashboard.
- Hierarchical: e.g., Hierarchical taxonomies can include parent and child terms, similar to categories.
Screenshot 29: Add new Taxonomy
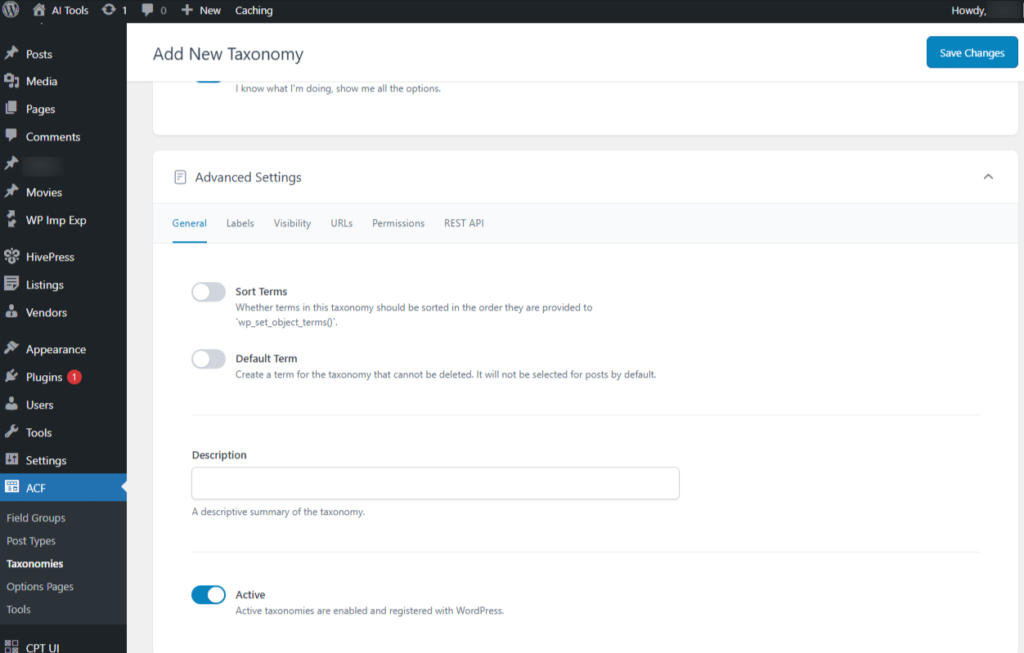
Advanced Settings
This section lets you set advanced settings for creating a taxonomy.
Advanced Settings → General
- Sort Terms: Specifies whether terms in this taxonomy should be ordered based on the sequence provided to wp_set_object_terms().
- Default Term: Creates a permanent term for the taxonomy that cannot be deleted. It will not be automatically assigned to posts.
- Description: A brief description that summarizes the purpose of the taxonomy.
- Active: Active taxonomies are those that are enabled and registered with WordPress.
Screenshot 30: Add new Taxonomy → Advanced Settings → General
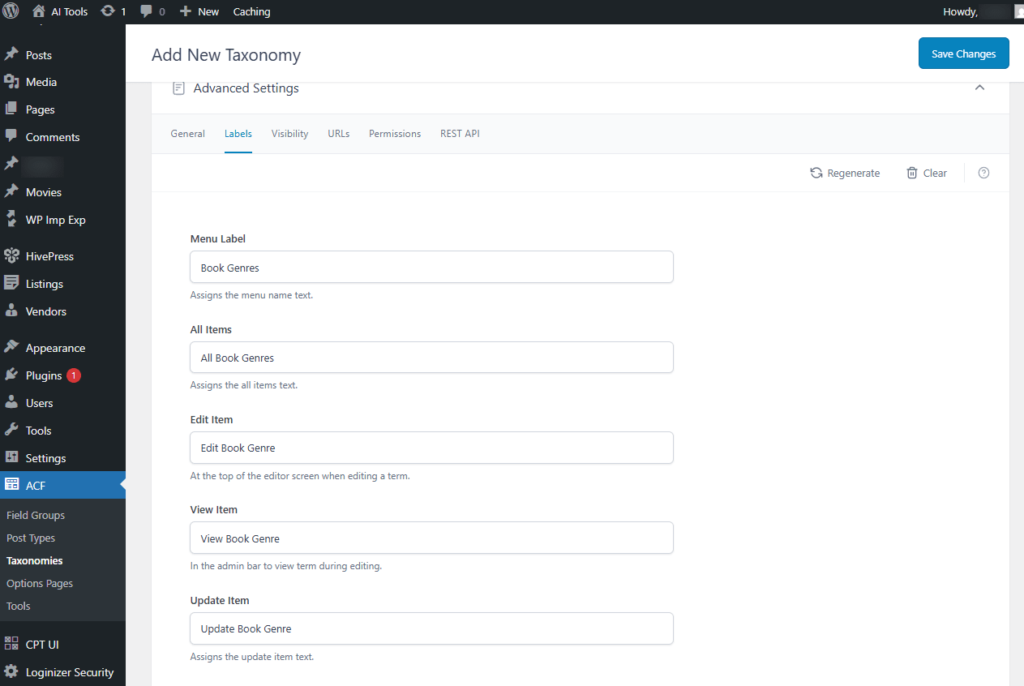
Advanced Settings → Labels
Set the labels displayed on various screens
- Menu Label: Specifies the text used for the menu name. E.g., Book Genres
- All Items: Specifies the text displayed for “All Items.” For e.g., All Book Genres
- Edit Item: Displayed at the top of the editor screen when editing a term. For e.g., Edit Book Genre.
- View Item: Appears in the admin bar to view the term while editing. For e.g., View Book Genre.
- Update Item: Specifies the text shown for “Update Item.” For e.g., Update Book Genre.
- Add New Item: Specifies the text displayed for “Add New Item.” For e.g., Add New Book Genre.
- New Item Name: Specifies the text shown for “New Item Name.” For e.g., New Book Genre Name.
- Search Items: Specifies the text displayed for “Search Items.” For e.g., Search Book Genre.
- Popular Items: Specifies the text shown for “Popular Items.” Used only for non-hierarchical taxonomies. For e.g., Popular Book Genre.
- Separate Items With Commas: Specifies the “Separate items with commas” text shown in the taxonomy meta box. Applicable only to non-hierarchical taxonomies.
- Add Or Remove Items: Specifies the “Add or remove items” text shown in the meta box when JavaScript is disabled. Used only for non-hierarchical taxonomies.
- Choose From the Most Used: Specifies the “Choose from the most used” text displayed in the meta box when JavaScript is disabled. Applicable only to non-hierarchical taxonomies.
- Most Used: Specifies the text displayed in the Title field of the “Most Used” tab.
- Not Found: Specifies the text shown when clicking “Choose from the most used” in the taxonomy meta box if no tags are available, and the text displayed in the terms list table when the taxonomy has no items.
- No Terms: Specifies the text shown in the posts and media list tables when no tags or categories exist. For e.g. No Book Genre
- Name Field Description: Describes the Name field on the Edit Tags screen.
- Slug Field Description: Describes the Slug field on the Edit Tags screen.
- Description Field Description: Describes the Description field on the Edit Tags screen.
- Items List Navigation: Specifies the text used for the hidden heading in table pagination. For e.g., Book Genre list navigation
- Items List: Specifies the text used for the hidden heading in the table. For e.g., Book Genre list
- Back To Items: Specifies the text for the link that returns to the main index after a term is updated. For e.g. ←Go to Book Genre.
- Item Link: Specifies the title for a navigation link block variation used in the block editor. For e.g. Book Genres Link.
- Item Link Description: Describes navigation link block variation used in the block editor. For e.g. A link to a book genre.
Screenshot 31: Add New Taxonomy → Advanced Settings → Labels
Advanced Settings → Visibility
This tab lets you set visibility for taxonomies.
- Show In UI: Items can be managed and edited from within the admin dashboard.
- Show In Admin Menu: Navigation for the admin editor is located in the sidebar menu.
- Meta Box: Controls the meta box displayed on the content editor screen. By default, hierarchical taxonomies use the Categories meta box, while non-hierarchical taxonomies use the Tags meta box.
- Appearance Menus Support: Allows items to be added to menus from the Appearance → Menus screen. This option must be enabled in Screen Options.
- Tag Cloud: Displays the taxonomy in the Tag Cloud widget settings.
- Quick Edit: Non-displays the taxonomy in the Quick Edit and Bulk Edit panels.
- Show Admin Column: Adds a column for the taxonomy to the most type list screens.

Screenshot 32: Add New Taxonomy → Advanced Settings → Visibility
Advanced Settings → URLs
This screen helps manage the URL for taxonomies.
- Permalink Rewrite: There are three options for the Permalink rewrite.
- Taxonomy Key
- Rewrites the URL using the taxonomy key as the slug. The resulting permalink structure will be https://yourwebsite.com/{slug}.
- Front URL Prefix: Modifies the permalink structure to include the WP_Rewrite::$front prefix in the URLs.
- Hierarchical: Includes parent-child terms in URLs for hierarchical taxonomies.
- Custom permalink
- Rewrites the URL using a custom slug specified in the field below. The resulting permalink structure will be https://yourwebsite.com/aitools/{slug}.
- URL Slug: Customise the slug that appears in the URL.
- Front URL Prefix: Modifies the permalink structure to append the WP_Rewrite::$front prefix to the URLs.
- Hierarchical: Displays parent and child terms in URLs for hierarchical taxonomies.
- No Permalink(prevent URL Rewriting) Permalinks are disabled for this taxonomy.
- Taxonomy Key
- Publicly Queryable: URLs for an item and items can be accessed with a query string.
- Query Variable Support: There are three options for Query Variable Support
- Taxonomy Key(Default): Terms can be accessed using a non-pretty permalink format, such as {query_var}={term_slug}.
- Custom Query Variable
- Terms can be accessed through a non-pretty permalink format, for example: {query_var}={term_slug}.
- Query Variable: :S Set a custom name for the query variable.
- No Query Variable Support
- Terms can be accessed using a plain permalink format, such as {query_var}={term_slug}.
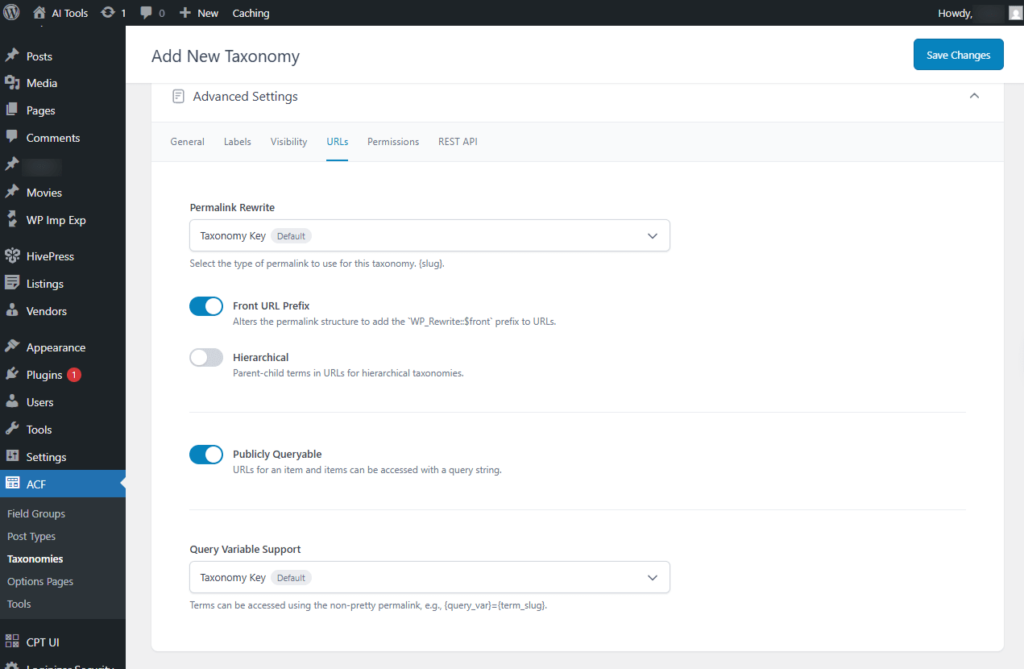
Screenshot 33: Add New Taxonomy → Advanced Settings → URLs
Advanced Settings → Permissions
This tab lets you set Permissions for taxonomies.
- Manage Terms Capability: The capability required to manage terms in this taxonomy. manage_categories(Default)
- Edit Terms Capability: The capability required to edit terms within this taxonomy. manage_categories(Default)
- Delete Terms Capability: The capability required to delete terms within this taxonomy. manage_categories(Default)
- Assign Terms Capability: The capability required to assign terms to this taxonomy.edit_posts(Default)
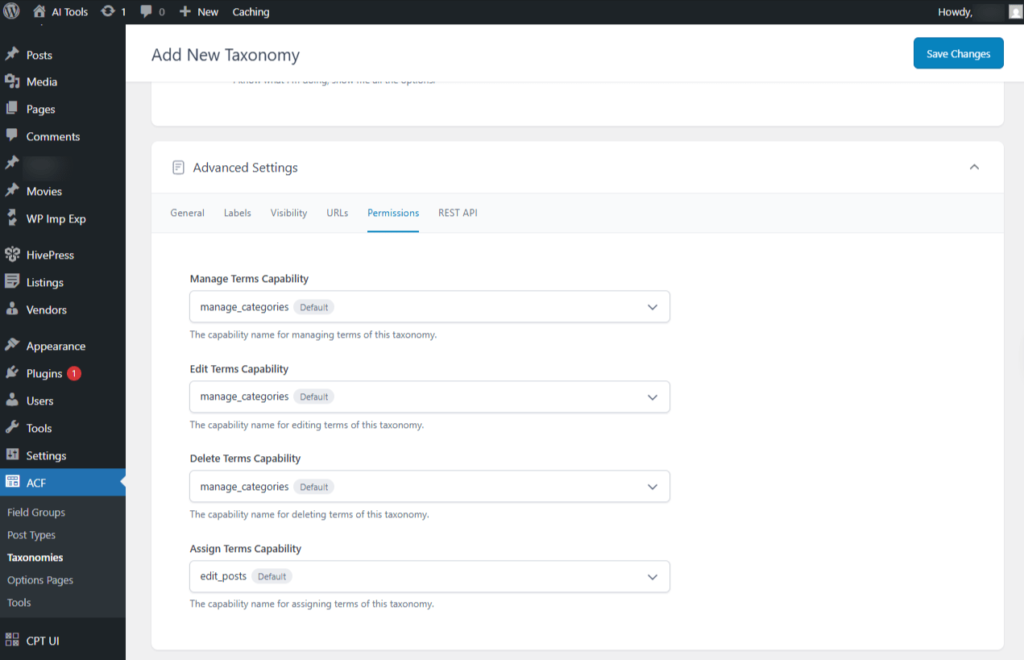
Screenshot 34: Add New Taxonomy → Advanced Settings → Permissions
Advanced Settings →REST API
Access the taxonomies using the REST API.
- Show in REST API: Make this post type available in the REST API.
- Base URL: The base path used for the REST API endpoints of this post type.
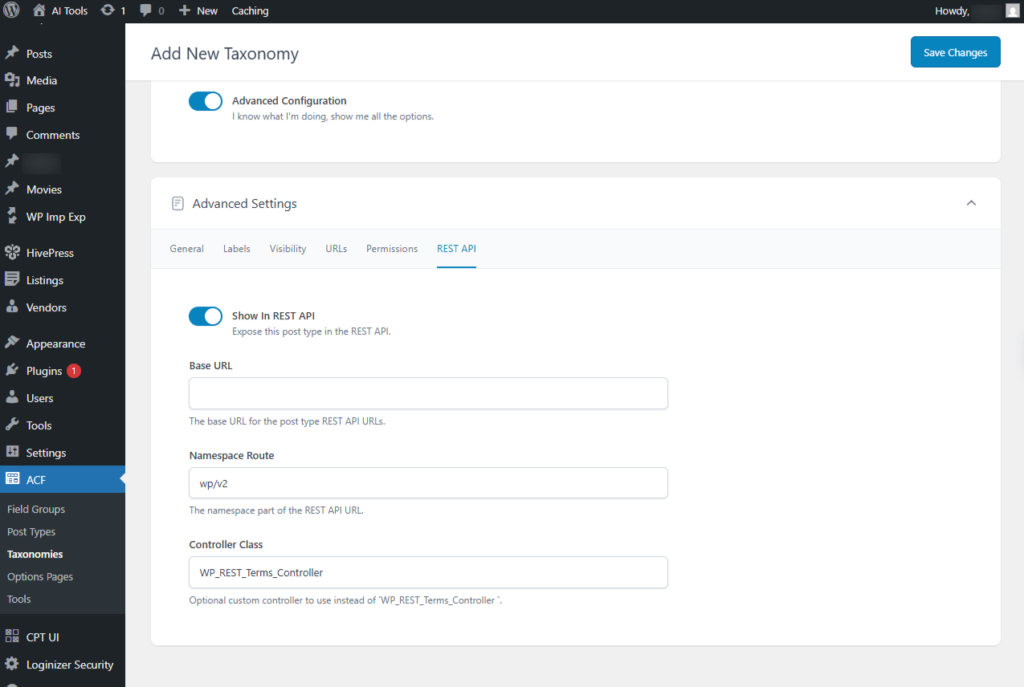
Screenshot 35: Add New Taxonomy → Advanced Settings → REST API
4. Tools
Using the tools menu, you can export and import ACF field groups, taxonomies, and custom post types as JSON.
Export
- Select Field Groups: Export, the Select Field Groups option lets you choose specific field groups (like Books CPT Groups) to include in your export, making it easy to back up or move custom field setups to another WordPress site.
- Select Post Types: Export, the Select Post Types option allows you to choose specific custom post types (like Books) for export, helping you transfer or replicate post type settings between WordPress sites.
- Select Taxonomies: Export, the Select Taxonomies option lets you choose custom taxonomies (like Book Genres) to include in your export, allowing easy migration or duplication of taxonomy settings across WordPress sites.
Import
- Select JSON File: Import a JSON file that includes field groups, post types, or taxonomies — only from trusted sources.
- Import from Custom Post Type UI: you can import existing Post Types and Taxonomies created with the Custom Post Type UI plugin, allowing you to manage and edit them directly within ACF.
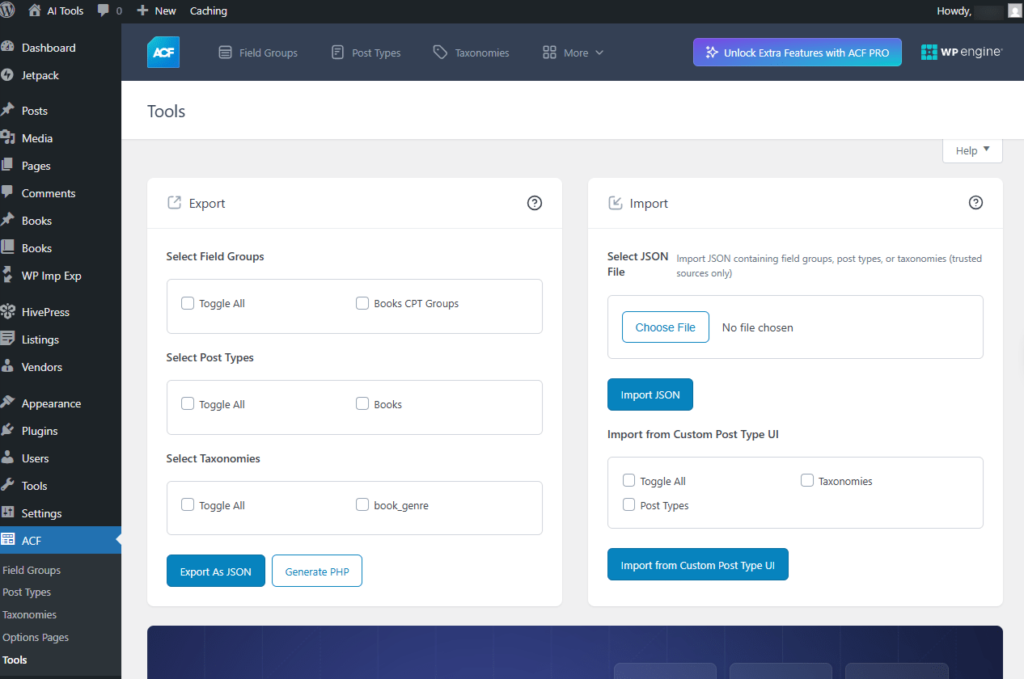
Screenshot 36: Tools Export Import
Conclusion
Advanced Custom Fields (ACF) is a powerful and user-friendly tool that allows you to create field groups, custom post types, and taxonomies effortlessly—no coding required. Its Pro version goes a step further by enabling the creation of custom options pages, giving you even greater control and flexibility over your WordPress site’s content and structure.
That’s it for this blog. Stay tuned for another awesome post!
Published on Nov 7, 2025 | Updated on Feb 20, 2026
Author

Abhijeet Bendre
Author
|
Reviewer

Savita Soni
Reviewer
|