Introduction:
Ever landed on a long blog post and felt lost scrolling through it? That’s where a Table of Contents (ToC) comes in handy. It helps your readers jump straight to the part they’re looking for, making your content easier to read and more user-friendly.
In this guide, we’ll walk you through how to add a Table of Contents to your WordPress posts using a simple plugin, Easy Table of Contents, with no coding required.
Why Should You Add a Table of Contents to Your WordPress Site?
Adding a Table of Contents isn’t just about looks; it comes with real benefits for both readers and search engines:
- Provides Readers with a Quick Overview: Visitors can instantly see what your page covers, without needing to scroll endlessly.
- Improves Navigation: With clickable links, users can easily jump to the section they’re interested in. It’s especially helpful on long posts or mobile devices.
- Boosts SEO Potential: A ToC adds internal links and keyword-rich headings, which help search engines understand your content better.
- Can Help You Win Featured Snippets: Google often pulls ToC links into featured results, giving your page more visibility and a higher click-through rate.
- Enhances User Experience: A well-structured page with a ToC feels more professional, keeps users engaged longer, and makes your content easier to scan.
Step 1: Create a Sample Blog Post to Demonstrate ToC
Let’s create a sample blog post so you can see exactly how the Table of Contents works in action. Here’s a post structure we’ll use:
- The main title of the page should use an H1 tag.
- Section headings beneath the title should use H2 tags.
- For sub-points or nested sections under each H2, use H3 or H4 tags as needed to maintain a logical content hierarchy.
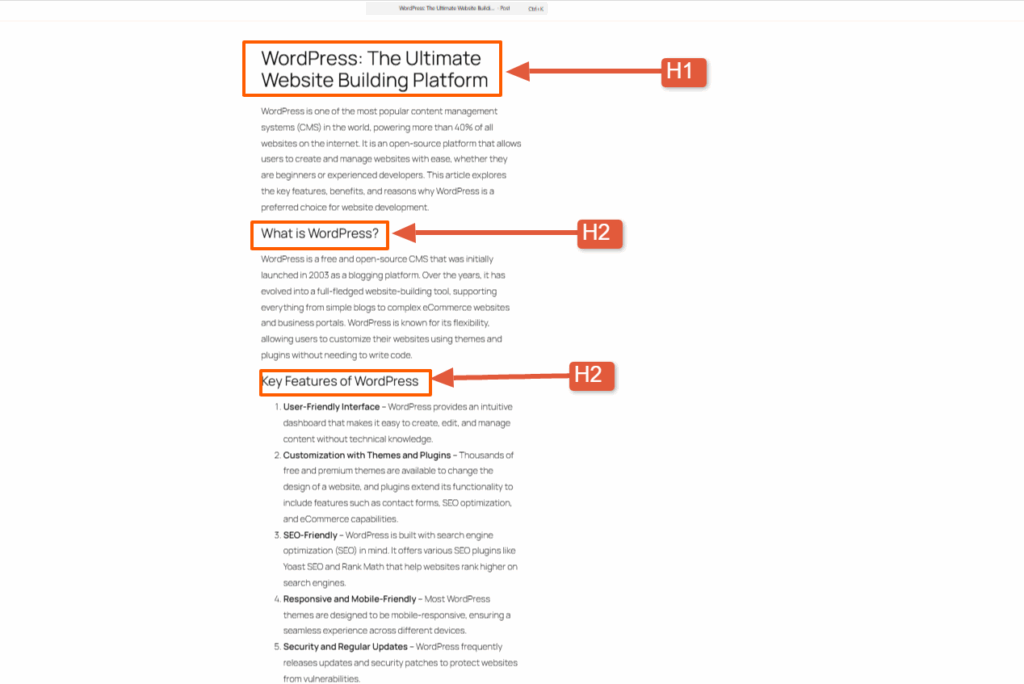
Screenshot 1: Sample Post Created in WordPress
Step 2: Installing the Easy Table of Contents Plugin
Let’s get started by installing the plugin.
- Log in to your WordPress Dashboard
- Navigate to Plugins > Add New
- Type Easy Table of Contents in the search bar.
- Click Install Now next to the plugin name
- After installation, click Activate
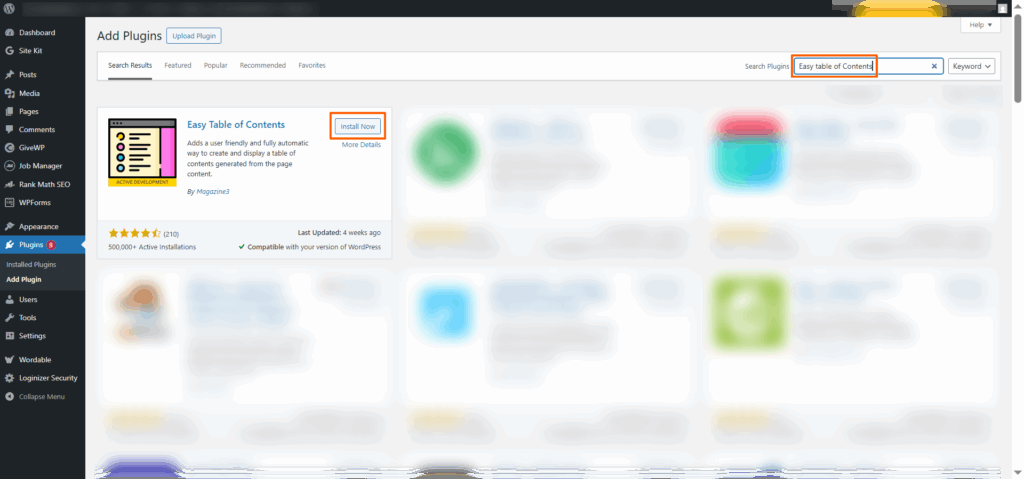
Screenshot 2: Install and Activate the Easy Table of Contents Plugin
Step 3: Navigating to the Plugin Settings
Once you have installed the plugin, navigate to the Settings Section of the Easy Table of Contents plugin. You’ll see multiple sections to customize the appearance of your Table of Contents (ToC).
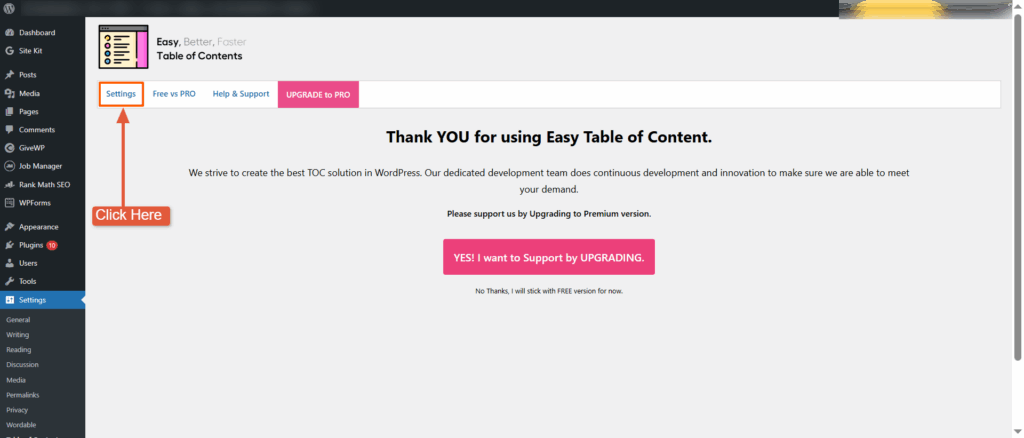
Screenshot 3: Settings Section of Easy Table of Contents Plugin
Step 4: Configuring General Settings
In the general settings, you can configure where and how the Table of Contents (ToC) appears.
- Enable Support:
- With this option, you can choose to display the ToC on:
- Regular blog posts
- Static pages
- Or any custom post types your site may be using
- Just tick the checkboxes that match your needs. For most bloggers, enabling it on posts is a great start. If you’re writing long-form content on pages, too (like guides or case studies), go ahead and enable it there as well.
- With this option, you can choose to display the ToC on:
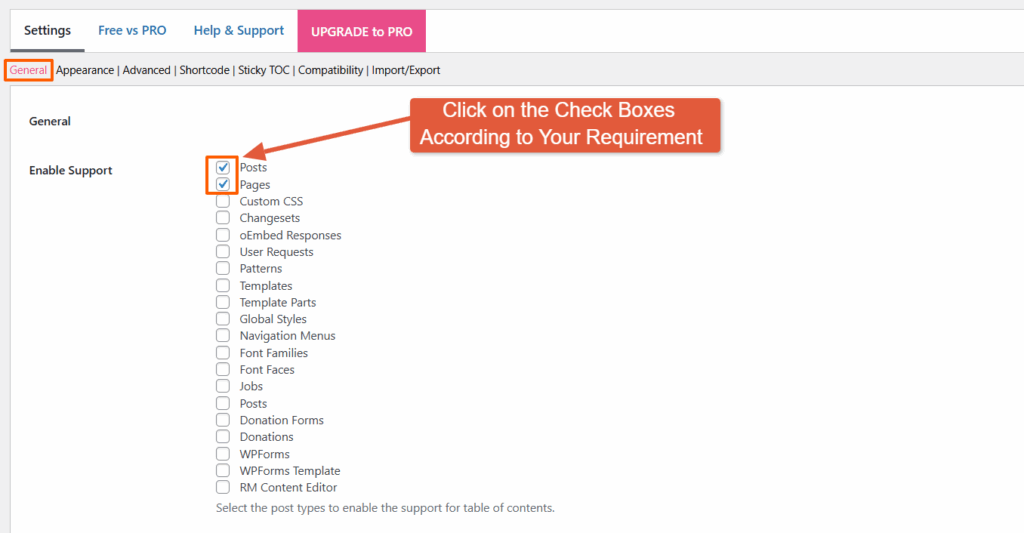
Screenshot 4: General Settings Panel Enable Support Options
- Auto Insert: When Auto Insert is enabled, the plugin automatically adds the Table of Contents to every new post or page that meets the criteria, eliminating the need for manual insertion each time.
- You can choose multiple options to auto-insert the Toc in different post types.
- If you prefer more control and want to decide on a case-by-case basis, you can leave this setting off and insert the ToC manually (we’ll cover that later). But if you know you’ll want a ToC in every post, enabling this option is a great set-it-and-forget-it move
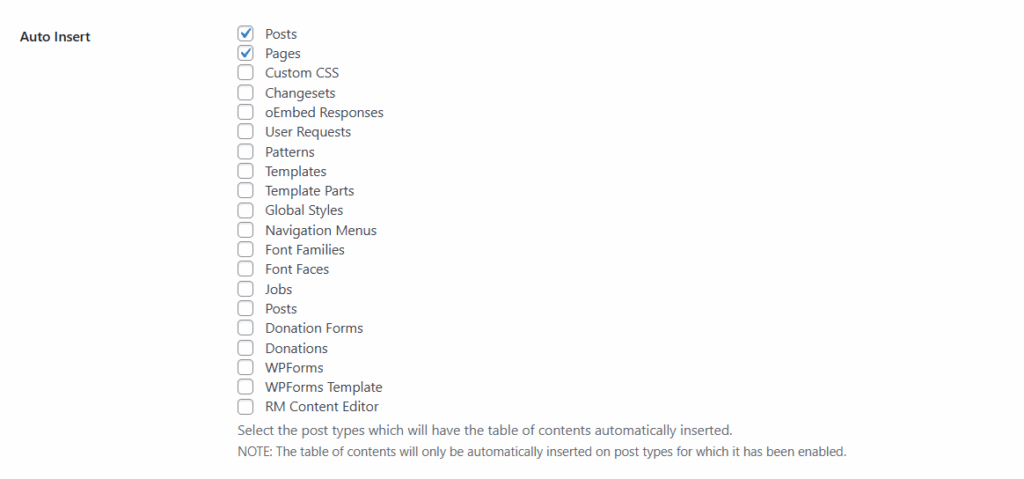
Screenshot 5: General Settings Panel Auto Insert Option
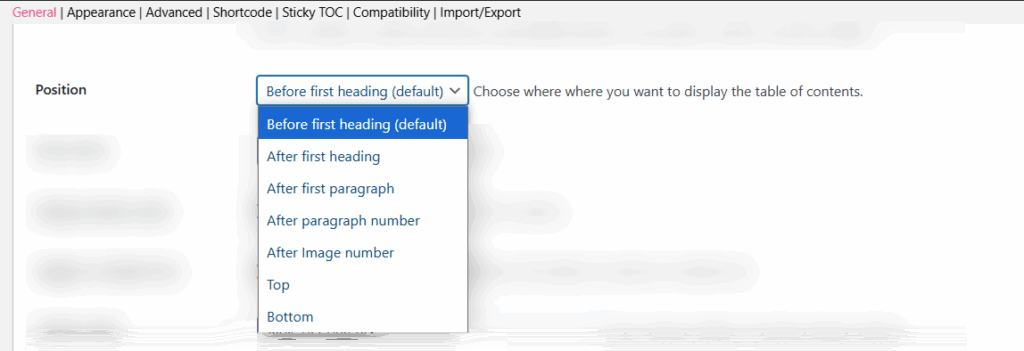
- Position: This setting lets you pick where the Table of Contents appears within your content.
- Here you will find these options:
- Before first heading (Recommended): This places the ToC right before your first H2 heading, which feels natural and helps guide the reader before they dive into your content.
- After the first heading, the ToC appears immediately after your first heading. This is helpful if you want to kick things off with a strong title and then let readers navigate.
- After the first paragraph, insert the ToC after your opening paragraph. It works well when you want to lead with a quick intro and keep things tidy before showing the ToC.
- After image: Ideal for image-heavy posts or tutorials. The ToC won’t interrupt the visual flow and appears only after a specific number of image is displayed.
- After number: If your content uses numbered lists or data early on, this option places the ToC after the numerical item that you have specified, though it’s a bit niche and less commonly used.
- Top: Inserts the ToC right at the top of the post, even before your introduction. It grabs attention but may feel a bit abrupt if your intro is important for context.
- Bottom: Places the ToC at the end of your post. Not very helpful for navigation, but can still be useful as a recap.
- For most blogs, “Before first heading” works best as it provides a nice flow, giving the reader a preview of what’s coming without disrupting the intro paragraph.
- Here you will find these options:
Screenshot 6: General Settings Panel Table of Content Position Options
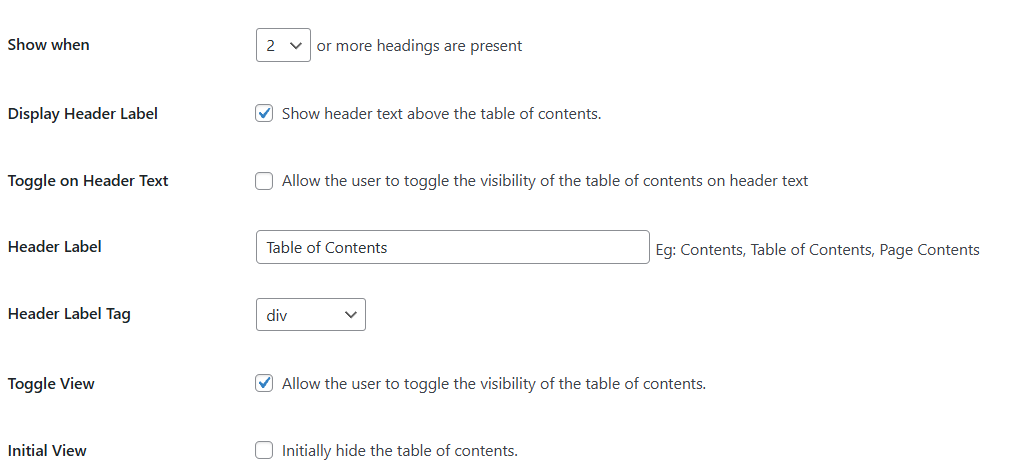
- Show When [X] Headings Are Present: Displays the ToC after the set number of headings (e.g., 2). Keeps shorter posts clean.
- Display Header Label: Adds a title above the ToC, like “Table of Contents,” which is helpful for clarity.
- Toggle on Header Text: Let users click the header to expand or collapse the ToC, which is useful for long lists.
- Header Label: Customize the ToC title (e.g., “Contents” or “On This Page”) to match your tone.
- Header Label Tag: Choose the HTML tag for the ToC title (like div, h2, etc.), mostly for styling or SEO.
- Toggle View: Enables a Show/Hide button for the entire ToC.
- Initial View – Hide by Default: Starts the ToC in a collapsed state. Great for keeping layouts minimal.
Screenshot 7: General Settings Panel Table Behavior & Display Options
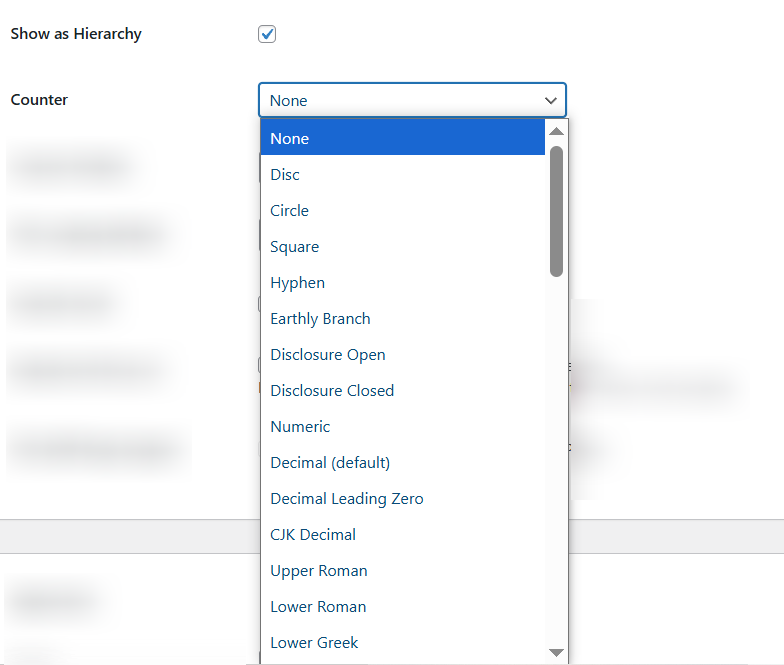
- Show as Hierarchy: Displays nested headings to reflect your content structure.
- Counter: Adds numbering (1.1, 1.2, etc.) in various formats.
Screenshot 8: General Settings Panel Hierarchy and Counter Options
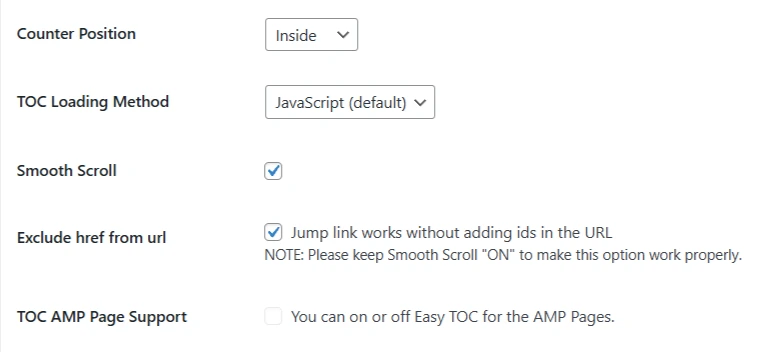
- Counter Position: lets you decide where the numbers appear — inside or outside the ToC items.
- TOC Loading Method: The Default is JavaScript, which loads the ToC smoothly without slowing down your site. Best left unchanged.
- Smooth Scroll: Ensures smooth navigation when clicking ToC links. Recommended to keep ON.
- Exclude href from URL: This prevents the section links from modifying the URL and works only when Smooth Scroll is enabled.
- AMP Page Support: Choose whether you want to show the ToC on AMP (mobile-optimized) pages.
Screenshot 9: General Settings Panel Functionality & Scroll Behavior Settings
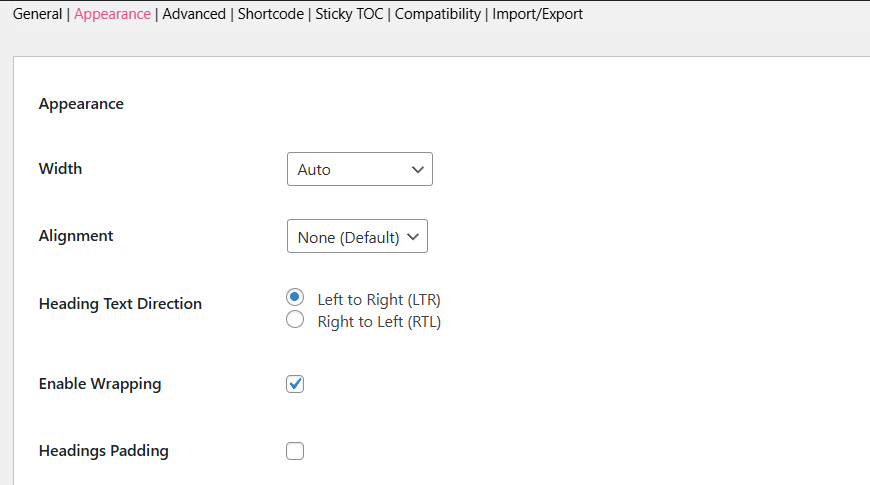
Step 5: Configuring Appearance Settings
Customize how the Table of Contents looks to match your site’s style and layout..
- Width: Set the box size to match your preferences.
- Alignment: This option allows you to choose how the ToC aligns within the page. The default is “None”, but other options include left, right, and center.
- Heading Text Direction:
- Select the direction your headings appear in.
- Left to Right (LTR) is standard for most languages; Right to Left (RTL) supports languages like Arabic or Hebrew.
- Enable Wrapping: Allows long headings to break into multiple lines instead of overflowing or being cut off.
- Heading Padding: Adjust the space around the Table of Contents by setting padding values for top, bottom, left, and right in pixels.
Screenshot 10: Appearance Settings Panel Width and Alignment Options
- Font Options: Change the font size and weight for the ToC content.
- Title Font Size: Controls the size of the ToC heading (e.g., “Table of Contents”).
- Title Font Weight: Sets how bold the heading appears.
- Font Size: Adjusts the body font of the ToC links.
- Font Weight: Sets the boldness of the regular link text.
- Child Font Size: Adjusts the size of subheading text in the ToC.

Screenshot 11: Appearance Settings Panel Font Options
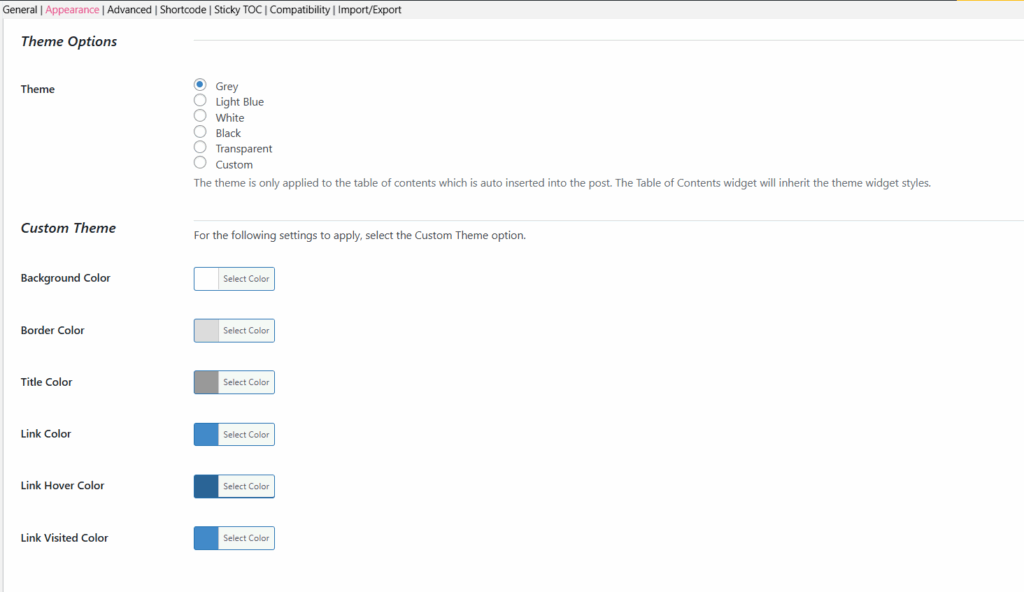
- Theme Options: Choose from preset themes like Grey, Light Blue, White, Black, Transparent, or Custom. These themes affect only the ToC inserted in your post content, not the widget version.
- Custom Theme Settings: (Only applies if you select “Custom” as your theme.)
- Background Color: Sets the ToC box background.
- Border Color: Adds a border color around the box.
- Title Color: Changes the color of the ToC heading text.
- Link Color: Sets the default link color for ToC items.
- Link Hover Color: Changes the link color when a user hovers over it.
- Link Visited Color: Displays a different color for links that have already been clicked.
Screenshot 12: Appearance Settings Panel, Theme and Custom Theme Options
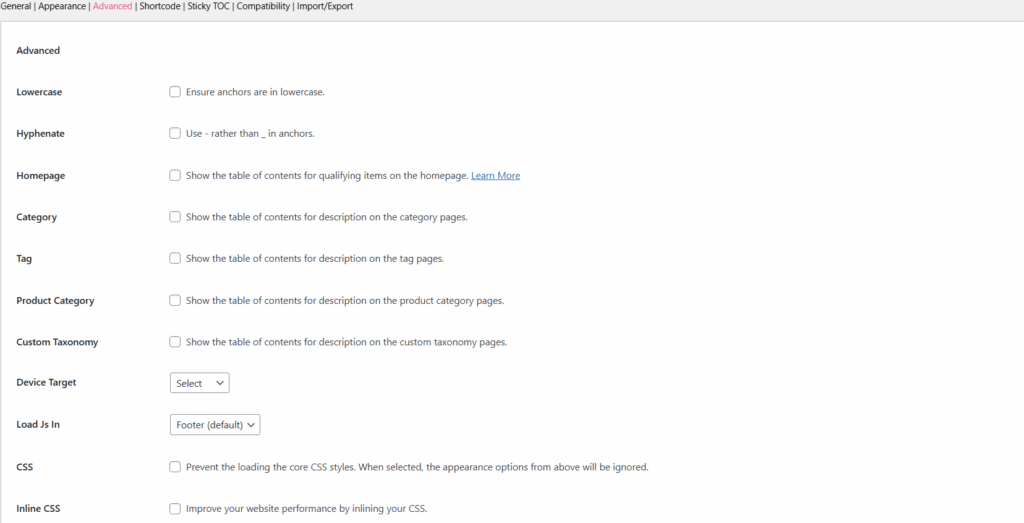
Step 6: Configuring Advanced Settings
These setting options help you fine-tune how and where your Table of Contents works across different types of pages and devices.
- Lowercase: Converts all anchor links (the clickable section links) to lowercase. This helps maintain consistency and avoid issues with case-sensitive URLs.
- Hyphenate: Replaces underscores (_) with hyphens (-) in anchor links. For better SEO and user experience, use hyphens in your URLs.
- Homepage: Enables the Table of Contents on posts or content displayed on your homepage (if supported).
- Category: Displays the ToC in the description area of category archive pages.
- Tag: Adds the ToC to the description section of tag archive pages.
- Product Category: If you’re using WooCommerce, this setting shows the ToC in product category descriptions.
- Custom Taxonomy: Allows the ToC to appear in the description of any custom taxonomy pages you’ve set up.
- Device Target: Lets you choose which devices the ToC will be shown on (desktop, tablet, mobile, or all). Ideal for controlling visibility based on screen size.
- Load JS In: Specifies where the plugin loads its JavaScript. The default is “Footer” to help improve page load speed.
- CSS: Disables the plugin’s default styles if you want to use your own custom CSS. Keep this unchecked unless you’re styling the ToC manually.
- Inline CSS: Helps boost performance by embedding the ToC styles directly into the HTML, reducing extra HTTP requests and improving page load speed.
Screenshot 13: Advanced Settings Panel
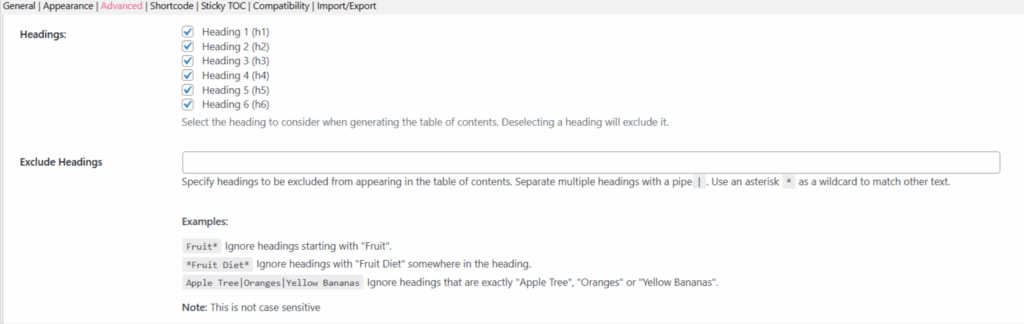
- Headings (H1–H6): You can choose which heading levels should be included in the ToC.
- By default, most users include H2 and H3, since H1 is usually the post title and already visible at the top.
- For more detailed posts, you might also include H4–H6.
- Simply check or uncheck the heading levels based on how your content is structured.
- Exclude Headings: Allows you to leave out specific headings from the ToC manually. Just enter the exact heading text or use wildcards to skip similar ones.
Screenshot 14: Advanced Settings for Headings Panel
- SiteNavigation Schema: Adds structured data to your Table of Contents so search engines can better understand your page layout. It can improve how your content appears in Google search results.
- Smooth Scroll Offset (Desktop): If your site has a sticky menu or admin bar at the top, this setting prevents headings from being hidden when users click ToC links. A value of 30px is good for most setups.
- Mobile Smooth Scroll Offset: Works the same as the desktop offset, but for mobile devices. Adjust it if your mobile menu covers content when scrolling to sections.
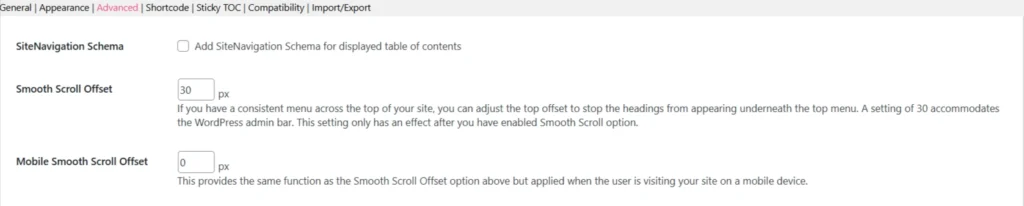
Screenshot 15: Advanced Settings Panel Site Navigation Schema & Scroll Offset
- Limit Path: This feature helps display the Table of Contents only for specific sections of your site.
- Just enter the path (starting with /) where you want the ToC to appear.
Example: /blog/, /docs/, /resources/guide/ - Great for keeping the ToC limited to certain areas like documentation or blog posts.
- Just enter the path (starting with /) where you want the ToC to appear.
- Exclude by Matching URL/String: This hides the ToC on specific pages based on URL patterns.
- Just enter part of the URL (one per line), and the plugin will skip adding a ToC to any matching pages.

Screenshot 16: Advanced Settings Panel Path Options
- Default Anchor Prefix: If your headings use non-English or special characters, this setting adds a fallback prefix to the anchor links (like i, toc_, or _) so they still work properly.
When left empty, numbers will be used instead. - Default Anchor Prefix For All: Forces the use of the anchor prefix even if your headings use standard characters. Useful for consistent URL structure.
- Widget Affix Selector: This option lets you pin the Table of Contents widget in your sidebar. You’ll need to enter the class or ID of your theme’s sidebar manually, for example, .widget-area or #sidebar. This keeps the ToC visible while scrolling.
- Add Request URI: Adds the current page’s URL before the anchor link (e.g., /post-name#section). Useful for internal navigation consistency.
- Add Self Reference Link: Adds the full URL before anchor links (e.g., https://yourdomain.com/post#section). This is handy for copying or sharing direct links to specific sections.
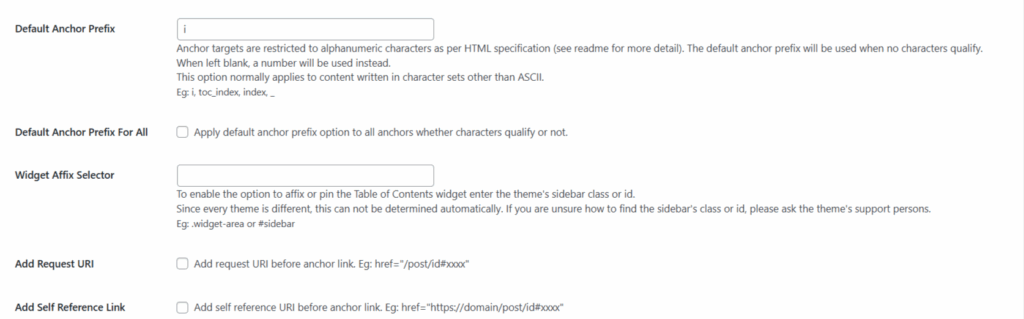
Screenshot 17: Advanced Settings Panel Anchor & Widget Options
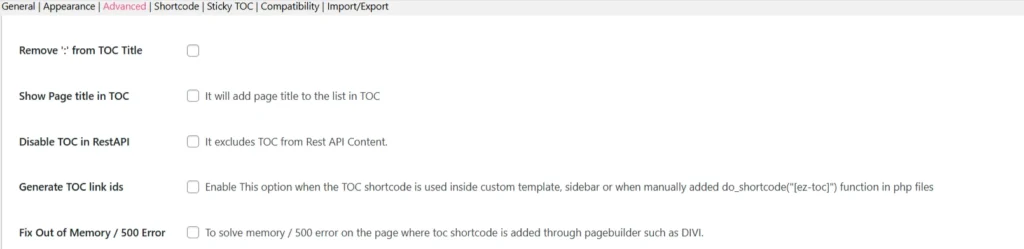
- Remove ‘:’ from TOC Title: Takes out the colon (:) that appears after the Table of Contents title, which is useful if you prefer a cleaner look.
- Show Page Title in TOC: Adds the page or post title as the first item in the Table of Contents. Helpful for long-form content or reports.
- Disable TOC in REST API: Stops the Table of Contents from appearing in REST API responses that are typically useful for developers or headless WordPress setups.
- Generate TOC Link IDs: Turn this on if you’re manually adding the ToC using a shortcode ([ez-toc]) in templates, sidebars, or PHP files. Ensures the anchor links still work.
- Fix Out of Memory / 500 Error: Enables a workaround for memory or server errors that might happen when using page builders like DIVI with the TOC shortcode.
Screenshot 18: Advanced Settings Panel Miscellaneous Settings
- Preserve Line Breaks: Keep the original line breaks from your headings in the Table of Contents, great for keeping formatting consistent.
- Ajax Load More: Ensures the ToC toggle works correctly with infinite scroll or content loaded via Ajax. Helpful for dynamic blogs or news sites.
- Display No Heading Text: Shows a fallback message when a heading is missing, so the ToC still makes sense even if some titles are empty.
- Shorten Heading: (Disabled by default) – If enabled, this would shorten long headings in the ToC to make it more concise.
- Remove TOC Links: Removes clickable anchor links from the Table of Contents, turning it into a plain list, which is ideal if you want a non-clickable overview.

Screenshot 19: Advanced Settings Panel, Additional Functionality Settings
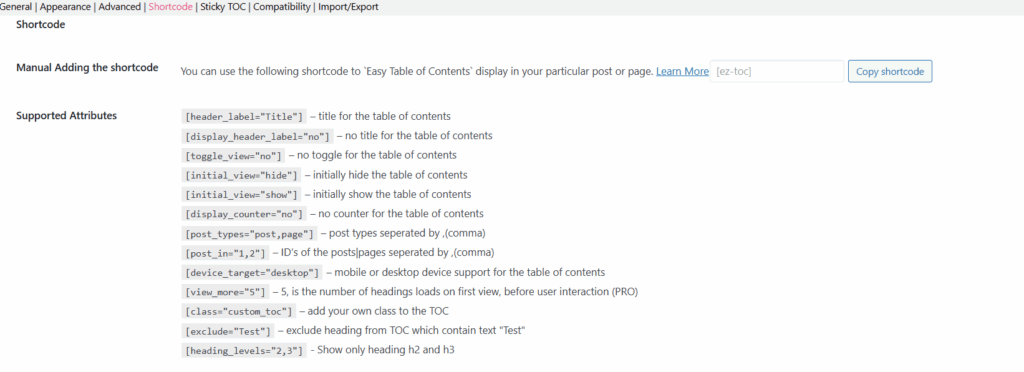
Step 7: Configuring Shortcode Settings
- If you want more control over where the Table of Contents appears, instead of relying on auto-insert, you can manually add it using the shortcode: [ez-toc]. Just paste it anywhere in your post or page where you’d like the ToC to appear.
- Common Shortcode Customizations: You can customize the ToC using these optional attributes:
- [header_label=”Contents”] – Set a custom title for your ToC.
- [display_header_label=”no”] – Hide the title completely.
- [toggle_view=”no”] – Removes the expand/collapse toggle.
- [initial_view=”hide”] – Keeps the ToC collapsed when the page loads.
- [display_counter=”no”] – Beside each ToC item, it turns off numbering
- [post_types=” post, page”] – Use the ToC on specific content types.
- [post_in=”12,45″] – Show the ToC only on certain post/page IDs.
- [device_target=”desktop”] – Choose where to show the ToC (desktop or mobile).
- [view_more=”5″] (PRO) – Show limited headings at first, expand on click.
- [class=”custom_toc”] – Lets you add your own custom CSS class for styling.
- [exclude=”Test”] – Exclude headings that contain the word “Test.”
- [heading_levels=”2,3″] – Will let you include only h2 and h3 headings in the ToC.
Screenshot 20: Shortcode Settings Panel for Manual Addition of Toc
- Manual ToC Widget Shortcode: If you’d like to display the Table of Contents in your sidebar or widget area, you can use this shortcode:[ez-toc-widget-sticky]. Simply add it into a Text or Shortcode widget in your WordPress sidebar to make the ToC stick and stay visible while users scroll through your content.
- Auto Insert Option (No Shortcode Needed): If you prefer not to use shortcodes at all, the plugin also supports automatic insertion.
- Just go to: WordPress Dashboard > Settings > Table of Contents > General Settings > Auto Insert.
- From there, you can enable the plugin to automatically add the ToC to posts, pages, or custom post types — no shortcode required during editing. This is the easiest option for beginners.

Screenshot 21: Shortcode Settings Panel for Manual Addition of Widget Shortcode and Auto Insert Options
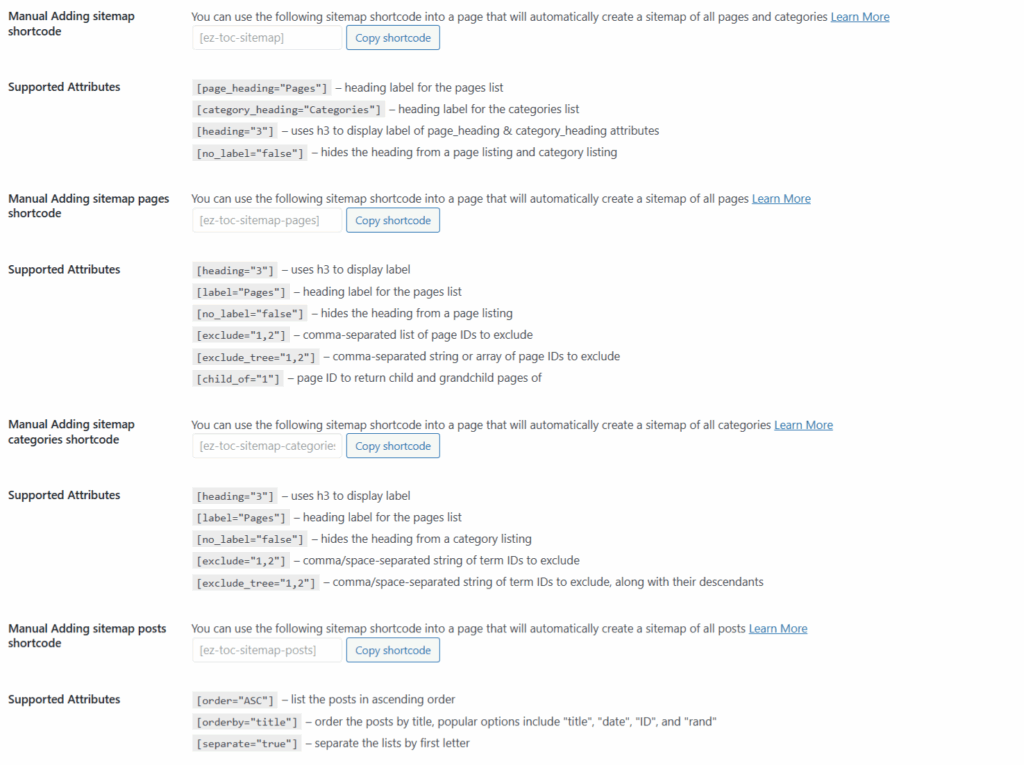
- Add a Sitemap Manually in WordPress: If you prefer adding a sitemap manually, the Easy Table of Contents plugin provides simple shortcodes. These shortcodes let you list all your pages, posts, or categories in an organized format on any WordPress page with no extra tools or coding required.
- Manual Adding Sitemap Shortcode: Use this shortcode [ez-toc-sitemap] that adds a full sitemap with all pages and categories to your WordPress page with no coding needed.
- Manual Adding Sitemap Pages Shortcode: Use this shortcode [ez-toc-sitemap-pages], which creates a sitemap that only includes pages, without categories or posts.
- Manual Adding Sitemap Categories Shortcode: Use this shortcode [ez-toc-sitemap-categories] to create a sitemap listing only categories.
- Manual Adding Sitemap Posts Shortcode: Use this shortcode [ez-toc-sitemap-posts] to generate a sitemap of all posts.
Screenshot 22: Shortcode Settings Panel for Adding a Sitemap Manually in WordPress
Step 8: Enabling Sticky TOC
The Sticky TOC feature keeps the Table of Contents visible on the screen as users scroll down your post or page. It “sticks” to a position usually on the side, so readers can easily jump to any section without scrolling back up.

Screenshot 23: Sticky ToC Settings
Step 9: Compatibility Options
These options ensure the Table of Contents works smoothly with popular third-party plugins and page builders. When enabled, they include special content types in the ToC that might otherwise be skipped.
- Created by Mediavine: If you’re using Mediavine’s Recipe Card plugin, enabling this option will automatically include the recipe headings inside the Table of Contents, which is great for food bloggers!
- GoodLayers Core Builder: If your site uses the GoodLayers page builder, this setting makes sure that all headings added via the builder are detected and shown in the TOC.
- Molongui Authorship: This ensures compatibility with the Molongui Authorship plugin, allowing proper ToC display even when author-specific content is involved.
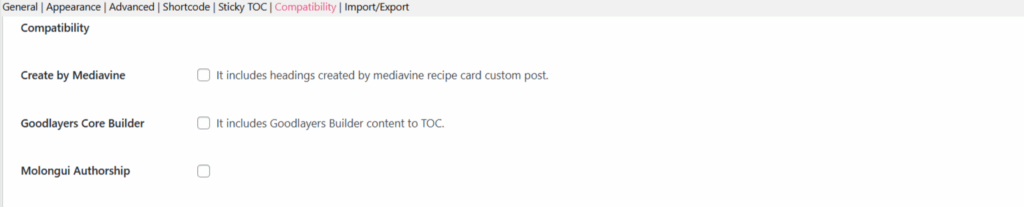
Screenshot 24: Compatibility Options
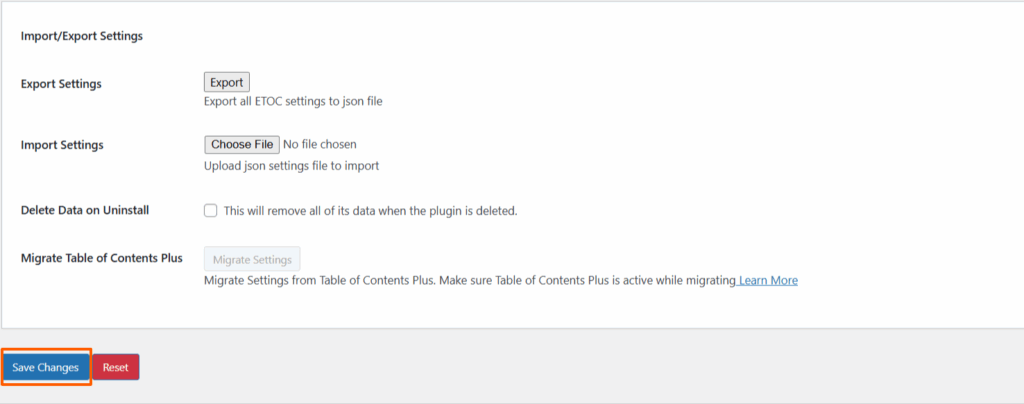
Step 10: Configuring Import/Export Settings
This section helps you save, restore, or transfer your Easy Table of Contents (ETOC) settings easily between websites or backups.
- Import/Export Settings: This section helps you save, restore, or transfer your Easy Table of Contents (ETOC) settings between websites or backups.
- Export Settings: Click Export to download your current ETOC settings as a .json file. This is useful for creating backups or applying the same configuration to another website.
- Import Settings: This lets you restore your saved preferences. Just click “Choose File,” upload your .json file, and the plugin will automatically apply your previous setup.
- Delete Data on Uninstall: Enable this option to completely remove all plugin data, including settings, when uninstalling Easy TOC.
- Only enable this if you’re sure you won’t need the settings in the future.
Finally, click the “Save Changes” button to apply your settings. Your Table of Contents is now fully configured and ready to appear on your posts or pages.
Screenshot 25: Configuring Import/Export Settings and Saving the Changes
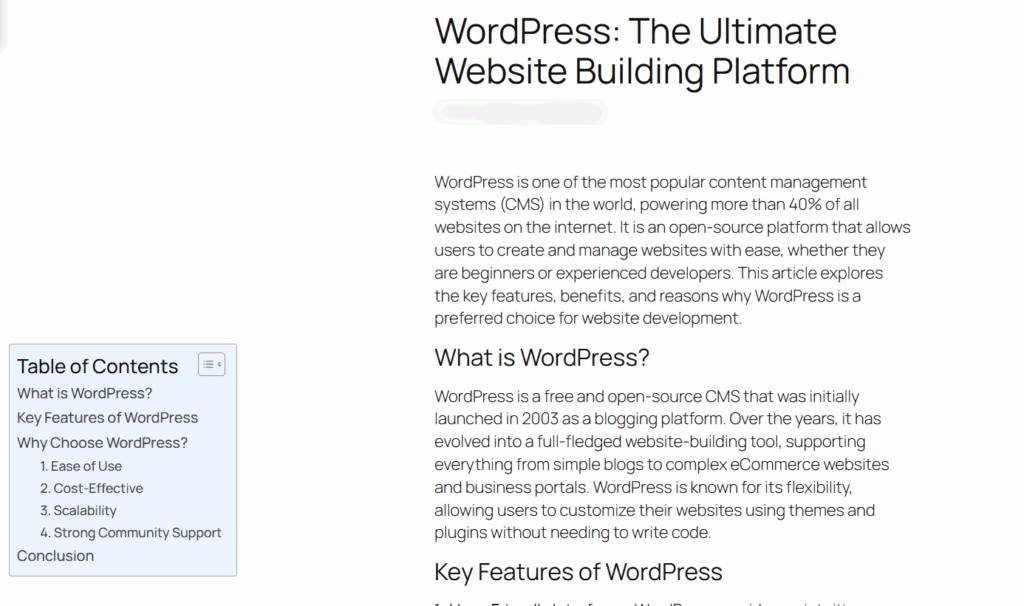
Step 11: Preview the Table of Contents on Your Post
To make sure everything is working:
- Open the sample post you created earlier.
- Scroll to the top of the content section.
- You should see the Table of Contents automatically displayed based on the headings in your post.
If it doesn’t appear, double-check that the post type is enabled in the plugin settings and that you have used proper heading tags (H2, H3, etc.).
Screenshot 26: Table of Contents Added to the Post
Conclusion
Adding a Table of Contents to your WordPress site doesn’t have to be complicated. With the right plugin and a few easy settings, you can instantly make your content more organized, reader-friendly, and optimized for SEO.
Now that you know how to do it, give it a try! Whether you’re writing blog posts, tutorials, or guides, a simple ToC can make a big difference in how your content is experienced.
Published on Jun 6, 2025 | Updated on Mar 2, 2026
Author

Sakina Attarwala
Author
|
Reviewer

Abhijeet Bendre
Author
|