Introduction
In Part 2, we went deeper into Matomo’s advanced reporting capabilities. You learned how to analyze detailed user behaviour, traffic sources, conversions, and e-commerce performance to make data-driven decisions. These reports included:
- Behaviour Reports
- Acquisition Reports
- E-commerce Reports
- Goals & Conversions
- Tag Manager
- Settings
With these insights, you now have a comprehensive understanding of how visitors behave, where they come from, and how well your site performs across multiple metrics.
In Part 3, we’ll have a look at the following:
- General Tracking Settings
- <script> Tag Settings
- Access
- Manage user roles, permissions, and access control.
- Privacy & GDPR
- Ensure full compliance with privacy laws and user consent requirements.
- Exclusions
- Control which users, roles, or IPs should be excluded from tracking.
- Geolocation
- Enable accurate location tracking for advanced reporting.
- Advanced Settings
- Fine-tune performance, database options, and system-level behaviors.
- Matomo Admin section
- Matomo Marketplace
- Install powerful plugins and manage subscriptions.
- Diagnostics section
- Help section
Settings for Auto Tracking mode
The Auto Tracking mode automatically creates and inserts the Matomo tracking JavaScript based on your selected settings. Simply choose what you want to track, and Matomo for WordPress will handle the rest.
There is a “show generated tracking code” link. It displays the tracking code as shown below.
![]()
Screenshot 1: Settings → Tracking → Settings for Auto Tracking mode
- Tracking code: This is a preview of the tracking code generated from your current configuration. The tracking code will be automatically added to your site and will send visitor data to Matomo.
- <noscript> code: This is a preview of your <noscript → code, which forms part of your tracking setup. It will only be added to your website if the noscript feature is enabled.
Privacy
The Privacy settings help you configure data protection options, such as consent handling and anonymization, to ensure your tracking complies with privacy regulations.
- Disable Cookies: Enable/Disable
- Completely turns off the use of tracking cookies. This can help improve privacy compliance, but it may reduce Matomo’s ability to identify returning visitors accurately.
- Limit Cookie Lifetime: Enable/Disable
- Set a shorter cookie duration if you want to minimize how long user activity is tracked over time.
Subdomain
The Subdomain settings allow you to track visitors across your site’s subdomains as a single visit, ensuring accurate cross-subdomain analytics.
- Treat Subdomains as One Website: Enable/Disable
- Enable this option to track visitors seamlessly across all subdomains by adding a *.-prefix to the cookie domain.
- Do not count subdomains as outlinks: Enable/Disable
- Treat all subdomains as part of a single website instead of external links by using a *.-prefix for the tracked domain.
- Enable Cross-Domain Linking: Enable/Disable
- When turned on, this ensures the same visitor ID is used across multiple domains. Since cookies can’t be shared between domains, Matomo appends a “pk_vid” parameter to URLs linking to your other domains. To make this feature work, be sure to configure which domains should be considered local in your Matomo settings.
Link Tracking
Link Tracking automatically records clicks on outbound links, downloads, and special link interactions to help you understand how visitors engage with your site.
- Add New File Types for Download Tracking
- Matomo automatically tracks downloads for files with extensions included in its list. To track additional file types, add their extensions here, separated by a vertical bar (|).
- Define All File Types for Download Tracking
- Replace Matomo’s default list of file extensions for download tracking with your own, separated by a vertical bar (|). Leave this field blank to keep the default settings (recommended).
- Set CSS Classes to Track as Downloads:
- Specify CSS classes for links that should be tracked as downloads (in addition to ‘piwik_download’). Enter multiple class names separated by a vertical bar (|). Leave blank to use Matomo’s default settings.
- Set CSS Classes to Track as Outlinks
- Specify CSS classes for links that should be tracked as outlinks (in addition to ‘piwik_link’). Enter multiple class names separated by a vertical bar (|). Leave blank to keep Matomo’s default settings.
Other Tracking
Other Tracking includes additional automatic tracking options that capture extra user interactions, giving you more detailed and comprehensive analytics data.”
-
- Track JavaScript Errors: Enable/Disable
- Enable this option to record JavaScript errors on your website as Matomo events.
- Track JavaScript Errors: Enable/Disable
- Enable Content Tracking:
-
-
- Turn on content tracking to monitor user interactions with specific pieces of content across your website.
- Options are
- Disabled
- Track all content blocks
- Track only visible content blocks
- Options are
- Turn on content tracking to monitor user interactions with specific pieces of content across your website.
-
- Enable Heartbeat Timer (enable with Care):
-
-
- Activate a heartbeat timer to measure visit duration more accurately by sending periodic ping requests while a visitor remains on your site.
- Specify the interval in seconds (default: 15) or set to 0 to disable.
-
Note: This increases the number of HTTP requests and may affect performance, depending on your server capacity and traffic.
Advanced
The Advanced settings let you customize deeper tracking behaviours and technical options to fine-tune how Matomo collects your website’s analytics data.
-
- Force POST requests: Enable/Disable
- When enabled, Matomo will use POST requests for trackCookie. This option is useful if you encounter “HTTP 414 URI Too Long” errors in your tracking code.
- Custom consent screen:
- Enables a specific Matomo consent mode. Configure this only if you are using your own consent screen, as it requires a custom WordPress setup. By default, no consent mode is activated.
- Options are
- None
- Require cookie consent
- Require tracking consent
- Endpoint for HTTP Tracking API:
- Options are
- Default
- Through WordPress Rest API
- By default, the HTTP Tracking API uses the Matomo plugin directory URL: https://yourwebsite.com/wp-content/plugins/matomo/app/matomo.php.
- You can switch to the WP REST API if you want to hide matomo.php or if the default URL isn’t working. https://yourwebsite.com/wp-json/matomo/v1/hit/
- Options are
- Endpoint for JavaScript tracker :
- By default, the JS tracking code is served from “https://yourwebsite.com//wp-content/uploads/matomo/matomo.js.”
- Options are
- Default
- Through WordPress’s Rest API (Slower)
- Plugin
- Options are
- You can choose to deliver it through the WP REST API (“https://tymescripts.com//wp-json/matomo/v1/hit/”) to hide matomo.js.
- However, this method launches WordPress PHP on every request, making it slower than serving the file directly from your web server.
- By default, the JS tracking code is served from “https://yourwebsite.com//wp-content/uploads/matomo/matomo.js.”
- Force POST requests: Enable/Disable
Note: Using the “Plugin” method may cause issues with premium features like Heatmap & Session Recording, Form Analytics, and Media Analytics.
![]()
Screenshot 2: Settings → Tracking → Settings for Auto Tracking Mode
Settings for Manual Tracking mode (Inactive)
In Manual tracking mode, you can create and customize your own JavaScript tracking code as needed. Matomo for WordPress will then automatically embed this script into your site’s HTML.
Tracking code
Displays the JavaScript tracking script that collects visitor data for Matomo.
Noscript code
Provides a fallback tracking method for visitors who have JavaScript disabled.
![]()
Screenshot 3: Settings → Tracking → Settings for manual tracking Mode
Script Tag Settings
These settings apply to most tracking modes and determine how Matomo for WordPress embeds <script> elements into your pages. In most cases, the default options are sufficient and don’t need to be changed.
Force Matomo to use a specific protocol
Options are
- Disable (Default)
- https (SSL)
JavaScript code position
- Footer/Header
Add data-cfasync=false; Enable/Disable
- Adds data-cfasync=”false” to the script tag to prevent Cloudflare’s Rocket Loader from modifying the script. This option is not applicable when using the Manual tracking mode.
![]()
Screenshot 4: Settings → Tracking → <script> → Tag Settings
Developer Settings
If your tracking code isn’t functioning properly, enabling this setting can help identify the issue. When activated, the tracker debugs the diagnostic details in tracking requests. It’s best to use this option only when troubleshooting and disable it immediately afterwards.
Tracker Debug Mode:
Options are
- Disabled (recommended)
- Always enabled
- Enabled on demand.
For security and privacy reasons, it’s recommended to enable this setting only for a short period of time. If you enable it on demand, add &debug=1 to tracker requests to view the debug output.
JavaScript tracking code
Want to manually add the tracking code to your site or use another plugin? No problem! Just copy and paste the tracking code below; you can customize it if needed.
Noscript tracking code
Adds a fallback tracking code for visitors who have JavaScript disabled.
![]()
Screenshot 5: Settings → Tracking → Developer Settings
Access
Control which user roles have permission to view and manage your reporting data.
- WordPress Role Matomo Role
- Editor: None/View/Write/Admin
- Author: None/View/Write/Admin
- Contributor: None/View/Write/Admin
- Subscriber: None/View/Write/Admin
- Customer: None/View/Write/Admin
- Shop manager: None/View/Write/Admin
Roles
You can grant individual users access to Matomo in one of the following roles:
- Matomo View
- Matomo Write
- Matomo Admin
- Matomo Super User
Capabilities
You can also use a WordPress plugin to manage Matomo capabilities for individual users. The following capabilities are supported:
- superuser_matomo
- admin_matomo
- write_matomo
- View_matomo
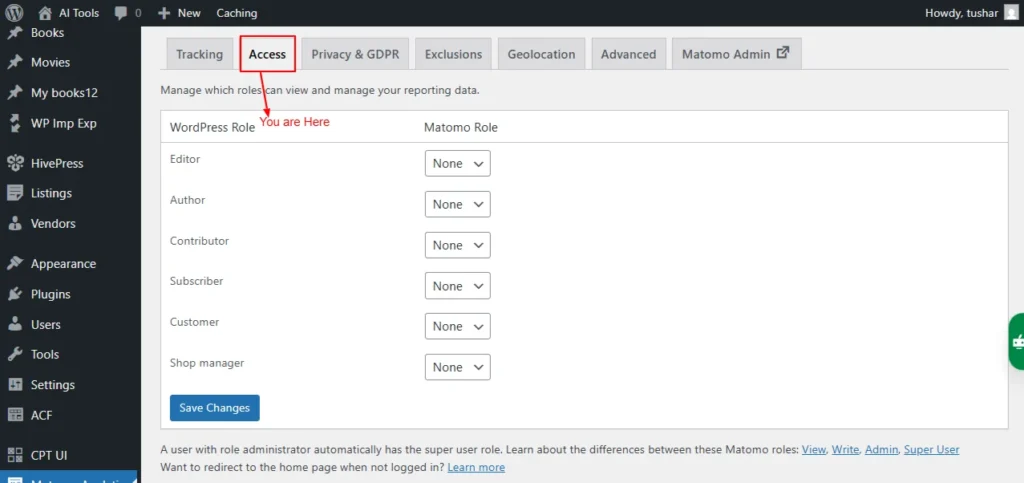
Screenshot 6: Settings → Access
Privacy & GDPR
This setting tab helps set your privacy and GDPR settings.
Matomo Analytics is built with privacy by design. All collected data is stored exclusively in your own MySQL database; no external business or Matomo team member can access it, and your logs or reports are never sent to other servers.
Ways Matomo protects the privacy of your users and customers
Key privacy features include:
- Anonymise data and IP addresses
- Configure data retention
- Matomo has an opt-out mechanism that lets users opt out of web analytics tracking (see below for the shortcode)
- Asking for consent
- GDPR overview
- GDPR tools
Let users opt out of tracking
You can embed the opt-out iframe on your website in two ways:
- Use the shortcode [matomo_opt_out_form].
- You can customize it with the language option (e.g., “de” or “en”).
- By default, the language is automatically detected from the user’s browser.
- Example: [matomo_opt_out_form language=de]
- Add the “Matomo Opt-Out” block directly to your page.
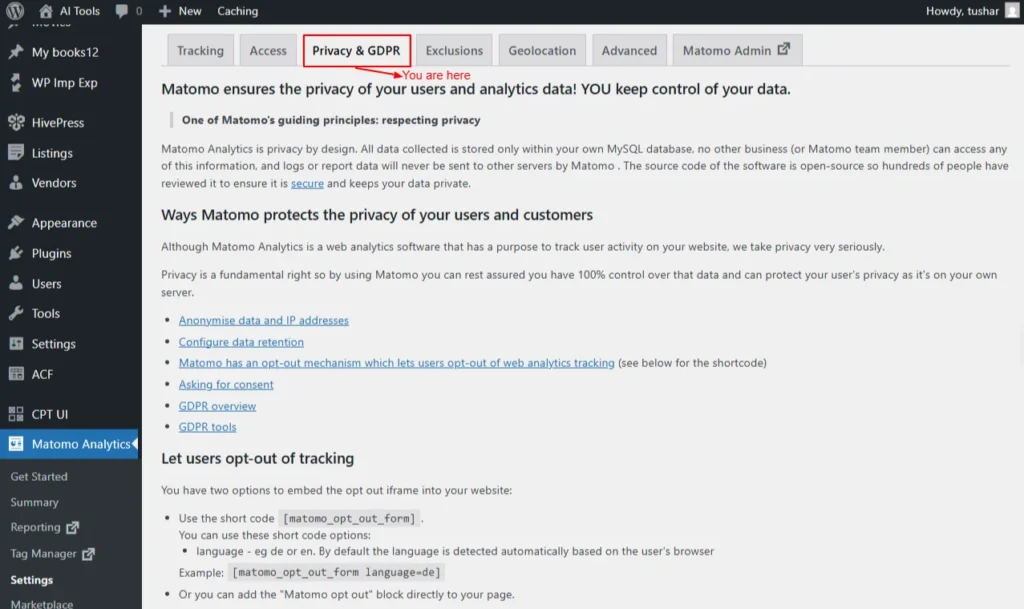
Screenshot 7: Settings → Privacy And GDPR
Exclusions
You can configure exclusions in this tab for which the data won’t be collected.
Tracking filter:
Select the user roles you do not want Matomo to track.
- Administrator
- Editor
- Author
- Contributor
- Subscriber
- Customer
- Shop manager
- Matomo View
- Matomo Write
- Matomo Admin
- Matomo Super User
Global list of Excluded IPs:
Enter the list of IP addresses you want Matomo to exclude from tracking, with one IP per line.
- You can use CIDR notation (e.g., 1.2.3.4/24) or wildcards (e.g., 1.2.3.* or 1.2.*.*).
- Your current IP address is 58.84.60.127.
Global list of URL query parameters to exclude:
List each URL parameter you want to exclude from tracking and reports on a separate line.
- Regular expressions (e.g., /^sess.*|.*[dD]ate$/) are supported.
- Matomo automatically excludes common session parameters like phpsessid and sessionid.
Global list of user agents to exclude:
Enter a list of user agents you want Matomo to exclude from tracking.
- If a visitor’s user agent string contains any of the specified values, that visitor will not be tracked.
- This is useful for excluding bots or crawlers.
- You can also use regular expressions, such as /bot|spider|crawl|scanner/i.
Keep Page URL fragments when tracking Page URLs: Check/uncheck
If the checkbox below is unchecked, URL fragments (the part after “#”) will be excluded from tracking. For example, example.org/index.html#first_section will be recorded as example.org/index.html.
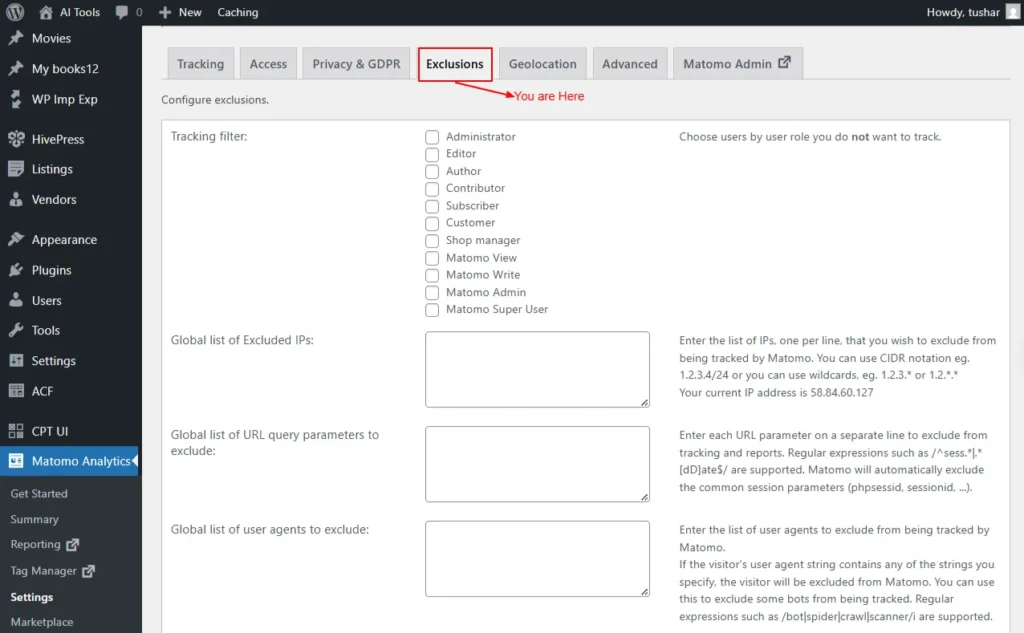
Screenshot 8: Settings → Exclusions
Geolocation
On this tab page, you can configure how Matomo determines your visitors’ locations.
Matomo identifies visitor locations using a geolocation database. By default, it uses DB-IP, but accuracy may vary. You can switch to MaxMind (free or paid), though Matomo can’t auto-configure it due to GDPR. Simply enter your MaxMind license key below to enable it.
MaxMind License Key:
Leave the field blank to continue using DB-IP. If you add a MaxMind license key, WordPress will fetch a ~60 MB database from MaxMind and store it in wp-content/uploads/matomo.
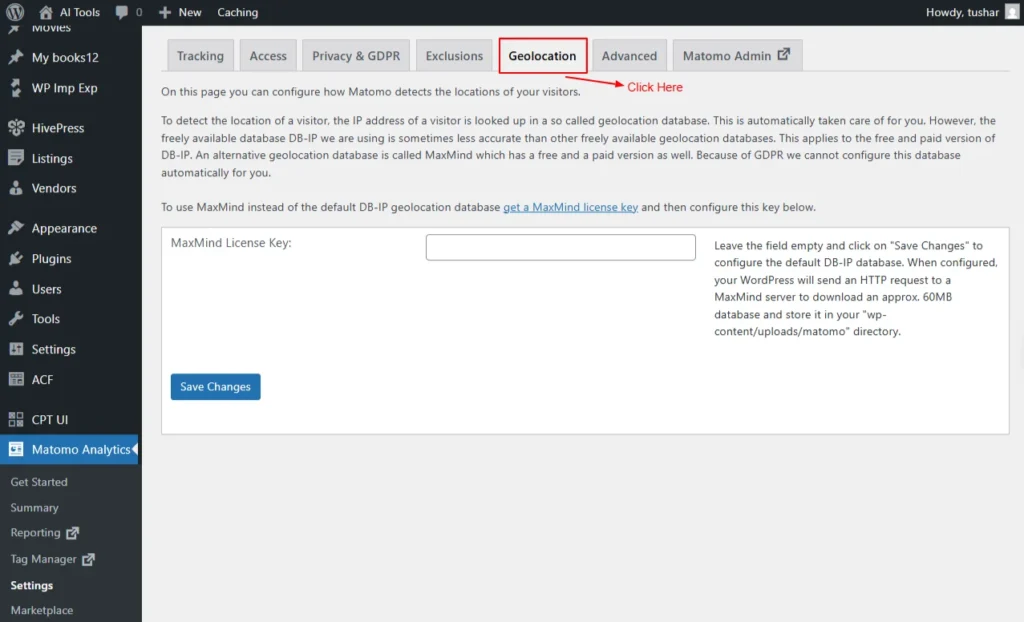
Screenshot 9: Settings → GeoLocation
Advanced
The Advanced settings provide additional configuration options for customizing how Matomo works, offering more control over tracking, performance, and technical behaviour.
Proxy IP headers
Set Proxy IP headers, choose one of the options below
- REMOTE_ADDR YOUR_IP (Default)
- HTTP_CLIENT_IP No value found
- HTTP_X_REAL_IP YOUR_IP58
- HTTP_X_FORWARDED_FOR YOUR_IP58
- HTTP_X_FORWARDED No value found
- HTTP_FORWARDED_FOR No value found
- HTTP_FORWARDED No value found
- HTTP_CF_CONNECTING_IP No value found
- HTTP_TRUE_CLIENT_IP No value found
- HTTP_X_CLUSTER_CLIENT_IP No value found
Delete all data on uninstall:
By default, uninstalling the Matomo plugin permanently deletes all data, unless you have a backup. If you disable this option, the tracked data in your database will be preserved. This helps protect your historical analytics data from being accidentally deleted during uninstallation.
Enable archiving via HTTP Server-side.
If you’re having issues with archiving (report generation), enabling this option may help resolve the problem.
Server-side tracking delay
Specifies the delay (in seconds) before server-side tracking is triggered.
- When e-commerce actions (like cart updates or orders) happen via AJAX or REST, Matomo tries to track them with JavaScript on the next page view. If no page view occurs within the set time, it falls back to server-side tracking. This setting controls how long Matomo should wait before switching.
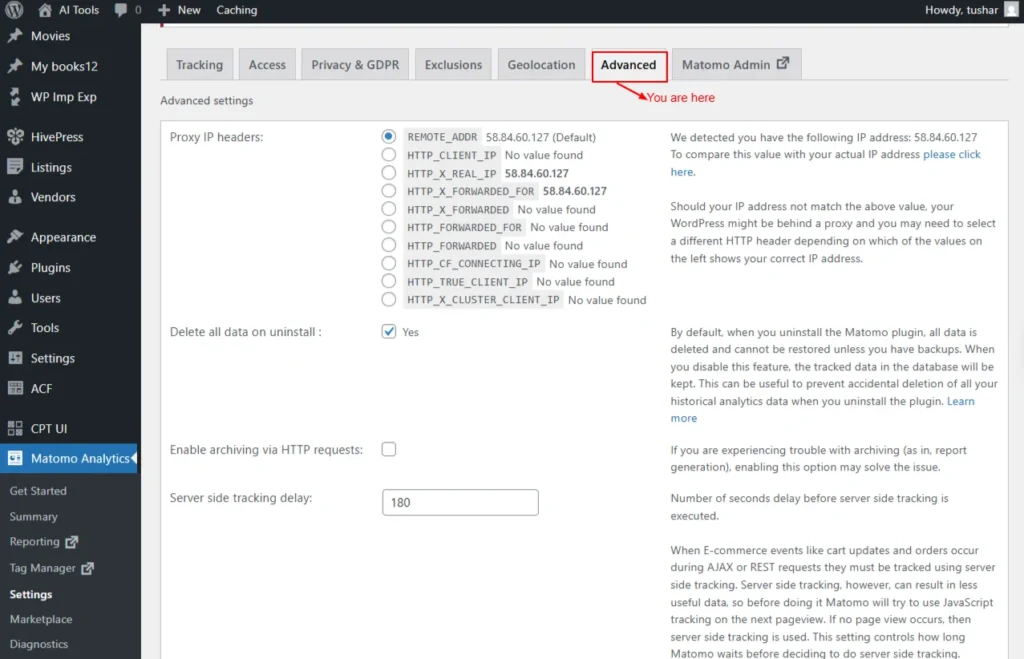
Screenshot 10: Settings → Advanced
Matomo Admin
This tab takes you to the Matomo admin dashboard settings menu

Screenshot 11: Matomo Admin setting menu
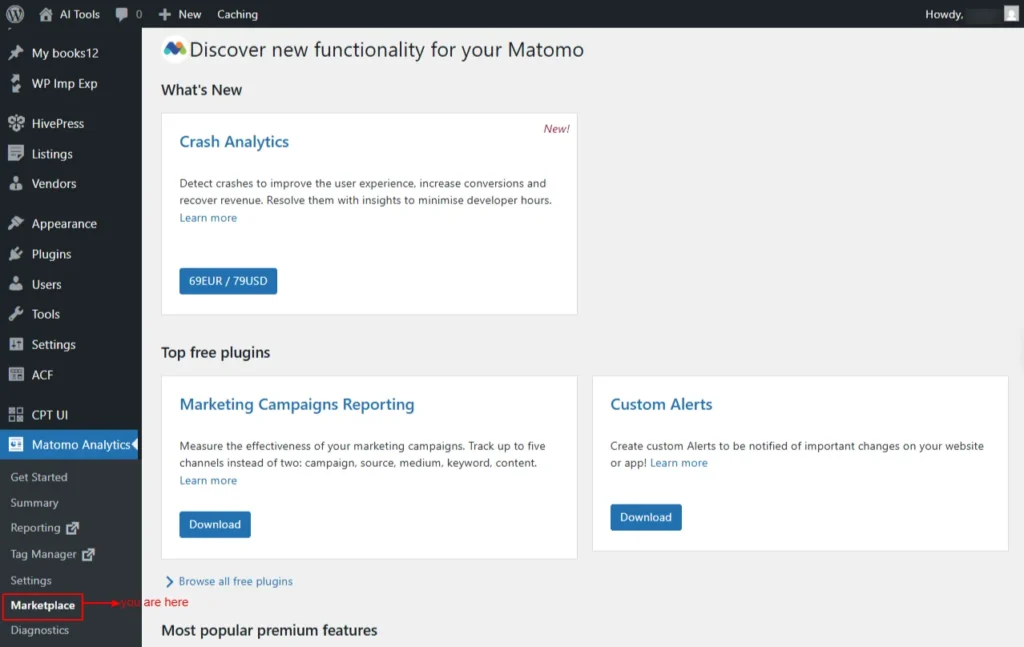
Marketplace
The Marketplace lets you browse, install, and manage additional Matomo plugins and features to extend your analytics capabilities.
Overview
Here you can activate free and premium features of Matomo Analytics
- Top free plugins
- Marketing Campaigns Reporting
- Evaluate the performance of your marketing campaigns by tracking up to five channels: campaign, source, medium, keyword, and content, instead of just two.
- Custom Alerts
- Set up custom alerts to get notified about important changes on your website or app!
- Free Plugins are available here: https://plugins.matomo.org/free
- Premium features
- Heatmap & Session Recording
- Custom Reports
- Premium Bundle
- Most popular content engagement
- Form Analytics
- Video & Audio Analytics
- Users Flow
- Most popular acquisition & SEO features
- Search Engine Keywords Performance
- SEO Web Vitals
- Advertising Conversion Export
- Multi Attribution
- Other premium features
- Funnels
- Cohorts
- Crash Analytics
Screenshot 12: Marketplace → Overview
Install Plugins
Matomo Marketplace is a central platform where you can find and install plugins, themes, and integrations that extend the capabilities of Matomo. It includes both free and premium add-ons created by Matomo and third-party developers, helping you customize analytics for your specific needs.
You can download the Matomo Marketplace for the WordPress plugin and install it, or upload and install the plugin.
- If you prefer not to use the Matomo Marketplace, you can manually download plugins. Automatic updates work only when the Marketplace plugin is enabled.
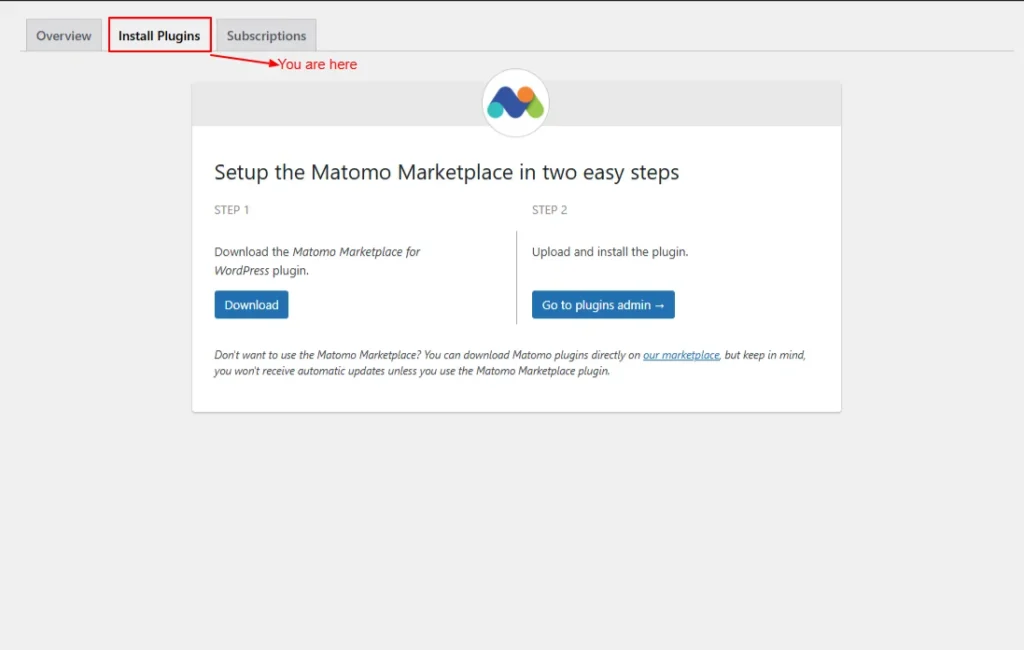
Screenshot 13: Marketplace → Install Plugins
Once installed, it will list all the marketplace plugins that can be installed
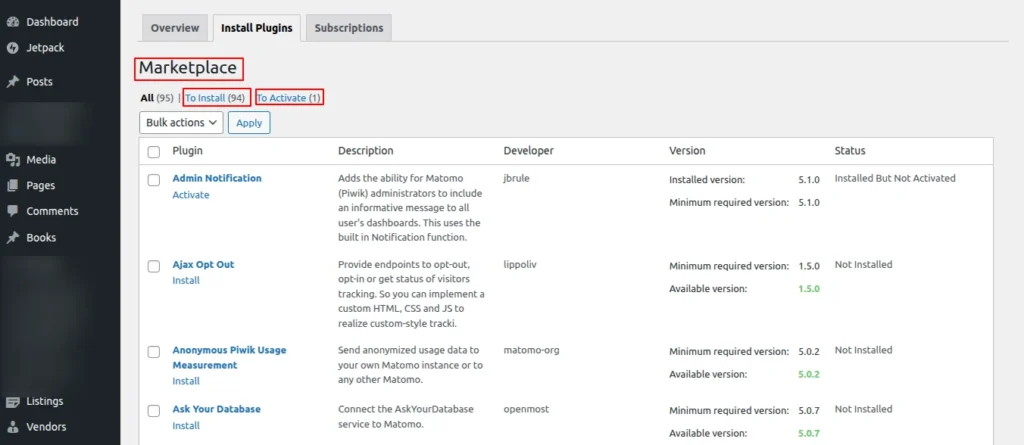
Screenshot 14: List of Marketplace
Subscriptions
Here, you can see all the subscripts for Plugins that are activated

Screenshot 15: Premium Feature Subscriptions
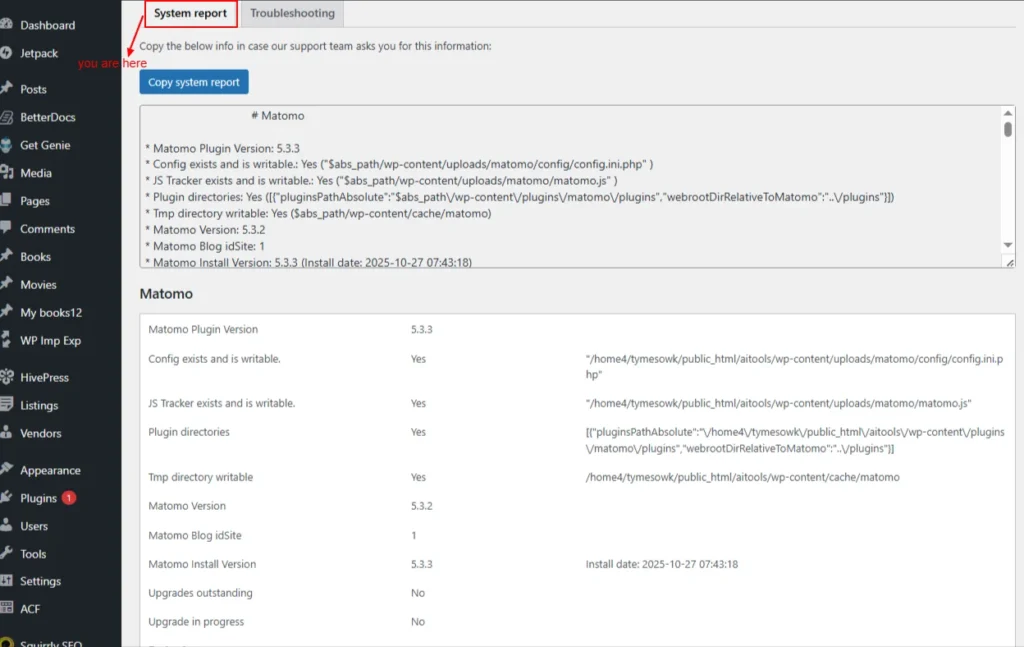
Diagnostics
Diagnostics provides system checks, error logs, and troubleshooting tools to help you identify and fix issues with your Matomo setup.
System Report
This page generates a system report, which can then be shared with the Matomom support team if needed.
Note: Be careful when sharing this since it contains a lot of information about your WordPress setup.
Screenshot 16: Diagnostics → System Report
Troubleshooting
The Troubleshooting section offers tools to identify, debug, and resolve common issues in your Matomo installation.
- Archive reports: Process and update your analytics reports to ensure fresh, accurate data.
- Clear Matomo cache: Removes stored cache files so the system can rebuild fresh data and improve performance.
- Install/update Geo-IP DB: Downloads or updates the GeoIP database used to detect visitor locations.
- Sync users: Matches and updates WordPress user data with Matomo’s user records.
- Sync site (blog): Ensures the WordPress site information is correctly synced with Matomo’s site settings.
- Run Updater: Executes pending updates for Matomo’s database or internal components. Regenerate tracking code: Creates a fresh tracking code snippet in case any configuration has changed.
- Run scheduled task: Manually triggers Matomo’s scheduled tasks that usually run automatically (like processing reports).
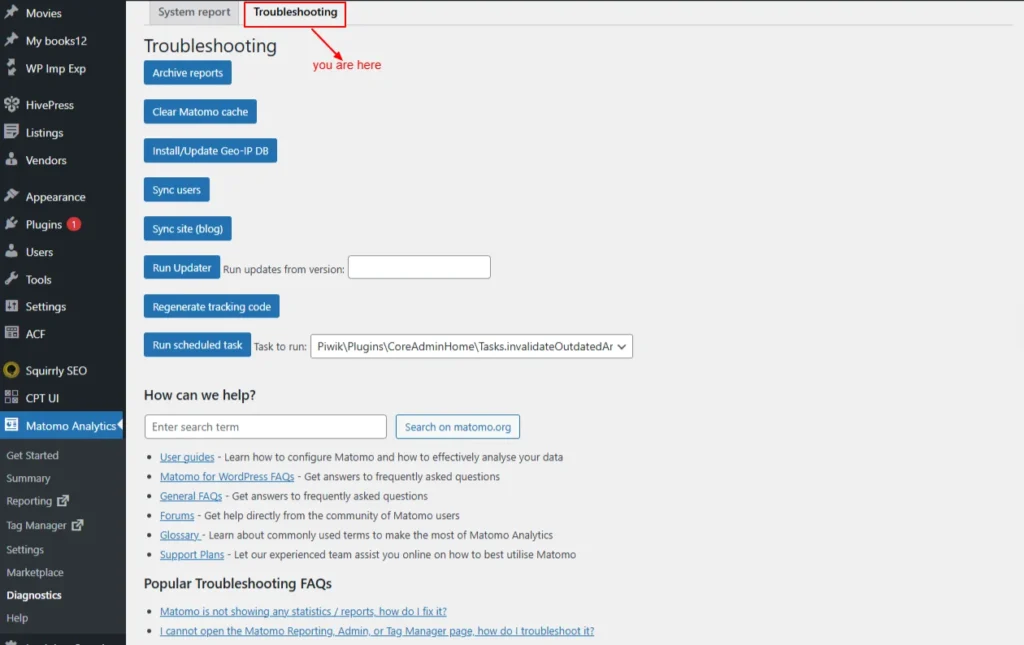
Screenshot 17: Diagnostics → Troubleshooting
Help
This page provides all the resources you need for Matomo.
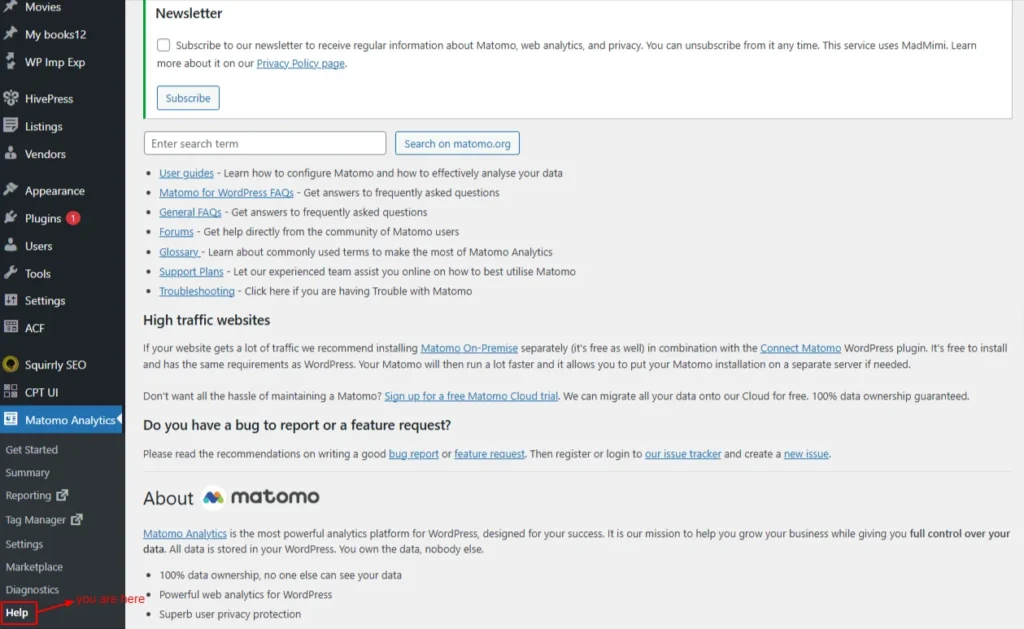
Screenshot 18: Help
Conclusion
Mastering Matomo inside WordPress isn’t a one-time setup; it’s an ongoing optimization process. Each part of this series has taken you step-by-step from installation to insights to advanced configuration and finally to extending Matomo with add-ons and diagnostics.
In Part 1, we learned how to install, set up, and update Matomo properly, as well as how to enable accurate tracking and explore the essential visitor reports that provide a clear picture of who visits your site and how they behave.
In Part 2, we delved deeper into behavioral analysis, performance metrics, acquisition channels, campaigns, and complete e-commerce analytics. You also learned how to create goals, track conversions, and understand what drives meaningful actions on your site.
In Part 3, we configured Matomo’s administrative and technical settings from tracking modes and script tags to GDPR, geolocation, exclusions, and backend container management. This part ensured your tracking is accurate, compliant, and optimized for your site’s structure.
We also explored the Matomo Marketplace, where you can install powerful plugins, manage subscriptions, generate system reports, diagnose issues, and access troubleshooting and help resources.
These tools extend Matomo’s capabilities and help maintain a stable, scalable analytics environment.
Across all these parts, you’ve built a complete, enterprise-grade analytics system that goes far beyond basic tracking. But just like SEO, analytics is never “finished.” You’ll need to continually analyze your data, experiment with improvements, and refine your tracking as your website evolves.
With all four parts of this series, you now have a complete roadmap to install, configure, extend, and maximize Matomo inside WordPress, giving you clear insights and long-term measurement power for 2025 and beyond.
Published on Dec 15, 2025 | Updated on Dec 26, 2025