Introduction
If you’ve started to feel like Webflow is holding your website back & want more flexibility to grow, customize, and take full control of it, migrating to WordPress is a smart move. The process might seem complicated at first, but with the proper planning, it becomes much easier.
Whether you’re a marketer or a business owner, this guide will help you move everything over smoothly. We’ll walk you through every stage, from preparing and exporting your content to rebuilding your design and launching your new WordPress site with confidence.
Why Consider Migrating from Webflow to WordPress in 2025?
Webflow makes it easy to create visually stunning websites with simple design tools right from the start. But as your business grows, you might find its features, integrations, & pricing too limiting.
On the other hand, WordPress gives you full control & flexibility. It scales effortlessly with your growth and opens the door to thousands of plugins and themes, making it a perfect fit whether you’re running a blog, an online store, or a large enterprise website.
Flexibility and Customization Options
WordPress’s open-source setup gives you complete freedom to shape your website however you want. You can create custom content types, add advanced features, and tweak the code to fit your needs without restrictions.
Plugin Ecosystem and Integrations
Webflow offers limited integrations, but WordPress supports almost any tool you can think of. From WooCommerce for eCommerce to Yoast SEO, marketing automation & CRM platforms that help your site grow.
Cost Efficiency and Long-Term Value
From a total cost of ownership perspective, WordPress offers significantly better long-term value. Your initial investment covers hosting, setup, and essential tools, but ongoing costs remain stable even as your website scales. Unlike Webflow’s usage-based pricing, where expenses rise with additional pages, traffic, CMS Collections, or users.
SEO Capabilities and Site Ownership
WordPress offers advanced SEO plugins (Yoast, Rank Math) to automate technical SEO sitemaps, schema, and redirects far beyond Webflow’s basics. Since it’s self-hosted, you fully own your data, code, and SEO with no vendor lock-in.
Preparing for Your Migration: What You Need Before You Start
Before moving from Webflow to WordPress, take time to organize and back up your existing site. This preparation ensures nothing gets lost during migration & helps you rebuild your site in WordPress with accuracy & efficiency.
Assessing Your Current Webflow Site Structure
- Check the Sitemap: – Export your Webflow sitemap with a crawler (e.g., Screaming Frog) or online tools and document every URL, hierarchy, and internal link.
- Forms and Interactive Elements: – List all forms & animations, & you’ll need to rebuild in WordPress.
- Custom Code & Integrations: Document all custom HTML/CSS/JS, analytics configurations, and API integrations implemented on your Webflow site.
- Check Images and Media Assets: – Create a full list of all images, videos, and documents with file names and alt text so you can verify them in WordPress, preventing missing visuals, broken URLs, and SEO loss during migration.
Choosing Reliable WordPress Hosting
- Choose a managed WordPress host (like Awesome Ops, WP Engine, Kinsta, or Cloudways) for better performance and security.
- Ensure compatibility with PHP 8+ and MySQL 8+.
- Set up WordPress on a staging site, create secure admin credentials, and enable HTTPS and automatic updates.
Exporting Content and Media from Webflow
You can export that data (like blog posts, case studies, or a team directory) as a CSV file. Open the CMS Collections section in Webflow, select the collection you want, & click Export. This CSV file will be your key to importing everything into WordPress.
Map the Content Structure
Before importing, decide how your Webflow content will live inside WordPress:
- Blog posts → Posts
- Case studies or portfolio items → Custom Post Type (CPT)
Document which Webflow fields should map to which WordPress fields. Here’s a simple example you can follow:
| Webflow Field | WordPress Field | Notes |
| name | Post Title | Main title of the post/page |
| slug | Post Slug | URL slug for the post |
| postcontent | Post Content | Main body content |
| postsummary | Post Excerpt | Short description/summary |
| image | Images → Image filenames | Will import to Media Library |
| published on | Post Date | Controls the “Published On” date |
| author | Post Author | Must match an existing WordPress username |
| maintag[1], tag2[1], tag3[1] | Taxonomies → Tags | Add tags if needed |
| poststatus | Post Status | Normally set manually to “Published.” |
| ctabuttontext, ctadescription featured | Custom Fields | Adds a custom field value |
Table 1: Sample Content Mapping from Webflow to WordPress
Export each Webflow CMS Collection as its own CSV file. If the CSV includes images, WP Import Export Lite can download and attach them to the WordPress Media Library.
Save Static Pages & Custom Elements
Static pages (like Home, About, and Services) are included in Webflow’s Code Export as static HTML, CSS, JS, and assets. This option is only available on paid Webflow plans. Since WordPress can’t directly import these exported files, the practical approach is to manually move over the text content and re-upload your images during the migration.
Custom layouts, forms, and animations are included in the exported code, but they aren’t directly usable in WordPress and typically need to be rebuilt or reconfigured. These elements can be recreated in WordPress using page builders like Gutenberg or Elementor.
Step-by-Step Process to Migrate from Webflow to WordPress
Installing and Setting Up WordPress
Start by installing WordPress on your hosting account. Most hosts offer a one-click installer. Create an admin account with a strong password and a valid email address.
Once installed, log in to your WordPress dashboard, your new control center for managing pages, posts, media, and plugins.
Before importing your content, adjust a few key settings:
- Timezone and Date/Time Format: Go to Dashboard → Settings → General and match your local time.

Screenshot 1: Date/Time Setting
- Permalinks: Under Settings → Permalinks, choose a clean structure like Post name. Match your Webflow URLs to preserve SEO value.
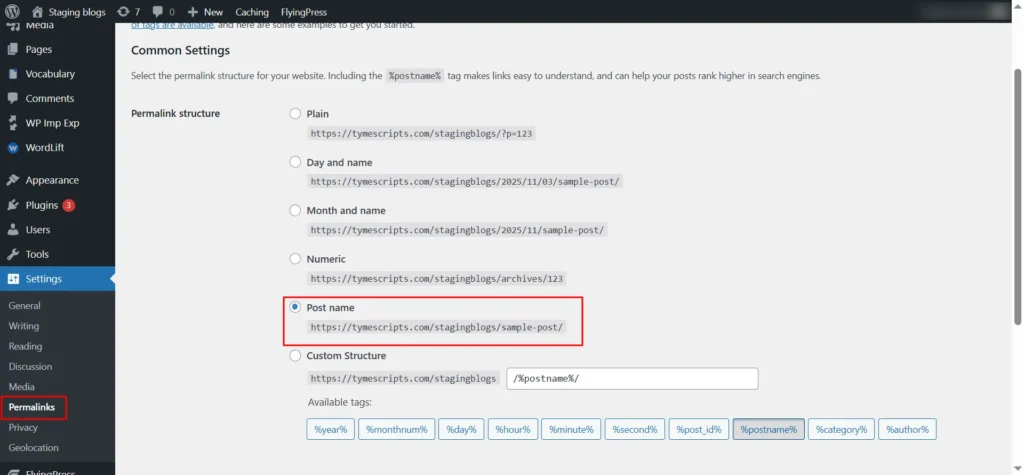
Screenshot 2: Permalinks
- Media Settings: Adjust upload file size limits and image sizes if needed.
- SSL: Enable HTTPS using your host’s SSL and a plugin like Really Simple SSL.
- Turn on automatic updates: Turn on automatic updates (Dashboard → Updates ) for WordPress core, plugins, and themes.
Once WordPress is installed, add a few essential plugins to get ready for migration:
- Migration: Use something like WP All Import Export (premium or the new name)to import your CSV exports.
- SEO plugin: Tools like Yoast SEO, Rank Math, or AIOSEO help maintain your search visibility.
- Security plugins: Wordfence or Sucuri helps in keeping your site secure.
- ACF (Advanced Custom Fields): Lets you create custom fields to match your Webflow content structure, best for migrating extra data like images, repeaters, text fields, and more.
- Custom Post Type UI (CPT UI): Helps you create custom post types & taxonomies by replicating Webflow CMS Collections like Blogs, Case Studies, Services, or Team Members.
Your WordPress setup is now ready for migration.
Importing Webflow Content to WordPress
Step 1: Install the WP Import Export Lite Plugin
- Go to your WordPress Dashboard → Plugins → Add New.
- Search for “WP Import Export Lite.”
- Click Install Now and then Activate the plugin.
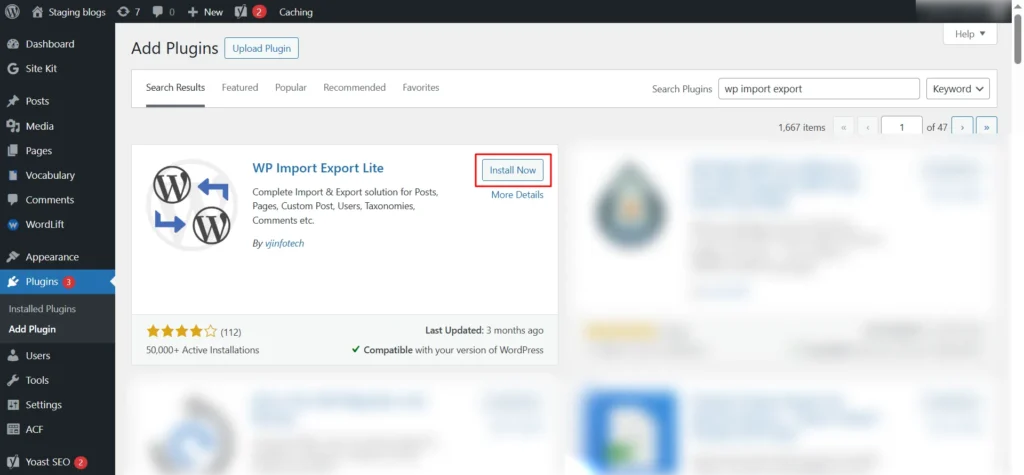
Screenshot 3: WP Import Export Lite
Step 2: Create a New Import
- Navigate to WP Imp Exp → New Import in your WordPress admin panel.
- Choose Upload from Desktop, then click Select Files to upload your CSV file.
- After the file uploads successfully, click Continue to Step 2.
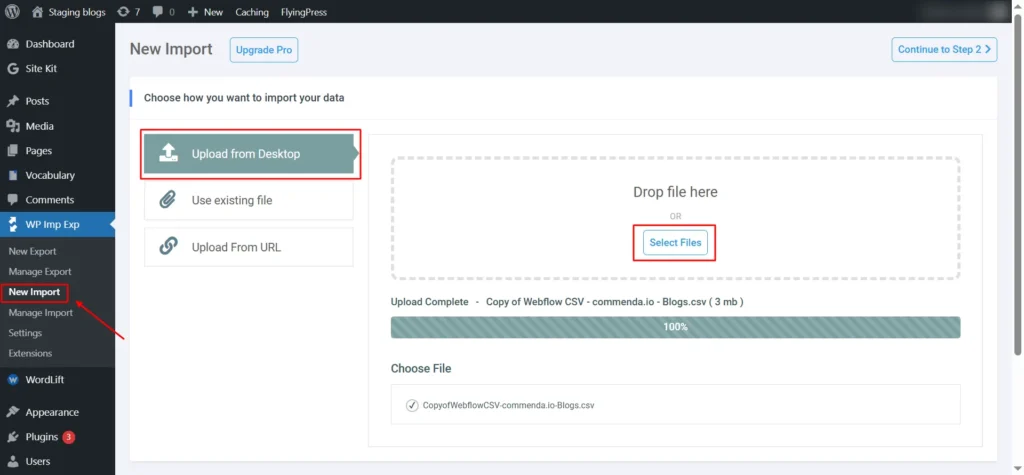
Screenshot 4: New Import
Step 3: Select Post Type
- Under Import each record as, choose Post, Page, or any custom post type depending on your data.
- In Handle New and Existing Items, select:
- Import new items only & skip existing items (recommended for first-time import).
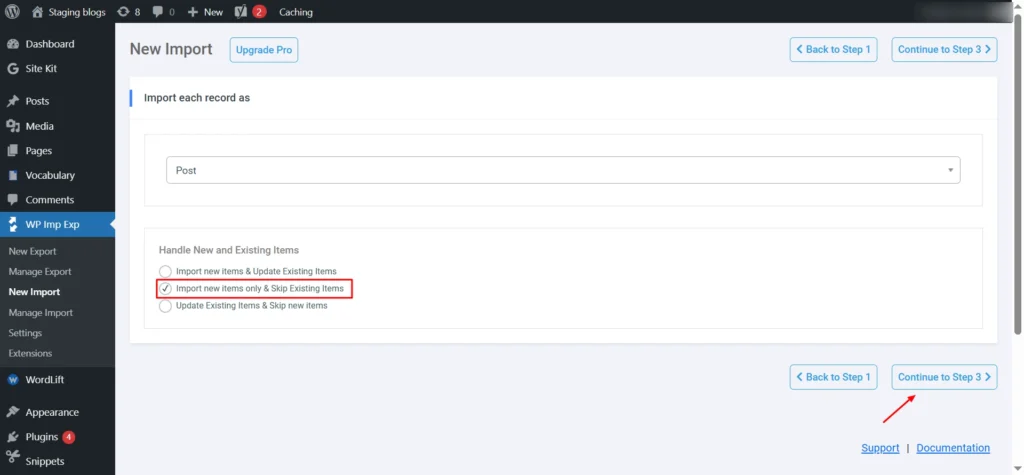
Screenshot 5: Select Post Type
Then click Continue to Step 3.
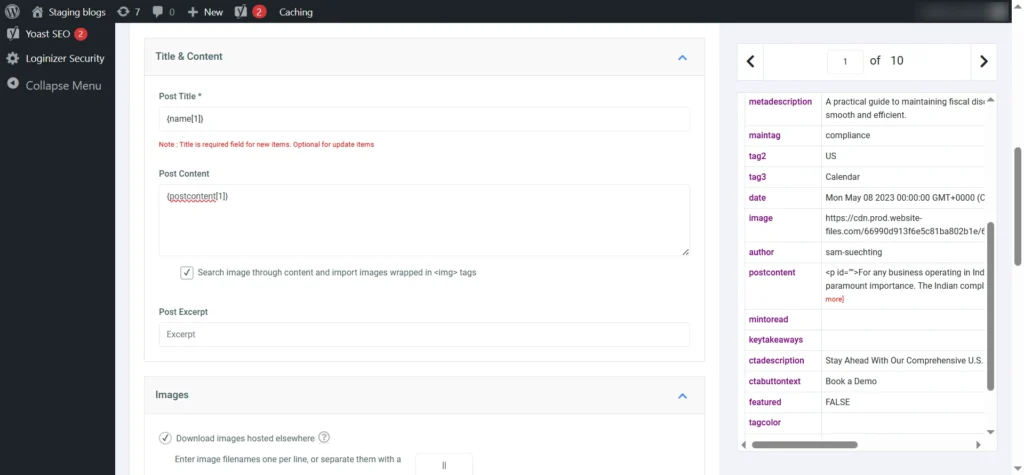
Step 4: Map Title and Content Fields
In the Title & Content section, map your CSV fields:
- In the Title & Content section, map your CSV fields:
- Post Title → {name[1]}
- Post Content → {postcontent[1]}
- Enable “Search image through content and import images wrapped in <img> tags” if your posts contain inline images.
Screenshot 6: Map Title and Content Fields
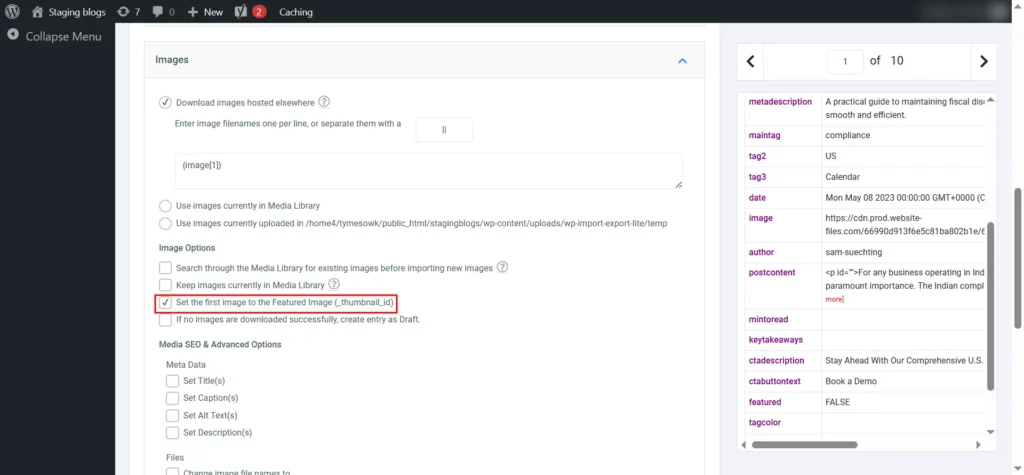
Step 5: Configure Image Settings
- Scroll to the Images section.
- Enable Download images hosted elsewhere and add your image field (e.g., {image[1]}).
- Check Set the first image to the Featured Image (_thumbnail_id) to automatically assign featured images.
Screenshot 7: Image Settings
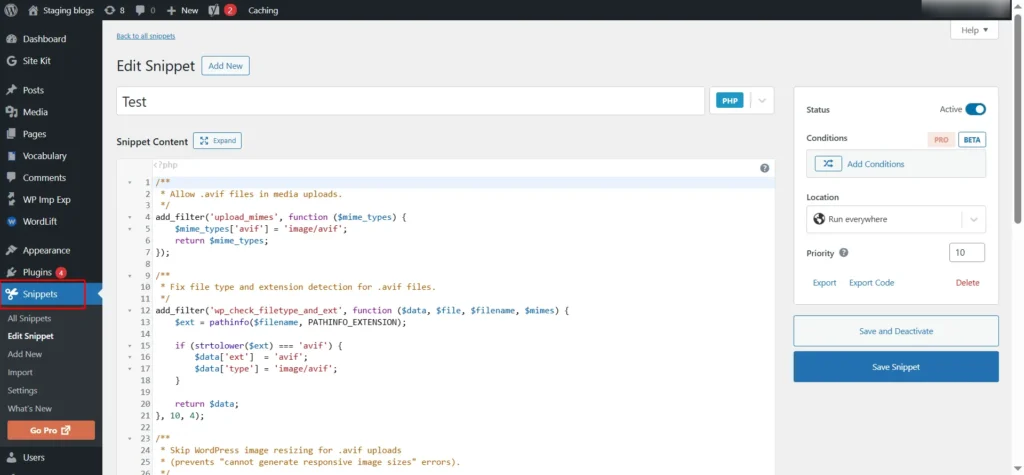
Handling AVIF Image Formats During Migration
Webflow often exports images in .avif format, which is good for keeping your visuals sharp and your site fast, but WordPress doesn’t fully support AVIF yet, so those images might not upload during migration.
You can easily enable AVIF support with a quick code snippet added through the Code Snippets plugin.
| // Allow AVIF in media uploads function allow_avif_uploads($mime_types) { $mime_types[‘avif’] = ‘image/avif’; return $mime_types; } add_filter(‘upload_mimes’, ‘allow_avif_uploads’); // Fix file type detection for AVIF function fix_avif_filetype_check($data, $file, $filename, $mimes) { $ext = pathinfo($filename, PATHINFO_EXTENSION); if (strtolower($ext) === ‘avif’) { $data[‘ext’] = ‘avif’; $data[‘type’] = ‘image/avif’; } return $data; } add_filter(‘wp_check_filetype_and_ext’, ‘fix_avif_filetype_check’, 10, 4); |
Screenshot 8: Handling AVIF Image
This code helps WordPress recognize .avif images properly. It not only allows you to upload AVIF files but also prevents those “file type not allowed” errors.
Once added, you can safely re-import or manually upload your .avif images through the media library without issues.
Step 6: Title & Meta Description
Scroll to the Yoast SEO section and map:

Screenshot 9: Title & Meta Description
Step 7: Custom Fields (If Applicable)
- Scroll to the “Custom Fields” section.
- Click Add New and create a mapping for each field.
- Enter the custom field name or WordPress ACF field name (e.g., cta_description, cta_button_text, featured) (from the Table 1 Fields that were mapped)
- In Value, insert the matching source placeholder
(e.g., {ctadescription[1]}, {ctabuttontext[1]}). - Set Options as Normal Data.
- Repeat for every field that you want to be imported.
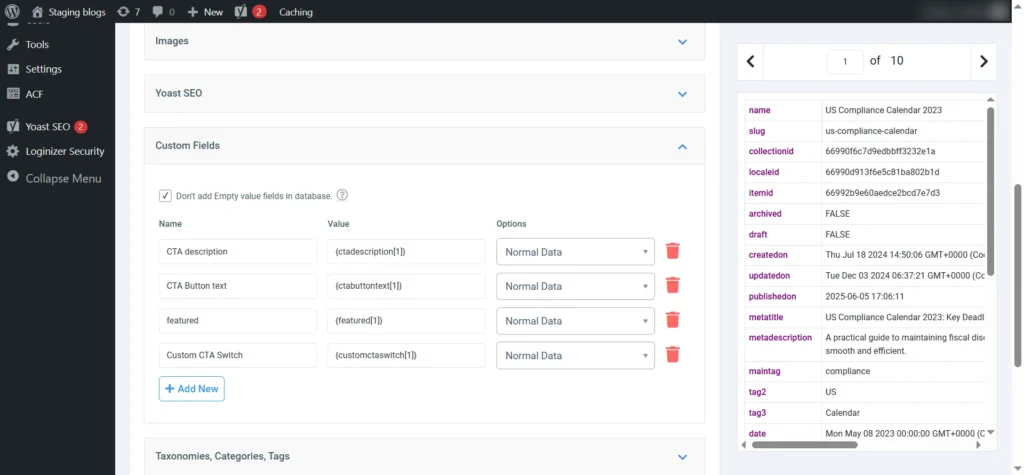
Screenshot 10: Map Custom Fields
Step 8: (Optional) Set Up Missing ACF Fields
Perform this step only if the ACF fields you need are not created in WordPress:
- Go to Plugins → Add New
- Install and activate Advanced Custom Fields
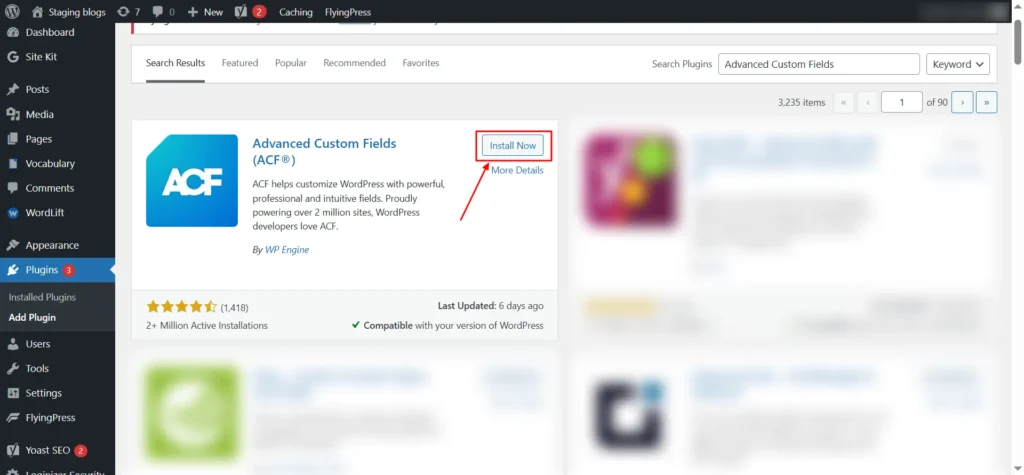
Screenshot 11: Install ACF
- Create a Field Group for your imported fields.
- Assign the Field Group to the correct Post Type.
- Save the field group.
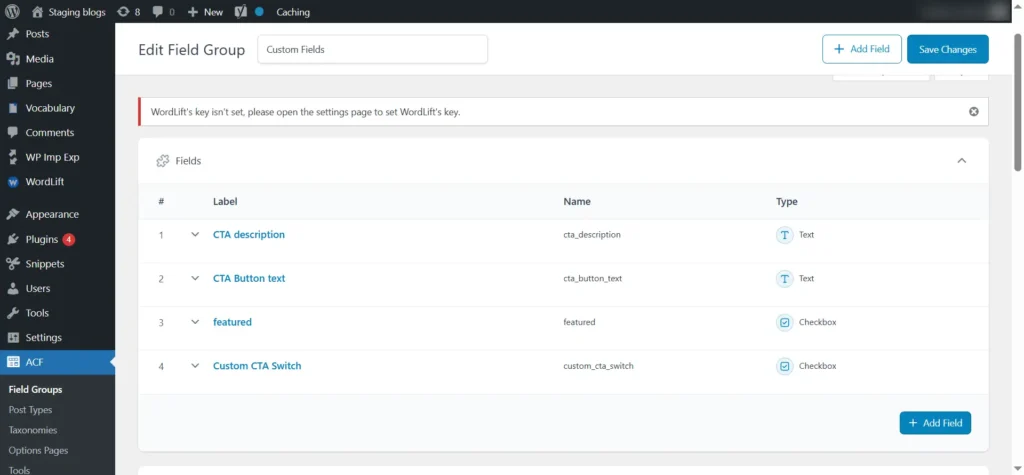
Screenshot 12: Field Groups
Step 9: Configure Taxonomies
Taxonomies organize your imported content in WordPress by grouping posts in categories, tags, or any custom taxonomies your theme or plugins use.
- Scroll down to the Taxonomies section.
- You’ll see options such as:
- Categories
- Tags
- Any custom taxonomy (e.g., “Topic,” “Industry,” “Location,” etc.) registered on your site.
- Enable the taxonomy you want to import (for example, Tags or Categories).
- In the mapping field, insert the corresponding columns from your CSV file. For example: {maintag[1]}, {tag2[1]}, {tag3[1]}
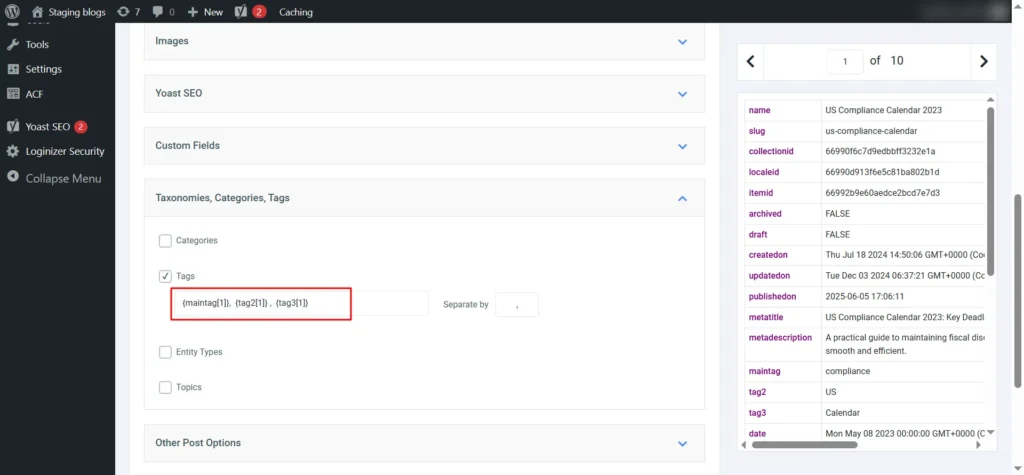
Screenshot 13: Taxonomies, Categories, Tags
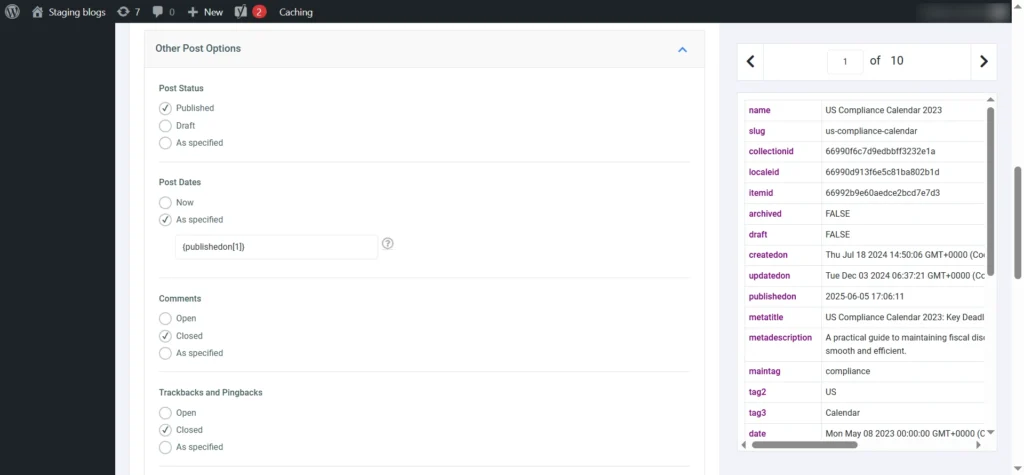
Step 10: Configure Post Status, Date & Discussion Options
Under Other Post Options, set the following:
- Post Status -> Published
- Post Dates -> {publishedon[1]}
The date field must use a format supported by WordPress. Example: 2024-11-10 13:00:00
Screenshot 14: Post Status, Date & Discussion
Next, map Slug and Post Author.

Screenshot 15: Slug & Author
- Match the author column from your CSV to the WordPress Author field. Eg: {author[1]}
- Before importing, make sure all the authors in your CSV are already users in WordPress.
- If an author doesn’t exist, create their user profile first.
- This way, every post you import will automatically show the right author.
Step 11: Handle Existing Items & Update Options
- In step 11, scroll to Search Existing Items.
- Choose how to detect duplicates on your site using one or more fields, for example, by slug, title, Post meta, or Post ID.
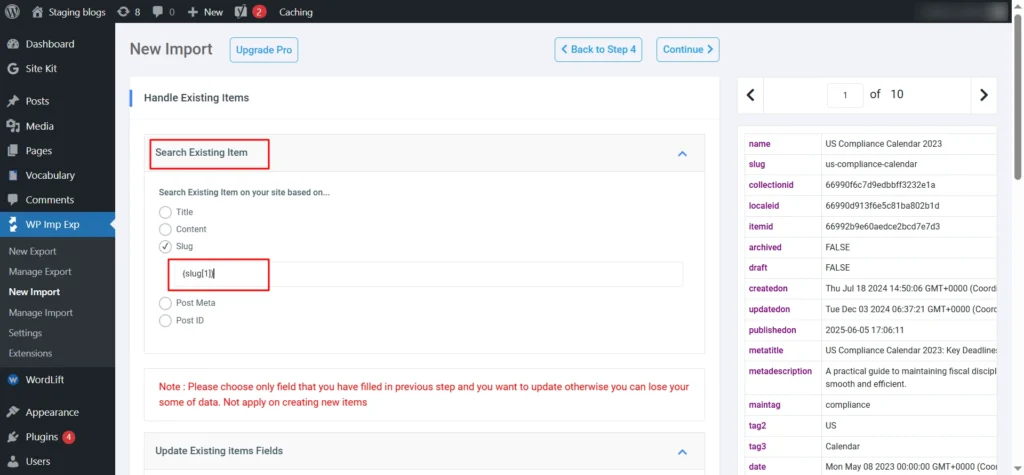
Screenshot 16: Search Existing Items
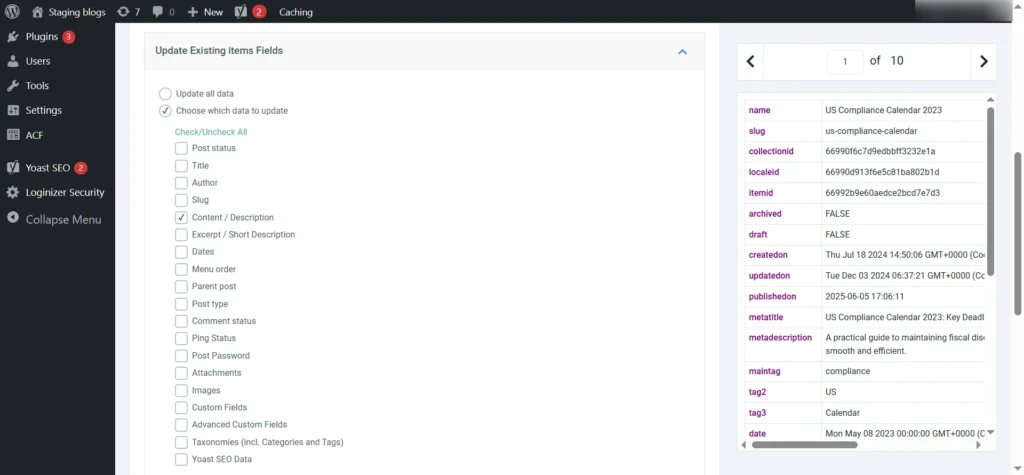
Update Existing Item Fields
- Choose which parts of your content to update, or choose ‘update all’ if you want.
- Post status
- Title
- Author
- Slug
- Content / Description
- Excerpt / Short Description
- Dates
- Menu order
- Parent post
- Post type
- Comment status
- Ping Status
- Post Password
- Attachments
- Images
- Custom Fields
- Taxonomies (incl. Categories and Tags)
- For your first import, you’ll need to select at least one field, as the plugin requires it.
- Check Title, Content, & Images as these are essential fields & safe to include.
- Leave other options like Dates, Slug, Custom Fields, or Taxonomies unchecked unless you need to update them.
Screenshot 17: Update Existing Item Fields
Speed Optimization
Enable iterative processing and processing around 20 records per batch (adjust as per server capacity).
Set a friendly name for the migration process, such as Webflow to WordPress migration {datetime}
You will be shown the Import Summary with all the settings that were set in the previous steps. To complete the import, you once in the import in background or run it as it is.
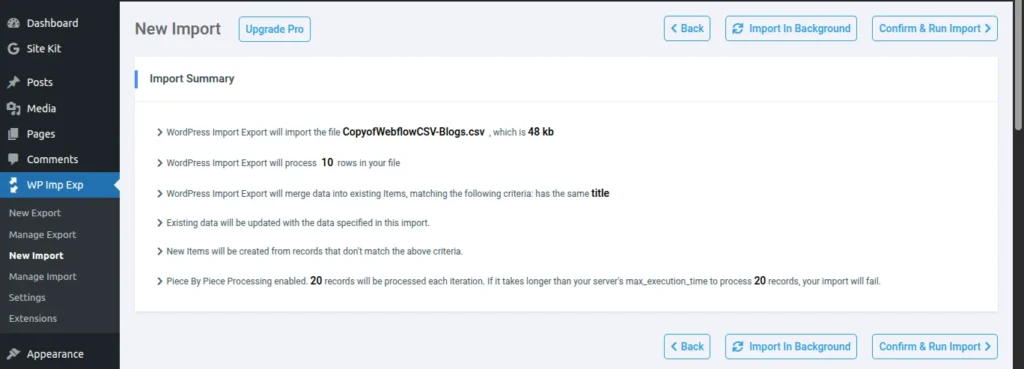
Screenshot 18: Import Summary
Click Continue to start the import.
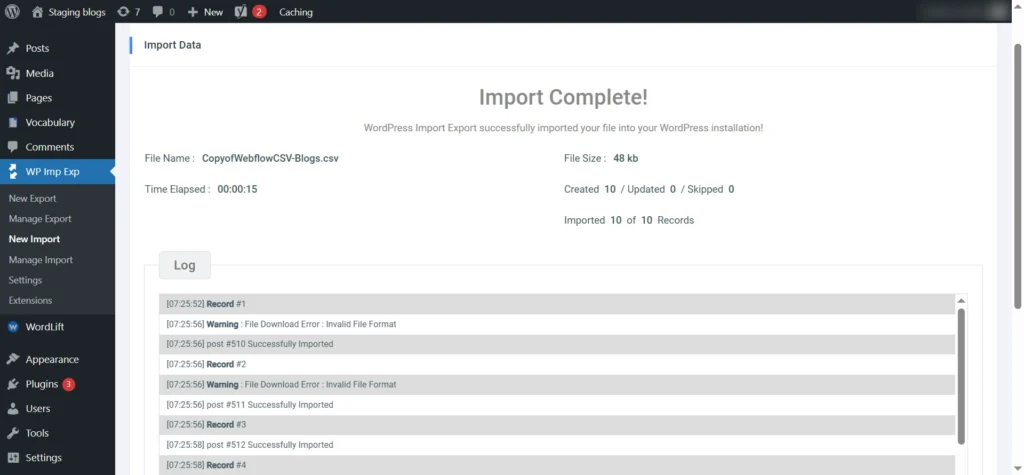
Screenshot 19: Import Complete for a Particular Collection
| Note: Repeat these steps (till Step 11) for all the CMS collections. Blogs in Webflow will be migrated to posts in WordPress. All other CMS collections should be migrated to custom post types. |
Rebuild Your Webflow Design in WordPress in Parallel
While your content migration is in progress, also start rebuilding your Webflow designs in WordPress. Doing both in parallel helps you save time, maintain design consistency, and ensure the new site is ready for launch as soon as your data migration is complete.
Decide how you want to build the site, like a custom theme, or customize a pre-built theme with a page builder like Elementor.
Choose a Theme
Pick a lightweight, flexible, mobile-friendly theme compatible with your plugins or builder. Avoid bloated themes.
Use the WordPress Customizer to:
- Upload your logo and brand assets
- Adjust colors, fonts, and layouts
- Configure headers, footers, and responsive settings
Replicating CMS Collections and Static Pages
First, note how many unique design pages there are. Then develop single and archive templates for all of them.
For blogs, use WordPress Posts, and for CMS collections, use Custom Post Types. Replicate them exactly as the original design.
Use Gutenberg or a page builder such as Elementor to replicate each webpage visually.
Similarly, for static pages, replicate them as WordPress pages.
When rebuilding your Webflow site in WordPress, the goal is to replicate every element visually, structurally, and functionally to achieve a seamless transition.
Here are a few things to consider
- Recreate the headers, footers, and navigation menus according to the Webflow layout.
- Recreate layout grids and sections to mirror Webflow’s structure.
- Match font families, font weights, and line heights
- Replicate color palettes and gradients for consistency across pages and components.
- Recreate spacing and alignment, and maintain the same padding, margins, and hierarchy used in Webflow.
- Rebuild animations and transitions using CSS, GSAP, or your WordPress page builder’s animation options.
- For category filters or sorting options, you can write custom WordPress queries or use plugins like FacetWP, SearchWP, or Relevanssi WordPress plugins.
- Recreate the forms using the Gravity Forms or Formidable Forms WordPress plugins.
Post-Migration Checklist: Ensuring a Smooth Transition
You’re almost at the finish line! With your content migrated and your design in place, the last step is to test everything & make sure it runs perfectly.
Testing Site Functionality and Performance
Check every page & feature to make sure they’re working properly:
- Navigation & Links: Check all internal and external links to ensure nothing is broken.
- Forms: Submit every contact or lead form to confirm it is working.
- Interactive Elements: Test sliders, buttons, pop-ups, & other dynamic features.
- User Accounts: Verify login, registration, & profile functionality if applicable.
View your website on different browsers & devices to ensure responsiveness.
A fast website improves both UX and SEO:
- Test page load times (GTMetrix, PageSpeed Insights)
- Check layouts on mobile and tablet
- Confirm cross-browser compatibility (Chrome, Safari, Firefox, Edge)
- Review Core Web Vitals: LCP, FID, CLS
Make sure your content is transferred correctly:
- Review each page & post to fix any formatting issues
- Check that all images, videos, and downloadable files appear and function properly
- Test internal & external links to ensure nothing is broken
Point your Webflow domain to WordPress
The final step is to connect your domain to your WordPress site. This just means updating your DNS settings so visitors & search engines are directed to your new WordPress hosting instead of Webflow. Follow these steps:
- Get DNS Records from Your WordPress Host: Log into your hosting account & locate the required DNS settings, usually nameservers (e.g., ns1.yourhost.com, ns2.yourhost.com), A record (server IP), or a CNAME for the www version.
- Access Your Domain Registrar: Sign in to the platform where your domain is registered (e.g., GoDaddy, Namecheap, Google Domains, Cloudflare). This is where you manage DNS & domain settings.
- Remove Webflow DNS Records: Delete any DNS records or nameservers that are still pointing to Webflow. Then, add the new nameservers, or update the A record/CNAME—provided by your WordPress host to make sure your domain connects to the correct server.
- Save & Allow DNS Propagation: Save your updated DNS settings, then allow DNS propagation. DNS propagation may take anywhere from a few minutes to 24–48 hours, during which your site may temporarily show the old version.
- Test Your Domain & Site: Once DNS propagation is complete, open your domain in a browser & make sure your WordPress site loads properly. Check a few pages, links, forms, and media to confirm everything is working as it should.
Conclusion
Migrating from Webflow to WordPress opens the door to more growth, freedom, and endless customization. With the right tools and proper planning, you can smoothly migrate your content, continue your unique design, and expand your site with ease.
Ready to make the move? Start your migration today and see just how far WordPress can take your website.
Want us to handle your Webflow-to-WordPress migration? Schedule a free consultation with our migration experts.
Frequently Asked Questions
No, you cannot directly transfer your Webflow design. The migration process requires you to recreate the design using a WordPress theme/template, a page builder, & custom HTML, JS, and CSS. This allows you to either replicate your old look or create a new one while ensuring high quality & responsiveness on your new platform.
The time it takes to migrate from Webflow to WordPress really depends on your site’s size, the amount of content, design complexity, & any custom features you want to include.
For a small to medium Webflow site with standard pages & blog posts, the migration usually takes around 5-6 weeks.
For bigger, more complex sites with custom layouts, e-commerce, or advanced features, the migration can take 10–12 weeks, including testing and SEO checks to ensure a smooth transition without any data loss.
Switching your website from Webflow to WordPress comes with several key advantages:
1. WordPress lets you customize your site freely with an extensive range of themes, plugins, and integrations.
2. As your website grows, WordPress scales effortlessly to handle increased traffic.
3. WordPress can be more cost-effective, too, avoiding the rising, tiered fees that Webflow charges as your site expands.
4. It gives you advanced SEO plugins like Yoast or Rank Math, helping your site perform better in search engines.
5. Most importantly, with WordPress, you fully own your website and all its data, with no platform restrictions
Published on Nov 28, 2025 | Updated on Nov 28, 2025